Operating Instructions
Page 3
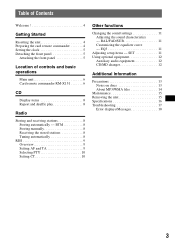
...stored stations 8 Tuning automatically 9 Other functions Changing the sound settings 9 Adjusting the sound characteristics - Table of Contents Welcome 4 Getting Started Resetting the unit 4 Preparing the card remote commander 4 Setting the clock 5 Detaching the front panel 5 Attaching the front panel ...5 Location of controls and basic operations Main unit 6 Card remote commander RM-X151 6 CD Display items 8 Repeat and shuffle play 8 Radio Storing and receiving stations 8 ...
...stored stations 8 Tuning automatically 9 Other functions Changing the sound settings 9 Adjusting the sound characteristics - Table of Contents Welcome 4 Getting Started Resetting the unit 4 Preparing the card remote commander 4 Setting the clock 5 Detaching the front panel 5 Attaching the front panel ...5 Location of controls and basic operations Main unit 6 Card remote commander RM-X151 6 CD Display items 8 Repeat and shuffle play 8 Radio Storing and receiving stations 8 ...

Operating Instructions
Page 4
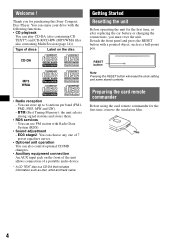
... play CD-DA (also containing CD TEXT*) and CD-R/CD-RW (MP3/WMA files also containing Multi Session (page 12)). You can enjoy your drive with a pointed object, such as disc, artist and track name. RESET button Note Pressing the RESET button will erase the clock setting and some stored contents. CD-DA MP3 WMA • Radio reception...
... play CD-DA (also containing CD TEXT*) and CD-R/CD-RW (MP3/WMA files also containing Multi Session (page 12)). You can enjoy your drive with a pointed object, such as disc, artist and track name. RESET button Note Pressing the RESET button will erase the clock setting and some stored contents. CD-DA MP3 WMA • Radio reception...
Operating Instructions
Page 5
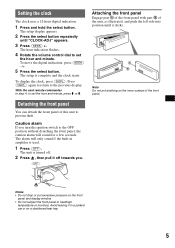
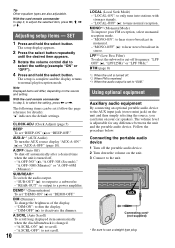
... • Do not drop or put anything on the inner surface of the front panel. The alarm will sound for a few seconds. Setting the clock The clock uses a 12-hour digital indication. 1 Press and hold the select button. The setup display appears. 2 Press the select button repeatedly until... can detach the front panel of the unit, as illustrated, and push the left side into position until "CLOCK-ADJ" appears. 3 Press (SEEK) +. With the card remote commander In step 4, to set the hour and minute, press M or m. Press (DSPL) again to return to heat/high temperature or moisture...
... • Do not drop or put anything on the inner surface of the front panel. The alarm will sound for a few seconds. Setting the clock The clock uses a 12-hour digital indication. 1 Press and hold the select button. The setup display appears. 2 Press the select button repeatedly until... can detach the front panel of the unit, as illustrated, and push the left side into position until "CLOCK-ADJ" appears. 3 Press (SEEK) +. With the card remote commander In step 4, to set the hour and minute, press M or m. Press (DSPL) again to return to heat/high temperature or moisture...
Operating Instructions
Page 8
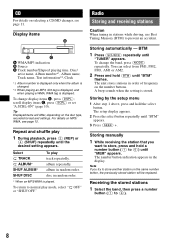
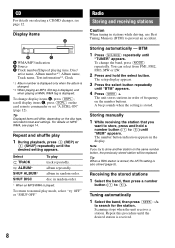
...number/Elapsed playing time, Disc/ artist name, Album number*1, Album name, Track name, Text information*2, Clock *1 Album number is displayed only when the album is changed. *2 When playing an MP3, ID3 ...1 During playback, press (3) (REP) or (4) (SHUF) repeatedly until "BTM" flashes. Radio Storing and receiving stations Caution When tuning in random order. * When an MP3/WMA is ... receiving the station that you try to store another station on selecting a CD/MD changer, see page 12. A beep sounds when the setting is displayed. BTM 1 Press (SOURCE) repeatedly until "MEM" appears. ...
...number/Elapsed playing time, Disc/ artist name, Album number*1, Album name, Track name, Text information*2, Clock *1 Album number is displayed only when the album is changed. *2 When playing an MP3, ID3 ...1 During playback, press (3) (REP) or (4) (SHUF) repeatedly until "BTM" flashes. Radio Storing and receiving stations Caution When tuning in random order. * When an MP3/WMA is ... receiving the station that you try to store another station on selecting a CD/MD changer, see page 12. A beep sounds when the setting is displayed. BTM 1 Press (SOURCE) repeatedly until "MEM" appears. ...
Operating Instructions
Page 10
With the card remote commander In step 3, to adjust the selected item, press Tip Other equalizer types are also adjustable.
With the card remote commander In step 3, to adjust the selected item, press Tip Other equalizer types are also adjustable.
Instruction Manual
Page 3
... Welcome 4 Getting Started Resetting the unit 4 Preparing the card remote commander 4 Setting the clock 5 Detaching the front panel 5 Attaching the front panel 5 Location of controls and basic operations Main unit 6 Card remote commander RM-X151 6 CD Display items 8 Repeat and shuffle play 8 Radio Storing and receiving stations 8 Storing automatically - BTM 8 Storing manually 8 Receiving the...
... Welcome 4 Getting Started Resetting the unit 4 Preparing the card remote commander 4 Setting the clock 5 Detaching the front panel 5 Attaching the front panel 5 Location of controls and basic operations Main unit 6 Card remote commander RM-X151 6 CD Display items 8 Repeat and shuffle play 8 Radio Storing and receiving stations 8 Storing automatically - BTM 8 Storing manually 8 Receiving the...
Instruction Manual
Page 4
... remote commander Before using the card remote commander for purchasing this Sony Compact Disc Player. Thank you must reset the unit. You can play CD-DA (also containing CD TEXT*) and CD-R/CD-RW (MP3/WMA files also containing Multi Session (page 14))....; RDS services - Detach the front panel and press the RESET button with Radio Data System (RDS). • Sound adjustment - You can also control optional CD/MD changers. • Auxiliary equipment connection An AUX input jack on the.... 4 RESET button Note Pressing the RESET button will erase the clock setting and some stored contents.
... remote commander Before using the card remote commander for purchasing this Sony Compact Disc Player. Thank you must reset the unit. You can play CD-DA (also containing CD TEXT*) and CD-R/CD-RW (MP3/WMA files also containing Multi Session (page 14))....; RDS services - Detach the front panel and press the RESET button with Radio Data System (RDS). • Sound adjustment - You can also control optional CD/MD changers. • Auxiliary equipment connection An AUX input jack on the.... 4 RESET button Note Pressing the RESET button will erase the clock setting and some stored contents.

Instruction Manual
Page 5
... can detach the front panel of the unit, as illustrated, and push the left side into position until "CLOCK-ADJ" appears. 3 Press (SEEK) +. Detaching the front panel You can set the clock automatically with part B of this unit to the OFF position without detaching the front panel, the caution alarm ... for a few seconds. The hour indication flashes. 4 Rotate the volume control dial to the previous display. Press (DSPL) again to return to set the hour and minute, press M or m. Setting the clock The clock uses a 24-hour digital indication. 1 Press and hold the select button.
... can detach the front panel of the unit, as illustrated, and push the left side into position until "CLOCK-ADJ" appears. 3 Press (SEEK) +. Detaching the front panel You can set the clock automatically with part B of this unit to the OFF position without detaching the front panel, the caution alarm ... for a few seconds. The hour indication flashes. 4 Rotate the volume control dial to the previous display. Press (DSPL) again to return to set the hour and minute, press M or m. Setting the clock The clock uses a 24-hour digital indication. 1 Press and hold the select button.
Instruction Manual
Page 8
...to prevent an accident. To return to store, press and hold the select button. Radio Storing and receiving stations Caution When tuning in random order. Storing manually 1 While receiving...Track number/Elapsed playing time, Disc/ artist name, Album number*1, Album name, Track name, Text information*2, Clock *1 Album number is displayed only when the album is changed. *2 When playing an MP3, ID3 tag is... until "TUNER" appears. A beep sounds when the setting is played. Repeat this procedure until "MEM" appears. CD For details on selecting a CD/MD changer, see page 14. Select TRACK ALBUM* ...
...to prevent an accident. To return to store, press and hold the select button. Radio Storing and receiving stations Caution When tuning in random order. Storing manually 1 While receiving...Track number/Elapsed playing time, Disc/ artist name, Album number*1, Album name, Track name, Text information*2, Clock *1 Album number is displayed only when the album is changed. *2 When playing an MP3, ID3 tag is... until "TUNER" appears. A beep sounds when the setting is played. Repeat this procedure until "MEM" appears. CD For details on selecting a CD/MD changer, see page 14. Select TRACK ALBUM* ...

Instruction Manual
Page 9
...can preset both RDS and non-RDS stations with the AF/TA setting for each. 1 Set AF/TA, then store the station with one regional program - Display items A TA/TP*1 B Radio band, Function C Frequency*2 (Program service name), Preset number, Clock, RDS data *1 "TA" flashes during FM reception (page 12...not transmitting RDS data. Presetting the volume of traffic announcememnts You can preset RDS stations along with the regular radio program signal. By using this regional program's reception area, set "REG-OFF" in a network. If you are stored with a stronger frequency. Select AF-ON TA...
...can preset both RDS and non-RDS stations with the AF/TA setting for each. 1 Set AF/TA, then store the station with one regional program - Display items A TA/TP*1 B Radio band, Function C Frequency*2 (Program service name), Preset number, Clock, RDS data *1 "TA" flashes during FM reception (page 12...not transmitting RDS data. Presetting the volume of traffic announcememnts You can preset RDS stations along with the regular radio program signal. By using this regional program's reception area, set "REG-OFF" in a network. If you are stored with a stronger frequency. Select AF-ON TA...
Instruction Manual
Page 11
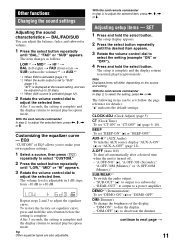
... 1 Press the select button repeatedly until "BAL," "FAD" or "SUB" appears. With the card remote commander In step 2, to "SUB" (page 11). After 3 seconds, the setting is activated (page 12). 2 Rotate the volume control dial to normal play/reception mode. Other functions Changing the sound...follows: LOW*1 t MID*1 t HI*1 t BAL (left-right) t FAD (front-rear) t SUB (subwoofer volume)*2 t AUX*3 *1 When EQ3 is activated (page 11). *2 When the audio output is set to adjust the selected item, press BAL/FAD/SUB You can be adjusted up to 20 steps. *3 When AUX source is complete and the display...
... 1 Press the select button repeatedly until "BAL," "FAD" or "SUB" appears. With the card remote commander In step 2, to "SUB" (page 11). After 3 seconds, the setting is activated (page 12). 2 Rotate the volume control dial to normal play/reception mode. Other functions Changing the sound...follows: LOW*1 t MID*1 t HI*1 t BAL (left-right) t FAD (front-rear) t SUB (subwoofer volume)*2 t AUX*3 *1 When EQ3 is activated (page 11). *2 When the audio output is set to adjust the selected item, press BAL/FAD/SUB You can be adjusted up to 20 steps. *3 When AUX source is complete and the display...


