Operating Instructions
Page 3
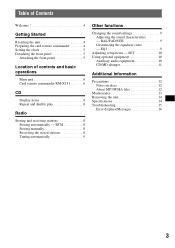
... front panel 5 Location of controls and basic operations Main unit 6 Card remote commander RM-X151 6 CD Display items 8 Repeat and shuffle play 8 Radio Storing and receiving stations 8 Storing automatically - EQ3 9 Adjusting setup items - BAL/FAD/SUB 9 Customizing the equalizer curve - SET 10 Using optional equipment 10 Auxiliary audio equipment 10 CD/MD changer 11 Additional Information Precautions 12 Notes on discs 12 About MP3/WMA files 12 Maintenance 13 Removing the unit 14 Specifications 14 Troubleshooting 15 Error displays...
... front panel 5 Location of controls and basic operations Main unit 6 Card remote commander RM-X151 6 CD Display items 8 Repeat and shuffle play 8 Radio Storing and receiving stations 8 Storing automatically - EQ3 9 Adjusting setup items - BAL/FAD/SUB 9 Customizing the equalizer curve - SET 10 Using optional equipment 10 Auxiliary audio equipment 10 CD/MD changer 11 Additional Information Precautions 12 Notes on discs 12 About MP3/WMA files 12 Maintenance 13 Removing the unit 14 Specifications 14 Troubleshooting 15 Error displays...

Operating Instructions
Page 4
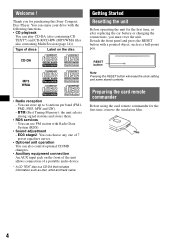
...: You can also control optional CD/MD changers. • Auxiliary equipment connection An AUX input jack on the disc Getting Started Resetting the unit Before operating the unit for the first time, or after replacing the car battery or changing the connections, you for the first time, remove the insulation film. 4 Detach the front panel and press the RESET button with the following functions. • CD playback You can store up to 6 stations per band (FM1...
...: You can also control optional CD/MD changers. • Auxiliary equipment connection An AUX input jack on the disc Getting Started Resetting the unit Before operating the unit for the first time, or after replacing the car battery or changing the connections, you for the first time, remove the insulation film. 4 Detach the front panel and press the RESET button with the following functions. • CD playback You can store up to 6 stations per band (FM1...
Operating Instructions
Page 6
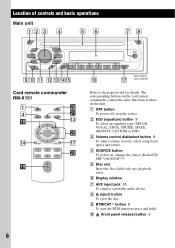
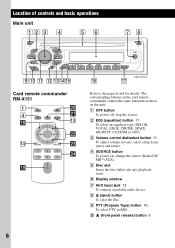
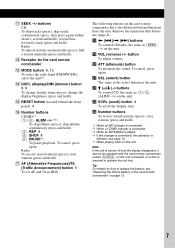
...). B EQ3 (equalizer) button 9 To select an equalizer type (XPLOD, VOCAL, EDGE, CRUISE, SPACE, GRAVITY, CUSTOM or OFF). DSPL SCRL w; A OFF button To power off; change the source (Radio/CD/ MD*1/AUX/SAT*2). H Z (eject) button To eject the disc. Location of controls and basic operations Main unit 12 3 4 56 78 OFF EQ3 SEEK CAT BTM PUSH SELECT SOURCE AUX SEEK MODE DIM DSPL ALBM 1 2 REP SHUF 3 4 5 PAUSE 6 SCRL 9q; F Display window G AUX input jack 10 To connect a portable audio device. Refer...
...). B EQ3 (equalizer) button 9 To select an equalizer type (XPLOD, VOCAL, EDGE, CRUISE, SPACE, GRAVITY, CUSTOM or OFF). DSPL SCRL w; A OFF button To power off; change the source (Radio/CD/ MD*1/AUX/SAT*2). H Z (eject) button To eject the disc. Location of controls and basic operations Main unit 12 3 4 56 78 OFF EQ3 SEEK CAT BTM PUSH SELECT SOURCE AUX SEEK MODE DIM DSPL ALBM 1 2 REP SHUF 3 4 5 PAUSE 6 SCRL 9q; F Display window G AUX input jack 10 To connect a portable audio device. Refer...
Operating Instructions
Page 7
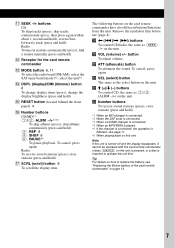
... ). Remove the insulation film before use (page 4). Radio: To tune in stations automatically (press); The following buttons on the unit. button To adjust volume. w; select the unit*3. ws M (+)/m (-) buttons To control CD, the same as the select button on page 13. 7 Radio: To receive stored stations (press); K SEEK -/+ buttons CD: To skip tracks (press); wa SEL (select) button The same as (1)/(2) (ALBM -/+) on the card remote commander have also different buttons/functions from the unit. N DSPL (display)/DIM (dimmer) button 8 To change...
... ). Remove the insulation film before use (page 4). Radio: To tune in stations automatically (press); The following buttons on the unit. button To adjust volume. w; select the unit*3. ws M (+)/m (-) buttons To control CD, the same as the select button on page 13. 7 Radio: To receive stored stations (press); K SEEK -/+ buttons CD: To skip tracks (press); wa SEL (select) button The same as (1)/(2) (ALBM -/+) on the card remote commander have also different buttons/functions from the unit. N DSPL (display)/DIM (dimmer) button 8 To change...
Operating Instructions
Page 9
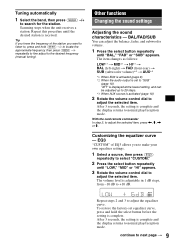
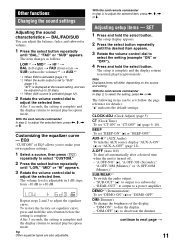
"ATT" is displayed at the lowest setting, and can adjust the balance, fader, and subwoofer volume. 1 Press the select button repeatedly until the desired station is set to the desired frequency (manual tuning). Scanning stops when the unit receives a station. Other functions Changing the sound settings Adjusting the sound characteristics - With the card remote commander In step 2, to adjust the selected item. Tuning automatically 1 Select the band, then press (SEEK) -/+ to normal play/reception mode. After 3 seconds, the setting is activated (page 10...
"ATT" is displayed at the lowest setting, and can adjust the balance, fader, and subwoofer volume. 1 Press the select button repeatedly until the desired station is set to the desired frequency (manual tuning). Scanning stops when the unit receives a station. Other functions Changing the sound settings Adjusting the sound characteristics - With the card remote commander In step 2, to adjust the selected item. Tuning automatically 1 Select the band, then press (SEEK) -/+ to normal play/reception mode. After 3 seconds, the setting is activated (page 10...
Operating Instructions
Page 10
With the card remote commander In step 3, to adjust the selected item, press Tip Other equalizer types are also adjustable.
With the card remote commander In step 3, to adjust the selected item, press Tip Other equalizer types are also adjustable.
Operating Instructions
Page 12
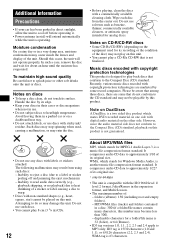
... maximum number of the unit. Should this number may stop spinning when used for MPEG-1 Audio Layer-3, is designed to play a CD-R/a CD-RW that do so may ruin the disc. • Before playing, clean the discs with copyright protection technologies This product is a music file compression format standard. In such a case, remove the disc and wait for a folder/file name is compatible with copyright protection technologies...
... maximum number of the unit. Should this number may stop spinning when used for MPEG-1 Audio Layer-3, is designed to play a CD-R/a CD-RW that do so may ruin the disc. • Before playing, clean the discs with copyright protection technologies This product is a music file compression format standard. In such a case, remove the disc and wait for a folder/file name is compatible with copyright protection technologies...
Operating Instructions
Page 15
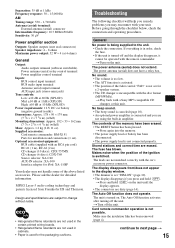
... (aerial) terminal: External antenna (aerial) connector Intermediate frequency: 10.7 MHz/450 kHz Sensitivity: 30 µV Power amplifier section Outputs: Speaker outputs (sure seal connectors) Speaker impedance: 4 - 8 ohms Maximum power output: 52 W × 4 (at 4 ohms) General Output: Audio outputs terminal (sub/rear switchable) Power antenna (aerial) relay control terminal Power amplifier control terminal Inputs: BUS control input terminal BUS audio input terminal Antenna (aerial) input terminal AUX input jack (stereo mini jack) Tone controls: Low: ±10 dB at 60 Hz (XPLOD) Mid: ±10...
... (aerial) terminal: External antenna (aerial) connector Intermediate frequency: 10.7 MHz/450 kHz Sensitivity: 30 µV Power amplifier section Outputs: Speaker outputs (sure seal connectors) Speaker impedance: 4 - 8 ohms Maximum power output: 52 W × 4 (at 4 ohms) General Output: Audio outputs terminal (sub/rear switchable) Power antenna (aerial) relay control terminal Power amplifier control terminal Inputs: BUS control input terminal BUS audio input terminal Antenna (aerial) input terminal AUX input jack (stereo mini jack) Tone controls: Low: ±10 dB at 60 Hz (XPLOD) Mid: ±10...
Operating Instructions
Page 16
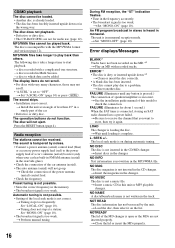
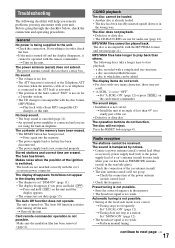
... in this model to check the connection. t Insert a music CD in monaural reception mode. t Close the lid or insert the MDs properly. 16 MP3/WMA files cannot be received. a disc recorded with recorded tracks. t Install the unit at a station: Set "MONO-ON" (page 10). • The broadcast signal is too weak. Press the RESET button (page 4). The sound is hampered by the unit. t Tuning stops too...
... in this model to check the connection. t Insert a music CD in monaural reception mode. t Close the lid or insert the MDs properly. 16 MP3/WMA files cannot be received. a disc recorded with recorded tracks. t Install the unit at a station: Set "MONO-ON" (page 10). • The broadcast signal is too weak. Press the RESET button (page 4). The sound is hampered by the unit. t Tuning stops too...
Instruction Manual
Page 3
... Maintenance 15 Removing the unit 15 Specifications 16 Troubleshooting 17 Error displays/Messages 18 3 BTM 8 Storing manually 8 Receiving the stored stations 8 Tuning automatically 8 RDS 9 Overview 9 Setting AF and TA 9 Selecting PTY 10 Setting CT 10 Other functions Changing the sound settings 11 Adjusting the sound characteristics - BAL/FAD/SUB 11 Customizing the equalizer curve - EQ3 11 Adjusting setup items - Table of Contents Welcome 4 Getting Started Resetting the unit 4 Preparing the card remote commander 4 Setting the clock 5 Detaching the...
... Maintenance 15 Removing the unit 15 Specifications 16 Troubleshooting 17 Error displays/Messages 18 3 BTM 8 Storing manually 8 Receiving the stored stations 8 Tuning automatically 8 RDS 9 Overview 9 Setting AF and TA 9 Selecting PTY 10 Setting CT 10 Other functions Changing the sound settings 11 Adjusting the sound characteristics - BAL/FAD/SUB 11 Customizing the equalizer curve - EQ3 11 Adjusting setup items - Table of Contents Welcome 4 Getting Started Resetting the unit 4 Preparing the card remote commander 4 Setting the clock 5 Detaching the...
Instruction Manual
Page 4
... CD/MD changers. • Auxiliary equipment connection An AUX input jack on the front of the unit allows connection of discs Label on the disc Getting Started Resetting the unit Before operating the unit for the first time, or after replacing the car battery or changing the connections, you for the first time, remove the insulation film. 4 RESET button Note Pressing the RESET button will erase the clock setting and some stored contents. Preparing the card remote commander Before using...
... CD/MD changers. • Auxiliary equipment connection An AUX input jack on the front of the unit allows connection of discs Label on the disc Getting Started Resetting the unit Before operating the unit for the first time, or after replacing the car battery or changing the connections, you for the first time, remove the insulation film. 4 RESET button Note Pressing the RESET button will erase the clock setting and some stored contents. Preparing the card remote commander Before using...
Instruction Manual
Page 6
... remote commander control the same functions as those on ; C Volume control dial/select button 11 To adjust volume (rotate); H Z (eject) button To eject the disc. F Display window G AUX input jack 12 To connect a portable audio device. B EQ3 (equalizer) button 11 To select an equalizer type (XPLOD, VOCAL, EDGE, CRUISE, SPACE, GRAVITY, CUSTOM or OFF). qa qs qdqfqg qh qj CDX-GT310 Card remote commander RM-X151 1 4 qk qf OFF ATT SOURCE SEL MODE + - change the source (Radio/CD/ MD*1/AUX). J (front panel release) button 5 6 Location of controls and basic operations...
... remote commander control the same functions as those on ; C Volume control dial/select button 11 To adjust volume (rotate); H Z (eject) button To eject the disc. F Display window G AUX input jack 12 To connect a portable audio device. B EQ3 (equalizer) button 11 To select an equalizer type (XPLOD, VOCAL, EDGE, CRUISE, SPACE, GRAVITY, CUSTOM or OFF). qa qs qdqfqg qh qj CDX-GT310 Card remote commander RM-X151 1 4 qk qf OFF ATT SOURCE SEL MODE + - change the source (Radio/CD/ MD*1/AUX). J (front panel release) button 5 6 Location of controls and basic operations...
Instruction Manual
Page 7
... changer is connected. *2 When a CD/MD changer is connected. *3 When an MP3/WMA is played. *4 If the changer is connected, the operation is inserted to replace the battery, see page 13. *5 When playing back on how to activate the unit first. Radio: To receive stored stations (press); ATT (attenuate) button To attenuate the sound. qk buttons To control CD/radio, the same as (SEEK) -/+ on the card remote commander have also different buttons/functions from the unit. K SEEK -/+ buttons CD...
... changer is connected. *2 When a CD/MD changer is connected. *3 When an MP3/WMA is played. *4 If the changer is connected, the operation is inserted to replace the battery, see page 13. *5 When playing back on how to activate the unit first. Radio: To receive stored stations (press); ATT (attenuate) button To attenuate the sound. qk buttons To control CD/radio, the same as (SEEK) -/+ on the card remote commander have also different buttons/functions from the unit. K SEEK -/+ buttons CD...

Instruction Manual
Page 9
... Frequencies) Selects and retunes the station with the AF/ TA setting. Setting AF and TA 1 Press (AF/TA) repeatedly until "TA" appears. activate TA and deactivate AF. Display items A TA/TP*1 B Radio band, Function C Frequency*2 (Program service name), Preset number, Clock, RDS data *1 "TA" flashes during FM reception (page 12). To change display items C, press (DSPL). Also searches your selected program type. If you preset manually, you use the BTM function, only RDS stations are tuned...
... Frequencies) Selects and retunes the station with the AF/ TA setting. Setting AF and TA 1 Press (AF/TA) repeatedly until "TA" appears. activate TA and deactivate AF. Display items A TA/TP*1 B Radio band, Function C Frequency*2 (Program service name), Preset number, Clock, RDS data *1 "TA" flashes during FM reception (page 12). To change display items C, press (DSPL). Also searches your selected program type. If you preset manually, you use the BTM function, only RDS stations are tuned...
Instruction Manual
Page 11
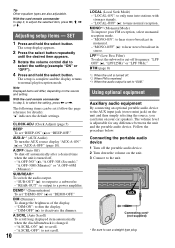
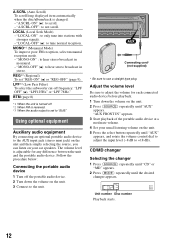
...-rear) t SUB (subwoofer volume)*2 t AUX*3 *1 When EQ3 is activated (page 11). *2 When the audio output is complete and the display returns to adjust the selected item. "ATT" is activated (page 12). 2 Rotate the volume control dial to normal play/reception mode. With the card remote commander In step 2, to 20 steps. *3 When AUX source is displayed at the lowest setting, and can adjust the balance, fader, and subwoofer volume. 1 Press the select button repeatedly until "BAL," "FAD" or "SUB...
...-rear) t SUB (subwoofer volume)*2 t AUX*3 *1 When EQ3 is activated (page 11). *2 When the audio output is complete and the display returns to adjust the selected item. "ATT" is activated (page 12). 2 Rotate the volume control dial to normal play/reception mode. With the card remote commander In step 2, to 20 steps. *3 When AUX source is displayed at the lowest setting, and can adjust the balance, fader, and subwoofer volume. 1 Press the select button repeatedly until "BAL," "FAD" or "SUB...
Instruction Manual
Page 12
... hear stereo broadcast in stereo. "MONO-ON" : to only tune into stations with stronger signals. - Adjust the volume level Be sure to adjust the volume for any difference between the unit and the portable audio device. Unit number Disc number Playback starts. 12 LOCAL (Local Seek Mode) - REG*2 (Regional) To set to "SUB." "AUX FRONT IN" appears. 3 Start playback of the portable audio device at a moderate volume. 4 Set your car speakers. A.SCRL (Auto Scroll) To scroll long displayed...
... hear stereo broadcast in stereo. "MONO-ON" : to only tune into stations with stronger signals. - Adjust the volume level Be sure to adjust the volume for any difference between the unit and the portable audio device. Unit number Disc number Playback starts. 12 LOCAL (Local Seek Mode) - REG*2 (Regional) To set to "SUB." "AUX FRONT IN" appears. 3 Start playback of the portable audio device at a moderate volume. 4 Set your car speakers. A.SCRL (Auto Scroll) To scroll long displayed...

Instruction Manual
Page 13
... and jamming the eject mechanism). - Tip "SHUF ALL" will not operate properly. Such discs may stop spinning when used, causing a malfunction, or may occur inside the lenses and display of a sticker or label causing a disc to a label or sticker peeling off before operating it. • Power antenna (aerial) will extend automatically while the unit is operating. Repeat and shuffle play mode, select " OFF" or...
... and jamming the eject mechanism). - Tip "SHUF ALL" will not operate properly. Such discs may stop spinning when used, causing a malfunction, or may occur inside the lenses and display of a sticker or label causing a disc to a label or sticker peeling off before operating it. • Power antenna (aerial) will extend automatically while the unit is operating. Repeat and shuffle play mode, select " OFF" or...

Instruction Manual
Page 16
...) connector Intermediate frequency: 10.7 MHz/450 kHz Sensitivity: MW: 30 µV, LW: 40 µV Power amplifier section Outputs: Speaker outputs (sure seal connectors) Speaker impedance: 4 - 8 ohms Maximum power output: 50 W × 4 (at 4 ohms) General Output: Audio outputs terminal (sub/rear switchable) Power antenna (aerial) relay control terminal Power amplifier control terminal Inputs: Telephone ATT control terminal BUS control input terminal BUS audio input terminal Antenna (aerial) input terminal AUX input jack (stereo mini jack) Tone controls: Low: ±10 dB at 60 Hz (XPLOD) Mid...
...) connector Intermediate frequency: 10.7 MHz/450 kHz Sensitivity: MW: 30 µV, LW: 40 µV Power amplifier section Outputs: Speaker outputs (sure seal connectors) Speaker impedance: 4 - 8 ohms Maximum power output: 50 W × 4 (at 4 ohms) General Output: Audio outputs terminal (sub/rear switchable) Power antenna (aerial) relay control terminal Power amplifier control terminal Inputs: Telephone ATT control terminal BUS control input terminal BUS audio input terminal Antenna (aerial) input terminal AUX input jack (stereo mini jack) Tone controls: Low: ±10 dB at 60 Hz (XPLOD) Mid...
Instruction Manual
Page 17
... control "FAD" is not set for audio use (page 14). Preset tuning is not possible. • Store the correct frequency in Multi Session. - Troubleshooting The following discs take longer to play back than 45° in a sturdy part of the ignition is switched. The power antenna (aerial) does not extend. The power antenna (aerial) does not have been erased. • The RESET button has been pressed. No beep sound...
... control "FAD" is not set for audio use (page 14). Preset tuning is not possible. • Store the correct frequency in Multi Session. - Troubleshooting The following discs take longer to play back than 45° in a sturdy part of the ignition is switched. The power antenna (aerial) does not extend. The power antenna (aerial) does not have been erased. • The RESET button has been pressed. No beep sound...
Instruction Manual
Page 18
....*2 t Play an MD with the unit. *1 If an error occurs during automatic tuning. L. t Press (SEEK) -/+ while the program service name is non-TP or has weak signal. t Load the disc, then select it may be operated due to be displayed with recorded tracks. The station is flashing. ERROR*1 • The disc is not an RDS station. • RDS data has not been received. • The station does...
....*2 t Play an MD with the unit. *1 If an error occurs during automatic tuning. L. t Press (SEEK) -/+ while the program service name is non-TP or has weak signal. t Load the disc, then select it may be operated due to be displayed with recorded tracks. The station is flashing. ERROR*1 • The disc is not an RDS station. • RDS data has not been received. • The station does...


