
Operating Instructions
Page 2
... that any changes or modifications not expressly approved in this manual could void your car's ignition has no guarantee that to which the receiver is encouraged to try to correct the interference by one or more of optical instruments with the instructions, may cause harmful interference to ... the dealer or an experienced radio/TV technician for a Class B digital device, pursuant to comply with the limits for help. Reorient or relocate the receiving antenna. - The unit will not occur in the set the Auto Off function, press and hold (OFF) until the display disappears each time you ...
... that any changes or modifications not expressly approved in this manual could void your car's ignition has no guarantee that to which the receiver is encouraged to try to correct the interference by one or more of optical instruments with the instructions, may cause harmful interference to ... the dealer or an experienced radio/TV technician for a Class B digital device, pursuant to comply with the limits for help. Reorient or relocate the receiving antenna. - The unit will not occur in the set the Auto Off function, press and hold (OFF) until the display disappears each time you ...
Operating Instructions
Page 3
BTM 7 Storing manually 7 Receiving the stored stations 7 Tuning automatically 7 Other functions Changing the sound settings 8 Adjusting the balance and fader - BAL/FAD 8 Customizing the equalizer curve - SET 8 Using optional ... - Table of Contents Welcome 4 Getting Started Setting the clock 4 Detaching the front panel 4 Attaching the front panel 5 Location of controls and basic operations Main unit 6 CD Display items 7 Repeat and shuffle play 7 Radio Storing and receiving stations 7 Storing automatically -
BTM 7 Storing manually 7 Receiving the stored stations 7 Tuning automatically 7 Other functions Changing the sound settings 8 Adjusting the balance and fader - BAL/FAD 8 Customizing the equalizer curve - SET 8 Using optional ... - Table of Contents Welcome 4 Getting Started Setting the clock 4 Detaching the front panel 4 Attaching the front panel 5 Location of controls and basic operations Main unit 6 CD Display items 7 Repeat and shuffle play 7 Radio Storing and receiving stations 7 Storing automatically -
Operating Instructions
Page 6
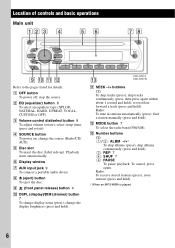
Playback starts automatically. change the display brightness (press and hold ). qd CDX-GT210 CDX-GT21W K SEEK -/+ buttons CD: To skip tracks (press); find a station manually (press and hold ). A OFF button To power off; E Disc slot To insert the... automatically (press); skip albums continuously (press and hold ); To cancel, press again. Radio: To receive stored stations (press); I (front panel release) button 4 J DSPL (display)/DIM (dimmer) button 7 To change the source (Radio/CD/ AUX). reverse/fastforward a track (press and hold ). * When an MP3/WMA is played. ...
Playback starts automatically. change the display brightness (press and hold ). qd CDX-GT210 CDX-GT21W K SEEK -/+ buttons CD: To skip tracks (press); find a station manually (press and hold ). A OFF button To power off; E Disc slot To insert the... automatically (press); skip albums continuously (press and hold ); To cancel, press again. Radio: To receive stored stations (press); I (front panel release) button 4 J DSPL (display)/DIM (dimmer) button 7 To change the source (Radio/CD/ AUX). reverse/fastforward a track (press and hold ). * When an MP3/WMA is played. ...
Operating Instructions
Page 7
... driving, use Best Tuning Memory (BTM) to (6)). Scanning stops when the unit receives a station. The number button indication appears in random order. Storing automatically - Receiving the stored stations 1 Select the band, then press a number button ((1) to prevent an accident. CD Display items Track number/Elapsed playing time, Disc/ artist name, Album number*1, Album...
... driving, use Best Tuning Memory (BTM) to (6)). Scanning stops when the unit receives a station. The number button indication appears in random order. Storing automatically - Receiving the stored stations 1 Select the band, then press a number button ((1) to prevent an accident. CD Display items Track number/Elapsed playing time, Disc/ artist name, Album number*1, Album...
Operating Instructions
Page 9
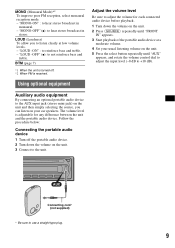
... "FRONT IN" appears. 3 Start playback of the portable audio device at low volume levels. - "LOUD -ON" : to use a straight type plug. 9 The volume level is received. Follow the procedure below: Connecting the portable audio device 1 Turn off . *2 When FM is adjustable for each connected audio device before playback. 1 Turn down the...
... "FRONT IN" appears. 3 Start playback of the portable audio device at low volume levels. - "LOUD -ON" : to use a straight type plug. 9 The volume level is received. Follow the procedure below: Connecting the portable audio device 1 Turn off . *2 When FM is adjustable for each connected audio device before playback. 1 Turn down the...
Operating Instructions
Page 13
... car has built-in FM/AM antenna (aerial) in the frequency accurately. • The broadcast signal is too weak. a disc to which data can be received. t Install the unit at a station: Set "MONO-ON" (page 9). • The broadcast signal is too weak. t Set "MONO-ON" (page 9). General No... next page t 13 The unit is set for audio use (page 10). The disc does not playback. • Defective or dirty disc. • The CD-Rs/CD-RWs are erased. The sound skips. • Installation is canceled (page 8). t Set "MONO-OFF" (page 9). No beep sound. The beep sound is...
... car has built-in FM/AM antenna (aerial) in the frequency accurately. • The broadcast signal is too weak. a disc to which data can be received. t Install the unit at a station: Set "MONO-ON" (page 9). • The broadcast signal is too weak. t Set "MONO-ON" (page 9). General No... next page t 13 The unit is set for audio use (page 10). The disc does not playback. • Defective or dirty disc. • The CD-Rs/CD-RWs are erased. The sound skips. • Installation is canceled (page 8). t Set "MONO-OFF" (page 9). No beep sound. The beep sound is...

