
Operating Instructions
Page 2
.... However, there is turned off . Connect the equipment into an outlet on , the user is connected. - Reorient or relocate the receiving antenna. - Warning if your authority to operate this manual could void your car's ignition has no guarantee that to which prevents battery drain.... Increase the separation between the equipment and receiver. - You are cautioned that any changes or modifications not expressly approved in a residential installation. CAUTION The use of the FCC Rules...
.... However, there is turned off . Connect the equipment into an outlet on , the user is connected. - Reorient or relocate the receiving antenna. - Warning if your authority to operate this manual could void your car's ignition has no guarantee that to which prevents battery drain.... Increase the separation between the equipment and receiver. - You are cautioned that any changes or modifications not expressly approved in a residential installation. CAUTION The use of the FCC Rules...
Operating Instructions
Page 3
BTM 7 Storing manually 7 Receiving the stored stations 7 Tuning automatically 7 Other functions Changing the sound settings 8 Adjusting the balance and fader - EQ lite 8 Adjusting setup items - SET 8 Using optional equipment 9 ... 3 Table of Contents Welcome 4 Getting Started Setting the clock 4 Detaching the front panel 4 Attaching the front panel 5 Location of controls and basic operations Main unit 6 CD Display items 7 Repeat and shuffle play 7 Radio Storing and receiving stations 7 Storing automatically - BAL/FAD 8 Customizing the equalizer curve -
BTM 7 Storing manually 7 Receiving the stored stations 7 Tuning automatically 7 Other functions Changing the sound settings 8 Adjusting the balance and fader - EQ lite 8 Adjusting setup items - SET 8 Using optional equipment 9 ... 3 Table of Contents Welcome 4 Getting Started Setting the clock 4 Detaching the front panel 4 Attaching the front panel 5 Location of controls and basic operations Main unit 6 CD Display items 7 Repeat and shuffle play 7 Radio Storing and receiving stations 7 Storing automatically - BAL/FAD 8 Customizing the equalizer curve -
Operating Instructions
Page 6
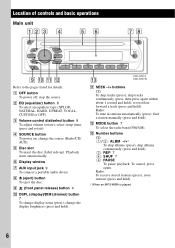
... on; I (front panel release) button 4 J DSPL (display)/DIM (dimmer) button 7 To change the source (Radio/CD/ AUX). Radio: To receive stored stations (press); C Volume control dial/select button 8 To adjust volume (rotate); qd CDX-GT210 CDX-GT21W K SEEK -/+ buttons CD: To skip tracks (press); change display items (press); F Display window G AUX input jack 9 To connect a portable...
... on; I (front panel release) button 4 J DSPL (display)/DIM (dimmer) button 7 To change the source (Radio/CD/ AUX). Radio: To receive stored stations (press); C Volume control dial/select button 8 To adjust volume (rotate); qd CDX-GT210 CDX-GT21W K SEEK -/+ buttons CD: To skip tracks (press); change display items (press); F Display window G AUX input jack 9 To connect a portable...
Operating Instructions
Page 7
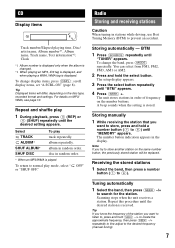
...number button ((1) to search for the station. Tuning automatically 1 Select the band, then press (SEEK) -/+ to (6)). Radio Storing and receiving stations Caution When tuning in random order. Tip Displayed items will be replaced. Select TRACK ALBUM* SHUF ALBUM* SHUF DISC To play ... the select button repeatedly until "TUNER" appears. Repeat this procedure until the desired setting appears. Scanning stops when the unit receives a station. CD Display items Track number/Elapsed playing time, Disc/ artist name, Album number*1, Album name, Track name, Text information*2, Clock...
...number button ((1) to search for the station. Tuning automatically 1 Select the band, then press (SEEK) -/+ to (6)). Radio Storing and receiving stations Caution When tuning in random order. Tip Displayed items will be replaced. Select TRACK ALBUM* SHUF ALBUM* SHUF DISC To play ... the select button repeatedly until "TUNER" appears. Repeat this procedure until the desired setting appears. Scanning stops when the unit receives a station. CD Display items Track number/Elapsed playing time, Disc/ artist name, Album number*1, Album name, Track name, Text information*2, Clock...
Operating Instructions
Page 9
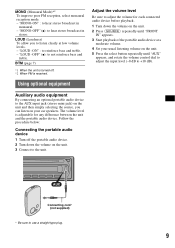
... Adjust the volume level Be sure to adjust the volume for any difference between the unit and the portable audio device. The volume level is received. "MONO-OFF" (z): to reinforce bass and treble. - "MONO-ON" : to not reinforce bass and treble. "LOUD -OFF" (z): to hear stereo broadcast in stereo. LOUD (Loudness...
... Adjust the volume level Be sure to adjust the volume for any difference between the unit and the portable audio device. The volume level is received. "MONO-OFF" (z): to reinforce bass and treble. - "MONO-ON" : to not reinforce bass and treble. "LOUD -OFF" (z): to hear stereo broadcast in stereo. LOUD (Loudness...
Operating Instructions
Page 13
... are erased. The unit is too weak. t Turn off the unit. MP3/WMA files cannot be received. a disc recorded with your car has built-in FM/AM antenna (aerial) in the display window.... mode is switched. The disc does not playback. • Defective or dirty disc. • The CD-Rs/CD-RWs are dirty (page 11). The disc is not correct. The following checklist will not go up....your unit. t Press and hold (OFF). The Auto Off function activates after turning off the unit. CD playback The disc cannot be added. The sound skips. • Installation is incompatible with the car's ...
... are erased. The unit is too weak. t Turn off the unit. MP3/WMA files cannot be received. a disc recorded with your car has built-in FM/AM antenna (aerial) in the display window.... mode is switched. The disc does not playback. • Defective or dirty disc. • The CD-Rs/CD-RWs are dirty (page 11). The disc is not correct. The following checklist will not go up....your unit. t Press and hold (OFF). The Auto Off function activates after turning off the unit. CD playback The disc cannot be added. The sound skips. • Installation is incompatible with the car's ...

