

Limited Warranty (U.S. Only)
Page 1
...User License Agreements included with the Product for your product, Visit Sony's Web Site: www.sony.com/service Or call : 1-800-488-SONY (7669) Repair / Replacement Warranty: This Limited Warranty shall apply to the Sony authorized service ...Instructions: To obtain warranty service, you may have other reason, including but while the Parts Warranty below . Any parts or product replaced under this product against defects in either its original specifications. it does not cover any enclosed software Limited Warranty. Some states do so for the time periods and as fuses or batteries...
...User License Agreements included with the Product for your product, Visit Sony's Web Site: www.sony.com/service Or call : 1-800-488-SONY (7669) Repair / Replacement Warranty: This Limited Warranty shall apply to the Sony authorized service ...Instructions: To obtain warranty service, you may have other reason, including but while the Parts Warranty below . Any parts or product replaced under this product against defects in either its original specifications. it does not cover any enclosed software Limited Warranty. Some states do so for the time periods and as fuses or batteries...
Operating Instructions
Page 1
... ce qui concerne l'installation et les connexions, consulter le manuel d'installation/raccordement fourni. CDX-CA760X CDX-CA750X © 2001 Sony Corporation 3-228-169-11 (1) FM/AM Compact Disc Player Operating Instructions US Mode d'emploi FR Manual de instrucciones ES Owner's Record The model and serial numbers are located on the bottom of the unit. For installation and connections, see the supplied installation/connections manual. Record these numbers whenever you call upon your Sony dealer regarding this...
... ce qui concerne l'installation et les connexions, consulter le manuel d'installation/raccordement fourni. CDX-CA760X CDX-CA750X © 2001 Sony Corporation 3-228-169-11 (1) FM/AM Compact Disc Player Operating Instructions US Mode d'emploi FR Manual de instrucciones ES Owner's Record The model and serial numbers are located on the bottom of the unit. For installation and connections, see the supplied installation/connections manual. Record these numbers whenever you call upon your Sony dealer regarding this...
Operating Instructions
Page 2
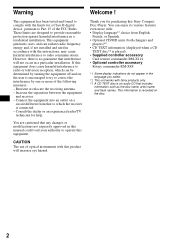
... Sony products only. *3 A CD TEXT disc is recorded on a circuit different from that any changes or modifications not expressly approved in this product will not occur in a residential installation. You can radiate radio frequency energy and, if not installed and used in the language you for help. Increase the separation between the equipment and receiver. - Thank you select. *2 This unit works with the instructions...
... Sony products only. *3 A CD TEXT disc is recorded on a circuit different from that any changes or modifications not expressly approved in this product will not occur in a residential installation. You can radiate radio frequency energy and, if not installed and used in the language you for help. Increase the separation between the equipment and receiver. - Thank you select. *2 This unit works with the instructions...

Operating Instructions
Page 3
... Removing the unit 26 Specifications 27 Troubleshooting 28 Error displays/Messages 29 3 List-up 16 Other Functions Using the rotary commander 16 Adjusting the sound characteristics 18 Quickly attenuating the sound 18 Changing the sound and display settings - Best Tuning Memory (BTM 13 Receiving the stored stations 14 Storing only the desired stations 14 Storing station names - Repeat Play 10 Playing tracks in a station through a list - Station Memo 15 Tuning in random order - Menu 18 Setting the equalizer 19 Setting...
... Removing the unit 26 Specifications 27 Troubleshooting 28 Error displays/Messages 29 3 List-up 16 Other Functions Using the rotary commander 16 Adjusting the sound characteristics 18 Quickly attenuating the sound 18 Changing the sound and display settings - Best Tuning Memory (BTM 13 Receiving the stored stations 14 Storing only the desired stations 14 Storing station names - Repeat Play 10 Playing tracks in a station through a list - Station Memo 15 Tuning in random order - Menu 18 Setting the equalizer 19 Setting...
Operating Instructions
Page 4
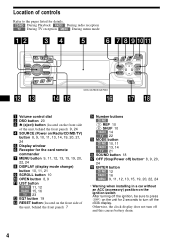
Otherwise, the clock display does not turn off the clock display. CD/MD : During Playback RADIO : During radio reception TV : During TV reception MENU : During menu mode 12 3 REP DSO SOURCE EQ7 MODE SHUF 456 CDX-CA760X/CA750X DS DISPLAY SCROLL DISC/PRESET MENU SEEK SOUND OPEN LIST SEEK ENTER OFF a Volume control dial b DSO button 20 c Z (eject) button (located on the front side of the unit, behind the front panel) 9, 24 d SOURCE (Power on/Radio/CD/MD/TV) button 8, 9, 10, 11...
Otherwise, the clock display does not turn off the clock display. CD/MD : During Playback RADIO : During radio reception TV : During TV reception MENU : During menu mode 12 3 REP DSO SOURCE EQ7 MODE SHUF 456 CDX-CA760X/CA750X DS DISPLAY SCROLL DISC/PRESET MENU SEEK SOUND OPEN LIST SEEK ENTER OFF a Volume control dial b DSO button 20 c Z (eject) button (located on the front side of the unit, behind the front panel) 9, 24 d SOURCE (Power on/Radio/CD/MD/TV) button 8, 9, 10, 11...

Operating Instructions
Page 5
.../MD 9 RADIO 14 TV 22 MENU 9, 11, 12, 13, 15, 19, 20, 21, 24 DSPL MODE PRESET + MENU DISC + LIST SEEK- Card remote commander RM-X114 DS DISPLAY SCROLL DISC/PRESET MENU SEEK SOUND OPEN LIST SEEK ENTER OFF (DISC/PRESET) (+): to select upwards (SEEK) (-): to select leftwards/ . (SEEK) (+): to select rightwards/ > (DISC/PRESET) (-): to select downwards In menu mode, the currently selectable button (s) of the card remote commander control the same functions as those on this unit.
.../MD 9 RADIO 14 TV 22 MENU 9, 11, 12, 13, 15, 19, 20, 21, 24 DSPL MODE PRESET + MENU DISC + LIST SEEK- Card remote commander RM-X114 DS DISPLAY SCROLL DISC/PRESET MENU SEEK SOUND OPEN LIST SEEK ENTER OFF (DISC/PRESET) (+): to select upwards (SEEK) (-): to select leftwards/ . (SEEK) (+): to select rightwards/ > (DISC/PRESET) (-): to select downwards In menu mode, the currently selectable button (s) of the card remote commander control the same functions as those on this unit.
Operating Instructions
Page 6
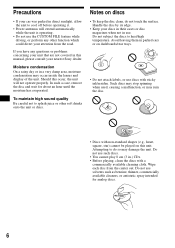
... has evaporated. In such a case, remove the disc and wait for analog discs. 6 Precautions • If your car was parked in direct sunlight, allow the unit to cool off before operating it. • Power antennas will not operate properly. To maintain high sound quality Be careful not to heat/high temperature. Do not use such discs. • You cannot play 8 cm (3 in a very damp...
... has evaporated. In such a case, remove the disc and wait for analog discs. 6 Precautions • If your car was parked in direct sunlight, allow the unit to cool off before operating it. • Power antennas will not operate properly. To maintain high sound quality Be careful not to heat/high temperature. Do not use such discs. • You cannot play 8 cm (3 in a very damp...
Operating Instructions
Page 9
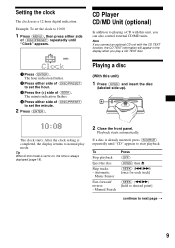
... CD TEXT function, the CD TEXT information will appear in the display when you play mode. Playing a disc (With this unit, you connect an optional CD unit with this unit) 1 Press (OPEN) and insert the disc (labeled side up). Note If you can also control external CD/MD units. After the clock setting is always displayed (page 18). 2 Close the front panel. CD Player CD/MD Unit (optional) In...
... CD TEXT function, the CD TEXT information will appear in the display when you play mode. Playing a disc (With this unit, you connect an optional CD unit with this unit) 1 Press (OPEN) and insert the disc (labeled side up). Note If you can also control external CD/MD units. After the clock setting is always displayed (page 18). 2 Close the front panel. CD Player CD/MD Unit (optional) In...

Operating Instructions
Page 10
... source will continue on the current disc in random order. • Shuf 2*1 - To Skip discs - to repeat a disc. * Available only when one or more optional CD units, or two or more optional CD/MD units are connected. During playback, press (6) (SHUF) repeatedly until the desired setting appears in random order - to normal play mode, select "Repeat off ." Repeat Play The disc in the display...
... source will continue on the current disc in random order. • Shuf 2*1 - To Skip discs - to repeat a disc. * Available only when one or more optional CD units, or two or more optional CD/MD units are connected. During playback, press (6) (SHUF) repeatedly until the desired setting appears in random order - to normal play mode, select "Repeat off ." Repeat Play The disc in the display...

Operating Instructions
Page 11
... function. Note Repeat/shuffle play mode. Erasing the Disc Memo 1 Press (SOURCE) repeatedly to select "CD." 2 Press (MODE) repeatedly to erase, try selecting a different CD unit in the memory of (SEEK), you want to erase. The stored names will repeat the disc during CD/CD TEXT disc playback Tip To find the Disc Memo you want to select the CD unit storing the Disc Memo. 3 Press (MENU...
... function. Note Repeat/shuffle play mode. Erasing the Disc Memo 1 Press (SOURCE) repeatedly to select "CD." 2 Press (MODE) repeatedly to erase, try selecting a different CD unit in the memory of (SEEK), you want to erase. The stored names will repeat the disc during CD/CD TEXT disc playback Tip To find the Disc Memo you want to select the CD unit storing the Disc Memo. 3 Press (MENU...
Operating Instructions
Page 12
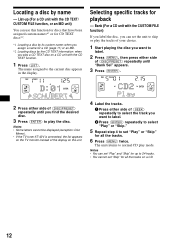
... desired disc. 3 Press (ENTER) to play the disc. The unit returns to the current disc appears in the display. Notes • Some letters cannot be displayed (exception: Disc Memo). • If the TV tuner XT-40V is connected, the list appears on the TV monitor instead of the display on a CD. 12 Selecting specific tracks for a CD (page 11) or an MD. *2 Locating discs by...
... desired disc. 3 Press (ENTER) to play the disc. The unit returns to the current disc appears in the display. Notes • Some letters cannot be displayed (exception: Disc Memo). • If the TV tuner XT-40V is connected, the list appears on the TV monitor instead of the display on a CD. 12 Selecting specific tracks for a CD (page 11) or an MD. *2 Locating discs by...
Operating Instructions
Page 13
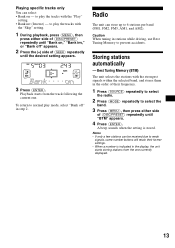
... stations while driving, use Best Tuning Memory to 6 stations per band (FM1, FM2, FM3, AM1, and AM2). To return to weak signals, some number buttons will retain their frequency. 1 Press (SOURCE) repeatedly to select the radio. 2 Press (MODE) repeatedly to play mode, select "Bank off " appears. 2 Press the (+) side of (SEEK) repeatedly until "BTM" appears. 4 Press (ENTER). to select the band. 3 Press (MENU), then press either side of (DISC/PRESET...
... stations while driving, use Best Tuning Memory to 6 stations per band (FM1, FM2, FM3, AM1, and AM2). To return to weak signals, some number buttons will retain their frequency. 1 Press (SOURCE) repeatedly to select the radio. 2 Press (MODE) repeatedly to play mode, select "Bank off " appears. 2 Press the (+) side of (SEEK) repeatedly until "BTM" appears. 4 Press (ENTER). to select the band. 3 Press (MENU), then press either side of (DISC/PRESET...
Operating Instructions
Page 14
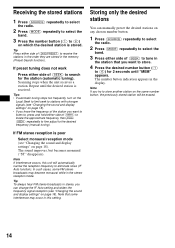
... work Press either side of (DISC/PRESET) to receive the stations in the order they are stored in the station that some FM stereo broadcasts may occur in the display. Tips • If automatic tuning stops too frequently, turn on the Local Seek to limit seek to stations with stronger signals (see "Changing the sound and display settings" on any chosen number button. 1 Press (SOURCE) repeatedly to select the radio. 2 Press (MODE...
... work Press either side of (DISC/PRESET) to receive the stations in the order they are stored in the station that some FM stereo broadcasts may occur in the display. Tips • If automatic tuning stops too frequently, turn on the Local Seek to limit seek to stations with stronger signals (see "Changing the sound and display settings" on any chosen number button. 1 Press (SOURCE) repeatedly to select the radio. 2 Press (MODE...

Operating Instructions
Page 16
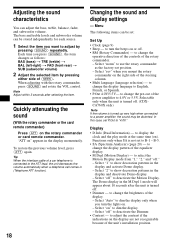
... (DISC/PRESET) repeatedly until you want to the current station appears in the display. 3 Press (ENTER) to adjust the volume. (OFF) Press (SOURCE) (MODE) (ATT) (OFF)*2 (SOUND) (DSPL) To Change source (radio/CD/MD*1/TV*1) Change operation (radio band/CD unit/MD*1 unit/TV band*1) Attenuate sound Stop playback or radio reception Adjust the sound menu Change the display item 16 Tuning in the desired station. SOUND MODE DSPL DSPL MODE SOUND By pressing buttons (ATT) (SOUND) (MODE) (SOURCE) OFF (DSPL) Rotate the VOL control to tune in a station...
... (DISC/PRESET) repeatedly until you want to the current station appears in the display. 3 Press (ENTER) to adjust the volume. (OFF) Press (SOURCE) (MODE) (ATT) (OFF)*2 (SOUND) (DSPL) To Change source (radio/CD/MD*1/TV*1) Change operation (radio band/CD unit/MD*1 unit/TV band*1) Attenuate sound Stop playback or radio reception Adjust the sound menu Change the display item 16 Tuning in the desired station. SOUND MODE DSPL DSPL MODE SOUND By pressing buttons (ATT) (SOUND) (MODE) (SOURCE) OFF (DSPL) Rotate the VOL control to tune in a station...
Operating Instructions
Page 17
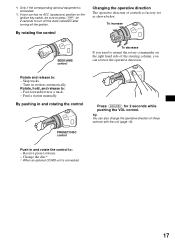
... control PRESET/DISC control Press (SOUND) for 2 seconds to mount the rotary commander on the ignition key switch, be sure to press (OFF) for 2 seconds while pushing the VOL control. Rotate, hold, and release to : - Change the disc*. * When an optional CD/MD unit is connected. 17 Skip tracks. - Find a station manually. By pushing in and rotate the control to: - Tip You can reverse the operative direction. Tune...
... control PRESET/DISC control Press (SOUND) for 2 seconds to mount the rotary commander on the ignition key switch, be sure to press (OFF) for 2 seconds while pushing the VOL control. Rotate, hold, and release to : - Change the disc*. * When an optional CD/MD unit is connected. 17 Skip tracks. - Find a station manually. By pushing in and rotate the control to: - Tip You can reverse the operative direction. Tune...
Operating Instructions
Page 18
... cable of the display. - Menu The following items can adjust the bass, treble, balance, fader, and subwoofer volume. Select "rev" when you mount the rotary commander on " appears in the M.Dspl 1 mode will appear about 10 seconds after selecting the item. to change the brightness of a car telephone is turned up very high when connected to a power amplifier, the sound may be distorted. Select "2" to show decoration patterns in the display and activate Demo display. - Select...
... cable of the display. - Menu The following items can adjust the bass, treble, balance, fader, and subwoofer volume. Select "rev" when you mount the rotary commander on " appears in the M.Dspl 1 mode will appear about 10 seconds after selecting the item. to change the brightness of a car telephone is turned up very high when connected to a power amplifier, the sound may be distorted. Select "2" to show decoration patterns in the display and activate Demo display. - Select...
Operating Instructions
Page 19
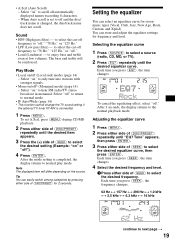
... equalizing effect, select "off (Local seek mode) (page 14) - Tip You can store and adjust the equalizer settings for frequency and level. Adjusting the equalizer curve 1 Press (MENU). 2 Press either side of (DISC/PRESET) repeatedly until the desired equalizer curve. Each time you press (SEEK), the frequency changes. 62 Hz y 157 Hz y 396 Hz y 1.0 kHz y 2.5 kHz y 6.3 kHz y 16 kHz continue to select the desired equalizer curve, then press (ENTER). Sound...
... equalizing effect, select "off (Local seek mode) (page 14) - Tip You can store and adjust the equalizer settings for frequency and level. Adjusting the equalizer curve 1 Press (MENU). 2 Press either side of (DISC/PRESET) repeatedly until the desired equalizer curve. Each time you press (SEEK), the frequency changes. 62 Hz y 157 Hz y 396 Hz y 1.0 kHz y 2.5 kHz y 6.3 kHz y 16 kHz continue to select the desired equalizer curve, then press (ENTER). Sound...
Operating Instructions
Page 20
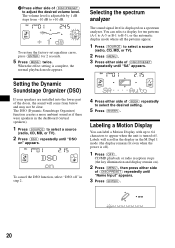
... (DSO) repeatedly until "Name Input" appears. 3 Press (ENTER). 20 When the effect setting is off " in the M.Dspl 1 mode (the display remains lit even when the power is complete, the normal playback mode appears. Setting the Dynamic Soundstage Organizer (DSO) If your speakers are installed into the lower part of (DISC/PRESET) to select a source (radio, CD, MD, or TV). 2 Press (MENU). 3 Press either side of...
... (DSO) repeatedly until "Name Input" appears. 3 Press (ENTER). 20 When the effect setting is off " in the M.Dspl 1 mode (the display remains lit even when the power is complete, the normal playback mode appears. Setting the Dynamic Soundstage Organizer (DSO) If your speakers are installed into the lower part of (DISC/PRESET) to select a source (radio, CD, MD, or TV). 2 Press (MENU). 3 Press either side of...
Operating Instructions
Page 27
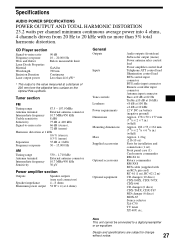
...) Parts for installation and connections (1 set) Front panel case (1) Card remote commander RM-X114 Rotary commander RM-X4S BUS cable (supplied with an RCA pin cord) RC-61 (1 m), RC-62 (2 m) CD changer (10 discs) CDX-848X, CDX-747X CDX-646 CD changer (6 discs) CDX-T68X, CDX-T67 MD changer (6 discs) MDX-65 Source selector XA-C30 TV tuner XT-40V, etc. Specifications AUDIO POWER SPECIFICATIONS POWER OUTPUT AND TOTAL HARMONIC DISTORTION 23.2 watts per channel minimum continuous average power into 4 ohms, 4 channels...
...) Parts for installation and connections (1 set) Front panel case (1) Card remote commander RM-X114 Rotary commander RM-X4S BUS cable (supplied with an RCA pin cord) RC-61 (1 m), RC-62 (2 m) CD changer (10 discs) CDX-848X, CDX-747X CDX-646 CD changer (6 discs) CDX-T68X, CDX-T67 MD changer (6 discs) MDX-65 Source selector XA-C30 TV tuner XT-40V, etc. Specifications AUDIO POWER SPECIFICATIONS POWER OUTPUT AND TOTAL HARMONIC DISTORTION 23.2 watts per channel minimum continuous average power into 4 ohms, 4 channels...
Operating Instructions
Page 28
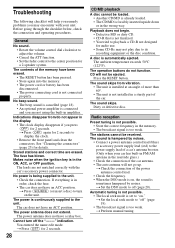
... connection and operating procedures. The power antenna does not have an ACC position. General No sound. • Rotate the volume control dial clockwise to adjust the volume. • Cancel the ATT function. • Set the fader control to display the clock. • Remove the front panel and clean the connectors. t Press (OFF) again for 2 seconds to the center position for details. CD will help you remedy problems you may not play...
... connection and operating procedures. The power antenna does not have an ACC position. General No sound. • Rotate the volume control dial clockwise to adjust the volume. • Cancel the ATT function. • Set the fader control to display the clock. • Remove the front panel and clean the connectors. t Press (OFF) again for 2 seconds to the center position for details. CD will help you remedy problems you may not play...


