
Operating Instructions
Page 3
...or from ink, or glue leaking from peeled-off . Do not expose the discs to protect the CD player from the center out. To keep the disc clean, do not touch the surface. Ink is necessary for analog discs. Stickers that is not finalized (Finalization is sticky. Labels are paste residue....the unit will not operate properly. When you play 8 cm (3 in.) CDs Use the optional Sony compact disc single adaptor (CSA-8) to direct sunlight or heat sources such as follows. To enjoy optimum sound, handle the disc as hot air-ducts, or leave them in a car parked in direct sunlight where there can...
...or from ink, or glue leaking from peeled-off . Do not expose the discs to protect the CD player from the center out. To keep the disc clean, do not touch the surface. Ink is necessary for analog discs. Stickers that is not finalized (Finalization is sticky. Labels are paste residue....the unit will not operate properly. When you play 8 cm (3 in.) CDs Use the optional Sony compact disc single adaptor (CSA-8) to direct sunlight or heat sources such as follows. To enjoy optimum sound, handle the disc as hot air-ducts, or leave them in a car parked in direct sunlight where there can...

Operating Instructions
Page 4
...Location of controls 5 Getting Started Resetting the unit 7 Detaching the front panel 7 Turning the unit on discs ... 23 Watching the TV or video while listening to a CD 9 Playing tracks repeatedly - List-...rotary commander 18 Using the rotary commander 19 Adjusting the sound characteristics 20 Attenuating the sound 20 Changing the sound and display settings ...... 21 Boosting the bass sound - List-up 13 Selecting specific tracks for playback -...to use the menu 8 Setting the clock 8 CD Player CD/MD Unit (optional) Listening to a CD or MD - Repeat Play 11 Playing tracks in random...
...Location of controls 5 Getting Started Resetting the unit 7 Detaching the front panel 7 Turning the unit on discs ... 23 Watching the TV or video while listening to a CD 9 Playing tracks repeatedly - List-...rotary commander 18 Using the rotary commander 19 Adjusting the sound characteristics 20 Attenuating the sound 20 Changing the sound and display settings ...... 21 Boosting the bass sound - List-up 13 Selecting specific tracks for playback -...to use the menu 8 Setting the clock 8 CD Player CD/MD Unit (optional) Listening to a CD or MD - Repeat Play 11 Playing tracks in random...

Operating Instructions
Page 5
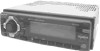
... (located on the front side of the unit behind the front panel) 9 4 DISC/PRST +/- (cursor up/down) buttons 8, 10, 12, 13, 14, 15, 16, 17, 21, 22, 24 ...During CD/MD playback: Disc change 11, 13 During radio reception: Preset stations select 16, 18 During TV reception: Band select 22 5 ...LIST SOURCE -SEEK/AMS SOUND PRST- - When you press (OFF) only momentarily, the clock display does not turn off the clock display after turning off and this causes battery wear. *2 CDX-C5005 only 5 Location of the unit)*2 The AM (FM) tuning interval is ...
... (located on the front side of the unit behind the front panel) 9 4 DISC/PRST +/- (cursor up/down) buttons 8, 10, 12, 13, 14, 15, 16, 17, 21, 22, 24 ...During CD/MD playback: Disc change 11, 13 During radio reception: Preset stations select 16, 18 During TV reception: Band select 22 5 ...LIST SOURCE -SEEK/AMS SOUND PRST- - When you press (OFF) only momentarily, the clock display does not turn off the clock display after turning off and this causes battery wear. *2 CDX-C5005 only 5 Location of the unit)*2 The AM (FM) tuning interval is ...
Operating Instructions
Page 6
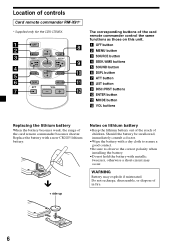
...when installing the battery. •Do not hold the battery with a new CR2025 lithium battery. OFF OPEN/CLOSE MENU SEEK DISC SOURCE LIST SEEK SOUND DISC ENTER DSPL ATT MODE VOL The corresponding buttons of in fire. 6 Replace the battery with metallic tweezers, otherwise a short-...controls Card remote commander RM-X91* * Supplied only for the CDX-C7000X. x + side up Notes on this unit. 1 OFF button 2 MENU button 3 SOURCE button 4 SEEK/AMS buttons 5 SOUND button 6 DSPL button 7 ATT button 8 LIST button 9 DISC/PRST buttons q; Location of children. ENTER button qa MODE button...
...when installing the battery. •Do not hold the battery with a new CR2025 lithium battery. OFF OPEN/CLOSE MENU SEEK DISC SOURCE LIST SEEK SOUND DISC ENTER DSPL ATT MODE VOL The corresponding buttons of in fire. 6 Replace the battery with metallic tweezers, otherwise a short-...controls Card remote commander RM-X91* * Supplied only for the CDX-C7000X. x + side up Notes on this unit. 1 OFF button 2 MENU button 3 SOURCE button 4 SEEK/AMS buttons 5 SOUND button 6 DSPL button 7 ATT button 8 LIST button 9 DISC/PRST buttons q; Location of children. ENTER button qa MODE button...

Operating Instructions
Page 7
... on the dashboard of a car parked in . Remove the front panel and press the reset button with you, use the built-in amplifier, the beep sound will be a considerable rise in temperature. Caution alarm If you detach the panel while the unit is still turned on the unit as illustrated, then...
... on the dashboard of a car parked in . Remove the front panel and press the reset button with you, use the built-in amplifier, the beep sound will be a considerable rise in temperature. Caution alarm If you detach the panel while the unit is still turned on the unit as illustrated, then...

Operating Instructions
Page 10
... always take priority over the original CD TEXT information when such information is displayed. Automatic Music Sensor (AMS) During playback, press either side of (DISC/PRST) repeatedly until "A.SCRL-OFF" appears. 3 Press the (+) side of (SEEK/AMS). Note If you use personalized labels, they will automatically...SEEK/AMS) momentarily for each track you want to the Motion Display mode after a few seconds. Some of the disc and you set the function on or off . (See "Changing the sound and display settings" on the setting when you press (SOURCE) to select "A.SCRL-ON." 4 Press (ENTER). ...
... always take priority over the original CD TEXT information when such information is displayed. Automatic Music Sensor (AMS) During playback, press either side of (DISC/PRST) repeatedly until "A.SCRL-OFF" appears. 3 Press the (+) side of (SEEK/AMS). Note If you use personalized labels, they will automatically...SEEK/AMS) momentarily for each track you want to the Motion Display mode after a few seconds. Some of the disc and you set the function on or off . (See "Changing the sound and display settings" on the setting when you press (SOURCE) to select "A.SCRL-ON." 4 Press (ENTER). ...

Operating Instructions
Page 15
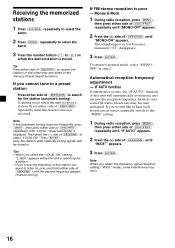
...display. If only a few stations can store up to select the tuner. You can be received, some number buttons will be erased. 15 A beep sounds when the setting is not in the order of your choice. 1 Press (SOURCE) repeatedly to select the tuner. 2 Press (MODE) repeatedly to (6))...number button. 4 Press the desired number button ((1) to select the band. 3 Press either side of (DISC/PRST) repeatedly until "MEM" appears. Memorizing only the desired stations You can preset up to 18 FM stations (6 each for two seconds until "BTM" appears. 4 Press (ENTER). The number button indication ...
...display. If only a few stations can store up to select the tuner. You can be received, some number buttons will be erased. 15 A beep sounds when the setting is not in the order of your choice. 1 Press (SOURCE) repeatedly to select the tuner. 2 Press (MODE) repeatedly to (6))...number button. 4 Press the desired number button ((1) to select the band. 3 Press either side of (DISC/PRST) repeatedly until "MEM" appears. Memorizing only the desired stations You can preset up to 18 FM stations (6 each for two seconds until "BTM" appears. 4 Press (ENTER). The number button indication ...
Operating Instructions
Page 16
... like to the "WIDE" setting. 1 During radio reception, press (MENU), then press either side of (DISC/PRST) repeatedly until "IF AUTO" appears. 2 Press the (+) side of (SEEK/AMS) until "WIDE""...frequency of the station you widen the frequency signal reception setting ("WIDE" mode), some FM stereo broadcasts may occur. 16 In such cases, some interference may become monaural. Note... When you want to listen to (6)) on which the desired station is received. The sound improves, but becomes monaural ("ST" disappears). 3 Press (ENTER). Press (ENTER). If you select...
... like to the "WIDE" setting. 1 During radio reception, press (MENU), then press either side of (DISC/PRST) repeatedly until "IF AUTO" appears. 2 Press the (+) side of (SEEK/AMS) until "WIDE""...frequency of the station you widen the frequency signal reception setting ("WIDE" mode), some FM stereo broadcasts may occur. 16 In such cases, some interference may become monaural. Note... When you want to listen to (6)) on which the desired station is received. The sound improves, but becomes monaural ("ST" disappears). 3 Press (ENTER). Press (ENTER). If you select...
Operating Instructions
Page 18
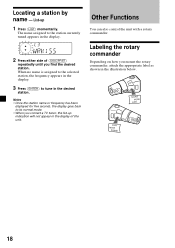
...in the display. 3 Press (ENTER) to its normal mode. • When you connect a TV tuner, the list-up 1 Press (LIST) momentarily. SOUND MODE DSPL DSPL MODE SOUND 18 Notes • Once the station name or frequency has been displayed for five seconds, the display goes back to tune in the... illustration below. Labeling the rotary commander Depending on how you find the desired station. List-up indication will not appear in the display of (DISC/...
...in the display. 3 Press (ENTER) to its normal mode. • When you connect a TV tuner, the list-up 1 Press (LIST) momentarily. SOUND MODE DSPL DSPL MODE SOUND 18 Notes • Once the station name or frequency has been displayed for five seconds, the display goes back to tune in the... illustration below. Labeling the rotary commander Depending on how you find the desired station. List-up indication will not appear in the display of (DISC/...

Operating Instructions
Page 20
.... Tip When the interface cable of the steering column, you want to turn off the engine. Press (ATT) to adjust the volume and sound menu. Note Adjust within three seconds after turning off the clock indication after selecting the item. To restore the previous volume level, press (ATT...) to adjust the volume. Tip You can store the bass and treble levels independently for two seconds while pushing the VOL control. 20 Attenuating the sound Press (ATT) on the right hand side of a car telephone is factoryset as follows: BAS (bass) t TRE (treble) t BAL (left-right) t FAD (...
.... Tip When the interface cable of the steering column, you want to turn off the engine. Press (ATT) to adjust the volume and sound menu. Note Adjust within three seconds after turning off the clock indication after selecting the item. To restore the previous volume level, press (ATT...) to adjust the volume. Tip You can store the bass and treble levels independently for two seconds while pushing the VOL control. 20 Attenuating the sound Press (ATT) on the right hand side of a car telephone is factoryset as follows: BAS (bass) t TRE (treble) t BAL (left-right) t FAD (...

Operating Instructions
Page 21
...off , 80 Hz, 120 Hz). 4 Press (ENTER). to select the frequency (Example: off frequency of the subwoofer output. *1 CDX-C5005 only *2 CDX-C7000X only Note If you press the (-) side of (DISC/PRST), the item changes as the factory-set : SET (setting) •CLOCK (page 8) •BEEP - to display the... position. - The D-bass function boosts the low and high frequency signal with the D-BASS button. Note If the bass sound becomes distorted, select a less effective setting of (DISC/PRST) for the pre-output)*2 - Select "REV" when you mount the rotary commander on or off frequency of the ...
...off , 80 Hz, 120 Hz). 4 Press (ENTER). to select the frequency (Example: off frequency of the subwoofer output. *1 CDX-C5005 only *2 CDX-C7000X only Note If you press the (-) side of (DISC/PRST), the item changes as the factory-set : SET (setting) •CLOCK (page 8) •BEEP - to display the... position. - The D-bass function boosts the low and high frequency signal with the D-BASS button. Note If the bass sound becomes distorted, select a less effective setting of (DISC/PRST) for the pre-output)*2 - Select "REV" when you mount the rotary commander on or off frequency of the ...
Operating Instructions
Page 22
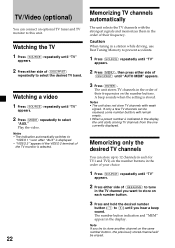
...(MODE) repeatedly to select the desired TV band. Watching the TV 1 Press (SOURCE) repeatedly until "TV" appears. 2 Press either side of (DISC/PRST) repeatedly to select "AUX." Memorizing only the desired TV channels You can connect an optional TV tuner and TV monitor to "VIDEO 1" soon ...2" appears if the VIDEO 2 terminal of the TV monitor is stored. Notes • The indication automatically switches to this unit. A beep sounds when the setting is selected. 22 Memorizing TV channels automatically The unit selects the TV channels with weak signals. The number button indication and "...
...(MODE) repeatedly to select the desired TV band. Watching the TV 1 Press (SOURCE) repeatedly until "TV" appears. 2 Press either side of (DISC/PRST) repeatedly to select "AUX." Memorizing only the desired TV channels You can connect an optional TV tuner and TV monitor to "VIDEO 1" soon ...2" appears if the VIDEO 2 terminal of the TV monitor is stored. Notes • The indication automatically switches to this unit. A beep sounds when the setting is selected. 22 Memorizing TV channels automatically The unit selects the TV channels with weak signals. The number button indication and "...

Operating Instructions
Page 27
..., the beep sound will help you remedy the problems you connect an optional amplifier and do not use the built- Defective MD or dirty CD. The ambient temperature exceeds 50°C (122°F). t Store again into the unit while the unit was ejecting the disc after you connect... a CD unit with your unit. The sound skips. t Press (LIST) for details. "Cleaning the connectors" (page 25) for two seconds. 27 The sound skips due to adjust the volume. t Press the reset button. You...
..., the beep sound will help you remedy the problems you connect an optional amplifier and do not use the built- Defective MD or dirty CD. The ambient temperature exceeds 50°C (122°F). t Store again into the unit while the unit was ejecting the disc after you connect... a CD unit with your unit. The sound skips. t Press (LIST) for details. "Cleaning the connectors" (page 25) for two seconds. 27 The sound skips due to adjust the volume. t Press the reset button. You...

Operating Instructions
Page 28
...176;F). Insert another CD/MD. antenna booster. (Only when your nearest Sony dealer. 28Sony Corporation Printed in Korea t Set the IF mode to the MONO mode (page 16). NO DISC No disc is not possible. The "ST" indication flashes. •Tune in ...the frequency accurately. •The broadcast signal is dirty or inserted upside down below 50°C (122°F). *1 When an error occurs during FM The WIDE mode is connected) The following indications will flash for about five seconds, and an alarm sound...
...176;F). Insert another CD/MD. antenna booster. (Only when your nearest Sony dealer. 28Sony Corporation Printed in Korea t Set the IF mode to the MONO mode (page 16). NO DISC No disc is not possible. The "ST" indication flashes. •Tune in ...the frequency accurately. •The broadcast signal is dirty or inserted upside down below 50°C (122°F). *1 When an error occurs during FM The WIDE mode is connected) The following indications will flash for about five seconds, and an alarm sound...


