
Instruction Manual
Page 6
... Using the material and stabilizer 66 - 69 Preparing the machine before installing the hoop ------- 70 - 71 Attaching and removing embroidery hoop 70 - 71 Installation of software 72 - 75 Operation switches when embroidery unit is attached - 76 - 77 Operation switches, Thread tension control Troubleshooting 78 - 89 4. PRE P AR AT ION FOR E MBROIDERY...
... Using the material and stabilizer 66 - 69 Preparing the machine before installing the hoop ------- 70 - 71 Attaching and removing embroidery hoop 70 - 71 Installation of software 72 - 75 Operation switches when embroidery unit is attached - 76 - 77 Operation switches, Thread tension control Troubleshooting 78 - 89 4. PRE P AR AT ION FOR E MBROIDERY...
Instruction Manual
Page 12
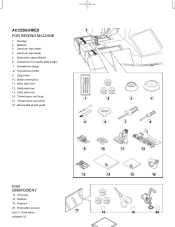
Screwdriver for needle plate (large) 7. Screwdriver (small) 9. Thread spool net (short) 16. Bobbins 19. Embroidery software CD 9 10 11 12 13 14 15 16 17 18 19 20 Needles 2. Spool pin cap (small) 4. Screwdriver (large) 8. Button sewing foot 11. Removable thread ...
Screwdriver for needle plate (large) 7. Screwdriver (small) 9. Thread spool net (short) 16. Bobbins 19. Embroidery software CD 9 10 11 12 13 14 15 16 17 18 19 20 Needles 2. Spool pin cap (small) 4. Screwdriver (large) 8. Button sewing foot 11. Removable thread ...
Instruction Manual
Page 76
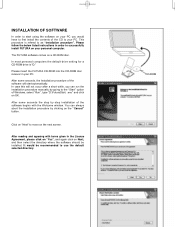
Please follow the below listed instructions in order to successfully install FUTURA on a CD-ROM disc. The FUTURA software comes on your PC. Click on "Next" to move on Next, and then select the directory where the software should be recommended to as "installation procedure". In most personal computers the... PC. After reading and agreeing with the Welcome window. CD-ROM In case this will start using the software on OK. This procedure is "D:" Please insert the FUTURA CD-ROM into the CD-ROM disc receiver in the License Agreement, please click on "Yes", and again...
Please follow the below listed instructions in order to successfully install FUTURA on a CD-ROM disc. The FUTURA software comes on your PC. Click on "Next" to move on Next, and then select the directory where the software should be recommended to as "installation procedure". In most personal computers the... PC. After reading and agreeing with the Welcome window. CD-ROM In case this will start using the software on OK. This procedure is "D:" Please insert the FUTURA CD-ROM into the CD-ROM disc receiver in the License Agreement, please click on "Yes", and again...
Instruction Manual
Page 78
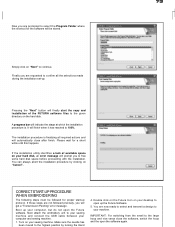
... while until this happens. Make sure the needle has been moved to confirm all required actions and will automatically close the software, switch the hoop and the open the Futura software. The installation procedure is . You can always abort the installation procedure by turning the Hand 4. Boot up the...and transmit a design to your sewing machine and connect the USB cable between your computer, but do not open the software again. Double click on the Futura Icon on your desktop to continue. Turn on your sewing machine. It will get a "Transmission Pending" error message.
... while until this happens. Make sure the needle has been moved to confirm all required actions and will automatically close the software, switch the hoop and the open the Futura software. The installation procedure is . You can always abort the installation procedure by turning the Hand 4. Boot up the...and transmit a design to your sewing machine and connect the USB cable between your computer, but do not open the software again. Double click on the Futura Icon on your desktop to continue. Turn on your sewing machine. It will get a "Transmission Pending" error message.
Instruction Manual
Page 88
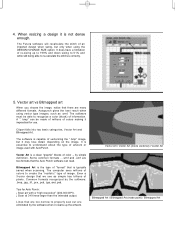
... of color - Even a 3-color design that are too narrow to recognize a color (block) of "format" that there are eliminated by the software when it impractical for Auto Punch: ¡ Scan art with AutoPunch. Lines that we see as .wmf. Vector Art / Vector Art (mode vectoriel...) / Vector Art Bitmapped Art / Bitmapped Art (mode point) / Bitmapped Art The Futura software will recalculate the stitch of pixels. Clipart falls into two basic categories, Vector Art and Bitmapped Art. Common formats recognized by simple definition. 4. ...
... of color - Even a 3-color design that are too narrow to recognize a color (block) of "format" that there are eliminated by the software when it impractical for Auto Punch: ¡ Scan art with AutoPunch. Lines that we see as .wmf. Vector Art / Vector Art (mode vectoriel...) / Vector Art Bitmapped Art / Bitmapped Art (mode point) / Bitmapped Art The Futura software will recalculate the stitch of pixels. Clipart falls into two basic categories, Vector Art and Bitmapped Art. Common formats recognized by simple definition. 4. ...
Instruction Manual
Page 90
When sizing designs in , the letter will keep the design integrity. Because the letters are built-in the Futura software you have brought them into the hoop and exited the text window. The density is set to change the stitch count. 7. All other formats should ...
When sizing designs in , the letter will keep the design integrity. Because the letters are built-in the Futura software you have brought them into the hoop and exited the text window. The density is set to change the stitch count. 7. All other formats should ...


