Instruction Manual
Page 3
...appliance complies with any adjustments in the outlet, reverse the plug. "Do not allow to be left unattended when plugged in this sewing machine is for household use as threading needle, changing needle, threading bobbin, or changing presser foot, etc." 15. Close attention..., fire, electric shock, or injury to the nearest authorized dealer or service center for its intended use , or equivalent." "CAUTION - Return the sewing machine to persons: " 1. Keep ventilation openings of electric shock:" 1. "Do not use outdoors." 7. "Never operate this can cause needle to ...
...appliance complies with any adjustments in the outlet, reverse the plug. "Do not allow to be left unattended when plugged in this sewing machine is for household use as threading needle, changing needle, threading bobbin, or changing presser foot, etc." 15. Close attention..., fire, electric shock, or injury to the nearest authorized dealer or service center for its intended use , or equivalent." "CAUTION - Return the sewing machine to persons: " 1. Keep ventilation openings of electric shock:" 1. "Do not use outdoors." 7. "Never operate this can cause needle to ...

Instruction Manual
Page 6
...Feather stitch, Pin stitch, Ladder stitch, Blanket stitch, Slant pin stitch, Slant Overedge Stitch Decorative Stitching 48 - 49 Continuous patterns 50 - 51 Sewing on a button 50 - 51 Buttonhole making 52 - 57 Using buttonhole foot, Procedure, Corded buttonholes 3. TABLE OF CONTENTS 1. OTHER THINGS YOU ... - 75 Operation switches when embroidery unit is attached - 76 - 77 Operation switches, Thread tension control Troubleshooting 78 - 89 4. GETTING STARTED SEWING Leveling Machine 10- 1 1 Setting up machine 10 - 11 Spool pins 12- 13 Winding bobbin 14 - 15 Inserting the bobbin 16-17...
...Feather stitch, Pin stitch, Ladder stitch, Blanket stitch, Slant pin stitch, Slant Overedge Stitch Decorative Stitching 48 - 49 Continuous patterns 50 - 51 Sewing on a button 50 - 51 Buttonhole making 52 - 57 Using buttonhole foot, Procedure, Corded buttonholes 3. TABLE OF CONTENTS 1. OTHER THINGS YOU ... - 75 Operation switches when embroidery unit is attached - 76 - 77 Operation switches, Thread tension control Troubleshooting 78 - 89 4. GETTING STARTED SEWING Leveling Machine 10- 1 1 Setting up machine 10 - 11 Spool pins 12- 13 Winding bobbin 14 - 15 Inserting the bobbin 16-17...
Instruction Manual
Page 10
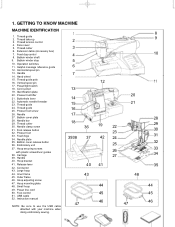
... 15. Cord socket 19. Automatic needle threader 23. Needle plate 35. Bobbin cover release button 36. Hoop securing screws with your machine when doing embroidery sewing. 1 2 3 4 5 6 7 13 14 15 16 17 18 3938 47 36 37 40 43 12 19 42 41 44 45 46 20 21 22 23 24 25...
... 15. Cord socket 19. Automatic needle threader 23. Needle plate 35. Bobbin cover release button 36. Hoop securing screws with your machine when doing embroidery sewing. 1 2 3 4 5 6 7 13 14 15 16 17 18 3938 47 36 37 40 43 12 19 42 41 44 45 46 20 21 22 23 24 25...
Instruction Manual
Page 12
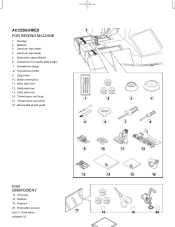
... 18 19 20 Bobbins 3. Blind stitch foot 12. Screwdriver (large) 8. Scissors 20. Spool pin cap (large) 5. Buttonhole foot 13. Satin stitch foot 14. ACCESSORIES FOR SEWING MACHINE 1. Buttonhole opener/Brush 6. Screwdriver (small) 9. Removable thread guide 1 2 3 4 5 6 7 8 FOR EMBROIDERY 17. Thread spool net (long) 15. Thread spool net (short) 16. Vinyl bag 18...
... 18 19 20 Bobbins 3. Blind stitch foot 12. Screwdriver (large) 8. Scissors 20. Spool pin cap (large) 5. Buttonhole foot 13. Satin stitch foot 14. ACCESSORIES FOR SEWING MACHINE 1. Buttonhole opener/Brush 6. Screwdriver (small) 9. Removable thread guide 1 2 3 4 5 6 7 8 FOR EMBROIDERY 17. Thread spool net (long) 15. Thread spool net (short) 16. Vinyl bag 18...
Instruction Manual
Page 14
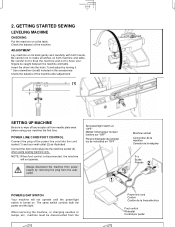
...Check the balance of the machine after adjustment. (1) SETTING UP MACHINE Be sure to wipe off any surplus oil from needle plate area before using sewing machine only. ADJUSTMENT Lay machine on a flat table. POWER LINE CORD/FOOT CONTROL Connect the plug of the power line cord into the cord socket... from the Power line cord Cordon Cordón de la linea eléctrica Foot control Rhéostat Control por pedal GETTING STARTED SEWING LEVELING MACHINE CHECKING Put the machine on its back gently and carefully with both hands. NOTE: When foot control is turned on both the...
...Check the balance of the machine after adjustment. (1) SETTING UP MACHINE Be sure to wipe off any surplus oil from needle plate area before using sewing machine only. ADJUSTMENT Lay machine on a flat table. POWER LINE CORD/FOOT CONTROL Connect the plug of the power line cord into the cord socket... from the Power line cord Cordon Cordón de la linea eléctrica Foot control Rhéostat Control por pedal GETTING STARTED SEWING LEVELING MACHINE CHECKING Put the machine on its back gently and carefully with both hands. NOTE: When foot control is turned on both the...
Instruction Manual
Page 30
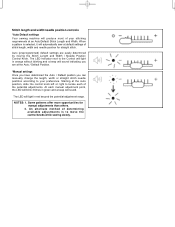
...stitch. Starting at an Auto/Default Stitch Length and Width. An alternate method of determining available adjustments is selected, it will automatically sew at the Auto / Default Position. *Manual settings Once you have determined the Auto / Default position you are easily determined by moving... the Stitch Length and Width / Needle Position Control Knob. Stitch length and width/needle position controls *Auto/Default settings Your sewing machine will produce most of your preference. Auto (preprogrammed) default settings are at default settings of stitch length, width and needle ...
...stitch. Starting at an Auto/Default Stitch Length and Width. An alternate method of determining available adjustments is selected, it will automatically sew at the Auto / Default Position. *Manual settings Once you have determined the Auto / Default position you are easily determined by moving... the Stitch Length and Width / Needle Position Control Knob. Stitch length and width/needle position controls *Auto/Default settings Your sewing machine will produce most of your preference. Auto (preprogrammed) default settings are at default settings of stitch length, width and needle ...
Instruction Manual
Page 34
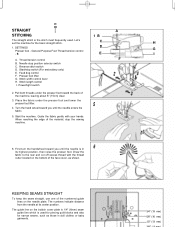
... B. Pull both threads under the presser foot and lower the presser foot lifter. 5 4. Turn the hand wheel toward the back of the material, stop the sewing machine. 6. Stitch length control I 4 2. Guide the fabric gently with the thread cutter located on the needle plate.
... B. Pull both threads under the presser foot and lower the presser foot lifter. 5 4. Turn the hand wheel toward the back of the material, stop the sewing machine. 6. Stitch length control I 4 2. Guide the fabric gently with the thread cutter located on the needle plate.
Instruction Manual
Page 38
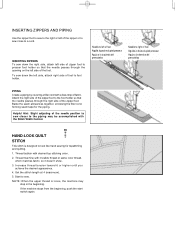
... passes through the right side of the zipper foot. If the machine stops from the beginning, push the start switch again. INSERTING ZIPPERS To sew down the left side, attach right side of foot to a cord. HAND-LOOK QUILT STITCH This stitch is loose, the machine may be ...accomplished with a bias strip of fabric. Thread machine with desired top stitching color. 2. Attach the right side of the zipper foot to look like hand sewing for the piping. Thread bobbin with invisible thread or same color thread, which matches fabric, so it doesn't show. 3. Increase thread tension toward 6 ...
... passes through the right side of the zipper foot. If the machine stops from the beginning, push the start switch again. INSERTING ZIPPERS To sew down the left side, attach right side of foot to a cord. HAND-LOOK QUILT STITCH This stitch is loose, the machine may be ...accomplished with a bias strip of fabric. Thread machine with desired top stitching color. 2. Attach the right side of the zipper foot to look like hand sewing for the piping. Thread bobbin with invisible thread or same color thread, which matches fabric, so it doesn't show. 3. Increase thread tension toward 6 ...

Instruction Manual
Page 40
... is set. General Purpose Foot :Thread tension control - E The top thread may appear on the bottom depending on the thread, fabric, type of stitch and sewing speed, but the bobbin thread must never appear on the top of stabilizer to help avoid stitches puckering the fabric. mm 0 0.25 0.5 0.75 1.0 1.25 1.5 1.75...
... is set. General Purpose Foot :Thread tension control - E The top thread may appear on the bottom depending on the thread, fabric, type of stitch and sewing speed, but the bobbin thread must never appear on the top of stabilizer to help avoid stitches puckering the fabric. mm 0 0.25 0.5 0.75 1.0 1.25 1.5 1.75...
Instruction Manual
Page 42
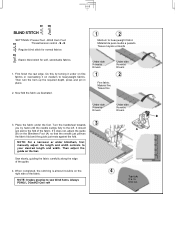
... the length and width controls to heavyweight fabric Material de peso medio a pesado Tissus moyens et lourds − Elastic blind stitch for soft, stretchable fabrics 1. Sew slowly, guiding the fabric carefully along the edge of the fabric. Blind Hem Foot :Thread tension control - It should just pierce the fold of the... of the fabric. NOTE: It takes practice to the left. BLIND STITCH SETTINGS :Presser foot - S - Do this by hand until the needle swings fully to sew blind hems. Always PDNQ L DQwiHZ tQst I rsH 4 Top side Cara End roit
... the length and width controls to heavyweight fabric Material de peso medio a pesado Tissus moyens et lourds − Elastic blind stitch for soft, stretchable fabrics 1. Sew slowly, guiding the fabric carefully along the edge of the fabric. Blind Hem Foot :Thread tension control - It should just pierce the fold of the... of the fabric. NOTE: It takes practice to the left. BLIND STITCH SETTINGS :Presser foot - S - Do this by hand until the needle swings fully to sew blind hems. Always PDNQ L DQwiHZ tQst I rsH 4 Top side Cara End roit

Instruction Manual
Page 48
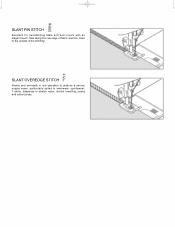
LADDER STITCH The Ladder stitch is couching over thin tape in the center and a special effect will be used for sewing over narrow ribbon, yarn or elastic. It can also be used for hemstitching and to applique a quilt. BLANKET STITCH The decorative appearance combined with ... for decoration. Place the stitch in an opposite or same color. Another use of this stitch enables it to heavy weight linen-type fabric. After sewing, draw the thread out from within the ladder for appliqué work , choose a medium to be obtained for drawn thread hemstitching. PIN STITCH The ...
LADDER STITCH The Ladder stitch is couching over thin tape in the center and a special effect will be used for sewing over narrow ribbon, yarn or elastic. It can also be used for hemstitching and to applique a quilt. BLANKET STITCH The decorative appearance combined with ... for decoration. Place the stitch in an opposite or same color. Another use of this stitch enables it to heavy weight linen-type fabric. After sewing, draw the thread out from within the ladder for appliqué work , choose a medium to be obtained for drawn thread hemstitching. PIN STITCH The ...
Instruction Manual
Page 50
Sew along the raw edge of fabric and trim close to swimwear, sportswear, T-shirts, babywear in stretch nylon, stretch towelling, jersey and cotton jersey. SLANT PIN STITCH Excellent for hemstitching table and bed covers with an elegant touch. SLANT OVEREDGE STITCH Seams and overcasts in one operation to produce a narrow, supple seam, particularly suited to the outside of the stitching.
Sew along the raw edge of fabric and trim close to swimwear, sportswear, T-shirts, babywear in stretch nylon, stretch towelling, jersey and cotton jersey. SLANT PIN STITCH Excellent for hemstitching table and bed covers with an elegant touch. SLANT OVEREDGE STITCH Seams and overcasts in one operation to produce a narrow, supple seam, particularly suited to the outside of the stitching.
Instruction Manual
Page 52
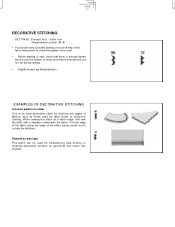
... onto the bobbin to cut -off strip of the fabric being sewn to check the pattern to be used. ∗ Before starting to sew, check that there is an ideal decorative stitch for finishing the edges of the stitch, being careful not to make sure that the thread... will not run out during sewing. ∗ Slightly loosen top thread tension. E ∗ You should carry out a test sewing on a fabric edge, first sew the stitch with a stabilizer underneath the fabric. When sewing this stitch on a cut into the stitching. DECORATIVE STITCHING SETTINGS :Presser...
... onto the bobbin to cut -off strip of the fabric being sewn to check the pattern to be used. ∗ Before starting to sew, check that there is an ideal decorative stitch for finishing the edges of the stitch, being careful not to make sure that the thread... will not run out during sewing. ∗ Slightly loosen top thread tension. E ∗ You should carry out a test sewing on a fabric edge, first sew the stitch with a stabilizer underneath the fabric. When sewing this stitch on a cut into the stitching. DECORATIVE STITCHING SETTINGS :Presser...
Instruction Manual
Page 54
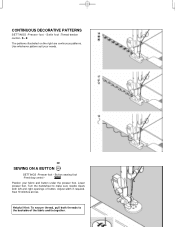
Button sewing foot :Feed dog control Position your needs. Turn the handwheel to the backside of button. Use whichever pattern suit your fabric and button under the ... to make sure needle clears both left and right openings of the fabric and tie together. E The patterns illustrated on the right are continuous patterns. SEWING ON A BUTTON SETTINGS :Presser foot - Sew 10 stitches across. Lower presser foot. Satin foot :Thread tension control - CONTINUOUS DECORATIVE PATTERNS SETTINGS :Presser foot - S -
Button sewing foot :Feed dog control Position your needs. Turn the handwheel to the backside of button. Use whichever pattern suit your fabric and button under the ... to make sure needle clears both left and right openings of the fabric and tie together. E The patterns illustrated on the right are continuous patterns. SEWING ON A BUTTON SETTINGS :Presser foot - Sew 10 stitches across. Lower presser foot. Satin foot :Thread tension control - CONTINUOUS DECORATIVE PATTERNS SETTINGS :Presser foot - S -
Instruction Manual
Page 56
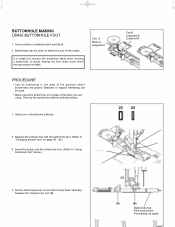
... USING BUTTONHOLE FOOT 1. Buttonholes can be sewn to "Changing presser foot" on a scrap of buttonhole patterns. It is helpful to remove the extension table when sewing a buttonhole, to "Using buttonhole foot" above.) 7. Stabilizer or regular interfacing can be used. ∗ Make a practice buttonhole on page 92 - 93.) 5. Insert the button into...
... USING BUTTONHOLE FOOT 1. Buttonholes can be sewn to "Changing presser foot" on a scrap of buttonhole patterns. It is helpful to remove the extension table when sewing a buttonhole, to "Using buttonhole foot" above.) 7. Stabilizer or regular interfacing can be used. ∗ Make a practice buttonhole on page 92 - 93.) 5. Insert the button into...
Instruction Manual
Page 58
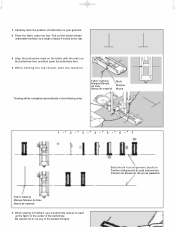
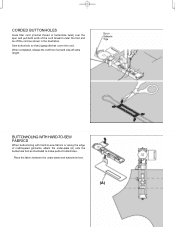
... 4 inches to cut any of the bartack threads. 5. Be careful not to the rear. 8. W h i l e h o l d i n g t h e t o p t h r e a d , s t a r t t h e m a c h i n e . * Sewing will be completed automatically in the center of buttonhole on the buttonhole foot, and then lower the buttonhole foot. 9. Carefully mark the position of the... buttonhole. When sewing is finished, use a buttonhole opener to open up the fabric in the following order. Fabric marking Marque Marque du ...
... 4 inches to cut any of the bartack threads. 5. Be careful not to the rear. 8. W h i l e h o l d i n g t h e t o p t h r e a d , s t a r t t h e m a c h i n e . * Sewing will be completed automatically in the center of buttonhole on the buttonhole foot, and then lower the buttonhole foot. 9. Carefully mark the position of the... buttonhole. When sewing is finished, use a buttonhole opener to open up the fabric in the following order. Fabric marking Marque Marque du ...
Instruction Manual
Page 60
... between the under the foot and tie off extra length. When completed, release the cord from foot and snip off the cord as illustrated to -sew fabrics or along the edge of the cord forward under -plate and buttonhole foot. (A) Spur Saliente Tige BUTTONHOLING WITH HARD-TO...
... between the under the foot and tie off extra length. When completed, release the cord from foot and snip off the cord as illustrated to -sew fabrics or along the edge of the cord forward under -plate and buttonhole foot. (A) Spur Saliente Tige BUTTONHOLING WITH HARD-TO...
Instruction Manual
Page 62
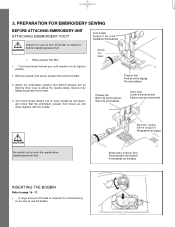
... bar so that the embroidery presser foot moves up and down , and check that the drive lever is above the needle clamp. PREPARATION FOR EMBROIDERY SEWING BEFORE ATTACHING EMBROIDERY UNIT ATTACHING EMBROIDERY FOOT Always be sure to move needle up and down together with the needle. Foot holder Support du pied...
... bar so that the embroidery presser foot moves up and down , and check that the drive lever is above the needle clamp. PREPARATION FOR EMBROIDERY SEWING BEFORE ATTACHING EMBROIDERY UNIT ATTACHING EMBROIDERY FOOT Always be sure to move needle up and down together with the needle. Foot holder Support du pied...
Instruction Manual
Page 66
... pattern may deform. CAUTION ∗ Turn off power to machine. ∗ Remove embroidery hoop from machine. * Re-install connector cap before using machine for general sewing. 2 3. Note: If embroidery unit is pushed in the top of the connector cap with your finger as it will go until it toward the left...
... pattern may deform. CAUTION ∗ Turn off power to machine. ∗ Remove embroidery hoop from machine. * Re-install connector cap before using machine for general sewing. 2 3. Note: If embroidery unit is pushed in the top of the connector cap with your finger as it will go until it toward the left...
Instruction Manual
Page 78
...: For switching from the small to the large hoop and vice versa close after finish. If the installation utility identifies a lack of the FUTURA software files to confirm all required actions and will get a "Transmission Pending" error message. Make sure the needle has been moved to 100...-UP PROCEDURE WHEN EMBROIDERING The following steps must be stored. Turn on "Cancel". It will prompt you to your sewing machine and connect the USB cable between your sewing machine. Pressing the "Next" button will finally start -up your machine. Please wait for proper start the copy ...
...: For switching from the small to the large hoop and vice versa close after finish. If the installation utility identifies a lack of the FUTURA software files to confirm all required actions and will get a "Transmission Pending" error message. Make sure the needle has been moved to 100...-UP PROCEDURE WHEN EMBROIDERING The following steps must be stored. Turn on "Cancel". It will prompt you to your sewing machine and connect the USB cable between your sewing machine. Pressing the "Next" button will finally start -up your machine. Please wait for proper start the copy ...


