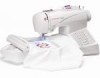
Instruction Manual
Page 3
... threading needle, changing needle, threading bobbin, or changing presser foot, etc." 15. To reduce the risk of the sewing machine and foot control free from all instructions before using and before operating machine " "SAVE THESE INSTRUCTIONS" "This product is for its intended use , or equivalent." "This sewing machine should always be used or where oxygen is not working properly, if it in the outlet, reverse the plug. To reduce the risk of lint, dust, and loose...
... threading needle, changing needle, threading bobbin, or changing presser foot, etc." 15. To reduce the risk of the sewing machine and foot control free from all instructions before using and before operating machine " "SAVE THESE INSTRUCTIONS" "This product is for its intended use , or equivalent." "This sewing machine should always be used or where oxygen is not working properly, if it in the outlet, reverse the plug. To reduce the risk of lint, dust, and loose...

Instruction Manual
Page 6
... when embroidery unit is attached - 76 - 77 Operation switches, Thread tension control Troubleshooting 78 - 89 4. OTHER THINGS YOU SHOULD KNOW Presser foot lifter 90-91 Feed dog control 90-91 Converting to free-arm sewing 90 - 91 Adjusting top thread tension 92 - 93 Changing presser foot 92 - 93 Operation switches 94 - 95 Needle, thread and fabric chart 96 - 97 Performance checklist 98 - 99 Cleaning hook area and feed dogs 100- 101 Oiling inside the face cover 102 - 103 Special accessories 104 - 105 Helpful...
... when embroidery unit is attached - 76 - 77 Operation switches, Thread tension control Troubleshooting 78 - 89 4. OTHER THINGS YOU SHOULD KNOW Presser foot lifter 90-91 Feed dog control 90-91 Converting to free-arm sewing 90 - 91 Adjusting top thread tension 92 - 93 Changing presser foot 92 - 93 Operation switches 94 - 95 Needle, thread and fabric chart 96 - 97 Performance checklist 98 - 99 Cleaning hook area and feed dogs 100- 101 Oiling inside the face cover 102 - 103 Special accessories 104 - 105 Helpful...
Instruction Manual
Page 10
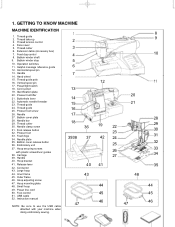
... take-up 3. Extension table (Accessory box) 7. Handle 14. Buttonhole lever 22. Handle 40. Large hoop 44. Hoop adjusting screw 47. Power line cord 50. Instruction manual NOTE: Be sure to use the USB cable attached with plastic screwdriver guides 38. Thread guide 2. Face cover 5. Feed dog control 8. Helpful message reference guide 12. Presser foot lifter 21. Automatic needle threader 23. Feed dogs 34. Bobbin cover release button 36. Thread cutter 6. Operation switches 11. Foot release button 32. Hoop securing screws with your machine when doing embroidery sewing...
... take-up 3. Extension table (Accessory box) 7. Handle 14. Buttonhole lever 22. Handle 40. Large hoop 44. Hoop adjusting screw 47. Power line cord 50. Instruction manual NOTE: Be sure to use the USB cable attached with plastic screwdriver guides 38. Thread guide 2. Face cover 5. Feed dog control 8. Helpful message reference guide 12. Presser foot lifter 21. Automatic needle threader 23. Feed dogs 34. Bobbin cover release button 36. Thread cutter 6. Operation switches 11. Foot release button 32. Hoop securing screws with your machine when doing embroidery sewing...
Instruction Manual
Page 12
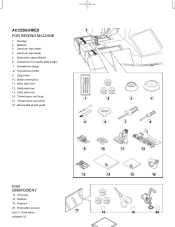
Spool pin cap (small) 4. Spool pin cap (large) 5. Screwdriver (small) 9. Satin stitch foot 14. Vinyl bag 18. Embroidery presser foot 21. Zipper foot 10. Bobbins 19. Scissors 20. Buttonhole foot 13. Removable thread guide 1 2 3 4 5 6 7 8 FOR EMBROIDERY 17. Buttonhole opener/Brush 6. Blind stitch foot 12. Thread spool net (short) 16. Embroidery software CD 9 10 11 12 13 14 15 16 17 18 19 20 Thread spool net (long) 15. Needles 2. Button sewing foot 11. Screwdriver for needle plate (large) 7. ACCESSORIES FOR SEWING MACHINE 1. Screwdriver (...
Spool pin cap (small) 4. Spool pin cap (large) 5. Screwdriver (small) 9. Satin stitch foot 14. Vinyl bag 18. Embroidery presser foot 21. Zipper foot 10. Bobbins 19. Scissors 20. Buttonhole foot 13. Removable thread guide 1 2 3 4 5 6 7 8 FOR EMBROIDERY 17. Buttonhole opener/Brush 6. Blind stitch foot 12. Thread spool net (short) 16. Embroidery software CD 9 10 11 12 13 14 15 16 17 18 19 20 Thread spool net (long) 15. Needles 2. Button sewing foot 11. Screwdriver for needle plate (large) 7. ACCESSORIES FOR SEWING MACHINE 1. Screwdriver (...
Instruction Manual
Page 14
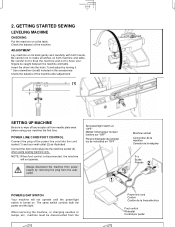
... the accessories. When servicing the machine, or changing needles or Iamps, etc., machine must be caught between the machine and table. POWER LINE CORD/FOOT CONTROL Connect the plug of the machine after adjustment. (1) SETTING UP MACHINE Be sure to have your machine the first time. Set power/light switch at "OFF" Mettez l'interrupteur moteur/ lumière sur "OFF". Check the balance of the machine. Insert the driver into the machine socket (3), when using your...
... the accessories. When servicing the machine, or changing needles or Iamps, etc., machine must be caught between the machine and table. POWER LINE CORD/FOOT CONTROL Connect the plug of the machine after adjustment. (1) SETTING UP MACHINE Be sure to have your machine the first time. Set power/light switch at "OFF" Mettez l'interrupteur moteur/ lumière sur "OFF". Check the balance of the machine. Insert the driver into the machine socket (3), when using your...
Instruction Manual
Page 26
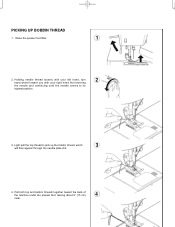
Holding needle thread loosely with your left hand, turn 2 hand wheel toward the back of the machine under the presser foot, leaving about 6" (15 cm) 4 clear. Light pull the top thread to its highest position. 3. PICKING UP BOBBIN THREAD 1. Pull both top and bobbin threads together toward you with your right hand first lowering the needle and continuing until the needle comes to pick up the bobbin thread, which 3 will then appear through the needle plate slot. 4. Raise the presser foot lifter. 1 2.
Holding needle thread loosely with your left hand, turn 2 hand wheel toward the back of the machine under the presser foot, leaving about 6" (15 cm) 4 clear. Light pull the top thread to its highest position. 3. PICKING UP BOBBIN THREAD 1. Pull both top and bobbin threads together toward you with your right hand first lowering the needle and continuing until the needle comes to pick up the bobbin thread, which 3 will then appear through the needle plate slot. 4. Raise the presser foot lifter. 1 2.
Instruction Manual
Page 30
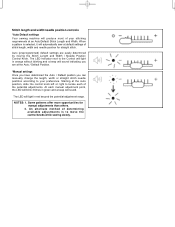
... determining available adjustments is selected, it will automatically sew at the Auto / Default Position. *Manual settings Once you have determined the Auto / Default position you are easily determined by moving the Stitch Length and Width / Needle Position Control Knob. Starting at an Auto/Default Stitch Length and Width. When a pattern is to locate each manual adjustment point, the LED will blink 3 times in green and a beep will light in orange...
... determining available adjustments is selected, it will automatically sew at the Auto / Default Position. *Manual settings Once you have determined the Auto / Default position you are easily determined by moving the Stitch Length and Width / Needle Position Control Knob. Starting at an Auto/Default Stitch Length and Width. When a pattern is to locate each manual adjustment point, the LED will blink 3 times in green and a beep will light in orange...
Instruction Manual
Page 34
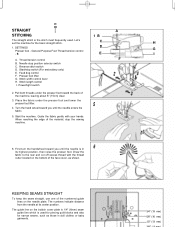
.../stop the sewing machine. 6. Stitch width control lever H. When reaching the edge of the machine, leaving about 6" (15cm) clear. 3 3. The numbers indicate distance from the needle at its highest position, then raise the presser foot. Power/light switch 1B C D E A F 2 H G I . Pull both threads under the presser foot and lower the presser foot lifter. 5 4. The guide line on the needle plate. STRAIGHT STITCHING The straight stitch is used . SETTINGS Presser foot - Thread tension control B. General Purpose Foot Thread tension control - Place the fabric under the...
.../stop the sewing machine. 6. Stitch width control lever H. When reaching the edge of the machine, leaving about 6" (15cm) clear. 3 3. The numbers indicate distance from the needle at its highest position, then raise the presser foot. Power/light switch 1B C D E A F 2 H G I . Pull both threads under the presser foot and lower the presser foot lifter. 5 4. The guide line on the needle plate. STRAIGHT STITCHING The straight stitch is used . SETTINGS Presser foot - Thread tension control B. General Purpose Foot Thread tension control - Place the fabric under the...
Instruction Manual
Page 38
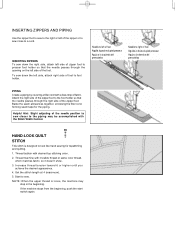
... of the needle position to sew closer to the piping may stop in the beginning. Set the stitich length at 4 (maximum). 5. Increase thread tension toward 6 or higher until you achieve the desired appearance. 4. INSERTING ZIPPERS AND PIPING Use the zipper foot to sew to the right or left of foot to foot holder. Helpful Hint: Slight adjusting of the zipper foot. Start to a cord. Baste the seam allowances together, enclosing the filler cord, forming seam tape...
... of the needle position to sew closer to the piping may stop in the beginning. Set the stitich length at 4 (maximum). 5. Increase thread tension toward 6 or higher until you achieve the desired appearance. 4. INSERTING ZIPPERS AND PIPING Use the zipper foot to sew to the right or left of foot to foot holder. Helpful Hint: Slight adjusting of the zipper foot. Start to a cord. Baste the seam allowances together, enclosing the filler cord, forming seam tape...

Instruction Manual
Page 40
... el centro The stitch length is 2 mm and the stitch width is set. Set length between 0.5 and 2.0. Use a backing of pattern increases from center needle position as illustrated. ZIGZAG STITCHING SETTINGS :Presser foot - S - General Purpose Foot :Thread tension control - PLACEMENT OF PATTERNS Stitch width of stabilizer to help avoid stitches puckering the fabric. is a closely spaced attractive stitch for satin stitching. E The top thread may appear on the bottom depending on the thread, fabric, type of stitch and sewing speed, but the bobbin thread must never...
... el centro The stitch length is 2 mm and the stitch width is set. Set length between 0.5 and 2.0. Use a backing of pattern increases from center needle position as illustrated. ZIGZAG STITCHING SETTINGS :Presser foot - S - General Purpose Foot :Thread tension control - PLACEMENT OF PATTERNS Stitch width of stabilizer to help avoid stitches puckering the fabric. is a closely spaced attractive stitch for satin stitching. E The top thread may appear on the bottom depending on the thread, fabric, type of stitch and sewing speed, but the bobbin thread must never...
Instruction Manual
Page 54
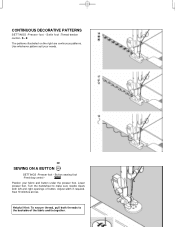
Use whichever pattern suit your fabric and button under the presser foot. S - E The patterns illustrated on the right are continuous patterns. SEWING ON A BUTTON SETTINGS :Presser foot - Lower presser foot. Helpful Hint: To secure thread, pull both left and right openings of the fabric and tie together. Satin foot :Thread tension control - Button sewing foot :Feed dog control Position your needs. Turn the handwheel to make sure needle clears both threads to the backside of button. CONTINUOUS DECORATIVE PATTERNS SETTINGS :Presser foot - Adjust width if required. Sew ...
Use whichever pattern suit your fabric and button under the presser foot. S - E The patterns illustrated on the right are continuous patterns. SEWING ON A BUTTON SETTINGS :Presser foot - Lower presser foot. Helpful Hint: To secure thread, pull both left and right openings of the fabric and tie together. Satin foot :Thread tension control - Button sewing foot :Feed dog control Position your needs. Turn the handwheel to make sure needle clears both threads to the backside of button. CONTINUOUS DECORATIVE PATTERNS SETTINGS :Presser foot - Adjust width if required. Sew ...
Instruction Manual
Page 62
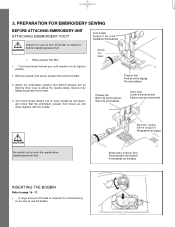
... machine before changing presser foot. CAUTION ∗ Raise presser foot lifter. Needle clamp Serre-aiguille Abrazadera de aguja Embroidery presser foot Pied presseur de broderie Prensatelas de bordado INSERTING THE BOBBIN Refer to page 16 - 17. ∗ A large amount of thread is required for embroidering, so be sure to turn off power to move needle up and down , and check that the drive lever is in its highest position. 1. Presser foot...
... machine before changing presser foot. CAUTION ∗ Raise presser foot lifter. Needle clamp Serre-aiguille Abrazadera de aguja Embroidery presser foot Pied presseur de broderie Prensatelas de bordado INSERTING THE BOBBIN Refer to page 16 - 17. ∗ A large amount of thread is required for embroidering, so be sure to turn off power to move needle up and down , and check that the drive lever is in its highest position. 1. Presser foot...
Instruction Manual
Page 64
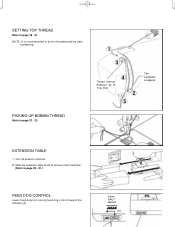
hilos 2 5 Tab Languette Lengüeta EXTENSION TABLE 1. NOTE: It is recommended to page 90 - 91.) FEED DOG CONTROL Lower feed dogs by moving feed dog control toward the direction (A). Slide the extension table to left to remove it from machine. (Refer to do the threading before data transferring. Down HAUT ABAJO (A) PICKING UP BOBBIN THREAD Refer to machine. 2. Turn off power to page 22 - 23. 1 3 4 Thread take-up Releveur de fil Tria- SETTING TOP THREAD Refer to page 18 - 21.
hilos 2 5 Tab Languette Lengüeta EXTENSION TABLE 1. NOTE: It is recommended to page 90 - 91.) FEED DOG CONTROL Lower feed dogs by moving feed dog control toward the direction (A). Slide the extension table to left to remove it from machine. (Refer to do the threading before data transferring. Down HAUT ABAJO (A) PICKING UP BOBBIN THREAD Refer to machine. 2. Turn off power to page 22 - 23. 1 3 4 Thread take-up Releveur de fil Tria- SETTING TOP THREAD Refer to page 18 - 21.
Instruction Manual
Page 78
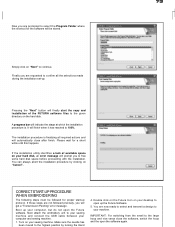
... the open up . Next attach the embroidery unit to the large hoop and vice versa close after finish. IMPORTANT: For switching from the small to your sewing machine and connect the USB cable between your hard disk, an error message will indicate the stage at which the installation procedure is finalizing all the selections made during the installation set-up the Futura Software...
... the open up . Next attach the embroidery unit to the large hoop and vice versa close after finish. IMPORTANT: For switching from the small to your sewing machine and connect the USB cable between your hard disk, an error message will indicate the stage at which the installation procedure is finalizing all the selections made during the installation set-up the Futura Software...
Instruction Manual
Page 80
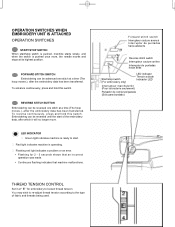
... re-adjust thread tension according to loosen thread tension. Red light indicates machine is pushed once more, the needle moves and stops at " E " for 2 - 3 seconds shows that an incorrect operation was made. ∗ Continuous flashing indicates that machine malfunctions. FORWARD STITCH SWITCH Embroidering can be reversed one stitch at a time (The hoop moves.), after the embroidery data has been transferred. REVERSE STITCH BUTTON Embroidering can be reversed until the start . Flashing red light indicates a problem...
... re-adjust thread tension according to loosen thread tension. Red light indicates machine is pushed once more, the needle moves and stops at " E " for 2 - 3 seconds shows that an incorrect operation was made. ∗ Continuous flashing indicates that machine malfunctions. FORWARD STITCH SWITCH Embroidering can be reversed one stitch at a time (The hoop moves.), after the embroidery data has been transferred. REVERSE STITCH BUTTON Embroidering can be reversed until the start . Flashing red light indicates a problem...
Instruction Manual
Page 82
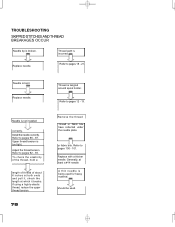
Needle is tangled around spool holder. To check the elasticity of the thread, hold a length of thread of about 6 inches at both ends and pull it breaks. or fabric bits. Install the needle correctly. Thread is bent. Remove the thread Thread or fabric bits have collected under the needle plate. Replace needle. Upper thread tension is incorrect. Refer to pages 18 - 21. If using a highly-elastic thread, reduce the upper thread tension. Replace with a thicker needle. Thread path is too tight. Refer to...
Needle is tangled around spool holder. To check the elasticity of the thread, hold a length of thread of about 6 inches at both ends and pull it breaks. or fabric bits. Install the needle correctly. Thread is bent. Remove the thread Thread or fabric bits have collected under the needle plate. Replace needle. Upper thread tension is incorrect. Refer to pages 18 - 21. If using a highly-elastic thread, reduce the upper thread tension. Replace with a thicker needle. Thread path is too tight. Refer to...
Instruction Manual
Page 86
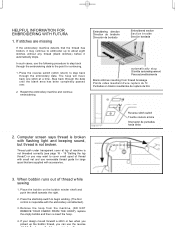
... THE HOOP), replace the empty bobbin and then re-insert the hoop. 4. Embroidering direction Direction de broderie Dirección de bordado Embroidered section Section brodée Sección bordada 1 3 5 7 2 4 68 automatically stop switch to cover small spool of thread with flashing light and beeping sound, but thread is inoperable with accessories. 3. Thread path under transparent cover at a time. When bobbin runs out of machine is broken with small net and use the reverse Reverse stitch...
... THE HOOP), replace the empty bobbin and then re-insert the hoop. 4. Embroidering direction Direction de broderie Dirección de bordado Embroidered section Section brodée Sección bordada 1 3 5 7 2 4 68 automatically stop switch to cover small spool of thread with flashing light and beeping sound, but thread is inoperable with accessories. 3. Thread path under transparent cover at a time. When bobbin runs out of machine is broken with small net and use the reverse Reverse stitch...

Instruction Manual
Page 96
...; de dessus Cara BOBBIN TENSION The bobbin tension has been correctly set at the factory, so you do not need to sew, you will need to remove the foot. Presser foot lifter 3. If, when you are sewing. The tension is largely determined by the balanced tension of fabric you start to adjust the tension control. ADJUSTING TOP THREAD TENSION STRAIGHT STITCHING The correct appearance of your stitching is well balanced when these two threads 'lock' in the highest position.
...; de dessus Cara BOBBIN TENSION The bobbin tension has been correctly set at the factory, so you do not need to sew, you will need to remove the foot. Presser foot lifter 3. If, when you are sewing. The tension is largely determined by the balanced tension of fabric you start to adjust the tension control. ADJUSTING TOP THREAD TENSION STRAIGHT STITCHING The correct appearance of your stitching is well balanced when these two threads 'lock' in the highest position.
Instruction Manual
Page 102
... stitches are not drawn back under presser foot before starting seam. - Replace needle (see page 96 - 97). * Machine is not threaded correctly. - Lower presser foot (see page 22 - 23). Needle breaks. * Fabric is not correct for thread and fabric. - THREAD PROBLEMS Thread bunches. * Top and bobbin threads are formed (see page 90 - 91). * Stitch length is not lowered - See page 16 - 17. * Lint accumulates in hook. - PERFORMANCE CHECKLIST GENERAL PROBLEMS Machine does not sew. * Power switch is not raised when sewing stitch patterns...
... stitches are not drawn back under presser foot before starting seam. - Replace needle (see page 96 - 97). * Machine is not threaded correctly. - Lower presser foot (see page 22 - 23). Needle breaks. * Fabric is not correct for thread and fabric. - THREAD PROBLEMS Thread bunches. * Top and bobbin threads are formed (see page 90 - 91). * Stitch length is not lowered - See page 16 - 17. * Lint accumulates in hook. - PERFORMANCE CHECKLIST GENERAL PROBLEMS Machine does not sew. * Power switch is not raised when sewing stitch patterns...
Instruction Manual
Page 108
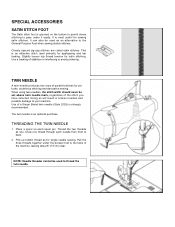
SPECIAL ACCESSORIES SATIN STITCH FOOT The Satin stitch foot is an optional purchase. Slightly loosen top thread tension for sewing satin stitches. THREADING THE TWIN NEEDLE 1. It is most useful for satin stitching. Use of parallel stitches for pin tucks, double top stitching and decorative sewing. Place a spool on the bottom to permit dense stitching to pass under the presser foot to thread the twin needle. TWIN NEEDLE A twin-needle produces two rows of a Singer Brand twin needle (Style 2025) is an attractive stitch used to the back of the stitch you...
SPECIAL ACCESSORIES SATIN STITCH FOOT The Satin stitch foot is an optional purchase. Slightly loosen top thread tension for sewing satin stitches. THREADING THE TWIN NEEDLE 1. It is most useful for satin stitching. Use of parallel stitches for pin tucks, double top stitching and decorative sewing. Place a spool on the bottom to permit dense stitching to pass under the presser foot to thread the twin needle. TWIN NEEDLE A twin-needle produces two rows of a Singer Brand twin needle (Style 2025) is an attractive stitch used to the back of the stitch you...


