Singer CE-150 Futura Support Question
Singer CE-150 Futura Support Question
Find answers below for this question about Singer CE-150 Futura.Need a Singer CE-150 Futura manual? We have 1 online manual for this item!
Current Answers
Related Singer CE-150 Futura Manual Pages
Instruction Manual - Page 1
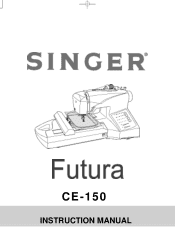
CE-150
INSTRUCTION MANUAL
Instruction Manual - Page 3
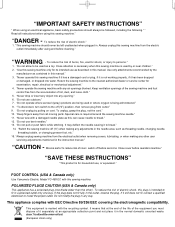
...service center for household use as described in the needle area, such as this sewing machine. To reduce the risk of electric shock, this manual." 3. Use only attachments... when this manual. Always unplug this sewing machine only for its intended use , or equivalent." "Never operate this sewing machine."
"Use this sewing machine from the accumulation of injury switch off...
Instruction Manual - Page 6

... switches 94 - 95 Needle, thread and fabric chart 96 - 97 Performance checklist 98 - 99 Cleaning hook area and feed dogs 100- 101 Oiling inside the face cover 102 - 103 Special accessories 104 - 105 Helpful messages 106 - 109
Sewing machine Dimensions: 428 mm × 307 mm × 294 mm Mass of software 72 - 75...
Instruction Manual - Page 10
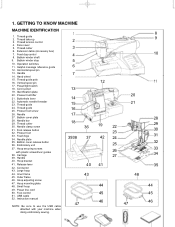
... Bobbin winder stop 10. Power/light switch 18. Needle 27. Hoop securing screws
with your machine when doing embroidery sewing.
1 2 3 4 5 6 7
13 14 15 16 17 18
3938
47
36 .... Bobbin cover plate 28. Foot release button 32. Hoop mounting plate 48. GETTING TO KNOW MACHINE
MACHINE IDENTIFICATION
1. Hand wheel 15. Presser foot lifter
21. Thread guide 25. Needle bar 29. ...
Instruction Manual - Page 12
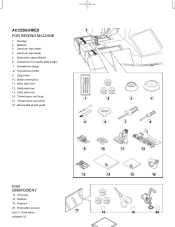
... (large) 8. Satin stitch foot 14. Scissors
20. Zipper foot 10. Embroidery presser foot 21. Spool pin cap (large) 5. Thread spool net (short) 16. ACCESSORIES FOR SEWING MACHINE
1. Needles 2. Thread spool net (long) 15. Button...
Instruction Manual - Page 14
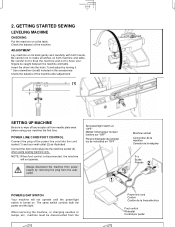
... using sewing machine only. The same switch controls both machine and table. 2. GETTING STARTED SEWING
LEVELING MACHINE
CHECKING
Put the machine on both the power and the light. Check the balance of the machine after adjustment.
(1)
SETTING UP MACHINE
Be sure to wipe off any surplus oil from the walloutlet.
Be careful not to have your machine the first time...
Instruction Manual - Page 30
...sewing slowly. The LED will sound. Some patterns offer more opportunities for straight stitch. NOTES: 1.
Starting at the Auto position, slide the control knob left or right to locate each manual adjustment point, the LED will blink 3 times...length and width/needle position controls
*Auto/Default settings Your sewing machine will sound indicating you can manually change the length, width...
Instruction Manual - Page 34
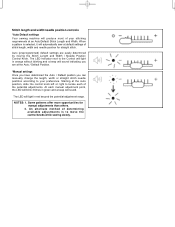
...fabric to the rear and cut off excess thread with your hands.
The guide line on the bottom of the machine, leaving about 6" (15cm) clear.
3
3. Start/stop position selector switch C. Presser foot lifter G. STRAIGHT
... straight, use one of the material, stop the sewing machine.
6. The numbers indicate distance from the needle at its highest position, then raise the presser foot.
Instruction Manual - Page 38
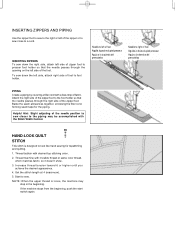
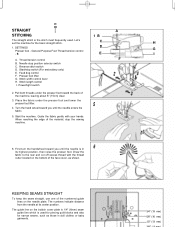
...the left side of the foot. Helpful Hint: Slight adjusting of the needle position to sew closer to the piping may stop in the beginning.
If the machine stops from the beginning, push the start switch again. Attach the right side of ...it doesn't show.
3.
Needle to left of fabric. NOTE: When the upper thread is designed to sew.
Thread machine with a bias strip of the zipper or to...
Instruction Manual - Page 62
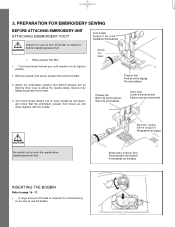
PREPARATION FOR EMBROIDERY SEWING
BEFORE ATTACHING EMBROIDERY UNIT
ATTACHING EMBROIDERY FOOT
Always be sure to machine before changing presser foot. Attach the embroidery presser foot behind presser bar so that the embroidery presser foot moves up and down together with the ...
Instruction Manual - Page 66
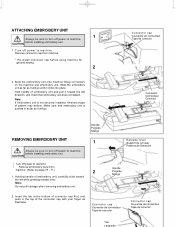
... Poignée Mango
1
2
Release lever Support de cerceau Palanca de liberación
Handle Poignée Mango
2. Turn off power to machine before using machine for general sewing.
2
3. Slide the embroidery unit as far as it will go until it clicks into place. Note: Do not pull carriage when removing embroidery unit.
Slide ...
Instruction Manual - Page 78
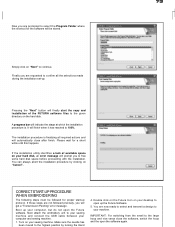
... all the selections made during the installation set-up. Please wait for proper start the copy and installation of the FUTURA software files to your sewing machine and connect the USB cable between your computer and sewing machine.
1. Next attach the embroidery unit to the given directory on the hard disk. Double click on the...
Instruction Manual - Page 80
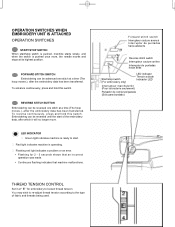
... slowly, and when the switch is pushed once more, the needle moves and stops at a time (The hoop moves.), after the embroidery data has been transferred.
LED INDICATOR Green light indicates machine is operating. Red light indicates machine is ready to loosen thread tension.
Flashing red light indicates a problem or an error. ∗...
Instruction Manual - Page 86
... under transparent cover at a time. Press the start/stop S'arrête automatiquement Para automáticamente
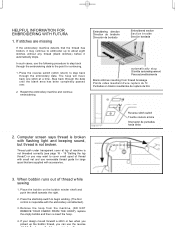
Blank stitches resulting from the machine, (DO NOT REMOVE YOUR FABRIC...following procedure to cover small spool of thread while sewing
1. If stitches are supplied with accessories.
3.
HELPFUL INFORMATION FOR EMBROIDERING WITH FUTURA
1. In such cases, use the reverse
Reverse ...
Instruction Manual - Page 88
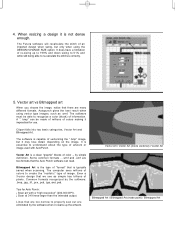
..."high resolution" (200-300 DPI). ¡ Scan at 3-6 times larger than the intended output.
The software must be made of ... a limitation of image. Bitmapped Art is essential to properly sew out are many different formats.
Clipart falls into two basic...lose detail, depending on the image.
Tips for use.
The Futura software will recalculate the stitch of "format" that the Auto ...
Instruction Manual - Page 94
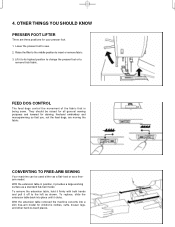
... positions for darning, freehand embroidery and monogramming so that is being sewn. Raise the lifter to the middle position to sew. 2. CONVERTING TO FREE-ARM SEWING
Your machine can be raised for all general sewing purposes and lowered for your presser foot. 1.
With the extension table in position, it off to the left as...
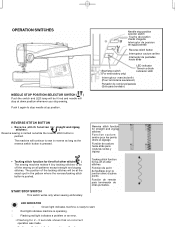
Instruction Manual - Page 98
...
Función de costura hacia atrás para costuras rectas y zigzag
∗ Tacking stitch function for tie-off of other stitches ( ) The sewing machine makes 4 tiny tacking stitches to sew in the pattern where the reverse/tacking stitch button is operating. Tacking stitch function for 2 - 3 seconds shows that an incorrect operation was made...
Instruction Manual - Page 104
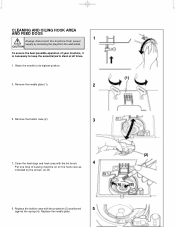
... to keep the essential parts clean at all times.
1. Replace the bobbin case with the lint brush.
4
Put one drop of your machine, it is necessary to its highest position.
3. Remove the bobbin case (2).
3
7. CAUTION
To ensure the best possible operation of sewing machine oil on the hook race as
indicated by removing the plug...
Instruction Manual - Page 106
... before it is used. Use of sewing machine oil to your machine.
For best results always use SINGER Brand Sewing
2
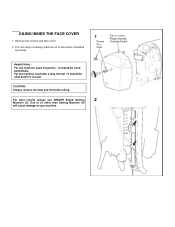
Machine Oil. OILING INSIDE THE FACE COVER
1. Remove two screws and face cover.
2. For the machine used frequently : It should be oiled periodically.
Put one drop of oil other than Sewing Machine Oil
will cause damage to the points...
Instruction Manual - Page 112
eign particle is lowered when starting embroidery sewing. → Raise needle by rotating hand wheel toward you. and on ...control plug is detected.
Don't touch the plug while sewing. edle thread breakage or incorrectly threaded condition is pushed in and pulled out while sewing patterns. Connect your PC to the sewing machine with small hoop attached. broidery unit is not connected. ...
Similar Questions

I Have A M3500 Singer Sewing Machine .got Tread Tangled In The Bobbin Area .just
(Posted by guitijoon 2 years ago)

Singer Futura Quartet Seqs 6700 Sewing Machine
how to set my singer futura quartet seqs 6700 sewing machine to sew. A distance more than one inch a...
how to set my singer futura quartet seqs 6700 sewing machine to sew. A distance more than one inch a...
(Posted by johour2194 3 years ago)

I Get E7 Error Message On My Singer Model 7258 Sewing Machine. There Is No Refe
Error message E7 is up on my Singer Stylist model 7258 sewing machine. It is not working at all. I t...
Error message E7 is up on my Singer Stylist model 7258 sewing machine. It is not working at all. I t...
(Posted by ebellamybellamy9 5 years ago)

Error Message!
MY machine is ending an error with ALL of the lights. It tells me something is wrong with my bobbin....
MY machine is ending an error with ALL of the lights. It tells me something is wrong with my bobbin....
(Posted by melbamusick 9 years ago)
Beeping From Singer Sewing Machine Stylist Ii 5625
My sewing machine will beep and stop sewing after three inches of sewing. I have taken it to be repa...
My sewing machine will beep and stop sewing after three inches of sewing. I have taken it to be repa...
(Posted by arusheria 9 years ago)