Singer CE-150 Futura Support Question
Singer CE-150 Futura Support Question
Find answers below for this question about Singer CE-150 Futura.Need a Singer CE-150 Futura manual? We have 1 online manual for this item!
Question posted by melbamusick on March 9th, 2015
Error Message!
MY machine is ending an error with ALL of the lights. It tells me something is wrong with my bobbin. Is there some little something I am overlooking? I have went through the steps listed NUMEROUS times. Help!
Current Answers
Answer #1: Posted by waelsaidani1 on March 9th, 2015 5:41 PM
waelsaidani1

Member since:
May 12th, 2013 Points: 19,501,797

Member since:
May 12th, 2013 Points: 19,501,797
All of the Error Messages signify that the upper tension path is not threaded correctly. Check that the transparent thread path located at the top of the machine is threaded correctly.
Hold thread in both hands and slip under transparent thread guide. While holding the thread securely, pull the thread towards you and then slip it back and forth like you were flossing. You should hear or feel two clicks as the thread slips past the thread guides.
Related Singer CE-150 Futura Manual Pages
Instruction Manual - Page 1
CE-150
INSTRUCTION MANUAL
Instruction Manual - Page 3
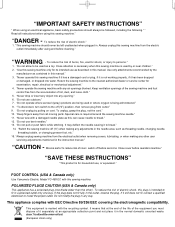
... as a toy. To reduce the risk of the sewing machine and foot control free from all instructions before cleaning." "This sewing machine should always be used or where oxygen is being used as threading needle, changing needle,
threading bobbin, or changing presser foot, etc." 15.
"Use this sewing machine only for its intended use , or equivalent." "Do...
Instruction Manual - Page 6

...100- 101 Oiling inside the face cover 102 - 103 Special accessories 104 - 105 Helpful messages 106 - 109
Sewing machine Dimensions: 428 mm × 307 mm × 294 mm Mass of patterns ...SEWI NG Before attaching embroidery unit 58 - 61 Attaching embroidery foot, Inserting the bobbin, Setting top thread, Picking up bobbin thread 22 - 23 Control panel function 24 - 27 Quick reference table of ...
Instruction Manual - Page 10
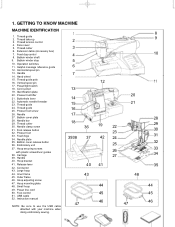
.... Needle plate 35. Hoop securing screws
with your machine when doing embroidery sewing.
1 2 3 4 5 6 7
13 14... button 32. Carriage 39. Thread take-up 3. Helpful message reference guide 12. Handle
14. Instruction manual
NOTE:...Bobbin cover release button 36. Bobbin cover plate 28. Power line cord 50. Bobbin winder shaft 9. Hoop adjusting screw 47. Power/light...
Instruction Manual - Page 12
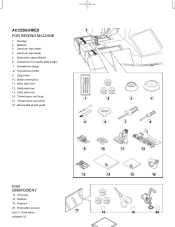
... cap (large) 5. Screwdriver (small) 9. Button sewing foot 11. Removable thread guide
1
2
3
4
5
6
7
8
FOR EMBROIDERY
17. Bobbins 19. Buttonhole foot 13. Embroidery presser foot 21. Blind stitch foot 12....16. Scissors
20. Thread spool net (long) 15. Vinyl bag 18. ACCESSORIES FOR SEWING MACHINE
1. Zipper foot 10. Screwdriver (large) 8. Spool pin cap (small) 4.
Instruction Manual - Page 14
... the accessories.
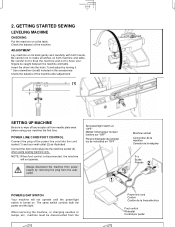
GETTING STARTED SEWING
LEVELING MACHINE
CHECKING
Put the machine on its back gently and carefully with both the power and the light. Check the balance of the power line cord into the hole (1) and adjust by removing the plug from needle plate area before using sewing machine only. When servicing the machine, or changing needles...
Instruction Manual - Page 30
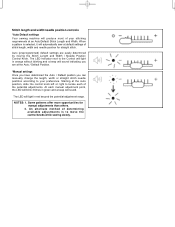
...Default Stitch Length and Width. NOTES: 1. The LED Indicator next to the Control will light in red beyond the potential adjustment range. At each of the potential adjustments. Some patterns ... adjustment point, the LED will blink 3 times in green and a beep will sound. Stitch length and width/needle position controls
*Auto/Default settings Your sewing machine will produce most of your preference.
Instruction Manual - Page 34
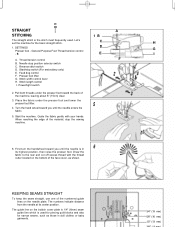
...Needle stop the sewing machine.
6. Stitch width control lever H. Start the machine. The numbers ...the material, stop position selector switch C. The guide line on the bobbin cover plate is 1/4" (6mm) seam guide line which is the stitch.../light switch
1B C D
E
A
F
2
H G I . STRAIGHT
STITCHING
The straight stitch is used . Let's set the machine for narrow seams, such as shown.
Instruction Manual - Page 38
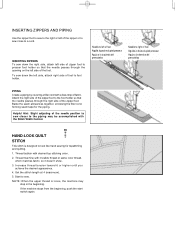
... until you achieve the desired appearance.
4. If the machine stops from the beginning, push the start switch again. Thread bobbin with invisible thread or same color thread, which matches ...fabric, so it doesn't show.
3.
Set the stitich length at 4 (maximum).
5. Helpful Hint: Slight adjusting of the needle position to sew...
Instruction Manual - Page 62
... de aguja
Embroidery presser foot Pied presseur de broderie Prensatelas de bordado
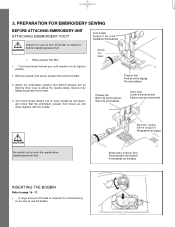
INSERTING THE BOBBIN
Refer to move needle up and down , and check that the drive lever is...de accionamiento
CAUTION
Be careful not to machine before changing presser foot. Secure it by tightening presser foot screw.
3. PREPARATION FOR EMBROIDERY SEWING
BEFORE ATTACHING EMBROIDERY UNIT
ATTACHING EMBROIDERY FOOT...
Instruction Manual - Page 66
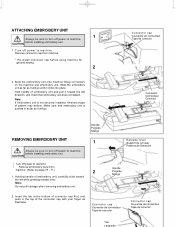
... not pull carriage when removing embroidery unit.
Slide the embroidery unit onto machine fitting connectors on the machine and embroidery unit. CAUTION
∗ Turn off power to machine. ∗ Remove embroidery hoop from machine.
* Re-install connector cap before using machine for general sewing.
2
3.
Handle Poignée Mango
1
2
Release lever Support de cerceau Palanca de liberaci...
Instruction Manual - Page 78
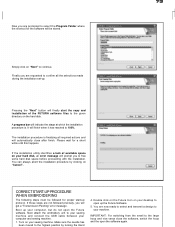
... for a short while until this happens. Next attach the embroidery unit to your sewing machine and connect the USB cable between your desktop to 100%.
It will prompt you are now ready to select and transmit a design to your hard disk, an error message will finish when it has reached to open the Futura software.
Instruction Manual - Page 80
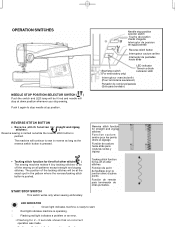
...one stitch at a time (The hoop moves.), after which it at its highest position. Flashing red light indicates a problem or an error. ∗ Flashing ... Continuous flashing indicates that machine malfunctions. To reverse continuously, press and hold this switch.
Red light indicates machine is operating.
Embroidering can be reversed one stitch at a time (The hoop moves.), after...
Instruction Manual - Page 86
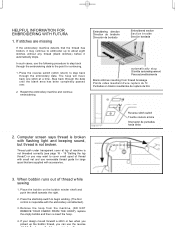
...Step back through the embroidery data. Restart the embroidery machine and continue embroidering. Thread path under transparent cover at a time... thread is broken with flashing light and beeping sound, but thread...sewing
1.
Place the bobbin on the bobbin winder shaft and push the shaft towards the right.
2.
HELPFUL INFORMATION FOR EMBROIDERING WITH FUTURA
1. When bobbin runs out of machine...
Instruction Manual - Page 98
... button is pushed.
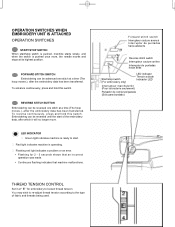
START/STOP SWITCH
This switch works only when sewing embroidery. The machine will continue to sew in the pattern where the reverse/tacking stitch button is pushed.
Flashing red light indicates a problem or an error.
∗ Flashing for tie-off the sewing on all patterns except straight and zigzag stitches. OPERATION SWITCHES
NEEDLE...
Instruction Manual - Page 100
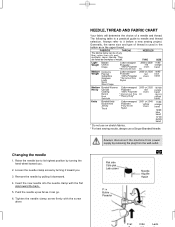
...4.
NEEDLES
TYPE
SIZE
Light- Bonded Wovens Heavy ...selection. They
are listed as it toward you .
3. Raise the needle bar to its highest position by pulling it before a new sewing project. Push ... from the wall-outlet. The following table is used in the bobbin as in the upper thread. Insert the new needle into the ...machine from power supply by turning it can be of weight.
Instruction Manual - Page 102
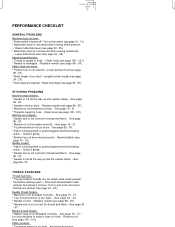
... formed (see page 96 - 97). * Needle size is not correct for thread and fabric. - Rewind bobbin (see page 90 - 91). * Stitch length is not raised when sewing stitch patterns. - See page 96 - 97. Needle thread breaks. * Machine is not all the way up into the needle clamp. - See page 96 - 97. Turn on...
Instruction Manual - Page 104
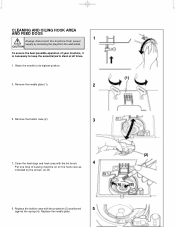
... keep the essential parts clean at all times.
1. Clean the feed dogs and hook area with the projection (3) positioned
5
against the spring (4). CLEANING AND OILING HOOK AREA AND FEED DOGS
1
Always disconnect the machine from the wall-outlet. CAUTION
To ensure the best possible operation of sewing machine oil on the hook race as...
Instruction Manual - Page 106
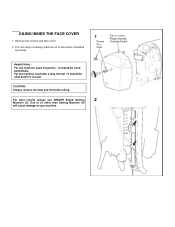
... is used frequently : It should be oiled before oiling. Remove two screws and face cover.
2. Put one drop of oil other than Sewing Machine Oil
will cause damage to the points indicated by arrows.
1
Screw Vis Guia
Face cover Plaque frontale Cubierta frontal
Helpful Hints :
For the machine used . OILING INSIDE THE FACE COVER
1.
Instruction Manual - Page 112
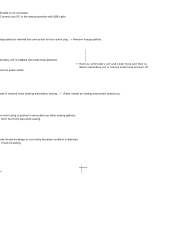
Connect your PC to the sewing machine with small hoop attached.
attach embroidery unit or remove small hoop and turn off
edle is inserted into cord ...power switch.
→ Remove embroidery unit and small hoop and then re- eign particle is lowered when starting embroidery sewing. → Raise needle by rotating hand wheel toward you. broidery unit is pushed in and pulled out while...
Similar Questions

I Have A M3500 Singer Sewing Machine .got Tread Tangled In The Bobbin Area .just
(Posted by guitijoon 2 years ago)

Singer Futura Quartet Seqs 6700 Sewing Machine
how to set my singer futura quartet seqs 6700 sewing machine to sew. A distance more than one inch a...
how to set my singer futura quartet seqs 6700 sewing machine to sew. A distance more than one inch a...
(Posted by johour2194 3 years ago)

I Get E7 Error Message On My Singer Model 7258 Sewing Machine. There Is No Refe
Error message E7 is up on my Singer Stylist model 7258 sewing machine. It is not working at all. I t...
Error message E7 is up on my Singer Stylist model 7258 sewing machine. It is not working at all. I t...
(Posted by ebellamybellamy9 5 years ago)

Beeping From Singer Sewing Machine Stylist Ii 5625
My sewing machine will beep and stop sewing after three inches of sewing. I have taken it to be repa...
My sewing machine will beep and stop sewing after three inches of sewing. I have taken it to be repa...
(Posted by arusheria 9 years ago)
