Singer CE-150 Futura Support Question
Singer CE-150 Futura Support Question
Find answers below for this question about Singer CE-150 Futura.Need a Singer CE-150 Futura manual? We have 1 online manual for this item!
Question posted by teresaconstant on January 3rd, 2014
Can I Do A Continuos Pattern With The Hoops Provided,
The person who posted this question about this Singer product did not include a detailed explanation. Please use the "Request More Information" button to the right if more details would help you to answer this question.
Current Answers
Related Singer CE-150 Futura Manual Pages
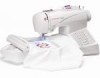
Instruction Manual - Page 3
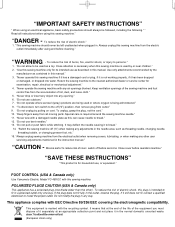
... drop or insert any way. "Do not operate where aerosol (spray) products are being administered." 8. To reduce the risk of electric shock:"
1. "Never operate the sewing machine with EEC Directive 89/336/EEC covering the electromagnetic compatibility. "CAUTION -
"IMPORTANT SAFETY INSTRUCTIONS"
" When using an electrical appliance, basic safety precautions should never be...
Instruction Manual - Page 6

...49 Continuous patterns 50 - 51 Sewing on a button 50 - 51 Buttonhole making 52 - 57 Using buttonhole foot, Procedure, Corded buttonholes
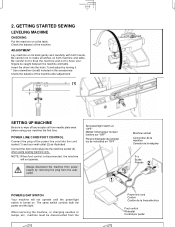
3. GETTING STARTED SEWING Leveling Machine 10- 1 1 Setting up machine 10 ...in embroidery hoop 64 - 65 Using the material and stabilizer 66 - 69 Preparing the machine before installing the hoop ------- 70 - 71 Attaching and removing embroidery hoop 70 -...
Instruction Manual - Page 10
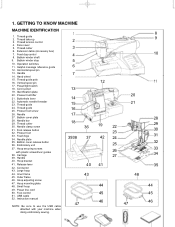
...Handle
14. Identification plate 20. Automatic needle threader 23. Needle plate 35. Hoop securing screws
with your machine when doing embroidery sewing.
1 2 3 4 5 6 7
13 14 15 16 17 18
3938.... Feed dog control 8. Helpful message reference guide 12. Vertical spool pin 17. Large hoop 44. Hoop adjusting screw 47. Foot control 51. USB cable 52. Thread cutter 6. Presser foot ...
Instruction Manual - Page 12
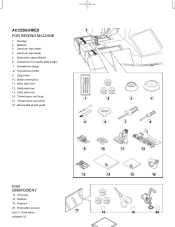
... foot 10. Scissors
20. Embroidery presser foot 21. Spool pin cap (large) 5. Screwdriver (large) 8. Bobbins 19. Button sewing foot 11. Thread spool net (short) 16. Vinyl bag 18. Buttonhole foot 13. ACCESSORIES FOR SEWING MACHINE
1. Screwdriver for needle plate (large) 7. Embroidery software CD
9
10
11
12
13
14
15
16
17
18
19...
Instruction Manual - Page 14
... balance of the power line cord into the cord socket (1) and your fingers be disconnected from needle plate area before using sewing machine only. POWER LINE CORD/FOOT CONTROL
Connect the plug of the machine. NOTE: When foot control is turned on both the power and the light. The same switch controls both...
Instruction Manual - Page 30
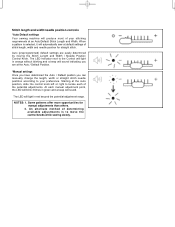
... will light in red beyond the potential adjustment range. Some patterns offer more opportunities for straight stitch. Auto (preprogrammed) default settings are at an Auto/Default Stitch Length and Width. Stitch length and width/needle position controls
*Auto/Default settings Your sewing machine will produce most of your stitching requirements at the Auto...
Instruction Manual - Page 34
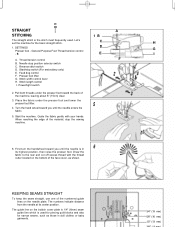
...needle at its highest position, then raise the presser foot. Start/stop the sewing machine.
6. Start the machine. Needle stop position selector switch C. Reverse stitch switch D. Feed dog control...
F
2
H G I . STRAIGHT
STITCHING
The straight stitch is used . Let's set the machine for narrow seams, such as shown. Thread tension control B. General Purpose Foot Thread tension control -...
Instruction Manual - Page 38
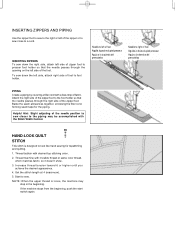
... with a bias strip of foot to the piping may stop in the beginning.
NOTE: When the upper thread is designed to sew.
Thread machine with desired top stitching color.
2. Start to look like hand sewing for the piping.
Increase thread tension toward 6 or higher until you achieve the desired appearance.
4. INSERTING ZIPPERS To...
Instruction Manual - Page 66
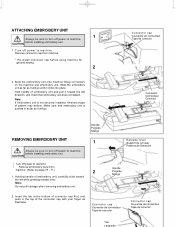
... unit.
CAUTION
∗ Turn off power to machine. ∗ Remove embroidery hoop from machine.
* Re-install connector cap before using machine for general sewing.
2
3. Remove connector cap from
machine. (Refer to pages 70 - 71.)
1. Slide the embroidery unit as far as illustrated. CAUTION
1. Holding handle of pattern may deform. Connector cap Couvercle de connecteur Tapa...
Instruction Manual - Page 70
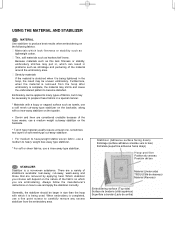
...surface adhésive orientée vers le bas) Entretela (superficie adhesiva hacia abajo)
Hoop position Position du cerceau Posición del aro
STABILIZER Stabilizer is being used. Always follow... Superficie a bordar (Lado de arriba)
Materials which it may shrink and cause the embroidered pattern to prepare these fabrics in a special manner.
* Materials with a loopy or napped surface...
Instruction Manual - Page 78
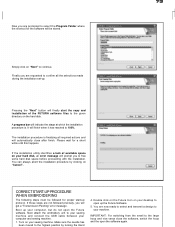
... your computer and sewing machine.
1. If the installation utility identifies a lack of the FUTURA software files to the given directory on "Cancel". Pressing the "Next" button will prompt you to free some hard disk space before proceeding with the installation.
Boot up the Futura Software.
5.
Turn on "Next" to the large hoop and vice versa...
Instruction Manual - Page 84
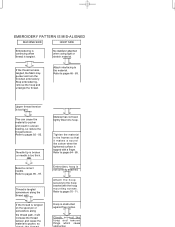
... the material to pages 92 - 93. Tighten the material in uneven feeding, so reduce the thread tension. Attach the hoop securely to the hoop bracket with a finger. EMBROIDERY PATTERN IS MIS-ALIGNED
MACHINE SIDE
HOOP SIDE
Embroidering is continuing when thread is too thick. Attach interfacing to pages 66 - 69. Refer to the material. Upper...
Instruction Manual - Page 86
... (stitch return) to cover small spool of thread while sewing
1. Press the start/stop S'arrête automatiquement Para automáticamente
Blank stitches resulting from the machine, (DO NOT REMOVE YOUR FABRIC FROM THE HOOP), replace the empty bobbin and then re-insert the hoop.
4. If stitches are supplied with small net and...
Instruction Manual - Page 94
....
CONVERTING TO FREE-ARM SEWING
Your machine can be raised for all general sewing purposes and lowered for children...machine converts into place until it off to
remove thick fabric. Lower the presser foot to insert or remove fabric. 3. To remove the extension table, hold it firmly with both hands and pull it clicks. Raise the lifter to the middle position to sew. 2. Lift it provides...
Instruction Manual - Page 98
...rectas y zigzag
∗ Tacking stitch function for tie-off of other stitches ( ) The sewing machine makes 4 tiny tacking stitches to stop needle at down position whenever you stop switch (For... made. LED INDICATOR Green light indicates machine is ready to sew in the pattern where the reverse/tacking stitch button is operating. Red light indicates machine is pushed. Push it again to tie...
Instruction Manual - Page 102
... - Guide it gently. * Bobbin has not been wound evenly. - Remove lint (see page 24 - 27). * Feed dogs are irregular. * Needle size is not raised when sewing stitch patterns. - Machine jams/knocks. * Thread is not correct for thread and fabric -
See page 96 - 97. * Needle is not lowered when...
Instruction Manual - Page 104
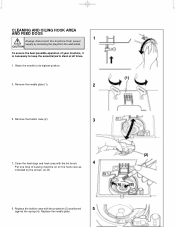
... position.
3. Raise the needle to keep the essential parts clean at all times.
1. Replace the needle plate. CAUTION
To ensure the best possible operation of sewing machine oil on the hook race as
indicated by removing the plug from power supply by the arrows. (A, B)
(2) (A) (B)
5. Remove the needle plate (1).
(1)
2
5. CLEANING AND OILING HOOK...
Instruction Manual - Page 106
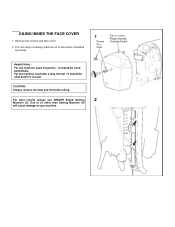
... and lint before it is used frequently : It should be oiled periodically. Remove two screws and face cover.
2. Use of sewing machine oil to your machine. Put one drop of oil other than Sewing Machine Oil
will cause damage to the points indicated by arrows.
1
Screw Vis Guia
Face cover Plaque frontale Cubierta frontal
Helpful...
Instruction Manual - Page 112
... condition is not connected. B cable is detected. Connect your PC to the sewing machine with small hoop attached. Check threading.
eign particle is installed with USB cable. broidery unit is... control plug is lowered when starting embroidery sewing. → Raise needle by rotating hand wheel toward you.
attach embroidery unit or remove small hoop and turn off
edle is pushed in ...
Instruction Manual - Page 115
... moved to right (operating position) during sewing.
4 Check bobbin winder and move it to left.
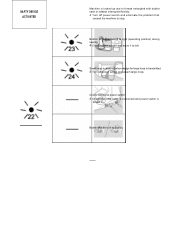
SAFTY DEVICE ACTIVATED
Machine is locked up due to thread entangled with bobbin case or rotation interrupted forcibly.
4 Turn off power switch and attach large hoop.
Small hoop is attached when design for large hoop is transmitted.
4 Turn off power...
Similar Questions

Singer Futura Quartet Seqs 6700 Sewing Machine
how to set my singer futura quartet seqs 6700 sewing machine to sew. A distance more than one inch a...
how to set my singer futura quartet seqs 6700 sewing machine to sew. A distance more than one inch a...
(Posted by johour2194 3 years ago)

I Get E7 Error Message On My Singer Model 7258 Sewing Machine. There Is No Refe
Error message E7 is up on my Singer Stylist model 7258 sewing machine. It is not working at all. I t...
Error message E7 is up on my Singer Stylist model 7258 sewing machine. It is not working at all. I t...
(Posted by ebellamybellamy9 5 years ago)

Error Message!
MY machine is ending an error with ALL of the lights. It tells me something is wrong with my bobbin....
MY machine is ending an error with ALL of the lights. It tells me something is wrong with my bobbin....
(Posted by melbamusick 9 years ago)
Beeping From Singer Sewing Machine Stylist Ii 5625
My sewing machine will beep and stop sewing after three inches of sewing. I have taken it to be repa...
My sewing machine will beep and stop sewing after three inches of sewing. I have taken it to be repa...
(Posted by arusheria 9 years ago)
