XV-Z15000 Operation Manual
Page 3
... using the projector, please read this product may cause radio interference in which case the user may be required to the presence of important operating and maintenance (servicing) instructions in reporting the loss or theft of your Projector, please record the Serial Number located on page 8. Introduction IMPORTANT • For your assistance in the literature accompanying the product. Model No.: XV-Z15000 Serial No.: WARNING: High...
... using the projector, please read this product may cause radio interference in which case the user may be required to the presence of important operating and maintenance (servicing) instructions in reporting the loss or theft of your Projector, please record the Serial Number located on page 8. Introduction IMPORTANT • For your assistance in the literature accompanying the product. Model No.: XV-Z15000 Serial No.: WARNING: High...
XV-Z15000 Operation Manual
Page 4
... Concerning Lamp Replacement See "Replacing the Lamp" on , the user is connected. • Consult the dealer or an experienced radio/TV technician for help. ONLY WARNING: FCC Regulations state that interference will not affect the picture quality or the life expectancy of these materials may cause harmful interference to operate this equipment not ex- This will not occur in a residential installation. This...
... Concerning Lamp Replacement See "Replacing the Lamp" on , the user is connected. • Consult the dealer or an experienced radio/TV technician for help. ONLY WARNING: FCC Regulations state that interference will not affect the picture quality or the life expectancy of these materials may cause harmful interference to operate this equipment not ex- This will not occur in a residential installation. This...
XV-Z15000 Operation Manual
Page 5
... Lamp 50 Lamp 50 Caution Concerning the Lamp 50 Replacing the Lamp 50 Removing and Installing the Lamp Unit 51 Resetting the Lamp Timer 52 Setup Setting Up the Projector 15 Setting Up the Projector 15 Standard Setup (Front Projection 15 Projection (PRJ) Mode 16 Ceiling-mount Setup 16 Screen Size and Projection Distance 17 Connections Samples of Cables for Connection 18 Connecting to Video Equipment 19 Connecting to a Computer 20 Controlling the Projector by a Computer ....21 Selecting the Film Mode 39 Setting Detail Enhancement 39 Reducing Image...
... Lamp 50 Lamp 50 Caution Concerning the Lamp 50 Replacing the Lamp 50 Removing and Installing the Lamp Unit 51 Resetting the Lamp Timer 52 Setup Setting Up the Projector 15 Setting Up the Projector 15 Standard Setup (Front Projection 15 Projection (PRJ) Mode 16 Ceiling-mount Setup 16 Screen Size and Projection Distance 17 Connections Samples of Cables for Connection 18 Connecting to Video Equipment 19 Connecting to a Computer 20 Controlling the Projector by a Computer ....21 Selecting the Film Mode 39 Setting Detail Enhancement 39 Reducing Image...

XV-Z15000 Operation Manual
Page 8
... using the projector in high-altitude areas such as mountains (at altitudes of the projector is not a malfunction. Observe the following safeguards when setting up the screen in and turn on the projector. Caution concerning the setup of the lens. tain it is regularly cleaned, use the projector in direct sunlight or room light. See "Regarding the Lamp" on the screen washes out the colors, making viewing dif...
... using the projector in high-altitude areas such as mountains (at altitudes of the projector is not a malfunction. Observe the following safeguards when setting up the screen in and turn on the projector. Caution concerning the setup of the lens. tain it is regularly cleaned, use the projector in direct sunlight or room light. See "Regarding the Lamp" on the screen washes out the colors, making viewing dif...

XV-Z15000 Operation Manual
Page 9
...; Some IC chips in . This does not indicate malfunction. ■ If the temperature inside the projector increases, due to blockage of the air vents, or the setting location, the temperature warning indicator will enter standby mode. If this state continues, the lamp will turn off the equipment to be connected. ■ Please read the operation manuals of the projector and the equipment to be connected for instructions on pages 48...
...; Some IC chips in . This does not indicate malfunction. ■ If the temperature inside the projector increases, due to blockage of the air vents, or the setting location, the temperature warning indicator will enter standby mode. If this state continues, the lamp will turn off the equipment to be connected. ■ Please read the operation manuals of the projector and the equipment to be connected for instructions on pages 48...
XV-Z15000 Operation Manual
Page 11
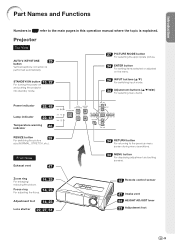
... switching input mode. 34 Adjustment buttons (P/R/O/Q) For selecting menu items. Power indicator 22, 48 Lamp indicator 22, 48 Temperature warning 48 indicator RESIZE button 29 For switching the picture size (NORMAL, STRETCH, etc.). Adjustment foot 14, 23 Lens shutter 22, 27, 51 34 RETURN button For returning to the main pages in refer to the previous menu screen during menu operations. 34 MENU button For displaying adjustment and setting screens. 12 Remote control sensor 47 Intake vent 23 HEIGHT ADJUST lever 23 Adjustment foot -9 Projector...
... switching input mode. 34 Adjustment buttons (P/R/O/Q) For selecting menu items. Power indicator 22, 48 Lamp indicator 22, 48 Temperature warning 48 indicator RESIZE button 29 For switching the picture size (NORMAL, STRETCH, etc.). Adjustment foot 14, 23 Lens shutter 22, 27, 51 34 RETURN button For returning to the main pages in refer to the previous menu screen during menu operations. 34 MENU button For displaying adjustment and setting screens. 12 Remote control sensor 47 Intake vent 23 HEIGHT ADJUST lever 23 Adjustment foot -9 Projector...

XV-Z15000 Operation Manual
Page 15
... projector facing a screen 5 INPUT button Page 15 2. Quick Start Quick Start This section provides an example showing how to connect the projector to image projection. Connect the projector to the video equipment and plug the power cord into the AC socket of the steps from connection through to video equipment that has an HDMI output terminal with a brief explanation of the projector Pages 18-22 3. On the remote control 2 1 ON button -13 Open...
... projector facing a screen 5 INPUT button Page 15 2. Quick Start Quick Start This section provides an example showing how to connect the projector to image projection. Connect the projector to the video equipment and plug the power cord into the AC socket of the steps from connection through to video equipment that has an HDMI output terminal with a brief explanation of the projector Pages 18-22 3. On the remote control 2 1 ON button -13 Open...

XV-Z15000 Operation Manual
Page 18
... screen) Menu item ➞ "Ceiling + Front" ■ Ceiling mounted, rear projection (with a translucent screen) Menu item ➞ "Rear" Menu item ➞ "Ceiling + Rear" Ceiling-mount Setup ■ It is recommended that you use the optional Sharp ceiling-mount adaptor and unit for the projection setting in use. (You can use any of the Projection Image Size and Projection Distance For details, refer to obtain the recommended ceiling-mount adaptor and unit (sold separately). Setting Up the Projector (Continued) Projection (PRJ) Mode The projector...
... screen) Menu item ➞ "Ceiling + Front" ■ Ceiling mounted, rear projection (with a translucent screen) Menu item ➞ "Rear" Menu item ➞ "Ceiling + Rear" Ceiling-mount Setup ■ It is recommended that you use the optional Sharp ceiling-mount adaptor and unit for the projection setting in use. (You can use any of the Projection Image Size and Projection Distance For details, refer to obtain the recommended ceiling-mount adaptor and unit (sold separately). Setting Up the Projector (Continued) Projection (PRJ) Mode The projector...

XV-Z15000 Operation Manual
Page 24
... lamp should be replaced. • When switching on the projector, a slight flickering of the projector. • The power indicator illuminates red, and the projector enters standby mode. Power indicator STANDBY/ON button Lamp indicator Lens shutter STANDBY button ON button On-screen display Info • Direct Power Off function: You can unplug the power cord from the AC outlet even if the cooling fan is warming up. Blinking in green: The lamp is still running. Turning the Power Off (Putting the Projector...
... lamp should be replaced. • When switching on the projector, a slight flickering of the projector. • The power indicator illuminates red, and the projector enters standby mode. Power indicator STANDBY/ON button Lamp indicator Lens shutter STANDBY button ON button On-screen display Info • Direct Power Off function: You can unplug the power cord from the AC outlet even if the cooling fan is warming up. Blinking in green: The lamp is still running. Turning the Power Off (Putting the Projector...

XV-Z15000 Operation Manual
Page 41
... signals are pro- Useful Features -39 Off Films are detected automatically. Menu operation ⇒ Page 34 wMosquito Noise Reduction (MNR) The so-called Mosquito Noise (flickering) can be set when the input signal is blurry. • When the contours and colors of depth. \ button Provides less detail enhancement. | button Provides more detail enhancement. qReducing Image Noise (DNR) Video digital noise reduction (DNR) provides high quality images...
... signals are pro- Useful Features -39 Off Films are detected automatically. Menu operation ⇒ Page 34 wMosquito Noise Reduction (MNR) The so-called Mosquito Noise (flickering) can be set when the input signal is blurry. • When the contours and colors of depth. \ button Provides less detail enhancement. | button Provides more detail enhancement. qReducing Image Noise (DNR) Video digital noise reduction (DNR) provides high quality images...
XV-Z15000 Operation Manual
Page 42
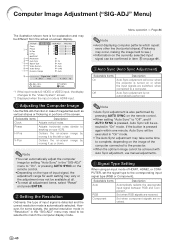
..., set the signal type to "Off", and if AUTO SYNC is also performed by moving it up or down. V-Pos Centers the on your VCR). RETURN ENTER END *1 If the input mode is HDMI input. 1Adjusting the Computer Image Use the SIG-ADJ function in case of the screen. Phase Adjusts horizontal noise (similar to the "Video System" screen. *2 Displayed when the input mode is S-VIDEO or VIDEO input, the display changes...
..., set the signal type to "Off", and if AUTO SYNC is also performed by moving it up or down. V-Pos Centers the on your VCR). RETURN ENTER END *1 If the input mode is HDMI input. 1Adjusting the Computer Image Use the SIG-ADJ function in case of the screen. Phase Adjusts horizontal noise (similar to the "Video System" screen. *2 Displayed when the input mode is S-VIDEO or VIDEO input, the display changes...

XV-Z15000 Operation Manual
Page 47
... the CEC setting on connected HDMI-compliant Sharp Video Products. Menu operation ⇒ Page 34 3Setting One Touch Play, System Standby and Input Name When a Sharp product equipped with HDMI CEC ("One Touch Play" and "System Standby"). Picture SIG-ADJ Auto Power Off Economy Mode One Touch Play System Standby Input Name Demo Mode RS-232C Fan Mode All Reset SCR-ADJ On Off Off Off PRJ-ADJ Off 9600bps Normal Lamp Timer (Life) SEL...
... the CEC setting on connected HDMI-compliant Sharp Video Products. Menu operation ⇒ Page 34 3Setting One Touch Play, System Standby and Input Name When a Sharp product equipped with HDMI CEC ("One Touch Play" and "System Standby"). Picture SIG-ADJ Auto Power Off Economy Mode One Touch Play System Standby Input Name Demo Mode RS-232C Fan Mode All Reset SCR-ADJ On Off Off Off PRJ-ADJ Off 9600bps Normal Lamp Timer (Life) SEL...

XV-Z15000 Operation Manual
Page 48
... connecting the projector to a Sharp Video Product with an HDMI cable using the projector at altitudes of approximately 4,900 feet (1,500 meters) or more. • When "Fan Mode" is set to "On" Operated exclusively with HDMI CEC ("One Touch Play" or "System Standby") works normally, the name of the connected Sharp Video Product is automatically captured. • When the input terminal name has been changed by a user, the changed when the remaining lamp life...
... connecting the projector to a Sharp Video Product with an HDMI cable using the projector at altitudes of approximately 4,900 feet (1,500 meters) or more. • When "Fan Mode" is set to "On" Operated exclusively with HDMI CEC ("One Touch Play" or "System Standby") works normally, the name of the connected Sharp Video Product is automatically captured. • When the input terminal name has been changed by a user, the changed when the remaining lamp life...

XV-Z15000 Operation Manual
Page 50
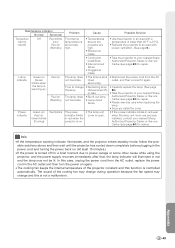
... the setting location, the temperature warning indicator will enter standby mode. The lamp is warming up. And if the temperature keeps on rising, " " will not turn on. When you try to turn on the projector a fourth time without replacing the lamp, the projector will illuminate in red. ■ If you find the temperature warning indicator blinking, be sure to be displayed on the screen. Maintenance Indicators ■ The warning lights (power indicator, lamp indicator and temperature warning indicator) on the projector indicate problems inside the projector increases...
... the setting location, the temperature warning indicator will enter standby mode. The lamp is warming up. And if the temperature keeps on rising, " " will not turn on. When you try to turn on the projector a fourth time without replacing the lamp, the projector will illuminate in red. ■ If you find the temperature warning indicator blinking, be sure to be displayed on the screen. Maintenance Indicators ■ The warning lights (power indicator, lamp indicator and temperature warning indicator) on the projector indicate problems inside the projector increases...
XV-Z15000 Operation Manual
Page 51
... the power supply recovers immediately after that, the lamp indicator will illuminate in red and the lamp may change and this case, unplug the power cord from the AC outlet, and then connect it again. • Carefully replace the lamp. (See page 50.) • Take the projector to your nearest Sharp Authorized Projector Dealer or Service Center (see page 60) for a brief moment due to change during operation...
... the power supply recovers immediately after that, the lamp indicator will illuminate in red and the lamp may change and this case, unplug the power cord from the AC outlet, and then connect it again. • Carefully replace the lamp. (See page 50.) • Take the projector to your nearest Sharp Authorized Projector Dealer or Service Center (see page 60) for a brief moment due to change during operation...

XV-Z15000 Operation Manual
Page 52
... replaced when the remaining lamp life becomes 5% or less, or when you contact your projector to the nearest Sharp Authorized Projector Dealer or Service Center for repair. -50 The lamp life (percentage) can often result in the bulb cracking. ■ When the lamp replacement indicator and on -screen display. (See page 46.) ■ Purchase a replacement lamp of the nearest Sharp Authorized Projector Dealer or Service Center, please call toll-free: 1-888-GO-SHARP...
... replaced when the remaining lamp life becomes 5% or less, or when you contact your projector to the nearest Sharp Authorized Projector Dealer or Service Center for repair. -50 The lamp life (percentage) can often result in the bulb cracking. ■ When the lamp replacement indicator and on -screen display. (See page 46.) ■ Purchase a replacement lamp of the nearest Sharp Authorized Projector Dealer or Service Center, please call toll-free: 1-888-GO-SHARP...

XV-Z15000 Operation Manual
Page 54
... use the same lamp, this time, keep all four buttons pressed down until the lamp indicator starts blinking green. • "LAMP 0000 H" is displayed, indicating that the lamp timer is connected to the projector. Then tighten the user service screw (3) to reset the lamp timer only when replacing the lamp. Info • Make sure to secure the lamp unit cover. Securing screws 1 2 Resetting the Lamp Timer Reset the lamp timer after replacing the lamp. Hold the lamp unit and pull it in the direction of the projector. 2 Reset the lamp timer...
... use the same lamp, this time, keep all four buttons pressed down until the lamp indicator starts blinking green. • "LAMP 0000 H" is displayed, indicating that the lamp timer is connected to the projector. Then tighten the user service screw (3) to reset the lamp timer only when replacing the lamp. Info • Make sure to secure the lamp unit cover. Securing screws 1 2 Resetting the Lamp Timer Reset the lamp timer after replacing the lamp. Hold the lamp unit and pull it in the direction of the projector. 2 Reset the lamp timer...
XV-Z15000 Operation Manual
Page 56
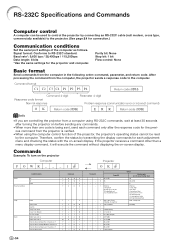
... Projector Name Check P J N 0 _ _ _ 1 Projector Name Return Standby mode (or 30-second startup time) OK OK or ERR 0 0:Normal 1:Temp High 2:Fan Error 4:Lamp Cover Open 8:Lamp Life 5% or less 16:Lamp Burnt-out 32:Lamp Ignition Failure 64:Temp Abnormally High 0:Off, 4:Lamp Error 0:Standby -54 If the projector receives a command other than one code is being sent, send each command only after turning the projector on -screen display. Commands Example: To turn on -screen display. After processing the command from the computer, the projector sends a response code...
... Projector Name Check P J N 0 _ _ _ 1 Projector Name Return Standby mode (or 30-second startup time) OK OK or ERR 0 0:Normal 1:Temp High 2:Fan Error 4:Lamp Cover Open 8:Lamp Life 5% or less 16:Lamp Burnt-out 32:Lamp Ignition Failure 64:Temp Abnormally High 0:Off, 4:Lamp Error 0:Standby -54 If the projector receives a command other than one code is being sent, send each command only after turning the projector on -screen display. Commands Example: To turn on -screen display. After processing the command from the computer, the projector sends a response code...

XV-Z15000 Operation Manual
Page 60
..., remove the power cord from a cold room into the wall outlet. • Power to the external connected devices is off. • The lens shutter is closed. • The selected input mode is wrong. • Cables are incorrectly connected to the projector. • Remote control battery has run out. • External output has not been set when connecting notebook computer. • The lamp unit cover is not installed correctly...
..., remove the power cord from a cold room into the wall outlet. • Power to the external connected devices is off. • The lens shutter is closed. • The selected input mode is wrong. • Cables are incorrectly connected to the projector. • Remote control battery has run out. • External output has not been set when connecting notebook computer. • The lamp unit cover is not installed correctly...

XV-Z15000 Operation Manual
Page 61
... - Check • When temperature inside the projector increases, the cooling fan runs faster. • The lamp indicator is not set to a close, replace the lamp. are inserted correctly or insert new ones. While the remaining lamp life draws to "On". A response code cannot be adversely affected by strong light. • The batteries may not work when the projector is connected to non-Sharp Video Products. • An HDMI cable is not used...
... - Check • When temperature inside the projector increases, the cooling fan runs faster. • The lamp indicator is not set to a close, replace the lamp. are inserted correctly or insert new ones. While the remaining lamp life draws to "On". A response code cannot be adversely affected by strong light. • The batteries may not work when the projector is connected to non-Sharp Video Products. • An HDMI cable is not used...


