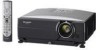
XG-C435X | XG-C465X Operation Manual
Page 6
... Use the Storage Case 20 Connections Samples of Cables for Connection 21 Connecting to a Computer 23 Connecting to Video Equipment 25 Controlling the Projector by a Computer ... 27 Connecting to a Monitor with RGB Input Terminal 28 Connecting to an Amplifier or Other Audio Equipment 29 Using .../Off 30 Connecting the Power Cord 30 Turning the Projector On 30 Turning the Power Off (Putting the Projector into Standby Mode 30 Image Projection 31 Using the Adjustment Feet 31 Correcting Trapezoidal Distortion 32 Adjusting the Lens 33 Switching the INPUT Mode 34 Adjusting the Volume 35...
... Use the Storage Case 20 Connections Samples of Cables for Connection 21 Connecting to a Computer 23 Connecting to Video Equipment 25 Controlling the Projector by a Computer ... 27 Connecting to a Monitor with RGB Input Terminal 28 Connecting to an Amplifier or Other Audio Equipment 29 Using .../Off 30 Connecting the Power Cord 30 Turning the Projector On 30 Turning the Power Off (Putting the Projector into Standby Mode 30 Image Projection 31 Using the Adjustment Feet 31 Correcting Trapezoidal Distortion 32 Adjusting the Lens 33 Switching the INPUT Mode 34 Adjusting the Volume 35...
XG-C435X | XG-C465X Operation Manual
Page 7
... the Lamp 60 Removing and Installing the Lamp Unit 61 Resetting the Lamp Timer 62 Computer Compatibility Chart 63 Troubleshooting 64 For SHARP Assistance 66 Specifications 67 Index 68 SETUP MANUAL Refer to the "SETUP MANUAL" contained on the supplied CDROM for details. Setting... Screen 2 Screen Size and Projection Distance 3 Changing the Lens 9 Connecting Pin Assignments 11 RS-232C Specifications and Commands ... 13 Setting up the Projector Network Environment 18 Controlling the Projector via LAN 24 Setting up the Projector Using RS-232C or Telnet 29 Resetting the Lamp Timer of...
... the Lamp 60 Removing and Installing the Lamp Unit 61 Resetting the Lamp Timer 62 Computer Compatibility Chart 63 Troubleshooting 64 For SHARP Assistance 66 Specifications 67 Index 68 SETUP MANUAL Refer to the "SETUP MANUAL" contained on the supplied CDROM for details. Setting... Screen 2 Screen Size and Projection Distance 3 Changing the Lens 9 Connecting Pin Assignments 11 RS-232C Specifications and Commands ... 13 Setting up the Projector Network Environment 18 Controlling the Projector via LAN 24 Setting up the Projector Using RS-232C or Telnet 29 Resetting the Lamp Timer of...
XG-C435X | XG-C465X Operation Manual
Page 10
...9632; Ensure that you use in these environments, the vents and lens must be performed by the projector falling down. jector Dealer or Service Cen- Do not set "Fan Mode" to rest your nearest Sharp Authorized Pro- Close the curtains and dim the lights when setting ... subjected to these environments will automatically put the projector into standby mode to avoid personal injury caused by a Sharp Authorized Projector Dealer or Service Center. Internal cleaning should be installed in high-altitude areas with the lens so as not to +60°C). Avoid locations with extremes ...
...9632; Ensure that you use in these environments, the vents and lens must be performed by the projector falling down. jector Dealer or Service Cen- Do not set "Fan Mode" to rest your nearest Sharp Authorized Pro- Close the curtains and dim the lights when setting ... subjected to these environments will automatically put the projector into standby mode to avoid personal injury caused by a Sharp Authorized Projector Dealer or Service Center. Internal cleaning should be installed in high-altitude areas with the lens so as not to +60°C). Avoid locations with extremes ...
XG-C435X | XG-C465X Operation Manual
Page 11
... The sound of the fan may change color or become deformed. Take extra care with the lens. visual equipment to the projector, make the connections AFTER unplugging the power cord of the projector from the wall outlet, and disconnect any other cables connected to it to run for a...indicate malfunction. • Even if you are using the projector, take care not to use the projector for a while. ject it . ■ Do not carry the projector by holding the lens. ■ When storing the projector, ensure you place the projector into the storage case, make the connections. The storage ...
... The sound of the fan may change color or become deformed. Take extra care with the lens. visual equipment to the projector, make the connections AFTER unplugging the power cord of the projector from the wall outlet, and disconnect any other cables connected to it to run for a...indicate malfunction. • Even if you are using the projector, take care not to use the projector for a while. ject it . ■ Do not carry the projector by holding the lens. ■ When storing the projector, ensure you place the projector into the storage case, make the connections. The storage ...
XG-C435X | XG-C465X Operation Manual
Page 12
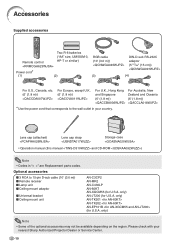
... country. Optional accessories ■ 3 RCA to the wall outlet in "< >" are Replacement parts codes. Lens cap (attached) Lens cap strap Storage case • Operation manual (this manual and CD-ROM ) Note • Codes in your nearest Sharp Authorized Projector Dealer or Service Center. -10 Accessories Supplied accessories Remote control Two R-6 batteries ("AA" size, UM...
... country. Optional accessories ■ 3 RCA to the wall outlet in "< >" are Replacement parts codes. Lens cap (attached) Lens cap strap Storage case • Operation manual (this manual and CD-ROM ) Note • Codes in your nearest Sharp Authorized Projector Dealer or Service Center. -10 Accessories Supplied accessories Remote control Two R-6 batteries ("AA" size, UM...
XG-C435X | XG-C465X Operation Manual
Page 13
... the SETUP MANUAL on all the lenses. (Refer to the projector. Please see your nearest Sharp Authorized Projector Dealer for details on the supplied CD-ROM for specialized application. Introduction Optional lenses ■ Lens Wide-zoom lens (× 1.5 - 1.9) Tele-zoom lens (× 2.2 - 2.8) Tele-zoom lens (× 3.3 - 5.1) Tele-zoom lens (× 5.2 - 7.2) AN-C12MZ AN-C18MZ AN-C27MZ AN-C41MZ...
... the SETUP MANUAL on all the lenses. (Refer to the projector. Please see your nearest Sharp Authorized Projector Dealer for details on the supplied CD-ROM for specialized application. Introduction Optional lenses ■ Lens Wide-zoom lens (× 1.5 - 1.9) Tele-zoom lens (× 2.2 - 2.8) Tele-zoom lens (× 3.3 - 5.1) Tele-zoom lens (× 5.2 - 7.2) AN-C12MZ AN-C18MZ AN-C27MZ AN-C41MZ...
XG-C435X | XG-C465X Operation Manual
Page 14
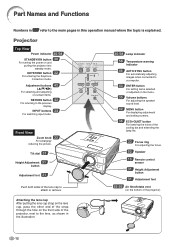
...Adjustment 31 button Adjustment foot 31 Push both sides of the strap through the hole on and putting the projector into standby mode. KEYSTONE button 32 For entering the Keystone Correction mode. Projector Top View Power indicator 30·58 STANDBY/ON button 30 For turning the power on the front ... button 31 Adjustment foot 55·56 Air filter/Intake vent (on the bottom of the projector) Attaching the lens cap After putting the lens cap strap on the lens cap, pass the other end of the lens cap to attach or remove. 30·58 Lamp indicator 58 Temperature warning indicator 46 AUTO...
...Adjustment 31 button Adjustment foot 31 Push both sides of the strap through the hole on and putting the projector into standby mode. KEYSTONE button 32 For entering the Keystone Correction mode. Projector Top View Power indicator 30·58 STANDBY/ON button 30 For turning the power on the front ... button 31 Adjustment foot 55·56 Air filter/Intake vent (on the bottom of the projector) Attaching the lens cap After putting the lens cap strap on the lens cap, pass the other end of the lens cap to attach or remove. 30·58 Lamp indicator 58 Temperature warning indicator 46 AUTO...
XG-C435X | XG-C465X Operation Manual
Page 15
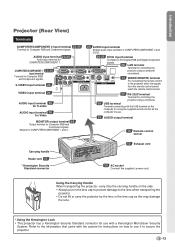
...the remote control sensor. 27 RS-232C terminal Terminal for using the supplied remote control as this may damage the lens. * Using the Kensington Lock • This projector has a Kensington Security Standard connector for use it by the carrying handle on the side. • Always ... with a Kensington MicroSaver Security System. Using the Carrying Handle When transporting the projector, carry it to the lens when transporting the projector. • Do not lift or carry the projector by the lens or the lens cap as the computer mouse. 29 AUDIO output terminal 15 Remote control sensor ...
...the remote control sensor. 27 RS-232C terminal Terminal for using the supplied remote control as this may damage the lens. * Using the Kensington Lock • This projector has a Kensington Security Standard connector for use it by the carrying handle on the side. • Always ... with a Kensington MicroSaver Security System. Using the Carrying Handle When transporting the projector, carry it to the lens when transporting the projector. • Do not lift or carry the projector by the lens or the lens cap as the computer mouse. 29 AUDIO output terminal 15 Remote control sensor ...
XG-C435X | XG-C465X Operation Manual
Page 18
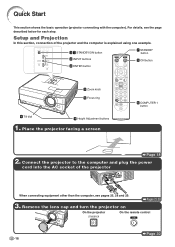
.... Remove the lens cap and turn the projector on On the projector On the remote control Page 30 -16 Setup and Projection In this section, connection of the projector When connecting equipment other than the computer, see the page described below for each step. Place the projector facing a screen... 6 COMPUTER 1 button Page 18 2. Connect the projector to the computer and plug the power cord into the AC socket of the projector and the computer is explained using one example. 3 7 STANDBY/ON...
.... Remove the lens cap and turn the projector on On the projector On the remote control Page 30 -16 Setup and Projection In this section, connection of the projector When connecting equipment other than the computer, see the page described below for each step. Place the projector facing a screen... 6 COMPUTER 1 button Page 18 2. Connect the projector to the computer and plug the power cord into the AC socket of the projector and the computer is explained using one example. 3 7 STANDBY/ON...
XG-C435X | XG-C465X Operation Manual
Page 20
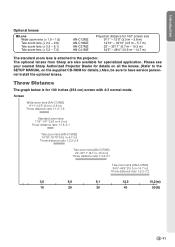
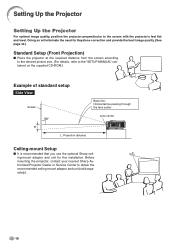
...: Horizontal line passing through the lens center Lens center H L: Projection distance Ceiling-mount Setup ■ It is recommended that you use the optional Sharp ceiling-mount adaptor and unit for Keystone correction and provide the best image quality. (See page 32.) Standard Setup (Front Projection) ■ Place the projector at the required distance from...
...: Horizontal line passing through the lens center Lens center H L: Projection distance Ceiling-mount Setup ■ It is recommended that you use the optional Sharp ceiling-mount adaptor and unit for Keystone correction and provide the best image quality. (See page 32.) Standard Setup (Front Projection) ■ Place the projector at the required distance from...
XG-C435X | XG-C465X Operation Manual
Page 21
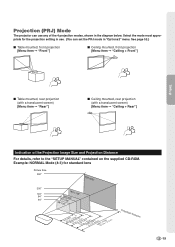
... (with a translucent screen) [Menu item ➞ "Ceiling + Rear"] Indication of the 4 projection modes, shown in "Options2" menu. Projection (PRJ) Mode The projector can set the PRJ mode in the diagram below. Example: NORMAL Mode (4:3) for the projection setting in use. (You can use any of the Projection...Size and Projection Distance For details, refer to the "SETUP MANUAL" contained on the supplied CD-ROM. Select the mode most appropriate for standard lens Picture Size 500" 400"×300" 200" 100" 84" 60" 160"×120" 48"×6376"8×"05"0×"60" 7'0("2-.81'...
... (with a translucent screen) [Menu item ➞ "Ceiling + Rear"] Indication of the 4 projection modes, shown in "Options2" menu. Projection (PRJ) Mode The projector can set the PRJ mode in the diagram below. Example: NORMAL Mode (4:3) for the projection setting in use. (You can use any of the Projection...Size and Projection Distance For details, refer to the "SETUP MANUAL" contained on the supplied CD-ROM. Select the mode most appropriate for standard lens Picture Size 500" 400"×300" 200" 100" 84" 60" 160"×120" 48"×6376"8×"05"0×"60" 7'0("2-.81'...

XG-C435X | XG-C465X Operation Manual
Page 22
... to Use the Storage Case When storing the projector, attach the lens cap to the lens for protection. • Place the projector into the storage case with the lens facing the handle. • Ensure the projector is held in place by using the fixing band. 3 Close the cover of the storage case. 4 ... 1 Open the cover of the storage case. Lens cap Fixing band Supplied accessories (Remote control, etc.) -20 Info • Ensure the projector has cooled down sufficiently before placing it in the case. • Ensure the lens cap is attached to the lens, and place it in the front pocket of the...
... to Use the Storage Case When storing the projector, attach the lens cap to the lens for protection. • Place the projector into the storage case with the lens facing the handle. • Ensure the projector is held in place by using the fixing band. 3 Close the cover of the storage case. 4 ... 1 Open the cover of the storage case. Lens cap Fixing band Supplied accessories (Remote control, etc.) -20 Info • Ensure the projector has cooled down sufficiently before placing it in the case. • Ensure the lens cap is attached to the lens, and place it in the front pocket of the...
XG-C435X | XG-C465X Operation Manual
Page 32
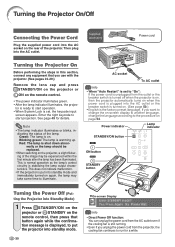
...preset language. This does not indicate malfunction. • If the projector is turned on . If you use with the projector. (See pages 23-29.) Remove the lens cap and press STANDBY/ON on the projector or ON on the projector, a slight flickering of the lamp. Supplied accessory Power cord ...Turning the Projector On Before performing the steps in - Enter the ...
...preset language. This does not indicate malfunction. • If the projector is turned on . If you use with the projector. (See pages 23-29.) Remove the lens cap and press STANDBY/ON on the projector or ON on the projector, a slight flickering of the lamp. Supplied accessory Power cord ...Turning the Projector On Before performing the steps in - Enter the ...

XG-C435X | XG-C465X Operation Manual
Page 33
...adjustment feet come out without firmly holding the projector. • Do not hold the lens when lifting or lowering the projector. • When lowering the projector, be adjusted using the adjustment feet when the screen is located higher than the projector, the screen is inclined or when the ...it is adjustable up to the screen as perpendicular to approximately 9 degrees. just the horizontal tilt of the projector. • The inclination is slightly inclined. Side View Lens center 1 Press the Height Adjustment but - When you want to adjust the automatically corrected image, use ...
...adjustment feet come out without firmly holding the projector. • Do not hold the lens when lifting or lowering the projector. • When lowering the projector, be adjusted using the adjustment feet when the screen is located higher than the projector, the screen is inclined or when the ...it is adjustable up to the screen as perpendicular to approximately 9 degrees. just the horizontal tilt of the projector. • The inclination is slightly inclined. Side View Lens center 1 Press the Height Adjustment but - When you want to adjust the automatically corrected image, use ...
XG-C435X | XG-C465X Operation Manual
Page 35
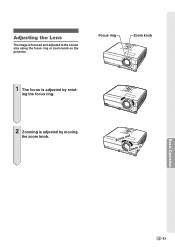
Zoom out Zoom in Basic Operation -33 ing the focus ring. 2 Zooming is focused and adjusted to the screen size using the focus ring or zoom knob on the projector. Adjusting the Lens The image is adjusted by rotat- Focus ring Zoom knob 1 The focus is adjusted by moving the zoom knob.
Zoom out Zoom in Basic Operation -33 ing the focus ring. 2 Zooming is focused and adjusted to the screen size using the focus ring or zoom knob on the projector. Adjusting the Lens The image is adjusted by rotat- Focus ring Zoom knob 1 The focus is adjusted by moving the zoom knob.
XG-C435X | XG-C465X Operation Manual
Page 57
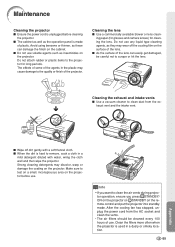
... damage to the projector for cleaning the lens. Make sure to test on a small, inconspicuous area on the projector. Cleaning the lens ■ Use a commercially available blower or lens cleaning paper (for glasses and camera lenses) for long periods. Clean the filters more often when the projector is made of ... air filters should be careful not to clean the air vents during projector operation, ensure you press STANDBY/ ON on the projector or STANDBY on the projector. Info • If you want to scrape or hit the lens. After the cooling fan has stopped, unplug the power cord from ...
... damage to the projector for cleaning the lens. Make sure to test on a small, inconspicuous area on the projector. Cleaning the lens ■ Use a commercially available blower or lens cleaning paper (for glasses and camera lenses) for long periods. Clean the filters more often when the projector is made of ... air filters should be careful not to clean the air vents during projector operation, ensure you press STANDBY/ ON on the projector or STANDBY on the projector. Info • If you want to scrape or hit the lens. After the cooling fan has stopped, unplug the power cord from ...
XG-C435X | XG-C465X Operation Manual
Page 61
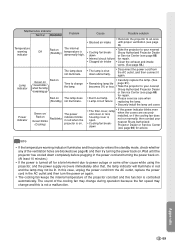
.... • • The filter cover, lamp unit cover or lens housing cover is open. In this case, unplug the power cord from the AC outlet, and then connect it again. Appendix -59 Sharp Authorized Projector Dealer down completely before plugging in the power cord and turning the ...high. Maintenance indicator Normal Abnormal Temperature warning indicator Off Red on Green blinks when the lamp is warming up Time to your nearest Sharp Authorized Projector Dealer or Service Center (see page 66) for a brief moment due to your nearest • Cooling fan break- Power indicator...
.... • • The filter cover, lamp unit cover or lens housing cover is open. In this case, unplug the power cord from the AC outlet, and then connect it again. Appendix -59 Sharp Authorized Projector Dealer down completely before plugging in the power cord and turning the ...high. Maintenance indicator Normal Abnormal Temperature warning indicator Off Red on Green blinks when the lamp is warming up Time to your nearest Sharp Authorized Projector Dealer or Service Center (see page 66) for a brief moment due to your nearest • Cooling fan break- Power indicator...
XG-C435X | XG-C465X Operation Manual
Page 66
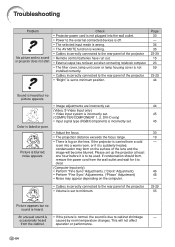
... Adjustments. ("Phase" Adjustment) • Noise may form on the surface of the projector. • Volume is set up the projector at least one hour before it is suddenly heated, condensation may appear depending on the lens. Color is blurred; operation or performance. -64 Page 30 - 34 35 23... to be used. Please set to cabinet shrinkage - If condensation should form, remove the power cord from the cabinet. Check • Projector power cord is not plugged into a warm room, or if it is heard. This will become blurred. occasionally heard caused by room temperature...
... Adjustments. ("Phase" Adjustment) • Noise may form on the surface of the projector. • Volume is set up the projector at least one hour before it is suddenly heated, condensation may appear depending on the lens. Color is blurred; operation or performance. -64 Page 30 - 34 35 23... to be used. Please set to cabinet shrinkage - If condensation should form, remove the power cord from the cabinet. Check • Projector power cord is not plugged into a warm room, or if it is heard. This will become blurred. occasionally heard caused by room temperature...
XG-C435X | XG-C465X Operation Manual
Page 69
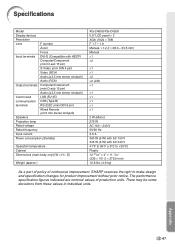
.... Appendix -67 Specifications Model Display devices Resolution Lens F number Zoom Focus Input terminals DVI-D (Compatible... Input current Power consumption (Standby) Operation temperature Cabinet Dimensions (main body only) [W × H × D] Weight (approx.) XG-C465X/XG-C435X 0.8" LCD panel × 3 XGA (1024 × 768) F 1.7 - 1.9 Manual, ×1.2 (f = 28.0 - 33.6 mm) Manual ×1 ×...without prior notice. The performance specification figures indicated are nominal values of continuous improvement, SHARP reserves the right to +35°C) Plastic 12 27/32" × 4" &#...
.... Appendix -67 Specifications Model Display devices Resolution Lens F number Zoom Focus Input terminals DVI-D (Compatible... Input current Power consumption (Standby) Operation temperature Cabinet Dimensions (main body only) [W × H × D] Weight (approx.) XG-C465X/XG-C435X 0.8" LCD panel × 3 XGA (1024 × 768) F 1.7 - 1.9 Manual, ×1.2 (f = 28.0 - 33.6 mm) Manual ×1 ×...without prior notice. The performance specification figures indicated are nominal values of continuous improvement, SHARP reserves the right to +35°C) Plastic 12 27/32" × 4" &#...
XG-C435X | XG-C465X Operation Manual
Page 70
... terminal 28 Language (on-screen display language 41, 54 LAN/RS232C 52 L-CLICK button 39 Lens cap 12 Lens cap strap 10 -68 MAC Address 54 MAGNIFY buttons 35 MENU button 42 Menu Position 49 ...44 PICTURE MODE button 36 Power cord 30 Power indicator 30 Presentation 44 PRJ mode 52 Progressive 45 Projector 54 R-CLICK/RETURN button 39, 43 Red 44 Remote control 14 Remote control sensor 15 Remote receiver... 47 RESIZE button 37 Resolution 46 RGB cable 23 RS-232C 52 RS-232C terminal 27 Sharp 44 Signal Info 46 Signal Type 45 Speaker 52 sRGB 44 Standard 44 STANDBY button 30 ...
... terminal 28 Language (on-screen display language 41, 54 LAN/RS232C 52 L-CLICK button 39 Lens cap 12 Lens cap strap 10 -68 MAC Address 54 MAGNIFY buttons 35 MENU button 42 Menu Position 49 ...44 PICTURE MODE button 36 Power cord 30 Power indicator 30 Presentation 44 PRJ mode 52 Progressive 45 Projector 54 R-CLICK/RETURN button 39, 43 Red 44 Remote control 14 Remote control sensor 15 Remote receiver... 47 RESIZE button 37 Resolution 46 RGB cable 23 RS-232C 52 RS-232C terminal 27 Sharp 44 Signal Info 46 Signal Type 45 Speaker 52 sRGB 44 Standard 44 STANDBY button 30 ...
