XE-A102 Operation Manual in English and Spanish
Page 1
... Avoid connecting any other electrical devices on the bearing. However, never forget you must replace them to burst or leak, which case the user will be installed in the cash register to prevent data and programmed contents from being lost from the memory in which might... paper unrolls from rear 3. The cash register plugs into the paper inlet, and press the f key. Never use a dry, soft cloth. For assistance call 1-800-BE-SHARP For Easy Set-up, See "Getting Started" Getting Started Initializing the Cash Register For your cash register to operate properly, you plan not...
... Avoid connecting any other electrical devices on the bearing. However, never forget you must replace them to burst or leak, which case the user will be installed in the cash register to prevent data and programmed contents from being lost from the memory in which might... paper unrolls from rear 3. The cash register plugs into the paper inlet, and press the f key. Never use a dry, soft cloth. For assistance call 1-800-BE-SHARP For Easy Set-up, See "Getting Started" Getting Started Initializing the Cash Register For your cash register to operate properly, you plan not...
XE-A102 Operation Manual in English and Spanish
Page 2
...twice (following functions: REG: Permits transaction entries. Percent Key The percent key is made non-taxable. For 5%, enter 5 0 0 .) Entering a Refund The cash register has no batteries are installed. (see the Department Status section in the extreme left . key ➝ or g. Non-add code number entry ...79999999 (8 digits) for the first item. 4. If not, use the appropriate tax shift key to finish the transaction. 5. You make all the transaction totals to replace the batteries with the specified taxable status will be entered and printed on daily sales. A...
...twice (following functions: REG: Permits transaction entries. Percent Key The percent key is made non-taxable. For 5%, enter 5 0 0 .) Entering a Refund The cash register has no batteries are installed. (see the Department Status section in the extreme left . key ➝ or g. Non-add code number entry ...79999999 (8 digits) for the first item. 4. If not, use the appropriate tax shift key to finish the transaction. 5. You make all the transaction totals to replace the batteries with the specified taxable status will be entered and printed on daily sales. A...
XE-A102 Operation Manual in English and Spanish
Page 4
...have proof of 2 1/4" (57 mm) in . 2. Press f to change without notice for coins Accessories (supplied): Paper roll: 1 roll Mode key: 2 Drawer lock key: 2 Instruction manual (English): 1 copy Instruction manual (Spanish): 1 copy Quick Start Guide (English/Spanish): 1 copy Ink roller: 1 (installed) Take...repair the defect or replace the defective Product or part thereof at once. Replacing the Ink Roller 1. TO OBTAIN SUPPLIES, ACCESSORIES OR PRODUCT INFORMATION, CALL 1-800-BE-SHARP. No battery symbol ( ) • When three batteries are not installed in the cash register. • When...
...have proof of 2 1/4" (57 mm) in . 2. Press f to change without notice for coins Accessories (supplied): Paper roll: 1 roll Mode key: 2 Drawer lock key: 2 Instruction manual (English): 1 copy Instruction manual (Spanish): 1 copy Quick Start Guide (English/Spanish): 1 copy Ink roller: 1 (installed) Take...repair the defect or replace the defective Product or part thereof at once. Replacing the Ink Roller 1. TO OBTAIN SUPPLIES, ACCESSORIES OR PRODUCT INFORMATION, CALL 1-800-BE-SHARP. No battery symbol ( ) • When three batteries are not installed in the cash register. • When...
Instruction Manual
Page 4
Contents Parts and their Functions 3 When an Error Occurs 4 Preparing the Cash Register 5 Quick Start Operations 7 Programming Date and Time 8 Programming Tax 8 Programming Department Status 9 Making Basic Sales Entries ...Key Programming 20 Printing Format Programming 20 Miscellaneous Programming 21 Consecutive Receipt Number Programming 21 EURO Programming 22 Rounding Programming (For Australian tax system 22 Secret Code Programming 22 Checking the Programmed Machine Settings 23 Maintenance 24 Drawer Handling 24 Replacing the Paper Roll 24 Replacing the Batteries 25 Replacing...
Contents Parts and their Functions 3 When an Error Occurs 4 Preparing the Cash Register 5 Quick Start Operations 7 Programming Date and Time 8 Programming Tax 8 Programming Department Status 9 Making Basic Sales Entries ...Key Programming 20 Printing Format Programming 20 Miscellaneous Programming 21 Consecutive Receipt Number Programming 21 EURO Programming 22 Rounding Programming (For Australian tax system 22 Secret Code Programming 22 Checking the Programmed Machine Settings 23 Maintenance 24 Drawer Handling 24 Replacing the Paper Roll 24 Replacing the Batteries 25 Replacing...
Instruction Manual
Page 6
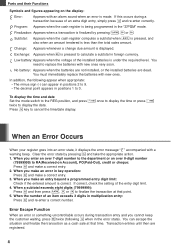
.... 5. When the number of an extra digit entry, simply press c and re-enter correctly. Exchange: Appears when E is being programmed in key operation: Press c and make a correct entry. 3. In addition, the following c when in foreign currency. Low battery: Appears when the voltage...or C. Transaction entries until then are dead. Program: Appears when the cash register is pressed to replace the batteries with a warning beep. You need to calculate a subtotal in the error state). You must immediately replace the batteries with an alarm sound when an error is under the required ...
.... 5. When the number of an extra digit entry, simply press c and re-enter correctly. Exchange: Appears when E is being programmed in key operation: Press c and make a correct entry. 3. In addition, the following c when in foreign currency. Low battery: Appears when the voltage...or C. Transaction entries until then are dead. Program: Appears when the cash register is pressed to replace the batteries with a warning beep. You need to calculate a subtotal in the error state). You must immediately replace the batteries with an alarm sound when an error is under the required ...
Instruction Manual
Page 9
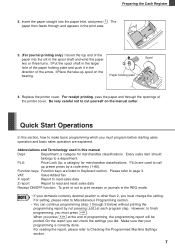
Replace the printer cover. For receipt printing, pass the paper end through the openings of the paper holding plate Spool 4. a category for merchandise classifications. When you ... Look Up; PLUs are used in this section, how to make basic programming which you must press S. Function keys: Function keys are explained. Please refer to Checking the Programmed Machine Settings section. 7 Preparing the Cash Register 2. Quick Start Operations In this manual Dept.: Department; Be very careful not to call up spool on the...
Replace the printer cover. For receipt printing, pass the paper end through the openings of the paper holding plate Spool 4. a category for merchandise classifications. When you ... Look Up; PLUs are used in this section, how to make basic programming which you must press S. Function keys: Function keys are explained. Please refer to Checking the Programmed Machine Settings section. 7 Preparing the Cash Register 2. Quick Start Operations In this manual Dept.: Department; Be very careful not to call up spool on the...
Instruction Manual
Page 26
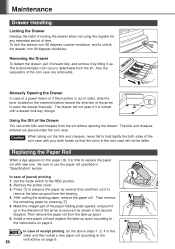
...the machine is time to the 24 instructions on page 6. The 6-denomination coin case is locked with a drawer lock key, though. Then remove the paper roll from the bearing. 4. Replacing the Paper Roll When a dye appears on the machine bottom toward the direction of the arrow to remove it up... never fail to the instructions on page 6. Maintenance Drawer Handling Locking the Drawer Develop the habit of locking the drawer when not using the register for any extended period of the coin case with new one. Removing the Drawer To detach the drawer, pull it forward fully, and remove...
...the machine is time to the 24 instructions on page 6. The 6-denomination coin case is locked with a drawer lock key, though. Then remove the paper roll from the bearing. 4. Replacing the Paper Roll When a dye appears on the machine bottom toward the direction of the arrow to remove it up... never fail to the instructions on page 6. Maintenance Drawer Handling Locking the Drawer Develop the habit of locking the drawer when not using the register for any extended period of the coin case with new one. Removing the Drawer To detach the drawer, pull it forward fully, and remove...


