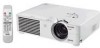

Operation Manual
Page 5
... persons. DO NOT REMOVE SCREWS EXCEPT SPECIFIED USER SERVICE SCREW. ONLY INFORMATION This equipment has been tested and found to the presence of important operating and maintenance (servicing) instructions in the literature accompanying the product. U.S.A. ONLY WARNING: High brightness light source. NO USER-SERVICEABLE PARTS EXCEPT LAMP UNIT. These limits are two important reasons for a Class A digital device, pursuant to Part 15 of the parts, service and labor warranty applicable...
... persons. DO NOT REMOVE SCREWS EXCEPT SPECIFIED USER SERVICE SCREW. ONLY INFORMATION This equipment has been tested and found to the presence of important operating and maintenance (servicing) instructions in the literature accompanying the product. U.S.A. ONLY WARNING: High brightness light source. NO USER-SERVICEABLE PARTS EXCEPT LAMP UNIT. These limits are two important reasons for a Class A digital device, pursuant to Part 15 of the parts, service and labor warranty applicable...
Operation Manual
Page 6
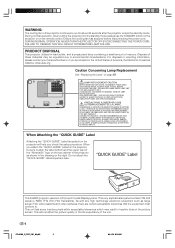
... GUIDE" Label This SHARP projector uses an LCD (Liquid Crystal Display) panel. As with any high technology electronic equipment such as shown in the drawing on the picture screen. This will help you check the setup procedure. During normal operation, when putting the projector into the standby mode always use the STANDBY button on the projector or on page 57. DURING NORMAL OPERATION, NEVER TURN THE PROJECTOR OFF BY DISCONNECTING THE POWER CORD. REPLACE WITH SAME SHARP LAMP UNIT...
... GUIDE" Label This SHARP projector uses an LCD (Liquid Crystal Display) panel. As with any high technology electronic equipment such as shown in the drawing on the picture screen. This will help you check the setup procedure. During normal operation, when putting the projector into the standby mode always use the STANDBY button on the projector or on page 57. DURING NORMAL OPERATION, NEVER TURN THE PROJECTOR OFF BY DISCONNECTING THE POWER CORD. REPLACE WITH SAME SHARP LAMP UNIT...

Operation Manual
Page 7
Simply and Easy Operation • Color-coded connections allows for hassle-free set-up. • Frequently used buttons, lens placement are positioned for image size of 180 W SHP lamp achieves excellent color uniformity and high brightness. • The Eco mode function reduces noise levels and power consumption while also extending lamp life. 5. XXXXXXXX • XXXXXXX -3 PG-A20X_E_PDF_P01_03.p65 3 03.4.23, 9:54 AM Wide Input Signal Compatibility • Video systems compatible (NTSC3.58, PAL...
Simply and Easy Operation • Color-coded connections allows for hassle-free set-up. • Frequently used buttons, lens placement are positioned for image size of 180 W SHP lamp achieves excellent color uniformity and high brightness. • The Eco mode function reduces noise levels and power consumption while also extending lamp life. 5. XXXXXXXX • XXXXXXX -3 PG-A20X_E_PDF_P01_03.p65 3 03.4.23, 9:54 AM Wide Input Signal Compatibility • Video systems compatible (NTSC3.58, PAL...

Operation Manual
Page 8
... Image 38 Special Modes (Special Mode Settings 38 -4 Auto Sync (Auto Sync Adjustment 39 Signal Info (Checking the Input Signal 39 Easy to Use Functions Picture Display Mode 40 Switching the Picture Display Mode 40 Still and Zoom Image 42 Freezing a Moving Image 42 Displaying an Enlarged Portion of an Image 42 Keylock Function 43 Locking the operation Buttons 43 Taking the Keylock off 43 Using the "Options" Menu 44 Lamp Timer (Life) (Checking the Lamp Life Status 44 Keystone (Setting the Keystone Correction Mode 44 OSD Display (Setting On-screen Display 45 Video System (Setting...
... Image 38 Special Modes (Special Mode Settings 38 -4 Auto Sync (Auto Sync Adjustment 39 Signal Info (Checking the Input Signal 39 Easy to Use Functions Picture Display Mode 40 Switching the Picture Display Mode 40 Still and Zoom Image 42 Freezing a Moving Image 42 Displaying an Enlarged Portion of an Image 42 Keylock Function 43 Locking the operation Buttons 43 Taking the Keylock off 43 Using the "Options" Menu 44 Lamp Timer (Life) (Checking the Lamp Life Status 44 Keystone (Setting the Keystone Correction Mode 44 OSD Display (Setting On-screen Display 45 Video System (Setting...

Operation Manual
Page 9
... Carrying the Projector 51 How to Use the Carrying Case 51 Maintenance 52 Replacing the Air Filter 53 Cleaning and Replacing the Air Filter 53 Maintenance Indicators 55 Regarding the Lamp 57 Lamp 57 Caution Concerning the Lamp 57 Replacing the Lamp 57 Removing and Installing the Lamp Unit 58 Resetting the Lamp Timer 59 Connecting Pin Assignments 60 RS-232C Specifications and Command Settings 61 Computer Compatibility Chart 62 Troubleshooting 63 For SHARP Assistance 65 Specifications 66...
... Carrying the Projector 51 How to Use the Carrying Case 51 Maintenance 52 Replacing the Air Filter 53 Cleaning and Replacing the Air Filter 53 Maintenance Indicators 55 Regarding the Lamp 57 Lamp 57 Caution Concerning the Lamp 57 Replacing the Lamp 57 Removing and Installing the Lamp Unit 58 Resetting the Lamp Timer 59 Connecting Pin Assignments 60 RS-232C Specifications and Command Settings 61 Computer Compatibility Chart 62 Troubleshooting 63 For SHARP Assistance 65 Specifications 66...

Operation Manual
Page 12
... . I Continuously watching the screen for instructions on page 55 for details. The sound of the projector is subjected to setup problems or block- Light falling directly on page 57. I The operating temperature of the projector from -4°F to 140°F (-20°C to changes in . When using the projector in the fan speed. I The storage temperature of the fan may be cleaned more often. Other connected equipment I If...
... . I Continuously watching the screen for instructions on page 55 for details. The sound of the projector is subjected to setup problems or block- Light falling directly on page 57. I The operating temperature of the projector from -4°F to 140°F (-20°C to changes in . When using the projector in the fan speed. I The storage temperature of the fan may be cleaned more often. Other connected equipment I If...

Operation Manual
Page 14
... the lens. -10 PG-A20X_E_PDF_P06_14.p65 10 22 Zoom knob 22 Focus ring Speaker 21 Foot release 21 Front adjustment foot 53 Air filter/cooling fan (Intake vent) (on the bottom of the projector) In this indicator will illuminate green. KEYSTONE button 29 For entering the Keystone Correction mode. ON button 26 For turning the power on , this operation manual where the topic is explained. Replace the lamp when the indicator illuminates red. 55 Temperature warning indicator...
... the lens. -10 PG-A20X_E_PDF_P06_14.p65 10 22 Zoom knob 22 Focus ring Speaker 21 Foot release 21 Front adjustment foot 53 Air filter/cooling fan (Intake vent) (on the bottom of the projector) In this indicator will illuminate green. KEYSTONE button 29 For entering the Keystone Correction mode. ON button 26 For turning the power on , this operation manual where the topic is explained. Replace the lamp when the indicator illuminates red. 55 Temperature warning indicator...

Operation Manual
Page 27
... the horizontal line passing through the center of the lens is reversed or inverted, readjust the setting to the screen, the image will be distorted, making viewing difficult. If the projected im- Light falling directly on the size of the screen. Connections and Setup Setting up the screen in a sunny or bright room. • A polarizing screen cannot be used , when placing the projector in front of the...
... the horizontal line passing through the center of the lens is reversed or inverted, readjust the setting to the screen, the image will be distorted, making viewing difficult. If the projected im- Light falling directly on the size of the screen. Connections and Setup Setting up the screen in a sunny or bright room. • A polarizing screen cannot be used , when placing the projector in front of the...

Operation Manual
Page 30
...; The power indicator illuminates red, and the projector enters standby mode. 2 Press on the projector or on again, the lamp indicator may take some time to illuminate. • When controlling the projector using RS-232C commands from a computer, wait for at the factory is ready to "Anti-Theft (Setting the Anti-Theft)" on page 48. If you want to change the on-screen display to another language, reset the language...
...; The power indicator illuminates red, and the projector enters standby mode. 2 Press on the projector or on again, the lamp indicator may take some time to illuminate. • When controlling the projector using RS-232C commands from a computer, wait for at the factory is ready to "Anti-Theft (Setting the Anti-Theft)" on page 48. If you want to change the on-screen display to another language, reset the language...
Operation Manual
Page 34
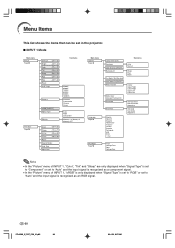
... 28 Lamp Timer (Life) Keystone OSD Display [ON/OFF] Background Eco Mode [Eco/Standard] Auto Power Off [ON/OFF] Menu Position Menu Color [Opaque/Translucent] Password Anti-Theft English Deutsch Español Nederlands Français Italiano Svenska Português Sub menu Auto Manual Sharp Blue None Center Upper Right Lower Right Upper Left Lower Left Old Password New Password Reconfirm Old Code New Code Reconfirm PRJ Mode Page 50 Front Ceiling+Front Rear Ceiling...
... 28 Lamp Timer (Life) Keystone OSD Display [ON/OFF] Background Eco Mode [Eco/Standard] Auto Power Off [ON/OFF] Menu Position Menu Color [Opaque/Translucent] Password Anti-Theft English Deutsch Español Nederlands Français Italiano Svenska Português Sub menu Auto Manual Sharp Blue None Center Upper Right Lower Right Upper Left Lower Left Old Password New Password Reconfirm Old Code New Code Reconfirm PRJ Mode Page 50 Front Ceiling+Front Rear Ceiling...

Operation Manual
Page 48
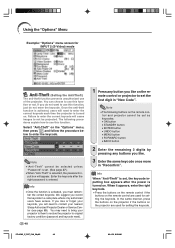
... check the lamp life status. Display the "Options" menu to 35. Manual Keystone Correction can confirm the cumulative lamp usage time and the remaining lamp life (percentage). Example: "Options" menu screen for the Keystone Correction. For lamp replacement, contact your nearest Sharp Authorized Projector Dealer or Service Center. • The table above indicates rough estimates in the case of the values shown depending on the "Options" menu and the desired mode for INPUT 2 (S-Video) mode Lamp Timer (Life) (Check- Remaining lamp life changes...
... check the lamp life status. Display the "Options" menu to 35. Manual Keystone Correction can confirm the cumulative lamp usage time and the remaining lamp life (percentage). Example: "Options" menu screen for the Keystone Correction. For lamp replacement, contact your nearest Sharp Authorized Projector Dealer or Service Center. • The table above indicates rough estimates in the case of the values shown depending on the "Options" menu and the desired mode for INPUT 2 (S-Video) mode Lamp Timer (Life) (Check- Remaining lamp life changes...

Operation Manual
Page 49
screen Display) This function allows you to turn the on-screen messages on the "Options" menu and the appropriate video system. OFF INPUT/VOLUME/AV MUTE/FREEZE/ AUTO SYNC/ENLARGE/ "An invalid button has been pressed." / *"All buttons on Projector are displayed. In that case, switch the video signal. Description of Background Images Selectable settings Description Sharp SHARP default image Blue Blue screen None Black screen Note • If the input signal has interference, the screen will be received, depending on...
screen Display) This function allows you to turn the on-screen messages on the "Options" menu and the appropriate video system. OFF INPUT/VOLUME/AV MUTE/FREEZE/ AUTO SYNC/ENLARGE/ "An invalid button has been pressed." / *"All buttons on Projector are displayed. In that case, switch the video signal. Description of Background Images Selectable settings Description Sharp SHARP default image Blue Blue screen None Black screen Note • If the input signal has interference, the screen will be received, depending on...
Operation Manual
Page 52
... the correct keycode each time the projector is turned on the remote control and projector cannot be set . (See page 47.) • When "Anti-Theft" is set as keycodes: • ON button • STANDBY button • ENTER button • UNDO button • MENU button • FORWARD button • BACK button 2 Enter the remaining 3 digits by pressing any button you like on the remote control are used for INPUT 2 (S-Video) mode Anti-Theft (Setting the Anti-Theft...
... the correct keycode each time the projector is turned on the remote control and projector cannot be set . (See page 47.) • When "Anti-Theft" is set as keycodes: • ON button • STANDBY button • ENTER button • UNDO button • MENU button • FORWARD button • BACK button 2 Enter the remaining 3 digits by pressing any button you like on the remote control are used for INPUT 2 (S-Video) mode Anti-Theft (Setting the Anti-Theft...

Operation Manual
Page 59
... this time, the lamp indicator will be displayed on the screen. I When the remaining lamp life becomes 5% or less, " " (yellow) will illuminate in red when the projector is on. • The filter/lamp unit cover is open. • Securely install the cover. • If the power indicator blinks even when the filter/lamp unit cover is securely installed, contact your nearest Sharp Authorized Projector Dealer or Service Center for approximately 3,000 hours with proper ventilation. • Cooling fan...
... this time, the lamp indicator will be displayed on the screen. I When the remaining lamp life becomes 5% or less, " " (yellow) will illuminate in red when the projector is on. • The filter/lamp unit cover is open. • Securely install the cover. • If the power indicator blinks even when the filter/lamp unit cover is securely installed, contact your nearest Sharp Authorized Projector Dealer or Service Center for approximately 3,000 hours with proper ventilation. • Cooling fan...
Operation Manual
Page 61
... nearest Sharp Authorized Projector Dealer or Service Center, please call toll-free: 1-888-GO-SHARP (1-888-467-4277). A loud sound may spread inside of the projector. Lamp failure can be replaced with the on -screen display icon are illuminated, it can be operating normally. I Should the lamp break, the glass particles may indicate lamp failure. In case of usage time. I If the new lamp does not light after operation of the lamp unit...
... nearest Sharp Authorized Projector Dealer or Service Center, please call toll-free: 1-888-GO-SHARP (1-888-467-4277). A loud sound may spread inside of the projector. Lamp failure can be replaced with the on -screen display icon are illuminated, it can be operating normally. I Should the lamp break, the glass particles may indicate lamp failure. In case of usage time. I If the new lamp does not light after operation of the lamp unit...

Operation Manual
Page 63
... arrow. Resetting the Lamp Timer Reset the lamp timer after replacing the lamp. 1 Connect the power cord. • Plug the power cord into the lamp unit compartment. PG-A20X_E_PDF_P51_62.p65 59 Handle Securing screws 3 1 2 User service screw AC socket ON button Volume buttons AUTO SYNC button 03.4.23, 9:59 AM -59 Appendix Info • If the lamp unit and filter/lamp unit cover are not correctly installed, the power will not turn on the projector. • "LAMP 0000H" is displayed, indicating that the lamp timer is connected to...
... arrow. Resetting the Lamp Timer Reset the lamp timer after replacing the lamp. 1 Connect the power cord. • Plug the power cord into the lamp unit compartment. PG-A20X_E_PDF_P51_62.p65 59 Handle Securing screws 3 1 2 User service screw AC socket ON button Volume buttons AUTO SYNC button 03.4.23, 9:59 AM -59 Appendix Info • If the lamp unit and filter/lamp unit cover are not correctly installed, the power will not turn on the projector. • "LAMP 0000H" is displayed, indicating that the lamp timer is connected to...

Operation Manual
Page 65
... computer. Commands Example: When turning on the projector, make the following order: command, parameter, and return code. Note • When the projector is verified. Computer Projector → P OWR _ _ _ 1 ← OK BUTTONS & REMOTE CONTROL KEY CONTROL CONTENTS Standby Power On INPUT1 INPUT2 INPUT3 INPUT1 SIGNAL TYPE : AUTO INPUT1 SIGNAL TYPE : RGB INPUT1 SIGNAL TYPE : COMPONENT Lamp Usage Time (hour) Remaining Lamp Life (Percentage) Lamp Status Unit Status Model Name Check AV Mute Off AV Mute On Auto Sync Start COMMAND PARAMETER RETURN...
... computer. Commands Example: When turning on the projector, make the following order: command, parameter, and return code. Note • When the projector is verified. Computer Projector → P OWR _ _ _ 1 ← OK BUTTONS & REMOTE CONTROL KEY CONTROL CONTENTS Standby Power On INPUT1 INPUT2 INPUT3 INPUT1 SIGNAL TYPE : AUTO INPUT1 SIGNAL TYPE : RGB INPUT1 SIGNAL TYPE : COMPONENT Lamp Usage Time (hour) Remaining Lamp Life (Percentage) Lamp Status Unit Status Model Name Check AV Mute Off AV Mute On Auto Sync Start COMMAND PARAMETER RETURN...
Operation Manual
Page 67
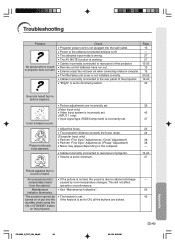
... sound is set to cabinet shrinkage - Color is blurred; Troubleshooting Problem No picture and no picture appears. occasionally heard caused by room temperature changes. standby mode using the ON or STANDBY button on or put into the wall outlet. • Power to the external connected devices is off. • The selected input mode is wrong. • The AV MUTE function is working. • Cables incorrectly connected to rear panel of the projector. • Remote control...
... sound is set to cabinet shrinkage - Color is blurred; Troubleshooting Problem No picture and no picture appears. occasionally heard caused by room temperature changes. standby mode using the ON or STANDBY button on or put into the wall outlet. • Power to the external connected devices is off. • The selected input mode is wrong. • The AV MUTE function is working. • Cables incorrectly connected to rear panel of the projector. • Remote control...

Operation Manual
Page 69
... http://www.sharp.be http://www.sharp.lu Sharp Corporation of Korea (82) 2-3660-2002 lcd@sharp-korea.co.kr http://www.sharpkorea.co.kr Sharp Business Systems (India) Limited (91) 11- 6431313 service@sharp-oa.com -65 PG-A20X_E_PDF_P63_69.p65 65 03.4.23, 9:59 AM Appendix For SHARP Assistance If you encounter any problems during setup or operation of this operation manual does not...
... http://www.sharp.be http://www.sharp.lu Sharp Corporation of Korea (82) 2-3660-2002 lcd@sharp-korea.co.kr http://www.sharpkorea.co.kr Sharp Business Systems (India) Limited (91) 11- 6431313 service@sharp-oa.com -65 PG-A20X_E_PDF_P63_69.p65 65 03.4.23, 9:59 AM Appendix For SHARP Assistance If you encounter any problems during setup or operation of this operation manual does not...
Operation Manual
Page 73
... INPUT button 27 Intake vent 52 Kensington Security Standard connector 11 Keylock 43 KEYSTONE button 29 Keystone correction 29 Lamp 57 Lamp indicator 55 Lamp Timer (Life 44 Language (on-screen display language 28 Lens cap 10 Memory 37 MENU button 32 Menu Color 46 Menu Position 46 NORMAL 40 ON button 26 Optional accessories 14 Options 44 OSD Display 45 Password 47 PDF 9 Phase 38 Picture Adjustment 36 Power cord 15 Power indicator 26 PRJ mode (Reversing/Inverting Projected Images) .... 50 Red 36 Remote control...
... INPUT button 27 Intake vent 52 Kensington Security Standard connector 11 Keylock 43 KEYSTONE button 29 Keystone correction 29 Lamp 57 Lamp indicator 55 Lamp Timer (Life 44 Language (on-screen display language 28 Lens cap 10 Memory 37 MENU button 32 Menu Color 46 Menu Position 46 NORMAL 40 ON button 26 Optional accessories 14 Options 44 OSD Display 45 Password 47 PDF 9 Phase 38 Picture Adjustment 36 Power cord 15 Power indicator 26 PRJ mode (Reversing/Inverting Projected Images) .... 50 Red 36 Remote control...


