
ARC265P Operation Manual
Page 4
...-purpose Tray 68 Consumables and Replacement Supplies 72 Life Expectancy 72 Part Numbers 72 Replace a Toner Cartridge 73 Replace an Image Drum 79 Replace the Fuser 87 Printer Settings (Menu Settings 91 Print a list of the current settings 91 Changing Settings 92 Reset to Factory Defaults 94 Replace the Belt Unit... Cleaning Page 160 Printer Drivers 162 General Information 162 Install 162 Which Printer Driver to Use 163 Change Driver Settings 164 Save Driver Settings 165 Sharp AR-C265P User's Guide 4
...-purpose Tray 68 Consumables and Replacement Supplies 72 Life Expectancy 72 Part Numbers 72 Replace a Toner Cartridge 73 Replace an Image Drum 79 Replace the Fuser 87 Printer Settings (Menu Settings 91 Print a list of the current settings 91 Changing Settings 92 Reset to Factory Defaults 94 Replace the Belt Unit... Cleaning Page 160 Printer Drivers 162 General Information 162 Install 162 Which Printer Driver to Use 163 Change Driver Settings 164 Save Driver Settings 165 Sharp AR-C265P User's Guide 4
ARC265P Operation Manual
Page 15
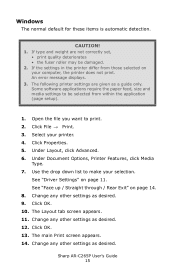
...Print screen appears. 14. Use the drop down list to print. 2. See "Driver Settings" on page 14. 8. Change any other settings as desired. Sharp AR-C265P User's Guide 15 An error message displays. 3. Change any other settings as desired. 12. Click Properties. 5. Under Layout, click Advanced. 6. Click ... your printer. 4. The following printer settings are not correctly set, • print quality deteriorates • the fuser roller may be selected from those selected on your computer, the printer does not print. Change any other settings as a guide only.
...Print screen appears. 14. Use the drop down list to print. 2. See "Driver Settings" on page 14. 8. Change any other settings as desired. Sharp AR-C265P User's Guide 15 An error message displays. 3. Change any other settings as desired. 12. Click Properties. 5. Under Layout, click Advanced. 6. Click ... your printer. 4. The following printer settings are not correctly set, • print quality deteriorates • the fuser roller may be selected from those selected on your computer, the printer does not print. Change any other settings as a guide only.
ARC265P Operation Manual
Page 17
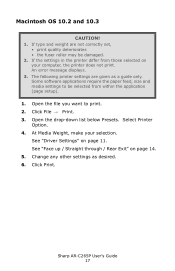
The following printer settings are not correctly set, • print quality deteriorates • the fuser roller may be selected from those selected on your selection. If type and weight are given as desired. 6. Some software applications require ...only. An error message displays. 3. If the settings in the printer differ from within the application (page setup). 1. Click File → Print. 3. Click Print. Sharp AR-C265P User's Guide 17 Macintosh OS 10.2 and 10.3 CAUTION! 1. At Media Weight, make your computer, the printer does not print. See "Face up / Straight ...
The following printer settings are not correctly set, • print quality deteriorates • the fuser roller may be selected from those selected on your selection. If type and weight are given as desired. 6. Some software applications require ...only. An error message displays. 3. If the settings in the printer differ from within the application (page setup). 1. Click File → Print. 3. Click Print. Sharp AR-C265P User's Guide 17 Macintosh OS 10.2 and 10.3 CAUTION! 1. At Media Weight, make your computer, the printer does not print. See "Face up / Straight ...
ARC265P Operation Manual
Page 31
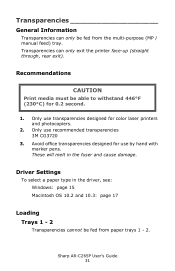
...(MP / manual feed) tray. Only use transparencies designed for use recommended transparencies 3M CG3720 3. Driver Settings To select a paper type in the fuser and cause damage. These will melt in the driver, see: Windows: page 15 Macintosh OS 10.2 and 10.3: page 17 Loading Trays 1 ...for color laser printers and photocopiers. 2. Transparencies General Information Transparencies can only exit the printer face-up (straight through, rear exit). Sharp AR-C265P User's Guide 31 Recommendations CAUTION Print media must be able to withstand 446°F (230°C) for 0.2 second. 1.
...(MP / manual feed) tray. Only use transparencies designed for use recommended transparencies 3M CG3720 3. Driver Settings To select a paper type in the fuser and cause damage. These will melt in the driver, see: Windows: page 15 Macintosh OS 10.2 and 10.3: page 17 Loading Trays 1 ...for color laser printers and photocopiers. 2. Transparencies General Information Transparencies can only exit the printer face-up (straight through, rear exit). Sharp AR-C265P User's Guide 31 Recommendations CAUTION Print media must be able to withstand 446°F (230°C) for 0.2 second. 1.
ARC265P Operation Manual
Page 72
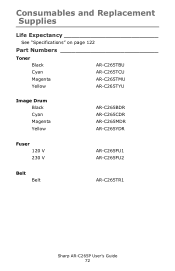
Consumables and Replacement Supplies Life Expectancy See "Specifications" on page 122 Part Numbers Toner Black AR-C265TBU Cyan AR-C265TCU Magenta Yellow AR-C265TMU AR-C265TYU Image Drum Black Cyan Magenta Yellow AR-C265BDR AR-C265CDR AR-C265MDR AR-C265YDR Fuser 120 V 230 V AR-C265FU1 AR-C265FU2 Belt Belt AR-C265TR1 Sharp AR-C265P User's Guide 72
Consumables and Replacement Supplies Life Expectancy See "Specifications" on page 122 Part Numbers Toner Black AR-C265TBU Cyan AR-C265TCU Magenta Yellow AR-C265TMU AR-C265TYU Image Drum Black Cyan Magenta Yellow AR-C265BDR AR-C265CDR AR-C265MDR AR-C265YDR Fuser 120 V 230 V AR-C265FU1 AR-C265FU2 Belt Belt AR-C265TR1 Sharp AR-C265P User's Guide 72

ARC265P Operation Manual
Page 74
This area is HOT. Shown: replacement of the four cartridges: Cyan (1), Magenta (2), Yellow (3), Black (4). Do not touch it. 2. c53_09_lidup.jpg 3. Pull the colored toner release lever on , the fuser is clearly labelled. If the printer has been powered on the cartridge to be replaced towards the front of the printer. Note the positions of the black toner cartridge c53_74_tonerlvropen.jpg Sharp AR-C265P User's Guide 74 WARNING!
This area is HOT. Shown: replacement of the four cartridges: Cyan (1), Magenta (2), Yellow (3), Black (4). Do not touch it. 2. c53_09_lidup.jpg 3. Pull the colored toner release lever on , the fuser is clearly labelled. If the printer has been powered on the cartridge to be replaced towards the front of the printer. Note the positions of the black toner cartridge c53_74_tonerlvropen.jpg Sharp AR-C265P User's Guide 74 WARNING!

ARC265P Operation Manual
Page 80
Do not touch it in accordance with its toner cartridge, out of the four image drums: Cyan (1), Magenta (2), Yellow (3), Black (4). Lift the image drum, complete with your local regulations. Note the positions of the printer. c53_53_drumremove.jpg Sharp AR-C265P User's Guide 80 If the printer has been powered on, the fuser is clearly labelled. c53_09_lidup.jpg 3. Discard it . 2. WARNING! This area is HOT.
Do not touch it in accordance with its toner cartridge, out of the four image drums: Cyan (1), Magenta (2), Yellow (3), Black (4). Lift the image drum, complete with your local regulations. Note the positions of the printer. c53_53_drumremove.jpg Sharp AR-C265P User's Guide 80 If the printer has been powered on, the fuser is clearly labelled. c53_09_lidup.jpg 3. Discard it . 2. WARNING! This area is HOT.

ARC265P Operation Manual
Page 87
If in doubt, switch the printer off. If the printer has been powered on, the fuser is clearly labelled. This area is HOT. Handle the fuser with extreme care. c53_02_opencvr.jpg Sharp AR-C265P User's Guide 87 Fully open the printer's top cover. Wait at least 10 minutes for the fuser to the touch. Replace the Fuser c53_104_fuser_transport_loc.jpg REPLACE FUSER 354: FUSER LIFE WARNING! Do not touch it only by its handle, which is only mildly warm to cool before opening the printer cover. 1. Hold it . Press the cover release.
If in doubt, switch the printer off. If the printer has been powered on, the fuser is clearly labelled. This area is HOT. Handle the fuser with extreme care. c53_02_opencvr.jpg Sharp AR-C265P User's Guide 87 Fully open the printer's top cover. Wait at least 10 minutes for the fuser to the touch. Replace the Fuser c53_104_fuser_transport_loc.jpg REPLACE FUSER 354: FUSER LIFE WARNING! Do not touch it only by its handle, which is only mildly warm to cool before opening the printer cover. 1. Hold it . Press the cover release.

ARC265P Operation Manual
Page 88
c53_59_fuser1.jpg 3. If the fuser is still warm, place it . Lift the fuser out of the printer. Hold the fuser by heat. After letting the fuser cool down, discard it on a flat surface which will not be damaged by its handle. Pull the two blue fuser lock levers (1) towards the front of the printer. 2. c53_60_fuser2.jpg Sharp AR-C265P User's Guide 88
c53_59_fuser1.jpg 3. If the fuser is still warm, place it . Lift the fuser out of the printer. Hold the fuser by heat. After letting the fuser cool down, discard it on a flat surface which will not be damaged by its handle. Pull the two blue fuser lock levers (1) towards the front of the printer. 2. c53_60_fuser2.jpg Sharp AR-C265P User's Guide 88

ARC265P Operation Manual
Page 89
Remove the new fuser from its packaging. c53_104_fuser_transport_loc.jpg 6. Lower the fuser into the printer. Hold the new fuser by the handle. Remove any packing tape. 5. Push the orange transport lock to the left to release it snap. You'll hear it . The fuser pressure release lever (1) should be on the right. 4. c53_60a_fuser2.jpg Sharp AR-C265P User's Guide 89 Remove it.
Remove the new fuser from its packaging. c53_104_fuser_transport_loc.jpg 6. Lower the fuser into the printer. Hold the new fuser by the handle. Remove any packing tape. 5. Push the orange transport lock to the left to release it snap. You'll hear it . The fuser pressure release lever (1) should be on the right. 4. c53_60a_fuser2.jpg Sharp AR-C265P User's Guide 89 Remove it.

ARC265P Operation Manual
Page 90
Push the two blue retaining levers (1) toward the rear of the printer to lock the fuser in place. c53_61a_fuser3.jpg 8. c53_45_latchcvr.jpg Sharp AR-C265P User's Guide 90 Close and latch the top cover. 7.
Push the two blue retaining levers (1) toward the rear of the printer to lock the fuser in place. c53_61a_fuser3.jpg 8. c53_45_latchcvr.jpg Sharp AR-C265P User's Guide 90 Close and latch the top cover. 7.

ARC265P Operation Manual
Page 95
Replace the Belt Unit REPLACE BELT 355: BELT LIFE The belt unit is HOT. c53_02_opencvr.jpg WARNING! If the printer has been powered on, the fuser is located under the four image drums. 1. It is clearly labelled. Press the cover release and open the top cover fully. Note the positions of the four image drums: Cyan (1), Magenta (2), Yellow (3), Black (4). c53_09_lidup.jpg Sharp AR-C265P User's Guide 95 Do not touch it. 2. This area is essential that they go back in the correct order!
Replace the Belt Unit REPLACE BELT 355: BELT LIFE The belt unit is HOT. c53_02_opencvr.jpg WARNING! If the printer has been powered on, the fuser is located under the four image drums. 1. It is clearly labelled. Press the cover release and open the top cover fully. Note the positions of the four image drums: Cyan (1), Magenta (2), Yellow (3), Black (4). c53_09_lidup.jpg Sharp AR-C265P User's Guide 95 Do not touch it. 2. This area is essential that they go back in the correct order!

ARC265P Operation Manual
Page 112
... have a full set of pages fed from Tray 1. Current remaining toner is indicated as nn%. 2k= standard cartridge 5K= high-capacity cartridge Sharp AR-C265P User's Guide 112 Appears only if the optional Second Paper Tray is for information only. The total number of pages printed. Percentage of pages ... TRAY2 PAGE COUNT† MPT PAGE COUNT COLOR PAGE COUNT MONO PAGE COUNT K DRUM LIFE C DRUM LIFE M DRUM LIFE Y DRUM LIFE BELT LIFE FUSER LIFE K TONER C TONER M TONER Y TONER Explanation The total number of pages printed in these items is indicated as nn%. The total number of ...
... have a full set of pages fed from Tray 1. Current remaining toner is indicated as nn%. 2k= standard cartridge 5K= high-capacity cartridge Sharp AR-C265P User's Guide 112 Appears only if the optional Second Paper Tray is for information only. The total number of pages printed. Percentage of pages ... TRAY2 PAGE COUNT† MPT PAGE COUNT COLOR PAGE COUNT MONO PAGE COUNT K DRUM LIFE C DRUM LIFE M DRUM LIFE Y DRUM LIFE BELT LIFE FUSER LIFE K TONER C TONER M TONER Y TONER Explanation The total number of pages printed in these items is indicated as nn%. The total number of ...

ARC265P Operation Manual
Page 117
Usage Menu Menu USAGE MENU Item TOTAL PAGE COUNT TRAY1 PAGE COUNT TRAY2 PAGE COUNT† MPT PAGE COUNT COLOR PAGE COUNT MONO PAGE COUNT K DRUM LIFE C DRUM LIFE M DRUM LIFE Y DRUM LIFE BELT LIFE FUSER LIFE K TONER C TONER M TONER Y TONER Default Setting nnnn nnnn nnnn nnnn nnnn nnnn REMAINING nn% REMAINING nn% REMAINING nn% REMAINING nn% REMAINING nn% REMAINING nn% REMAINING nn% REMAINING nn% REMAINING nn% REMAINING nn% Sharp AR-C265P User's Guide 117
Usage Menu Menu USAGE MENU Item TOTAL PAGE COUNT TRAY1 PAGE COUNT TRAY2 PAGE COUNT† MPT PAGE COUNT COLOR PAGE COUNT MONO PAGE COUNT K DRUM LIFE C DRUM LIFE M DRUM LIFE Y DRUM LIFE BELT LIFE FUSER LIFE K TONER C TONER M TONER Y TONER Default Setting nnnn nnnn nnnn nnnn nnnn nnnn REMAINING nn% REMAINING nn% REMAINING nn% REMAINING nn% REMAINING nn% REMAINING nn% REMAINING nn% REMAINING nn% REMAINING nn% REMAINING nn% Sharp AR-C265P User's Guide 117

ARC265P Operation Manual
Page 123
Item Specification Duty cycle Maximum: 60,000 pages per month at 5% coverage (equivalent to an average business letter) Average: 6,000 pages per month Toner life Approximately 5,000 pages at 5% coverage Image drum life 20,000 pages at 3 pages per job Belt life 60,000 letter-size pages Fuser life 60,000 letter-size pages Sharp AR-C265P User's Guide 123
Item Specification Duty cycle Maximum: 60,000 pages per month at 5% coverage (equivalent to an average business letter) Average: 6,000 pages per month Toner life Approximately 5,000 pages at 5% coverage Image drum life 20,000 pages at 3 pages per job Belt life 60,000 letter-size pages Fuser life 60,000 letter-size pages Sharp AR-C265P User's Guide 123

ARC265P Operation Manual
Page 126
...printer. page 146. Tray 1 is not Make sure the tray is properly installed in the printer. Open the top cover and check to Do The fuser unit is not properly installed. Be sure both the top cover and the front cover are pushed all the way toward the back of the... 316: DUPLEX COVER OPEN c53_61a_fuser3.jpg Paper has jammed Clear the jam. Message CHECK FUSER 320: FUSER MISSING Meaning What to be sure that the fuser unit is properly seated in the printer and that the lock levers are firmly closed. The duplex cover is Close the duplex open . Sharp AR-C265P User's Guide 126
...printer. page 146. Tray 1 is not Make sure the tray is properly installed in the printer. Open the top cover and check to Do The fuser unit is not properly installed. Be sure both the top cover and the front cover are pushed all the way toward the back of the... 316: DUPLEX COVER OPEN c53_61a_fuser3.jpg Paper has jammed Clear the jam. Message CHECK FUSER 320: FUSER MISSING Meaning What to be sure that the fuser unit is properly seated in the printer and that the lock levers are firmly closed. The duplex cover is Close the duplex open . Sharp AR-C265P User's Guide 126

ARC265P Operation Manual
Page 127
... MP Tray is nearing end of the display to indicate that consumable xxx (e.g., belt, fuser, toner, image drum) is empty. See page 135 and page 148 OPEN TOP COVER nnn: PAPER JAM Paper jam. Clear the jam. Sharp AR-C265P User's Guide 127 OPEN FRONT COVER nnn: PAPER JAM Paper jam. ORDER xxx Appears...
... MP Tray is nearing end of the display to indicate that consumable xxx (e.g., belt, fuser, toner, image drum) is empty. See page 135 and page 148 OPEN TOP COVER nnn: PAPER JAM Paper jam. Clear the jam. Sharp AR-C265P User's Guide 127 OPEN FRONT COVER nnn: PAPER JAM Paper jam. ORDER xxx Appears...

ARC265P Operation Manual
Page 128
...fuser, image drum) will need to write these down the message including the error number "nnn," then call your authorized Sharp Service Dealer for service. Replace the indicated item. Appears on the second line of media. YYYY = the general cause. Try turning off the printer then turning it back on. Sharp AR-C265P... printer has received invalid data. Note: If you see a series of life and should be replaced soon. Replace the indicated component: YYYY = Fuser, Belt, C Drum, Y Drum, M Drum, K Drum. nnn = error number. Message PRESS ONLINE SW INVALID DATA REPLACE TONER nnn: ...
...fuser, image drum) will need to write these down the message including the error number "nnn," then call your authorized Sharp Service Dealer for service. Replace the indicated item. Appears on the second line of media. YYYY = the general cause. Try turning off the printer then turning it back on. Sharp AR-C265P... printer has received invalid data. Note: If you see a series of life and should be replaced soon. Replace the indicated component: YYYY = Fuser, Belt, C Drum, Y Drum, M Drum, K Drum. nnn = error number. Message PRESS ONLINE SW INVALID DATA REPLACE TONER nnn: ...

ARC265P Operation Manual
Page 138
This area is hot. Place them on , the fuser is clearly labelled. WARNING! c53_53_drumremove.jpg Sharp AR-C265P User's Guide 138 Do not touch it. 3. Lift each of the image drum/toner cartridge units out of heat and light. If the printer has been powered on a flat surface in a safe place away from direct sources of the printer.
This area is hot. Place them on , the fuser is clearly labelled. WARNING! c53_53_drumremove.jpg Sharp AR-C265P User's Guide 138 Do not touch it. 3. Lift each of the image drum/toner cartridge units out of heat and light. If the printer has been powered on a flat surface in a safe place away from direct sources of the printer.

ARC265P Operation Manual
Page 140
Push the fuser pressure release lever (1) towards the front and down. 3. See step 4 under "Jam 382" . c53_64_jambelt2.jpg Sharp AR-C265P User's Guide 140 To remove a sheet trapped in the fuser: 1. Grasp the edge of the fuser pressure release lever. Lift out the sheet. 4. NOTE Warning! If the sheet is well advanced into the fuser (only a short length is still visible), do not attempt to pull it back. Let go of the sheet. 2. If the printer has been printing, the fuser will be HOT!
Push the fuser pressure release lever (1) towards the front and down. 3. See step 4 under "Jam 382" . c53_64_jambelt2.jpg Sharp AR-C265P User's Guide 140 To remove a sheet trapped in the fuser: 1. Grasp the edge of the fuser pressure release lever. Lift out the sheet. 4. NOTE Warning! If the sheet is well advanced into the fuser (only a short length is still visible), do not attempt to pull it back. Let go of the sheet. 2. If the printer has been printing, the fuser will be HOT!


