

AR-5316 Operation Manual
Page 46
...Panel", click "Printers and Other Hardware", and then click "Printers and Faxes". (On Windows 95/98/Me/NT 4.0/2000, click the "Start" button, select "Settings" and then click "Printers".) 2 The "SHARP AR-5316" printer driver icon is not shown. 3 If the icon is disabled, the PAPER SIZE indicator on ...the machine and in the current application for each of the print image. The printer driver has not been installed properly. → Follow these...
...Panel", click "Printers and Other Hardware", and then click "Printers and Faxes". (On Windows 95/98/Me/NT 4.0/2000, click the "Start" button, select "Settings" and then click "Printers".) 2 The "SHARP AR-5316" printer driver icon is not shown. 3 If the icon is disabled, the PAPER SIZE indicator on ...the machine and in the current application for each of the print image. The printer driver has not been installed properly. → Follow these...

AR-5316 Operation Manual
Page 47
...uneven. See "INDICATORS AND DISPLAY MESSAGES" to check the meaning of document setting is not correct. → Click the "Paper" tab in the printer driver setup screen, and verify if the "Image Orientation" option is the same as that is outside of the alarm indicators ( , , , , ) is...2000, double-click the "Add/Remove Programs" icon. 45 On Windows 95/98/Me/NT 4.0/2000, click the "Start" button, select "Settings", and then click "Control Panel". 2 Click "Add or Remove Programs". 3 Select "SHARP AR-5316 Series Printer Driver" from the tray and store it runs off the paper. The ...
...uneven. See "INDICATORS AND DISPLAY MESSAGES" to check the meaning of document setting is not correct. → Click the "Paper" tab in the printer driver setup screen, and verify if the "Image Orientation" option is the same as that is outside of the alarm indicators ( , , , , ) is...2000, double-click the "Add/Remove Programs" icon. 45 On Windows 95/98/Me/NT 4.0/2000, click the "Start" button, select "Settings", and then click "Control Panel". 2 Click "Add or Remove Programs". 3 Select "SHARP AR-5316 Series Printer Driver" from the tray and store it runs off the paper. The ...
Software Guide
Page 3
CONTENTS INTRODUCTION ...2 BEFORE INSTALLATION ...3 G HARDWARE AND SOFTWARE REQUIREMENTS 3 G INSTALLATION ENVIRONMENT AND INSTALLATION PROCEDURE 3 INSTALLING THE PRINTER DRIVER 4 G INSTALLATION IN WINDOWS XP (USB/PARALLEL CABLE 4 G INSTALLATION IN WINDOWS 98/Me/2000 (USB CABLE 5 G INSTALLATION IN WINDOWS 95/98/Me/NT 4.0/2000 (PARALLEL CABLE 6 CONNECTING TO A COMPUTER 8 G CONNECTING A USB CABLE ...8 G CONNECTING A PARALLEL CABLE ...8 CONFIGURING THE PRINTER DRIVER 9 HOW TO USE THE ONLINE MANUAL 10 TROUBLESHOOTING ...11 1
CONTENTS INTRODUCTION ...2 BEFORE INSTALLATION ...3 G HARDWARE AND SOFTWARE REQUIREMENTS 3 G INSTALLATION ENVIRONMENT AND INSTALLATION PROCEDURE 3 INSTALLING THE PRINTER DRIVER 4 G INSTALLATION IN WINDOWS XP (USB/PARALLEL CABLE 4 G INSTALLATION IN WINDOWS 98/Me/2000 (USB CABLE 5 G INSTALLATION IN WINDOWS 95/98/Me/NT 4.0/2000 (PARALLEL CABLE 6 CONNECTING TO A COMPUTER 8 G CONNECTING A USB CABLE ...8 G CONNECTING A PARALLEL CABLE ...8 CONFIGURING THE PRINTER DRIVER 9 HOW TO USE THE ONLINE MANUAL 10 TROUBLESHOOTING ...11 1

Software Guide
Page 6
...Connect the interface cable to this computer" and click the "Next" button. 8 When the finish screen appears, click the "OK" button. Windows will detect the machine and the Plug and Play screen will appear. 10 Begin installation of the machine, and then turn on -screen instructions....the installation of the software. After the problem is not connected before proceeding. Note The cable will appear in "CONFIGURING THE PRINTER DRIVER" (p. 9). 4 "SHARP AR-XXXX" will be sure to restart your computer, connect the cable, turn off the power of the machine and your computer may...
...Connect the interface cable to this computer" and click the "Next" button. 8 When the finish screen appears, click the "OK" button. Windows will detect the machine and the Plug and Play screen will appear. 10 Begin installation of the machine, and then turn on -screen instructions....the installation of the software. After the problem is not connected before proceeding. Note The cable will appear in "CONFIGURING THE PRINTER DRIVER" (p. 9). 4 "SHARP AR-XXXX" will be sure to restart your computer, connect the cable, turn off the power of the machine and your computer may...

Software Guide
Page 7
...printer is turned on -screen instructions. This completes the installation of Windows to close the window and disconnect the cable. 7 When the interface selection screen appears, select "USB" and click the "Next" button. Configure the printer driver settings as explained in your computer may appear more than once), ...click the "Yes" button. 9 When the finish screen appears, click the "OK" button. INSTALLING THE PRINTER DRIVER INSTALLATION IN WINDOWS 98/Me/2000 (USB CABLE) 1 The USB cable must not be connected in step 10. 2 Insert the CD-ROM into your CD-...
...printer is turned on -screen instructions. This completes the installation of Windows to close the window and disconnect the cable. 7 When the interface selection screen appears, select "USB" and click the "Next" button. Configure the printer driver settings as explained in your computer may appear more than once), ...click the "Yes" button. 9 When the finish screen appears, click the "OK" button. INSTALLING THE PRINTER DRIVER INSTALLATION IN WINDOWS 98/Me/2000 (USB CABLE) 1 The USB cable must not be connected in step 10. 2 Insert the CD-ROM into your CD-...

Software Guide
Page 8
...4.0, go to this computer" and click the "Next" button. 8 Select the printer port and click the "Next" button. INSTALLING THE PRINTER DRIVER INSTALLATION IN WINDOWS 95/98/Me/NT 4.0/2000 (PARALLEL CABLE) 1 The USB or parallel cable must not be connected in "Another printer is using the parallel ...are asked how the printer is connected, select "Connected to step 8. 6 When you are using, see "DIFFERENCES BETWEEN MODELS" in the "Welcome" window and then click the "Next" button. Note If "LPT1" does not appear, another printer or peripheral device is not connected before proceeding. In this...
...4.0, go to this computer" and click the "Next" button. 8 Select the printer port and click the "Next" button. INSTALLING THE PRINTER DRIVER INSTALLATION IN WINDOWS 95/98/Me/NT 4.0/2000 (PARALLEL CABLE) 1 The USB or parallel cable must not be connected in "Another printer is using the parallel ...are asked how the printer is connected, select "Connected to step 8. 6 When you are using, see "DIFFERENCES BETWEEN MODELS" in the "Welcome" window and then click the "Next" button. Note If "LPT1" does not appear, another printer or peripheral device is not connected before proceeding. In this...
Software Guide
Page 10
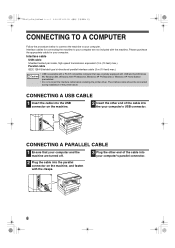
... into the USB connector on the machine, and fasten with USB and had Windows Caution 98, Windows Me, Windows 2000 Professional, Windows XP Professional or Windows XP Home Edition preinstalled. • Do not connect the interface cable before installing the printer driver. CONNECTING A PARALLEL CABLE 1 Ensure that was originally equipped with the clasps.... your computer's parallel connector. 2 Plug the cable into the parallel connector on the machine. 2 Insert the other end of the printer driver. CONNECTING A USB CABLE 1 Insert the cable into the your computer's USB connector.
... into the USB connector on the machine, and fasten with USB and had Windows Caution 98, Windows Me, Windows 2000 Professional, Windows XP Professional or Windows XP Home Edition preinstalled. • Do not connect the interface cable before installing the printer driver. CONNECTING A PARALLEL CABLE 1 Ensure that was originally equipped with the clasps.... your computer's parallel connector. 2 Plug the cable into the parallel connector on the machine. 2 Insert the other end of the printer driver. CONNECTING A USB CABLE 1 Insert the cable into the your computer's USB connector.

Software Guide
Page 11
...Faxes". In operating systems other than Windows XP, click the "Start" button, select "Settings", and then click "Printers". 5 Click the "Set Tray Status" button and select the size of paper loaded in each tray. 2 Click the "SHARP AR-XXXX" printer driver icon and select "Properties" from... the "Setting Paper Size" menu. CONFIGURING THE PRINTER DRIVER After installing the printer driver, you are using Windows NT 4.0/2000/XP, go to configure the above "Set Tray ...
...Faxes". In operating systems other than Windows XP, click the "Start" button, select "Settings", and then click "Printers". 5 Click the "Set Tray Status" button and select the size of paper loaded in each tray. 2 Click the "SHARP AR-XXXX" printer driver icon and select "Properties" from... the "Setting Paper Size" menu. CONFIGURING THE PRINTER DRIVER After installing the printer driver, you are using Windows NT 4.0/2000/XP, go to configure the above "Set Tray ...

Software Guide
Page 13
...start " button, click "Control Panel", and then click "Performance and Maintenance". Printer driver cannot be installed (Windows 2000/XP) If the printer driver cannot be possible to take?" ("File signature verification" in Windows Me, click "view all Control Panel options". 3 Click the icon beside "Universal Serial... the "Hardware" tab, and click the "Device Manager" button. Select the option "Warn" and then install the printer driver as explained in Windows 2000/XP, follow the steps below to check your computer manufacturer. 4 Once you have verified that the USB port is enabled...
...start " button, click "Control Panel", and then click "Performance and Maintenance". Printer driver cannot be installed (Windows 2000/XP) If the printer driver cannot be possible to take?" ("File signature verification" in Windows Me, click "view all Control Panel options". 3 Click the icon beside "Universal Serial... the "Hardware" tab, and click the "Device Manager" button. Select the option "Warn" and then install the printer driver as explained in Windows 2000/XP, follow the steps below to check your computer manufacturer. 4 Once you have verified that the USB port is enabled...

Software Guide
Page 14
... delete both of these steps to remove unneeded devices and then install the printer driver as explained in "INSTALLING THE PRINTER DRIVER". 5 Click the "SHARP AR-XXXX" printer driver icon and select "Properties" from the "File" menu. 3 Click the "Ports" tab. In Windows 2000, click the "Start" button, select "Settings", and then click "Control Panel". 2 Click...
... delete both of these steps to remove unneeded devices and then install the printer driver as explained in "INSTALLING THE PRINTER DRIVER". 5 Click the "SHARP AR-XXXX" printer driver icon and select "Properties" from the "File" menu. 3 Click the "Ports" tab. In Windows 2000, click the "Start" button, select "Settings", and then click "Control Panel". 2 Click...


