AL-1655CS Operation Manual
Page 1
MODEL AL-1655CS MODEL AL-1655CS DIGITAL MULTIFUNCTIONAL SYSTEM OPERATION MANUAL Page PREPARATIONS 9 LOADING PAPER 18 MAKING COPIES 24 CONVENIENT COPY FUNCTIONS 30 SETTING UP THE SOFTWARE 40 PRINTER/SCANNER FUNCTIONS 59 USER SETTINGS 64 TROUBLESHOOTING AND MAINTENANCE 71 APPENDIX 93
MODEL AL-1655CS MODEL AL-1655CS DIGITAL MULTIFUNCTIONAL SYSTEM OPERATION MANUAL Page PREPARATIONS 9 LOADING PAPER 18 MAKING COPIES 24 CONVENIENT COPY FUNCTIONS 30 SETTING UP THE SOFTWARE 40 PRINTER/SCANNER FUNCTIONS 59 USER SETTINGS 64 TROUBLESHOOTING AND MAINTENANCE 71 APPENDIX 93
AL-1655CS Operation Manual
Page 4
..., AND SCANNER MODES 62 HOW TO USE THE ONLINE MANUAL 63 7 USER SETTINGS USER PROGRAMS 64 SELECTING A SETTING FOR A USER PROGRAM 69 8 TROUBLESHOOTING AND MAINTENANCE DISPLAY MESSAGES 71 TROUBLESHOOTING THE MACHINE 73 PROBLEMS DURING SETUP OF THE SOFTWARE 77 MISFEED REMOVAL 80 TD CARTRIDGE REPLACEMENT 85 DRUM CARTRIDGE REPLACEMENT 87 CHECKING THE...
..., AND SCANNER MODES 62 HOW TO USE THE ONLINE MANUAL 63 7 USER SETTINGS USER PROGRAMS 64 SELECTING A SETTING FOR A USER PROGRAM 69 8 TROUBLESHOOTING AND MAINTENANCE DISPLAY MESSAGES 71 TROUBLESHOOTING THE MACHINE 73 PROBLEMS DURING SETUP OF THE SOFTWARE 77 MISFEED REMOVAL 80 TD CARTRIDGE REPLACEMENT 85 DRUM CARTRIDGE REPLACEMENT 87 CHECKING THE...
AL-1655CS Operation Manual
Page 14
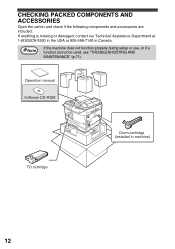
CHECKING PACKED COMPONENTS AND ACCESSORIES Open the carton and check if the following components and accessories are included. Operation manual Software CD-ROM TD cartridge Drum cartridge (installed in Canada. If anything is missing or damaged, contact our Technical Assistance Department at 1-(630)378-3590 in the USA or 905-568-7140 in machine) 12 Note If the machine does not function properly during setup or use, or if a function cannot be used, see "TROUBLESHOOTING AND MAINTENANCE" (p.71).
CHECKING PACKED COMPONENTS AND ACCESSORIES Open the carton and check if the following components and accessories are included. Operation manual Software CD-ROM TD cartridge Drum cartridge (installed in Canada. If anything is missing or damaged, contact our Technical Assistance Department at 1-(630)378-3590 in the USA or 905-568-7140 in machine) 12 Note If the machine does not function properly during setup or use, or if a function cannot be used, see "TROUBLESHOOTING AND MAINTENANCE" (p.71).

AL-1655CS Operation Manual
Page 73
... power switch off the power, release the scan head locking 85 13 switch, and turn the power back on. 8 Chapter 8 TROUBLESHOOTING AND MAINTENANCE Problems related to general use only genuine SHARP parts and supplies. JAM Remove the misfeed as many problems can be solved by the user. Close the RSPF RSPF COVER...
... power switch off the power, release the scan head locking 85 13 switch, and turn the power back on. 8 Chapter 8 TROUBLESHOOTING AND MAINTENANCE Problems related to general use only genuine SHARP parts and supplies. JAM Remove the misfeed as many problems can be solved by the user. Close the RSPF RSPF COVER...
AL-1655CS Operation Manual
Page 74
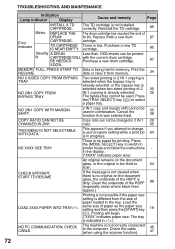
... in progress. If the message is not cleared when there is no paper for printing. The tray is not correctly connected to select a paper tray. TROUBLESHOOTING AND MAINTENANCE Indication Lamp indicator Display Cause and remedy Page INSTALL A TD CARTRIDGE. Purchase a new TD IS NEAR EMPTY. cartridge. 85 Steadily A DRUM Less than...
... in progress. If the message is not cleared when there is no paper for printing. The tray is not correctly connected to select a paper tray. TROUBLESHOOTING AND MAINTENANCE Indication Lamp indicator Display Cause and remedy Page INSTALL A TD CARTRIDGE. Purchase a new TD IS NEAR EMPTY. cartridge. 85 Steadily A DRUM Less than...
AL-1655CS Operation Manual
Page 75
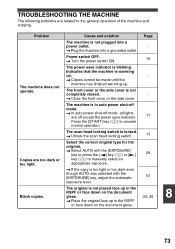
.... The scan head locking switch is not completely closed. - → Close the front cover or the side cover. The machine does not operate. Blank copies. TROUBLESHOOTING THE MACHINE The following problems are related to manually select an appropriate exposure. → If the copy is too light or too dark even though...
.... The scan head locking switch is not completely closed. - → Close the front cover or the side cover. The machine does not operate. Blank copies. TROUBLESHOOTING THE MACHINE The following problems are related to manually select an appropriate exposure. → If the copy is too light or too dark even though...
AL-1655CS Operation Manual
Page 76
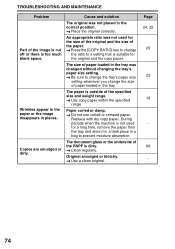
... or there is too much blank space. Wrinkles appear in the paper or the image disappears in the correct position. → Place the original correctly. TROUBLESHOOTING AND MAINTENANCE Problem Part of the paper. → Press the [COPY RATIO] key to prevent moisture absorption.
... or there is too much blank space. Wrinkles appear in the paper or the image disappears in the correct position. → Place the original correctly. TROUBLESHOOTING AND MAINTENANCE Problem Part of the paper. → Press the [COPY RATIO] key to prevent moisture absorption.

AL-1655CS Operation Manual
Page 77
... not match the width of the paper and reload so that the paper is not used - During periods when the machine is properly 19 loaded. TROUBLESHOOTING AND MAINTENANCE Cause and solution Page Misfeed occur. → To remove the misfeed, see "MISFEED 80 REMOVAL". Problem Paper misfeed.
... not match the width of the paper and reload so that the paper is not used - During periods when the machine is properly 19 loaded. TROUBLESHOOTING AND MAINTENANCE Cause and solution Page Misfeed occur. → To remove the misfeed, see "MISFEED 80 REMOVAL". Problem Paper misfeed.

AL-1655CS Operation Manual
Page 78
... indicator is out of the error indicator and lit or blinking. Lighting fixture flickers. A copy job stops before it is complete. The tray is lit. TROUBLESHOOTING AND MAINTENANCE Problem Cause and solution Paper size for other indicators are lit. → If other electric appliances. Copying or printing is performed. → Set...
... indicator is out of the error indicator and lit or blinking. Lighting fixture flickers. A copy job stops before it is complete. The tray is lit. TROUBLESHOOTING AND MAINTENANCE Problem Cause and solution Paper size for other indicators are lit. → If other electric appliances. Copying or printing is performed. → Set...

AL-1655CS Operation Manual
Page 80
... devices. If the "Universal Serial Bus controllers" shows a yellow exclamation point or does not appear, you must check your computer manual for USB troubleshooting or contact your controller chipset type and Root Hub. In Windows 98/Me/2000, click the "Start" button, select "Settings", and then click...computer manufacturer. 4 Once you have verified that the USB port is enabled, install the software as explained in "INSTALLING THE SOFTWARE". 78 TROUBLESHOOTING AND MAINTENANCE Plug and play screen does not appear (USB only) If the Plug and Play screen does not appear after you connect the ...
... devices. If the "Universal Serial Bus controllers" shows a yellow exclamation point or does not appear, you must check your computer manual for USB troubleshooting or contact your controller chipset type and Root Hub. In Windows 98/Me/2000, click the "Start" button, select "Settings", and then click...computer manufacturer. 4 Once you have verified that the USB port is enabled, install the software as explained in "INSTALLING THE SOFTWARE". 78 TROUBLESHOOTING AND MAINTENANCE Plug and play screen does not appear (USB only) If the Plug and Play screen does not appear after you connect the ...

AL-1655CS Operation Manual
Page 81
In Windows 95/98/Me/NT 4.0/2000, double-click the "Add/Remove Programs" icon. 3 Select "SHARP AL-1500/1600CS Series MFP Driver" and Button 8 Manager from the list, and remove the software. Note In Windows 2000, double-click the "...3 Click the icon beside "Other devices". If "AL-XXXXCS" and "SHARP ALXXXXCS" appear, select and delete both of these items. If "Other devices" does not appear, close the "Device Manager" Note window. 4 Install the software as explained in "INSTALLING THE SOFTWARE". TROUBLESHOOTING AND MAINTENANCE The MFP driver cannot be correctly installed...
In Windows 95/98/Me/NT 4.0/2000, double-click the "Add/Remove Programs" icon. 3 Select "SHARP AL-1500/1600CS Series MFP Driver" and Button 8 Manager from the list, and remove the software. Note In Windows 2000, double-click the "...3 Click the icon beside "Other devices". If "AL-XXXXCS" and "SHARP ALXXXXCS" appear, select and delete both of these items. If "Other devices" does not appear, close the "Device Manager" Note window. 4 Install the software as explained in "INSTALLING THE SOFTWARE". TROUBLESHOOTING AND MAINTENANCE The MFP driver cannot be correctly installed...
AL-1655CS Operation Manual
Page 83
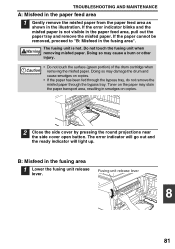
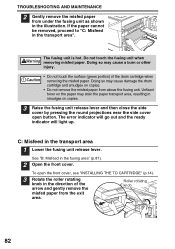
... cannot be removed, proceed to "B: Misfeed in the fusing area 1 Lower the fusing unit release lever. The fusing unit is not visible in the illustration. TROUBLESHOOTING AND MAINTENANCE A: Misfeed in the paper feed area 1 Gently remove the misfed paper from the paper feed area as shown in the paper feed area...
... cannot be removed, proceed to "B: Misfeed in the fusing area 1 Lower the fusing unit release lever. The fusing unit is not visible in the illustration. TROUBLESHOOTING AND MAINTENANCE A: Misfeed in the paper feed area 1 Gently remove the misfed paper from the paper feed area as shown in the paper feed area...
AL-1655CS Operation Manual
Page 84
... remove the misfed paper from the exit area. The error indicator will go out and the ready indicator will light up. Roller rotating knob 82 TROUBLESHOOTING AND MAINTENANCE 2 Gently remove the misfed paper from above the fusing unit. The fusing unit is hot. To open button. If the paper cannot be...
... remove the misfed paper from the exit area. The error indicator will go out and the ready indicator will light up. Roller rotating knob 82 TROUBLESHOOTING AND MAINTENANCE 2 Gently remove the misfed paper from above the fusing unit. The fusing unit is hot. To open button. If the paper cannot be...

AL-1655CS Operation Manual
Page 85
... the RSPF, be sure to insert the reversing tray into the exit area until it locks in the wrong order, the covers may occur at one of three locations: if the misfed original is visible in the document feeder tray, (A) in the exit area or (C) under the document feeder cover. D: ... Caution then close the side cover. Document feeder cover (B) Open the RSPF and rotate the roller to the left and out from the exit area. TROUBLESHOOTING AND MAINTENANCE 4 Raise the fusing unit release lever, close the front cover and then close the RSPF to clear the error indicator. Remove the misfed...
... the RSPF, be sure to insert the reversing tray into the exit area until it locks in the wrong order, the covers may occur at one of three locations: if the misfed original is visible in the document feeder tray, (A) in the exit area or (C) under the document feeder cover. D: ... Caution then close the side cover. Document feeder cover (B) Open the RSPF and rotate the roller to the left and out from the exit area. TROUBLESHOOTING AND MAINTENANCE 4 Raise the fusing unit release lever, close the front cover and then close the RSPF to clear the error indicator. Remove the misfed...

AL-1655CS Operation Manual
Page 86
Press the [START] key ( ) to clear the error indicator. Note Open and close the RSPF to resume copying. 84 Return the indicated number of the arrow while rotating the roller. TROUBLESHOOTING AND MAINTENANCE (C) If the original does not move easily into the exit area, remove it in the display. "RETURN X ORIGINAL(S) START TO RESUME" will appear in the direction of pages to the document feeder tray.
Press the [START] key ( ) to clear the error indicator. Note Open and close the RSPF to resume copying. 84 Return the indicated number of the arrow while rotating the roller. TROUBLESHOOTING AND MAINTENANCE (C) If the original does not move easily into the exit area, remove it in the display. "RETURN X ORIGINAL(S) START TO RESUME" will appear in the direction of pages to the document feeder tray.

AL-1655CS Operation Manual
Page 88
... horizontally four or five times. The error indicator will go out and the ready indicator will light up. 7 When closing the covers, be damaged. 86 TROUBLESHOOTING AND MAINTENANCE 4 Remove the TD cartridge from the bag. Hold the tab of the protective cover and pull the tab to your side to close...
... horizontally four or five times. The error indicator will go out and the ready indicator will light up. 7 When closing the covers, be damaged. 86 TROUBLESHOOTING AND MAINTENANCE 4 Remove the TD cartridge from the bag. Hold the tab of the protective cover and pull the tab to your side to close...
AL-1655CS Operation Manual
Page 90
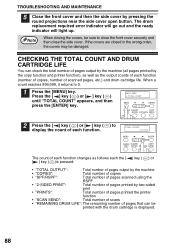
... count of each function changes as follows each function. The drum replacement required error indicator will go out and the ready indicator will light up. TROUBLESHOOTING AND MAINTENANCE 5 Close the front cover and then the side cover by pressing the round projections near the side cover open button.
... count of each function changes as follows each function. The drum replacement required error indicator will go out and the ready indicator will light up. TROUBLESHOOTING AND MAINTENANCE 5 Close the front cover and then the side cover by pressing the round projections near the side cover open button.

AL-1655CS Operation Manual
Page 92
... and drum cartridge shown below with a clean cloth. Wipe only the parts that are indicated in "TD CARTRIDGE REPLACEMENT" (p.85) and "DRUM CARTRIDGE REPLACEMENT" (p.87). TROUBLESHOOTING AND MAINTENANCE TD cartridge and drum cartridge 1 Remove the TD cartridge and drum cartridge as explained in the illustration. Doing so may be dirty.
... and drum cartridge shown below with a clean cloth. Wipe only the parts that are indicated in "TD CARTRIDGE REPLACEMENT" (p.85) and "DRUM CARTRIDGE REPLACEMENT" (p.87). TROUBLESHOOTING AND MAINTENANCE TD cartridge and drum cartridge 1 Remove the TD cartridge and drum cartridge as explained in the illustration. Doing so may be dirty.

AL-1655CS Operation Manual
Page 93
... right end of the transfer charger, gently slide the cleaner to the left end, and then remove it. Repeat this operation two or three times. TROUBLESHOOTING AND MAINTENANCE Transfer charger 1 Turn the power switch off. (p.17) 2 Ensure that the bypass tray is stopped on the way, smudges on . (p.16) 8 91...
... right end of the transfer charger, gently slide the cleaner to the left end, and then remove it. Repeat this operation two or three times. TROUBLESHOOTING AND MAINTENANCE Transfer charger 1 Turn the power switch off. (p.17) 2 Ensure that the bypass tray is stopped on the way, smudges on . (p.16) 8 91...
AL-1655CS Operation Manual
Page 121
... cartridge replacement 85 Thick paper 18 Transfer charger 9, 91 Transparency film 18, 19, 21 Tray location indicator 10, 71 [TRAY SELECT] key 10, 22, 27 Troubleshooting 71 U USB 5, 42, 45, 59, 68 USB connector 9, 46 User program 64 User settings 64 Using the printer mode 60 Using the scanner mode 61...
... cartridge replacement 85 Thick paper 18 Transfer charger 9, 91 Transparency film 18, 19, 21 Tray location indicator 10, 71 [TRAY SELECT] key 10, 22, 27 Troubleshooting 71 U USB 5, 42, 45, 59, 68 USB connector 9, 46 User program 64 User settings 64 Using the printer mode 60 Using the scanner mode 61...