
Owners Manual
Page 3
... a Class B digital device, pursuant to Part 15 of the FCC rules. Use only shielded cable to connect I/O devices to this Manual Any changes or modifications not expressly approved by copyright. If this equipment does cause harmful interference to radio or television reception, which the receiver is no guarantee that may void your new digital camera. Operation is subject to change without...
... a Class B digital device, pursuant to Part 15 of the FCC rules. Use only shielded cable to connect I/O devices to this Manual Any changes or modifications not expressly approved by copyright. If this equipment does cause harmful interference to radio or television reception, which the receiver is no guarantee that may void your new digital camera. Operation is subject to change without...

Owners Manual
Page 7
... manual Points giving some extended instructions or special points to pay attention to. Your SANYO product is connected. * Consult the dealer or an experienced radio/TV technician for a Class B digital device, pursuant to Part 15 of the FCC Rules. In the European Union there are designated to provide reasonable protection against harmful interference in the sections "Troubleshooting". Please help...
... manual Points giving some extended instructions or special points to pay attention to. Your SANYO product is connected. * Consult the dealer or an experienced radio/TV technician for a Class B digital device, pursuant to Part 15 of the FCC Rules. In the European Union there are designated to provide reasonable protection against harmful interference in the sections "Troubleshooting". Please help...

Owners Manual
Page 11
...1 Main Features ...1 Camera Views 2 Front View ...2 Back View ...2 Top View ...2 Bottom View ...3 Left / Right View ...3 LED Indicators 3 Camera Buttons 4 Navigation Buttons ...4 The Scene Button ...6 Function Buttons ...7 LCD screen ...8 Capture/Video Mode Display 8 Camera Setup 13 Attaching the Wrist Strap 13 Inserting the Batteries 13 Inserting an SD/MMC Memory Card 14 Turning On ...14 First Time Use 15 Getting Started 16 Taking your First Photo 16 Using Macro Mode ...16 Setting the Flash Mode ...16 Using the Zoom in/out Function 16 Using the Self-timer and Burst Photography 17...
...1 Main Features ...1 Camera Views 2 Front View ...2 Back View ...2 Top View ...2 Bottom View ...3 Left / Right View ...3 LED Indicators 3 Camera Buttons 4 Navigation Buttons ...4 The Scene Button ...6 Function Buttons ...7 LCD screen ...8 Capture/Video Mode Display 8 Camera Setup 13 Attaching the Wrist Strap 13 Inserting the Batteries 13 Inserting an SD/MMC Memory Card 14 Turning On ...14 First Time Use 15 Getting Started 16 Taking your First Photo 16 Using Macro Mode ...16 Setting the Flash Mode ...16 Using the Zoom in/out Function 16 Using the Self-timer and Burst Photography 17...

Owners Manual
Page 12
... Video Resolution ...24 White Balance ...24 Color ...24 Saturation ...24 Contrast ...25 Setup ...25 Photo & Video Playback 26 Playback Mode Display 26 Viewing Photos/Videos on the LCD Screen 28 Viewing M-Burst Photos 28 Listening to Voice Memo 28 Viewing Photos/Videos on your TV 29 Zooming In During Playback 30 Deleting Photos/Videos 30 Using the Playback Menu 30 DPOF ...30 Slideshow ...32 Resize ...32 Rotate ...33 Protect ...33 Move ...34 Transferring Photos/Videos to your PC 35 Camera Settings 36 The Setup Menu 36 File Number ...36 Digital Zoom...
... Video Resolution ...24 White Balance ...24 Color ...24 Saturation ...24 Contrast ...25 Setup ...25 Photo & Video Playback 26 Playback Mode Display 26 Viewing Photos/Videos on the LCD Screen 28 Viewing M-Burst Photos 28 Listening to Voice Memo 28 Viewing Photos/Videos on your TV 29 Zooming In During Playback 30 Deleting Photos/Videos 30 Using the Playback Menu 30 DPOF ...30 Slideshow ...32 Resize ...32 Rotate ...33 Protect ...33 Move ...34 Transferring Photos/Videos to your PC 35 Camera Settings 36 The Setup Menu 36 File Number ...36 Digital Zoom...
Owners Manual
Page 15
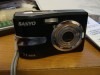
... resolution • 15x zoom (Up to 3x optical zoom and 5x digital zoom) • 1/2.5 inch CCD image sensor • 2.4 inch LTPS TFT LCD monitor • 16 MB internal flash memory with optional external SD/MMC card • Sleek and slim design • Easy-to-use your camera, and is intended for all regions • Bundled AP-CD (Application Software, Driver and User's Manual for your reference only...
... resolution • 15x zoom (Up to 3x optical zoom and 5x digital zoom) • 1/2.5 inch CCD image sensor • 2.4 inch LTPS TFT LCD monitor • 16 MB internal flash memory with optional external SD/MMC card • Sleek and slim design • Easy-to-use your camera, and is intended for all regions • Bundled AP-CD (Application Software, Driver and User's Manual for your reference only...
Owners Manual
Page 18
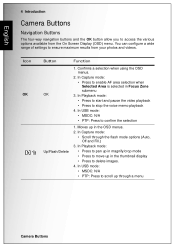
....) 3. In USB mode: • MSDC: N/A • PTP: Press to delete images. 4. Confirms a selection when using the OSD menus. 2. In Playback mode: • Press to start and pause the video playback • Press to confirm the selection 1. In Playback mode: • Press to pan up in magnify/crop mode • Press to ensure maximum results from the On Screen Display (OSD) menu. Icon OK Button OK Up/Flash/Delete Function 1. In USB mode: •...
....) 3. In USB mode: • MSDC: N/A • PTP: Press to delete images. 4. Confirms a selection when using the OSD menus. 2. In Playback mode: • Press to start and pause the video playback • Press to confirm the selection 1. In Playback mode: • Press to pan up in magnify/crop mode • Press to ensure maximum results from the On Screen Display (OSD) menu. Icon OK Button OK Up/Flash/Delete Function 1. In USB mode: •...
Owners Manual
Page 30
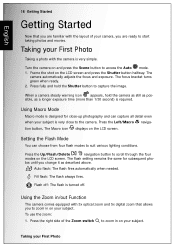
... various lighting conditions. Turn the camera on the LCD screen. When a camera steady warning icon appears, hold the Shutter button to capture the image. The Macro icon displays on and press the Scene button to access the Auto mode. 1. The flash setting remains the same for close to the camera. Using the Zoom in/out Function The camera comes equipped with 3x optical zoom and 5x digital zoom that you are ready to start taking photos and movies. Setting the Flash Mode You...
... various lighting conditions. Turn the camera on the LCD screen. When a camera steady warning icon appears, hold the Shutter button to capture the image. The Macro icon displays on and press the Scene button to access the Auto mode. 1. The flash setting remains the same for close to the camera. Using the Zoom in/out Function The camera comes equipped with 3x optical zoom and 5x digital zoom that you are ready to start taking photos and movies. Setting the Flash Mode You...

Owners Manual
Page 32
... modes: Press the Scene button to locate Video mode. Use the Up/Down navigation buttons to access Scene menu which displays the Scene menu options. 4. Press the OK button to confirm your subject using the LCD screen and press the Shutter button to indicate recording is steady on and press the Scene button. The self-timer LED is in different environments and conditions. To record a video clip: 1. If not, recording will continue until all free memory...
... modes: Press the Scene button to locate Video mode. Use the Up/Down navigation buttons to access Scene menu which displays the Scene menu options. 4. Press the OK button to confirm your subject using the LCD screen and press the Shutter button to indicate recording is steady on and press the Scene button. The self-timer LED is in different environments and conditions. To record a video clip: 1. If not, recording will continue until all free memory...
Owners Manual
Page 35
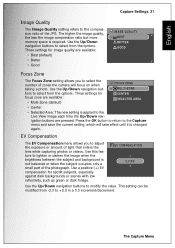
... to adjust the exposure or amount of zones the camera will take effect until it is required. EV Compensation The EV Compensation menu allows you to select the number of light that enters the lens while capturing photos or videos. The higher the image quality, the less the image compression ratio but more memory space is changed again. English Capture Settings 21 Image Quality The Image Quality setting refers...
... to adjust the exposure or amount of zones the camera will take effect until it is required. EV Compensation The EV Compensation menu allows you to select the number of light that enters the lens while capturing photos or videos. The higher the image quality, the less the image compression ratio but more memory space is changed again. English Capture Settings 21 Image Quality The Image Quality setting refers...
Owners Manual
Page 42
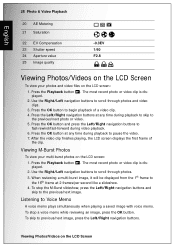
... previous/next photo or video. 5. Press the OK button at 2 frames/per second like a slideshow. 4. Viewing M-Burst Photos To view your photos and video files on the LCD screen: 1. English 28 Photo & Video Playback 20 AE Metering 21 Saturation 22 EV Compensation 23 Shutter speed 24 Aperture value 25 Image quality -0.3EV 1/60 F2.8 Viewing Photos/Videos on the LCD Screen To view your multi-burst photos on the LCD screen: 1. The most recent photo or video clip is displayed. 2. Listening...
... previous/next photo or video. 5. Press the OK button at 2 frames/per second like a slideshow. 4. Viewing M-Burst Photos To view your photos and video files on the LCD screen: 1. English 28 Photo & Video Playback 20 AE Metering 21 Saturation 22 EV Compensation 23 Shutter speed 24 Aperture value 25 Image quality -0.3EV 1/60 F2.8 Viewing Photos/Videos on the LCD Screen To view your multi-burst photos on the LCD screen: 1. The most recent photo or video clip is displayed. 2. Listening...
Owners Manual
Page 44
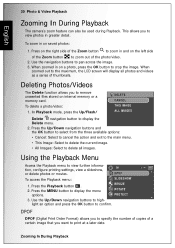
... the Zoom button to zoom in on internal memory or a memory card. In Playback mode, press the Up/Flash/ DELETE CANCEL THIS IMAGE ALL IMAGES Delete navigation button to pan across the image. 3. tion, configure printing settings, view a slideshow, 2/140 or delete photos or movies. DPOF To access the Playback menu: SLIDESHOW 1. Use the navigation buttons to display the Delete menu. 2. Press the MENU button to confirm. To zoom in and on a photo, press the OK button to the maximum, the LCD screen will display all images. To delete a photo/video...
... the Zoom button to zoom in on internal memory or a memory card. In Playback mode, press the Up/Flash/ DELETE CANCEL THIS IMAGE ALL IMAGES Delete navigation button to pan across the image. 3. tion, configure printing settings, view a slideshow, 2/140 or delete photos or movies. DPOF To access the Playback menu: SLIDESHOW 1. Use the navigation buttons to display the Delete menu. 2. Press the MENU button to confirm. To zoom in and on a photo, press the OK button to the maximum, the LCD screen will display all images. To delete a photo/video...
Owners Manual
Page 46
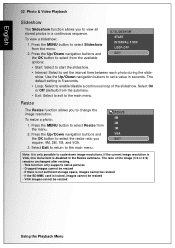
... default setting is 5 seconds. • Loop: Select to enable/disable a continuous loop of the image (4:3 or 3:2) remains unchanged after resizing. • This function only supports native pictures • Cropped images cannot be resized • If there is not sufficient storage space, images cannot be resized • If the SD/MMC card is locked, images cannot be resized • VGA images cannot be resized Using the Playback Menu...
... default setting is 5 seconds. • Loop: Select to enable/disable a continuous loop of the image (4:3 or 3:2) remains unchanged after resizing. • This function only supports native pictures • Cropped images cannot be resized • If there is not sufficient storage space, images cannot be resized • If the SD/MMC card is locked, images cannot be resized • VGA images cannot be resized Using the Playback Menu...

Owners Manual
Page 49
... (provided on -screen instructions to complete the installation. Connect the camera's USB port to a free USB port on your PC: Use the software CD to install the camera driver. Transferring Photos/Videos to your PC using the USB cable. Copy the files from the drives to the directory on your PC English Photo & Video Playback 35 Transferring Photos/Videos to your PC To transfer photos and videos to your PC. Follow the on the software CD) to view or edit the photos and videos respectively.
... (provided on -screen instructions to complete the installation. Connect the camera's USB port to a free USB port on your PC: Use the software CD to install the camera driver. Transferring Photos/Videos to your PC using the USB cable. Copy the files from the drives to the directory on your PC English Photo & Video Playback 35 Transferring Photos/Videos to your PC To transfer photos and videos to your PC. Follow the on the software CD) to view or edit the photos and videos respectively.
Owners Manual
Page 50
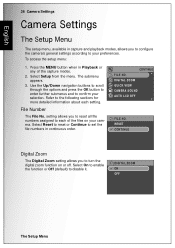
...Setup from the menu. RESET CONTINUE Digital Zoom The Digital Zoom setting allows you to set the file numbers in continuous order. The submenu appears. 3. DIGITAL ZOOM QUICK VIEW CAMERA SOUND AUTO LCD OFF FILE NO. Select Reset to reset or Continue to turn the digital zoom function on your preferences. File Number The File No. Select On to enable the function or Off (default) to confirm your selection. English 36 Camera Settings Camera Settings The Setup Menu The setup menu, available in capture and playback modes, allows you to configure the camera's general settings...
...Setup from the menu. RESET CONTINUE Digital Zoom The Digital Zoom setting allows you to set the file numbers in continuous order. The submenu appears. 3. DIGITAL ZOOM QUICK VIEW CAMERA SOUND AUTO LCD OFF FILE NO. Select Reset to reset or Continue to turn the digital zoom function on your preferences. File Number The File No. Select On to enable the function or Off (default) to confirm your selection. English 36 Camera Settings Camera Settings The Setup Menu The setup menu, available in capture and playback modes, allows you to configure the camera's general settings...
Owners Manual
Page 51
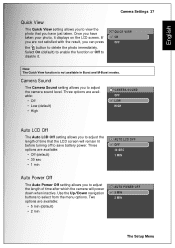
... time that you have taken your photo, it . Camera Settings 37 QUICK VIEW ON OFF Note: The Quick View function is not available in Burst and M-Burst modes. Three options are available: • Off (default) • 30 sec • 1 min AUTO LCD OFF OFF 30 SEC 1 MIN Auto Power Off The Auto Power Off setting allows you have just taken. Use the Up/Down navigation buttons to disable it displays on the LCD screen...
... time that you have taken your photo, it . Camera Settings 37 QUICK VIEW ON OFF Note: The Quick View function is not available in Burst and M-Burst modes. Three options are available: • Off (default) • 30 sec • 1 min AUTO LCD OFF OFF 30 SEC 1 MIN Auto Power Off The Auto Power Off setting allows you have just taken. Use the Up/Down navigation buttons to disable it displays on the LCD screen...
Owners Manual
Page 52
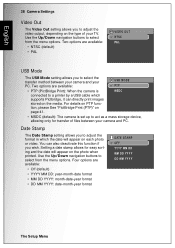
... photo when printed. Two options are available: • NTSC (default) • PAL VIDEO OUT NTSC PAL USB Mode The USB Mode setting allows you to adjust the video output, depending on the type of files between your camera and your PC. English 38 Camera Settings Video Out The Video Out setting allows you to select the transfer method between your camera and PC. Use the Up/Down navigation buttons to adjust the format in which supports...
... photo when printed. Two options are available: • NTSC (default) • PAL VIDEO OUT NTSC PAL USB Mode The USB Mode setting allows you to adjust the video output, depending on the type of files between your camera and your PC. English 38 Camera Settings Video Out The Video Out setting allows you to select the transfer method between your camera and PC. Use the Up/Down navigation buttons to adjust the format in which supports...

Owners Manual
Page 53
... menu uses. Scroll down the list and select your camera. The Setup Menu Language The Language setting allows you to select from the menu options. If an SD/MMC card is not detected, all photos and videos are stored in the internal memory. • Internal Memory: All photos and videos are stored in the camera, all photos and videos are available: IMAGE STORAGE AUTO INTERNAL MEMORY • Auto (default): When selected, the camera chooses the storage medium automatically. DATE & TIME...
... menu uses. Scroll down the list and select your camera. The Setup Menu Language The Language setting allows you to select from the menu options. If an SD/MMC card is not detected, all photos and videos are stored in the internal memory. • Internal Memory: All photos and videos are stored in the camera, all photos and videos are available: IMAGE STORAGE AUTO INTERNAL MEMORY • Auto (default): When selected, the camera chooses the storage medium automatically. DATE & TIME...

Owners Manual
Page 54
Use the Up/Down navigation buttons to camera default setting? EXIT YES Voice Memo The Voice Memo setting allows you to reset the camera to the original factory default settings. FORMAT MEMORY CARD INTERNAL MEMORY EXIT RESET Reset to select from the menu options. VOICE MEMO ON OFF The Setup Menu English 40 Camera Settings Format The Format setting allows you to erase all modifications you have made to record a voice memo when a photo is taken. Once selected, the Reset screen displays a confirmation message. Select...
Use the Up/Down navigation buttons to camera default setting? EXIT YES Voice Memo The Voice Memo setting allows you to reset the camera to the original factory default settings. FORMAT MEMORY CARD INTERNAL MEMORY EXIT RESET Reset to select from the menu options. VOICE MEMO ON OFF The Setup Menu English 40 Camera Settings Format The Format setting allows you to erase all modifications you have made to record a voice memo when a photo is taken. Once selected, the Reset screen displays a confirmation message. Select...
Owners Manual
Page 57
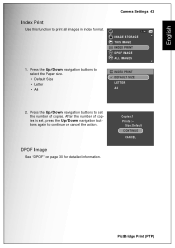
... navigation buttons to print all images in index format. 1. Press the Up/Down navigation buttons to set , press the Up/Down navigation buttons again to continue or cancel the action. After the number of copies is set the number of copies. Copies:1 Prints:-- Size:Default CONTINUE CANCEL PictBridge Print (PTP) English Index Print Use this function to select the Paper size. • Default Size • Letter • A4 Camera Settings 43 2/140 IMAGE STORAGE THIS IMAGE INDEX PRINT DPOF IMAGE ALL IMAGES INDEX PRINT DEFAULT SIZE...
... navigation buttons to print all images in index format. 1. Press the Up/Down navigation buttons to set , press the Up/Down navigation buttons again to continue or cancel the action. After the number of copies is set the number of copies. Copies:1 Prints:-- Size:Default CONTINUE CANCEL PictBridge Print (PTP) English Index Print Use this function to select the Paper size. • Default Size • Letter • A4 Camera Settings 43 2/140 IMAGE STORAGE THIS IMAGE INDEX PRINT DPOF IMAGE ALL IMAGES INDEX PRINT DEFAULT SIZE...

Owners Manual
Page 62
... No image displays on the TV screen Insufficient space on the card Action • The batteries may be exhausted. Replace the memory card with a new one or delete unnecessary images from the existing card. Delete unnecessary images. 48 Troubleshooting Troubleshooting English Problem Camera does not turn on Camera turns off automatically LCD turns off automatically Empty battery icon is displayed on the LCD after which camera turns off LCD screen displays 'Card Requires Formatting' LCD screen displays 'Card is Full' LCD screen displays 'Card is locked' Insufficient memory space...
... No image displays on the TV screen Insufficient space on the card Action • The batteries may be exhausted. Replace the memory card with a new one or delete unnecessary images from the existing card. Delete unnecessary images. 48 Troubleshooting Troubleshooting English Problem Camera does not turn on Camera turns off automatically LCD turns off automatically Empty battery icon is displayed on the LCD after which camera turns off LCD screen displays 'Card Requires Formatting' LCD screen displays 'Card is Full' LCD screen displays 'Card is locked' Insufficient memory space...


