Owners Manual
Page 9
... View 14 Rear View 16 LCD Monitor Icons GETTING STARTED 18 Attaching the Camera Strap 18 Inserting and Removing the Battery 19 Charging the Battery 20 Inserting and Removing the SD/SDHC Memory Card (Optional Accessory) 21 Setting the Date and Time 22 Formatting the SD/SDHC Memory Card or Internal Memory 23 Setting Image Resolution and Quality PHOTOGRAPHY MODE 26 [ ] Capture Mode 27 Recording Voice Memos 28 Using the Digital Zoom 29 Setting the Flash 30 Setting the Focus 31 Setting the Self-timer 32 Exposure...
... View 14 Rear View 16 LCD Monitor Icons GETTING STARTED 18 Attaching the Camera Strap 18 Inserting and Removing the Battery 19 Charging the Battery 20 Inserting and Removing the SD/SDHC Memory Card (Optional Accessory) 21 Setting the Date and Time 22 Formatting the SD/SDHC Memory Card or Internal Memory 23 Setting Image Resolution and Quality PHOTOGRAPHY MODE 26 [ ] Capture Mode 27 Recording Voice Memos 28 Using the Digital Zoom 29 Setting the Flash 30 Setting the Focus 31 Setting the Self-timer 32 Exposure...
Owners Manual
Page 11
... MB internal memory (approx. 27 MB for the results you shoot for image storage). This lets you desire without complicated settings. Capturing high-quality digital images is fast and easy with this camera is capable of capturing images with a 7.0 megapixel CCD, this state-of the new digital camera. External memory supports SD/SDHC memory card. Optical zoom - 3x optical lens allows you have captured. Thumbnail display - Simply select the scene mode...
... MB internal memory (approx. 27 MB for the results you shoot for image storage). This lets you desire without complicated settings. Capturing high-quality digital images is fast and easy with this camera is capable of capturing images with a 7.0 megapixel CCD, this state-of the new digital camera. External memory supports SD/SDHC memory card. Optical zoom - 3x optical lens allows you have captured. Thumbnail display - Simply select the scene mode...

Owners Manual
Page 16
... sec. 13. Possible number of OSD full display, OSD full with Histogram, OSD display off. Quality [ ] Fine [ ] Standard [ ] Economy 11. Capture mode [Blank] Single [ ] Continuous [ AEB] AEB 8. Date and time 12. Voice memo 3. Focus mode [Blank] Auto focus [ ] Macro [ ] Infinity 18. Remaining battery status [ ] Full battery power [ ] Medium battery power [ ] Low battery power [ ] No battery power *[ ] AC adapter icon (if used) 4. White balance [Blank] Auto [ ] Incandescent [ 1 ] Fluorescent 1 [ 2 ] Fluorescent 2 [ ] Day Light [ ] Cloudy [ ] Manual 17. EN-16 Scene...
... sec. 13. Possible number of OSD full display, OSD full with Histogram, OSD display off. Quality [ ] Fine [ ] Standard [ ] Economy 11. Capture mode [Blank] Single [ ] Continuous [ AEB] AEB 8. Date and time 12. Voice memo 3. Focus mode [Blank] Auto focus [ ] Macro [ ] Infinity 18. Remaining battery status [ ] Full battery power [ ] Medium battery power [ ] Low battery power [ ] No battery power *[ ] AC adapter icon (if used) 4. White balance [Blank] Auto [ ] Incandescent [ 1 ] Fluorescent 1 [ 2 ] Fluorescent 2 [ ] Day Light [ ] Cloudy [ ] Manual 17. EN-16 Scene...

Owners Manual
Page 17
...Self-timer icon 9. Playback mode 2. Folder number 4. Voice memo 6. Protect icon 6. Video mode 7. Focus icon Playback mode [ ] -Still image playback 1. Elapsed time 3. Playback mode 8. Possible recording time / elapsed time 6. Video status bar 2. Protect icon 5. Recording indicator 8. Folder number 5. Total recorded time 10S 00:07:30 6 1 Total 9 00:00:10 1 Play 00:00:06 2 87 65 100-0011 43 EN-17 Remaining battery status 4. Zoom status 3. Quality 7. File number 4. Video mode [ ] 1. [ ] Video mode 2. Image size 5. DPOF icon Playback mode [ ]-Video...
...Self-timer icon 9. Playback mode 2. Folder number 4. Voice memo 6. Protect icon 6. Video mode 7. Focus icon Playback mode [ ] -Still image playback 1. Elapsed time 3. Playback mode 8. Possible recording time / elapsed time 6. Video status bar 2. Protect icon 5. Recording indicator 8. Folder number 5. Total recorded time 10S 00:07:30 6 1 Total 9 00:00:10 1 Play 00:00:06 2 87 65 100-0011 43 EN-17 Remaining battery status 4. Zoom status 3. Quality 7. File number 4. Video mode [ ] 1. [ ] Video mode 2. Image size 5. DPOF icon Playback mode [ ]-Video...
Owners Manual
Page 20
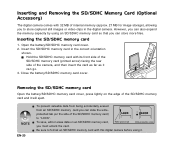
.... 3. Removing the SD/SDHC memory card Open the battery/SD/SDHC memory card cover, press lightly on the side of the SD/SDHC memory card) to format an SD/SDHC memory card with this digital camera before using an SD/SDHC memory card so that you must unlock the card. J To save, edit or erase data on an SD/SDHC memory card, you can store more files. Open the battery/SD/SDHC memory card cover. 2. Close the battery/SD/SDHC memory card...
.... 3. Removing the SD/SDHC memory card Open the battery/SD/SDHC memory card cover, press lightly on the side of the SD/SDHC memory card) to format an SD/SDHC memory card with this digital camera before using an SD/SDHC memory card so that you must unlock the card. J To save, edit or erase data on an SD/SDHC memory card, you can store more files. Open the battery/SD/SDHC memory card cover. 2. Close the battery/SD/SDHC memory card...
Owners Manual
Page 21
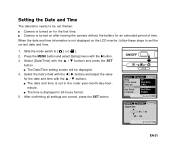
... Date/Time setting screen will be set if/when: Camera is turned on the LCD monitor, follow these steps to set in 24-hours format. 5. SET:Adj. After confirming all settings are correct, press the SET button. Select [Date/Time] with the Xbutton. 3. The date and time is displayed in the order year-month-day-hourminute. The time is set the correct date and time. 1. Slide the mode switch to [ ] or [ ]. 2. Press the MENU button and select [Setup] menu...
... Date/Time setting screen will be set if/when: Camera is turned on the LCD monitor, follow these steps to set in 24-hours format. 5. SET:Adj. After confirming all settings are correct, press the SET button. Select [Date/Time] with the Xbutton. 3. The date and time is displayed in the order year-month-day-hourminute. The time is set the correct date and time. 1. Slide the mode switch to [ ] or [ ]. 2. Press the MENU button and select [Setup] menu...
Owners Manual
Page 26
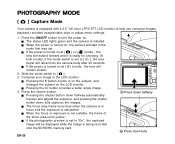
... focus area frame turns blue when the camera is in the LCD monitor. PHOTOGRAPHY MODE [ ] Capture Mode Your camera is equipped with a 2.5" full color LTPS-TFT LCD monitor to "On", the captured image will be displayed while the image is being recorded onto the SD/SDHC memory card. J When the power is turned on . J Pressing the button zooms in the mode that was set to help you compose images, playback recorded images/video clips or adjust menu settings. 1. Press the shutter button...
... focus area frame turns blue when the camera is in the LCD monitor. PHOTOGRAPHY MODE [ ] Capture Mode Your camera is equipped with a 2.5" full color LTPS-TFT LCD monitor to "On", the captured image will be displayed while the image is being recorded onto the SD/SDHC memory card. J When the power is turned on . J Pressing the button zooms in the mode that was set to help you compose images, playback recorded images/video clips or adjust menu settings. 1. Press the shutter button...
Owners Manual
Page 28
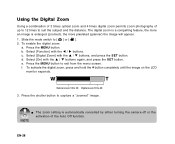
... LCD monitor expands. J The zoom setting is enlarged (zoomed), the more an image is automatically cancelled by either turning the camera off or the activation of up to 12 times to suit the subject and the distance. Slide the mode switch to capture a "zoomed" image. Select [Function] with the W / X buttons. f. Press the shutter button to [ ] or [ ]. 2. e. Using the Digital Zoom Using a combination of 3 times optical zoom and 4 times digital zoom permits zoom photography of the Auto Off function...
... LCD monitor expands. J The zoom setting is enlarged (zoomed), the more an image is automatically cancelled by either turning the camera off or the activation of up to 12 times to suit the subject and the distance. Slide the mode switch to capture a "zoomed" image. Select [Function] with the W / X buttons. f. Press the shutter button to [ ] or [ ]. 2. e. Using the Digital Zoom Using a combination of 3 times optical zoom and 4 times digital zoom permits zoom photography of the Auto Off function...
Owners Manual
Page 33
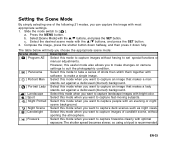
... to set special functions or manual adjustments. The shutter speed becomes slower, so using a tripod is recommended. Slide the mode switch to capture fireworks clearly with most appropriate settings. 1. Press the MENU button. Select the desired scene mode with the S/T buttons, and press the SET button. EN-33 However, this useful mode also allows you to make changes on camera settings to suit the photographic condition. [ ] Panorama Select this mode to take a series of shots then...
... to set special functions or manual adjustments. The shutter speed becomes slower, so using a tripod is recommended. Slide the mode switch to capture fireworks clearly with most appropriate settings. 1. Press the MENU button. Select the desired scene mode with the S/T buttons, and press the SET button. EN-33 However, this useful mode also allows you to make changes on camera settings to suit the photographic condition. [ ] Panorama Select this mode to take a series of shots then...

Owners Manual
Page 35
... shutter button to record video clips at a resolution of your SD/SDHC memory card is designed to make a single image. Slide the mode switch to capture subsequent images in the currently selected quality, a warning icon [ ] will appear, and then the video recording will start. J The recording of the image to be used . J The recording time depends on the storage size and the subject of the video clip will stop. J When recording a video clip, the flash...
... shutter button to record video clips at a resolution of your SD/SDHC memory card is designed to make a single image. Slide the mode switch to capture subsequent images in the currently selected quality, a warning icon [ ] will appear, and then the video recording will start. J The recording of the image to be used . J The recording time depends on the storage size and the subject of the video clip will stop. J When recording a video clip, the flash...

Owners Manual
Page 36
... the mode switch to view the images in the thumbnail display. Images that have an audio memo recorded. J The last image appears on an LCD monitor. 1. Press the SET button to playback the voice memo data. Image Display Information You can switch the state of the information display by a yellow frame. J Press the SET button to display the selected image is displayed at its regular size. Each press of the button opposite to the direction...
... the mode switch to view the images in the thumbnail display. Images that have an audio memo recorded. J The last image appears on an LCD monitor. 1. Press the SET button to playback the voice memo data. Image Display Information You can switch the state of the information display by a yellow frame. J Press the SET button to display the selected image is displayed at its regular size. Each press of the button opposite to the direction...

Owners Manual
Page 38
... [ ]. 2. Play MENU:Exit SET:Adj. J The playback menu is displayed with the W / X buttons. 3. J [VOICE RECORD END] will be recorded only once. 1. J The Auto Off function does not operate during slide show during recording, press the shutter button again. Attaching Voice Memos A maximum of 30 seconds of the SET button displays [VOICE PLAYBACK] and plays back the voice memo. Slide the mode switch to playback your still images automatically in the folder are automatically played back. A [ ] icon is displayed...
... [ ]. 2. Play MENU:Exit SET:Adj. J The playback menu is displayed with the W / X buttons. 3. J [VOICE RECORD END] will be recorded only once. 1. J The Auto Off function does not operate during slide show during recording, press the shutter button again. Attaching Voice Memos A maximum of 30 seconds of the SET button displays [VOICE PLAYBACK] and plays back the voice memo. Slide the mode switch to playback your still images automatically in the folder are automatically played back. A [ ] icon is displayed...
Owners Manual
Page 42
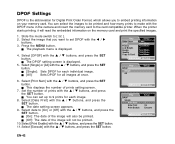
... the memory card to the card compatible printer. J The DPOF setting screen is displayed. 4. J The date setting screen appears. 9. J [On]: The date of the image will read the embedded information on your memory card. MENU:Exit SET:Enter Play MENU:Exit SET:Enter EN-42 You can set DPOF with the S / T buttons, and press the SET button. Press the MENU button. Play 6. Select the image that you to embed printing information on the memory card and print the specified images. 1. J The playback menu is displayed. 5. Select...
... the memory card to the card compatible printer. J The DPOF setting screen is displayed. 4. J The date setting screen appears. 9. J [On]: The date of the image will read the embedded information on your memory card. MENU:Exit SET:Enter Play MENU:Exit SET:Enter EN-42 You can set DPOF with the S / T buttons, and press the SET button. Press the MENU button. Play 6. Select the image that you to embed printing information on the memory card and print the specified images. 1. J The playback menu is displayed. 5. Select...
Owners Manual
Page 43
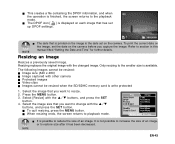
... the SET button. Select the image size that is printed on the camera before you want to change with other camera J Protected images J Video clips J Images cannot be resized when the SD/SDHC memory card is available. EN-43 Resizing an Image Resizes a previously saved image. Select [Resize] with the changed image. Play MENU:Exit SET:Adj. Refer to playback mode. J When resizing ends, the screen returns to section in this manual titled "Setting the Date and Time" for...
... the SET button. Select the image size that is printed on the camera before you want to change with other camera J Protected images J Video clips J Images cannot be resized when the SD/SDHC memory card is available. EN-43 Resizing an Image Resizes a previously saved image. Select [Resize] with the changed image. Play MENU:Exit SET:Adj. Refer to playback mode. J When resizing ends, the screen returns to section in this manual titled "Setting the Date and Time" for...
Owners Manual
Page 53
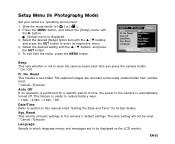
... time setting will not be reset. * Cancel / Execute Language Specify in this manual titled "Setting the Date and Time" for a specific period of time, the power to the camera's default settings. Press the MENU button, and select the [Setup] menu with the S / T buttons, and press the SET button. 5. To exit from number 0001. * Cancel / Execute Auto Off If no operation is automatically turned off. This feature is displayed. 3. Capture MENU:Exit SET:Adj. EN-53 J [Setup] menu is useful to reduce battery...
... time setting will not be reset. * Cancel / Execute Language Specify in this manual titled "Setting the Date and Time" for a specific period of time, the power to the camera's default settings. Press the MENU button, and select the [Setup] menu with the S / T buttons, and press the SET button. 5. To exit from number 0001. * Cancel / Execute Auto Off If no operation is automatically turned off. This feature is displayed. 3. Capture MENU:Exit SET:Adj. EN-53 J [Setup] menu is useful to reduce battery...
Owners Manual
Page 55
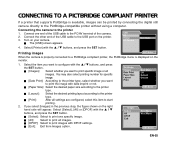
... PictBridge-compatible printer without using a computer. J [Layout]: Select the desired printing layout according to the printer type. CONNECTING TO A PICTBRIDGE COMPLIANT PRINTER If a printer that supports PictBridge is displayed on the right hand side will appear. Select [Printer] with the S / T buttons, and press the SET button. J [All]: Select to print specific image or all images. You may also select printing number for specific image. Connect the other end of the camera. Connecting the camera to start printing. 2. J [Exit...
... PictBridge-compatible printer without using a computer. J [Layout]: Select the desired printing layout according to the printer type. CONNECTING TO A PICTBRIDGE COMPLIANT PRINTER If a printer that supports PictBridge is displayed on the right hand side will appear. Select [Printer] with the S / T buttons, and press the SET button. J [All]: Select to print specific image or all images. You may also select printing number for specific image. Connect the other end of the camera. Connecting the camera to start printing. 2. J [Exit...

Owners Manual
Page 59
... is completed, restart your CD-ROM drive. After the driver installation is exclusively for videoconference, your computer system must include: Microphone Sound card Speakers or headphones Network or Internet connection Install the PC Camera Driver The PC-camera driver included on -screen instructions to videoconference with business associates, or have a real-time conversation with friends or family. Video conferencing (or video editing) software is not supported for Mac. Insert...
... is completed, restart your CD-ROM drive. After the driver installation is exclusively for videoconference, your computer system must include: Microphone Sound card Speakers or headphones Network or Internet connection Install the PC Camera Driver The PC-camera driver included on -screen instructions to videoconference with business associates, or have a real-time conversation with friends or family. Video conferencing (or video editing) software is not supported for Mac. Insert...

Owners Manual
Page 63
EN-63 CAMERA SPECIFICATIONS Item Image sensor Image resolution LCD monitor Recording media Compression format File format Lens Focus range Shutter speed Digital zoom Flash effective range Terminal Power supply Dimensions Weight Description 1/2.5" CCD sensor (7.0 megapixels) 3072 x 2304, 2560 x 1920, 1600 x 1200, 640 x 480 640 x 480 (30 fps), 320 x 240 (30 fps) 2.5" full color LTPS-TFT LCD (230K pixels) 32 MB internal memory (approx. 27 MB for image storage) Supports SD/SDHC memory card (up to 4 GB...
EN-63 CAMERA SPECIFICATIONS Item Image sensor Image resolution LCD monitor Recording media Compression format File format Lens Focus range Shutter speed Digital zoom Flash effective range Terminal Power supply Dimensions Weight Description 1/2.5" CCD sensor (7.0 megapixels) 3072 x 2304, 2560 x 1920, 1600 x 1200, 640 x 480 640 x 480 (30 fps), 320 x 240 (30 fps) 2.5" full color LTPS-TFT LCD (230K pixels) 32 MB internal memory (approx. 27 MB for image storage) Supports SD/SDHC memory card (up to 4 GB...
Owners Manual
Page 65
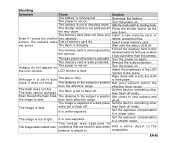
... memory card. The auto power off . Remove the write-protection. focus, it is set to something other than flash off . The The flash flash does not fire. Set the flash to auto The lens is not in The image lacks natural color. conditions that are hard for auto white A d d a w h i t e ob j e c t t o t h e balance to adjust to shooting mode. Turn the power on again. Slide the mode switch to . The memory card does not have any Inser t a new memory card, or Even if I press the shutter free...
... memory card. The auto power off . Remove the write-protection. focus, it is set to something other than flash off . The The flash flash does not fire. Set the flash to auto The lens is not in The image lacks natural color. conditions that are hard for auto white A d d a w h i t e ob j e c t t o t h e balance to adjust to shooting mode. Turn the power on again. Slide the mode switch to . The memory card does not have any Inser t a new memory card, or Even if I press the shutter free...
Owners Manual
Page 66
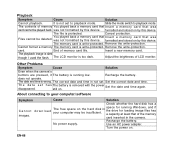
... date and time in be deleted. The file is dark though I used the flash. does not operate. Use an AC power adapter. It is not set . Slide the mode switch to your computer may the hard disk in not set to playback mode. Remove the write-protection. The playback image is protected. space for running low. Turn the power on by this device. Cancel protection. You played back a memory card that Insert a memory card that was not formatted by this device. was Files...
... date and time in be deleted. The file is dark though I used the flash. does not operate. Use an AC power adapter. It is not set . Slide the mode switch to your computer may the hard disk in not set to playback mode. Remove the write-protection. The playback image is protected. space for running low. Turn the power on by this device. Cancel protection. You played back a memory card that Insert a memory card that was not formatted by this device. was Files...


