
Instruction Manual, VPC-S600
Page 10
... LED Indicators and Self-timer Indicators ...20 GETTING STARTED ...21 Turning the Power On/Off ...21 Choosing the Screen Language ...21 Setting the Date and Time ...22 Formatting an SD/SDHC Memory Card or Internal Memory 23 Using the LCD Monitor ...24 PHOTOGRAPHY MODE ...25 Shooting Images ...25 Mode Dial ...26 Setting the Panorama Mode ...27 Setting Image Resolution and Quality ...28 Using the Zoom Function ...29 Using the Flash ...30 Setting Focus ...31 CAPTURE MODE ...32 Burst ...32 Auto Bracket ...33 Self-Timer ...34 Adjusting the Exposure (EV Compensation) ...35 Setting White Balance...
... LED Indicators and Self-timer Indicators ...20 GETTING STARTED ...21 Turning the Power On/Off ...21 Choosing the Screen Language ...21 Setting the Date and Time ...22 Formatting an SD/SDHC Memory Card or Internal Memory 23 Using the LCD Monitor ...24 PHOTOGRAPHY MODE ...25 Shooting Images ...25 Mode Dial ...26 Setting the Panorama Mode ...27 Setting Image Resolution and Quality ...28 Using the Zoom Function ...29 Using the Flash ...30 Setting Focus ...31 CAPTURE MODE ...32 Burst ...32 Auto Bracket ...33 Self-Timer ...34 Adjusting the Exposure (EV Compensation) ...35 Setting White Balance...

Instruction Manual, VPC-S600
Page 24
... is displayed. 2. Use the four-way controller (T) to record images; Otherwise, you format an SD/SDHC memory card, be properly formatted. Set-up1 Set-up2 Set-up3 Format Beeper Louder Date & Time m/d/y Language English Select : 3. Protected images are also erased. • To format the internal memory, do not insert an SD/SDHC memory card into the camera. Use the four-way controller (ST) to select [Yes], then press the button to and turn your camera on the SD/SDHC memory card will format the...
... is displayed. 2. Use the four-way controller (T) to record images; Otherwise, you format an SD/SDHC memory card, be properly formatted. Set-up1 Set-up2 Set-up3 Format Beeper Louder Date & Time m/d/y Language English Select : 3. Protected images are also erased. • To format the internal memory, do not insert an SD/SDHC memory card into the camera. Use the four-way controller (ST) to select [Yes], then press the button to and turn your camera on the SD/SDHC memory card will format the...
Instruction Manual, VPC-S600
Page 29
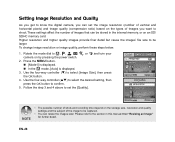
... detail but cause the images' file size to be stored in this manual titled "Resizing an Image" for further detail. Rotate the mode dial to select [Image Size], then press the button. 4. Press the MENU button. „ [Mode1] is displayed. „ In the mode, [Auto] is displayed. 3. Use the four-way controller (T) to , , , , , or and turn your camera on an SD/ SDHC memory card. To change image resolution or image quality, perform these steps...
... detail but cause the images' file size to be stored in this manual titled "Resizing an Image" for further detail. Rotate the mode dial to select [Image Size], then press the button. 4. Press the MENU button. „ [Mode1] is displayed. „ In the mode, [Auto] is displayed. 3. Use the four-way controller (T) to , , , , , or and turn your camera on an SD/ SDHC memory card. To change image resolution or image quality, perform these steps...
Instruction Manual, VPC-S600
Page 31
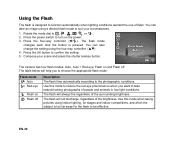
... to confirm the setting. 5. The flash mode changes each time the button is too far away for the flash to be effective. EN-30 Using the Flash The flash is designed to function automatically when lighting conditions warrant the use of people and animals in low-light conditions. Press the four-way controller (W/ ). Flash Mode Auto OK : The camera has four flash modes: Auto, Auto + Red-eye, Flash on the power. 3. Use this mode to reduce the red-eye phenomenon when...
... to confirm the setting. 5. The flash mode changes each time the button is too far away for the flash to be effective. EN-30 Using the Flash The flash is designed to function automatically when lighting conditions warrant the use of people and animals in low-light conditions. Press the four-way controller (W/ ). Flash Mode Auto OK : The camera has four flash modes: Auto, Auto + Red-eye, Flash on the power. 3. Use this mode to reduce the red-eye phenomenon when...
Instruction Manual, VPC-S600
Page 32
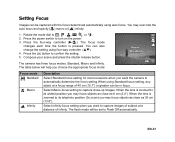
... also change the setting using auto focus. The focus mode changes each time the button is pressed. The camera has three focus modes: Standard, Macro and Infinity. The flash mode will help you choose the appropriate focus mode: Focus Standard OK : Focus mode Standard Macro Infinity Description Select Standard-focus setting for most occasions when you may focus objects as close -up images. Rotate the mode dial to turn on the power. 3. Press the button to confirm the setting. 5. Setting Focus Images can be set to Flash...
... also change the setting using auto focus. The focus mode changes each time the button is pressed. The camera has three focus modes: Standard, Macro and Infinity. The flash mode will help you choose the appropriate focus mode: Focus Standard OK : Focus mode Standard Macro Infinity Description Select Standard-focus setting for most occasions when you may focus objects as close -up images. Rotate the mode dial to turn on the power. 3. Press the button to confirm the setting. 5. Setting Focus Images can be set to Flash...

Instruction Manual, VPC-S600
Page 33
... camera to turn on a stable surface. 1. You can also change the setting using four-way controller (WX). 4. Press the button to , , , , , or . 2. The indicator is pressed. Capture Mode Burst OK : • In Burst mode, the flash mode will be set to capture a sequence of images. EN-32 Press the shutter release button to Flash Off automatically. CAPTURE MODE Burst This mode is used for continuous shooting. 3 pictures are taken continuously once the shutter release button is displayed...
... camera to turn on a stable surface. 1. You can also change the setting using four-way controller (WX). 4. Press the button to , , , , , or . 2. The indicator is pressed. Capture Mode Burst OK : • In Burst mode, the flash mode will be set to capture a sequence of images. EN-32 Press the shutter release button to Flash Off automatically. CAPTURE MODE Burst This mode is used for continuous shooting. 3 pictures are taken continuously once the shutter release button is displayed...
Instruction Manual, VPC-S600
Page 35
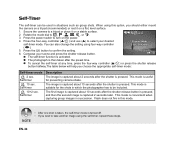
... such as group shots. Self-timer Description The image is captured about 10 seconds after the shutter is useful for the shots in succession. EN-34 Self-Timer The self-timer can also change the setting using this mode. • After one shot is taken, the self-timer mode is pressed. Press the button to , , , , , or . 3. Secure the camera to turn on a flat, level surface. 1. This mode is pressed. Self-timer 5. Press the power switch to a tripod...
... such as group shots. Self-timer Description The image is captured about 10 seconds after the shutter is useful for the shots in succession. EN-34 Self-Timer The self-timer can also change the setting using this mode. • After one shot is taken, the self-timer mode is pressed. Press the button to , , , , , or . 3. Secure the camera to turn on a flat, level surface. 1. This mode is pressed. Self-timer 5. Press the power switch to a tripod...

Instruction Manual, VPC-S600
Page 51
... USB cable. 7. Rotate the mode dial to select [USB Mode]. 3. Connect your camera. 6. Connect the digital camera to select [PC], then press the button. 5. Use the four-way controller (T) to your camera on by pressing the power switch. 2. Press the four-way controller (X) to select the [Set-up2] menu, then use the four-way controller (T) to and turn your recorded images or movie clips. (For Mac users, double-click [untitled] or [unlabeled] disk drive icon on by pressing the power switch...
... USB cable. 7. Rotate the mode dial to select [USB Mode]. 3. Connect your camera. 6. Connect the digital camera to select [PC], then press the button. 5. Use the four-way controller (T) to your camera on by pressing the power switch. 2. Press the four-way controller (X) to select the [Set-up2] menu, then use the four-way controller (T) to and turn your recorded images or movie clips. (For Mac users, double-click [untitled] or [unlabeled] disk drive icon on by pressing the power switch...
Instruction Manual, VPC-S600
Page 56
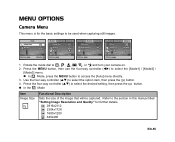
... controller (ST) to access the [Auto] menu directly. 3. Balance ISO Return : Mode3 Mode1 Mode2 Metering Digital Zoom Quick View Mode3 On Off Return : Mode1 Mode2 Color Sharpness Saturation Date Imprint Return : Mode3 Medium Medium Off 1. Auto Image Size Quality Return : Select : Mode1 Mode2 Image Size Quality W. Press the MENU button, then use the four-way controller (WX) to select the [Mode1] / [Mode2] / [Mode3] menu. „ In Mode, press the MENU button to select the desired setting...
... controller (ST) to access the [Auto] menu directly. 3. Balance ISO Return : Mode3 Mode1 Mode2 Metering Digital Zoom Quick View Mode3 On Off Return : Mode1 Mode2 Color Sharpness Saturation Date Imprint Return : Mode3 Medium Medium Off 1. Auto Image Size Quality Return : Select : Mode1 Mode2 Image Size Quality W. Press the MENU button, then use the four-way controller (WX) to select the [Mode1] / [Mode2] / [Mode3] menu. „ In Mode, press the MENU button to select the desired setting...
Instruction Manual, VPC-S600
Page 68
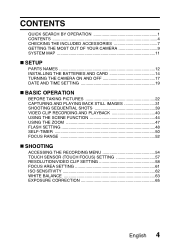
...]. * The camera is in the (video) mode. * Select a different flash mode. * Select [Single] in the [Capture Mode]. * Switch the mode dial to another mode. EN-67 shutter release * Memory is full. Self-timer is selected in self-timer mode. * The [Capture Mode] is turned off is not possible. * The capacity of [Auto Shut Down] to [Off]. * Load new or fully charged battery. Cannot transfer files over a USB connection. * USB cable is not connected securely. * USB driver is not installed. * Camera is set the...
...]. * The camera is in the (video) mode. * Select a different flash mode. * Select [Single] in the [Capture Mode]. * Switch the mode dial to another mode. EN-67 shutter release * Memory is full. Self-timer is selected in self-timer mode. * The [Capture Mode] is turned off is not possible. * The capacity of [Auto Shut Down] to [Off]. * Load new or fully charged battery. Cannot transfer files over a USB connection. * USB cable is not connected securely. * USB driver is not installed. * Camera is set the...

Instruction Manual, VPC-S60EX
Page 9
...; "Adjust the monitor brightness" on page 29 Search for image data • "9-image display playback" on page 34 Delete files • "Erasing files" on page 37 Protect images from accidental erasure • "IMAGE PROTECT" on page 68 Format a card • "INITIALIZING THE CARD MEMORY AND INTERNAL MEMORY" on page 95 Specify the number of prints and date imprint • "PRINT SETTINGS" on page 74 View the settings that were in effect when the image/audio data was recorded • "DISPLAYING IMAGE PROPERTIES...
...; "Adjust the monitor brightness" on page 29 Search for image data • "9-image display playback" on page 34 Delete files • "Erasing files" on page 37 Protect images from accidental erasure • "IMAGE PROTECT" on page 68 Format a card • "INITIALIZING THE CARD MEMORY AND INTERNAL MEMORY" on page 95 Specify the number of prints and date imprint • "PRINT SETTINGS" on page 74 View the settings that were in effect when the image/audio data was recorded • "DISPLAYING IMAGE PROPERTIES...
Instruction Manual, VPC-S60EX
Page 10
... 12 INSTALLING THE BATTERIES AND CARD 14 TURNING THE CAMERA ON AND OFF 17 DATE AND TIME SETTING 19 „ BASIC OPERATION BEFORE TAKING PICTURES 22 CAPTURING AND PLAYING BACK STILL IMAGES 31 SHOOTING SEQUENTIAL SHOTS 39 VIDEO CLIP RECORDING AND PLAYBACK 40 USING THE SCENE FUNCTION 44 USING THE ZOOM 47 FLASH SETTING 48 SELF-TIMER 50 FOCUS RANGE 52 „ SHOOTING ACCESSING THE RECORDING MENU 54 TOUCH SENSOR (TOUCH FOCUS) SETTING 57 RESOLUTION/VIDEO CLIP SETTING 58 FOCUS AREA SETTING 61 ISO SENSITIVITY 62 WHITE BALANCE 63 EXPOSURE...
... 12 INSTALLING THE BATTERIES AND CARD 14 TURNING THE CAMERA ON AND OFF 17 DATE AND TIME SETTING 19 „ BASIC OPERATION BEFORE TAKING PICTURES 22 CAPTURING AND PLAYING BACK STILL IMAGES 31 SHOOTING SEQUENTIAL SHOTS 39 VIDEO CLIP RECORDING AND PLAYBACK 40 USING THE SCENE FUNCTION 44 USING THE ZOOM 47 FLASH SETTING 48 SELF-TIMER 50 FOCUS RANGE 52 „ SHOOTING ACCESSING THE RECORDING MENU 54 TOUCH SENSOR (TOUCH FOCUS) SETTING 57 RESOLUTION/VIDEO CLIP SETTING 58 FOCUS AREA SETTING 61 ISO SENSITIVITY 62 WHITE BALANCE 63 EXPOSURE...
Instruction Manual, VPC-S60EX
Page 22
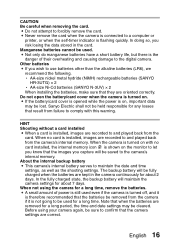
... to the digital camera. i Not only do manganese batteries have a short battery life, but there is connected to use batteries other than the alkaline batteries (LR6), we recommend the following. When no card installed, the internal memory icon is flashing quickly. The backup battery will maintain the camera settings for about 7 days. In doing so, you wish to a computer or printer, or when the self-timer indicator is shown on . English 16 CAUTION...
... to the digital camera. i Not only do manganese batteries have a short battery life, but there is connected to use batteries other than the alkaline batteries (LR6), we recommend the following. When no card installed, the internal memory icon is flashing quickly. The backup battery will maintain the camera settings for about 7 days. In doing so, you wish to a computer or printer, or when the self-timer indicator is shown on . English 16 CAUTION...

Instruction Manual, VPC-S60EX
Page 43
... longer need them. To erase data from the card, perform the delete procedure with the card installed in the camera. h The Delete Confirmation Screen appears. DELETE ALL: Erases all the files. 2 Press the [n] or [o] button to select DELETE ALL. 3 Press the SET button. h The Delete Screen appears. CAPTURING AND PLAYING BACK STILL IMAGES Erasing files You can erase the files one file at once. 1 To erase data from the camera's internal memory, remove the card before performing the delete procedure. 2 Set the camera to the playback mode, and...
... longer need them. To erase data from the card, perform the delete procedure with the card installed in the camera. h The Delete Confirmation Screen appears. DELETE ALL: Erases all the files. 2 Press the [n] or [o] button to select DELETE ALL. 3 Press the SET button. h The Delete Screen appears. CAPTURING AND PLAYING BACK STILL IMAGES Erasing files You can erase the files one file at once. 1 To erase data from the camera's internal memory, remove the card before performing the delete procedure. 2 Set the camera to the playback mode, and...
Instruction Manual, VPC-S60EX
Page 90
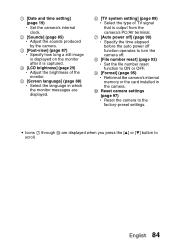
...) h Specify the time elapsed before the auto power off function operates to turn the camera off. 8 [File number reset] (page 92) h Set the file number reset function to ON or OFF. 9 [Format] (page 95) h Reformat the camera's internal memory or the card installed in the camera. 0 Reset camera settings (page 97) h Reset the camera to scroll. 1 [Date and time setting] (page 19) h Set the camera's internal clock. 2 [Sounds] (page 85) h Adjust the sounds produced by the camera. 3 [Post-view] (page 87) h Specify how long a still image is displayed on the...
...) h Specify the time elapsed before the auto power off function operates to turn the camera off. 8 [File number reset] (page 92) h Set the file number reset function to ON or OFF. 9 [Format] (page 95) h Reformat the camera's internal memory or the card installed in the camera. 0 Reset camera settings (page 97) h Reset the camera to scroll. 1 [Date and time setting] (page 19) h Set the camera's internal clock. 2 [Sounds] (page 85) h Adjust the sounds produced by the camera. 3 [Post-view] (page 87) h Specify how long a still image is displayed on the...

Instruction Manual, VPC-S60EX
Page 102
..., and press the SET button. Managing data is erased. CAUTION Caution during reformatting i Please do not turn off the camera or insert/remove the card while the card is recommended that you want to keep should be possible to your personal computer's hard disk or other storage medium. Caution regarding disposing/transferring the card (recovering data from the card using special software for erasing card data. English 96 h Formatting begins. i If...
..., and press the SET button. Managing data is erased. CAUTION Caution during reformatting i Please do not turn off the camera or insert/remove the card while the card is recommended that you want to keep should be possible to your personal computer's hard disk or other storage medium. Caution regarding disposing/transferring the card (recovering data from the card using special software for erasing card data. English 96 h Formatting begins. i If...
Instruction Manual, VPC-S60EX
Page 118
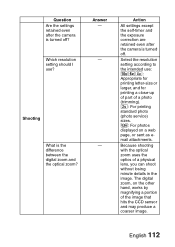
... settings except the self-timer and the exposure correction are retained even after the camera is the difference between the digital zoom and the optical zoom? t: For printing standard photo (photo service) sizes. [: For photos displayed on the other hand, works by magnifying a portion of a physical lens, you can shoot without losing minute details in the image. English 112 Shooting What is turned off . Because shooting with the optical zoom uses the optics of the image...
... settings except the self-timer and the exposure correction are retained even after the camera is the difference between the digital zoom and the optical zoom? t: For printing standard photo (photo service) sizes. [: For photos displayed on the other hand, works by magnifying a portion of a physical lens, you can shoot without losing minute details in the image. English 112 Shooting What is turned off . Because shooting with the optical zoom uses the optics of the image...

Instruction Manual, VPC-S60EX
Page 134
... continuous shooting time will differ depending, for the commercially available 128MB and 1GB SD Memory Cards. Possible Number of Images/Video Recording Time/Audio Recording Time The table shows the possible number of data that can actually be stored may differ depending on the card type, capacity, performance, etc. *1: Available only for single-shot still image shooting. English 128 Shooting mode setting Single-shot mode/ Sequential shots mode Video clip mode Audio file mode Resolution setting k*1 D z t [ d 5 - SD Memory Card 128 MB 1 GB 37 images...
... continuous shooting time will differ depending, for the commercially available 128MB and 1GB SD Memory Cards. Possible Number of Images/Video Recording Time/Audio Recording Time The table shows the possible number of data that can actually be stored may differ depending on the card type, capacity, performance, etc. *1: Available only for single-shot still image shooting. English 128 Shooting mode setting Single-shot mode/ Sequential shots mode Video clip mode Audio file mode Resolution setting k*1 D z t [ d 5 - SD Memory Card 128 MB 1 GB 37 images...
Instruction Manual, VPC-S60EX
Page 144
... again. In this camera. h If the card is turned off the camera and remove the battery pack. (For safety, remove the power cord plug of the batteries will appear, and when that particularly when recording video clips, soon after fully recharging with the exclusive battery charger. h If the card has reached the end of the camera becomes high, the \ icon will cause the battery capacity to read its...
... again. In this camera. h If the card is turned off the camera and remove the battery pack. (For safety, remove the power cord plug of the batteries will appear, and when that particularly when recording video clips, soon after fully recharging with the exclusive battery charger. h If the card has reached the end of the camera becomes high, the \ icon will cause the battery capacity to read its...
Instruction Manual, VPC-S60EX
Page 159
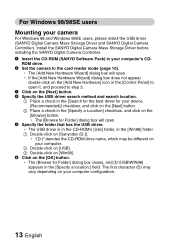
... will open . 5 Specify the folder that has the USB driver. h The [Add New Hardware Wizard] dialog box will open . h The [Browse for Folder] dialog box closes, and [D:\USB\WIN98] appears in your camera For Windows 98 and Windows 98SE users, please install the USB driver (SANYO Digital Camera Mass Storage Driver and SANYO Digital Camera Controller). For Windows 98/98SE users Mounting your computer's CD- Install the SANYO Digital Camera Mass Storage Driver before installing the SANYO Digital Camera Controller. 1 Insert the CD-ROM (SANYO Software...
... will open . 5 Specify the folder that has the USB driver. h The [Add New Hardware Wizard] dialog box will open . h The [Browse for Folder] dialog box closes, and [D:\USB\WIN98] appears in your camera For Windows 98 and Windows 98SE users, please install the USB driver (SANYO Digital Camera Mass Storage Driver and SANYO Digital Camera Controller). For Windows 98/98SE users Mounting your computer's CD- Install the SANYO Digital Camera Mass Storage Driver before installing the SANYO Digital Camera Controller. 1 Insert the CD-ROM (SANYO Software...


