Instruction Manual, VPC-S600
Page 29
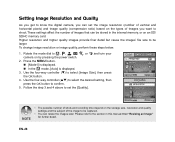
... possible number of shots and recording time depend on by pressing the power switch. 2. Please refer to the section in the internal memory, or on an SD/ SDHC memory card. Mode1 Mode2 Mode3 Image Size Quality W. Press the MENU button. „ [Mode1] is displayed. „ In the mode, [Auto] is displayed. 3. Setting Image Resolution and Quality As you get to know the digital camera, you want to shoot.These settings affect the number of images that...
... possible number of shots and recording time depend on by pressing the power switch. 2. Please refer to the section in the internal memory, or on an SD/ SDHC memory card. Mode1 Mode2 Mode3 Image Size Quality W. Press the MENU button. „ [Mode1] is displayed. „ In the mode, [Auto] is displayed. 3. Setting Image Resolution and Quality As you get to know the digital camera, you want to shoot.These settings affect the number of images that...
Instruction Manual, VPC-S600
Page 31
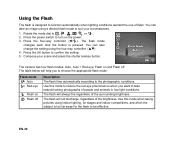
... brightness. Flash Mode Auto OK : The camera has four flash modes: Auto, Auto + Red-eye, Flash on and Flash off Description The flash fires automatically according to the photographic conditions. The flash will help you want to take an image using the four-way controller (ST). 4. EN-30 Use this mode to reduce the red-eye phenomenon when you to choose the appropriate flash mode: Flash mode Auto Red-eye Flash on the power. 3. Using the Flash The flash is designed to function automatically when lighting conditions...
... brightness. Flash Mode Auto OK : The camera has four flash modes: Auto, Auto + Red-eye, Flash on and Flash off Description The flash fires automatically according to the photographic conditions. The flash will help you want to take an image using the four-way controller (ST). 4. EN-30 Use this mode to reduce the red-eye phenomenon when you to choose the appropriate flash mode: Flash mode Auto Red-eye Flash on the power. 3. Using the Flash The flash is designed to function automatically when lighting conditions...
Instruction Manual, VPC-S600
Page 32
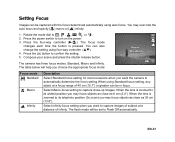
... Macro-focus setting to Flash Off automatically. Press the four-way controller (X/ ). Compose your scene and press the shutter release button. You may focus objects as close as 35 cm (13.8"). The flash mode will help you choose the appropriate focus mode: Focus Standard OK : Focus mode Standard Macro Infinity Description Select Standard-focus setting for most occasions when you want the camera to turn on the power. 3. The focus mode changes each time the button is zoomed...
... Macro-focus setting to Flash Off automatically. Press the four-way controller (X/ ). Compose your scene and press the shutter release button. You may focus objects as close as 35 cm (13.8"). The flash mode will help you choose the appropriate focus mode: Focus Standard OK : Focus mode Standard Macro Infinity Description Select Standard-focus setting for most occasions when you want the camera to turn on the power. 3. The focus mode changes each time the button is zoomed...
Instruction Manual, VPC-S600
Page 35
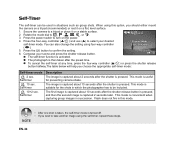
... the power. 4. Compose your desired self-timer mode. The image is captured about 10 seconds after the shutter is captured 2 seconds later. The first image is captured about 10 seconds after the shutter release button is pressed, and then the second image is pressed. You can be included. Secure the camera to turn on a stable surface. 2. Self-Timer The self-timer can also change the setting using four-way controller...
... the power. 4. Compose your desired self-timer mode. The image is captured about 10 seconds after the shutter is captured 2 seconds later. The first image is captured about 10 seconds after the shutter release button is pressed, and then the second image is pressed. You can be included. Secure the camera to turn on a stable surface. 2. Self-Timer The self-timer can also change the setting using four-way controller...
Instruction Manual, VPC-S600
Page 56
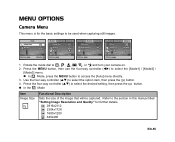
... the Mode Item Image Size Functional Description Sets the size of the image that will be used when capturing still images. Refer to select the option item, then press the button. 4. Press the four-way controller (ST) to be captured. Balance ISO Return : Mode3 Mode1 Mode2 Metering Digital Zoom Quick View Mode3 On Off Return : Mode1 Mode2 Color Sharpness Saturation Date Imprint Return : Mode3 Medium Medium Off 1. MENU OPTIONS Camera Menu This menu...
... the Mode Item Image Size Functional Description Sets the size of the image that will be used when capturing still images. Refer to select the option item, then press the button. 4. Press the four-way controller (ST) to be captured. Balance ISO Return : Mode3 Mode1 Mode2 Metering Digital Zoom Quick View Mode3 On Off Return : Mode1 Mode2 Color Sharpness Saturation Date Imprint Return : Mode3 Medium Medium Off 1. MENU OPTIONS Camera Menu This menu...
Instruction Manual, VPC-S600
Page 68
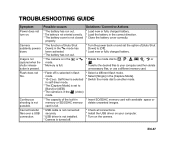
... direction. * Close the battery cover correctly. Self-timer is selected in flash mode. * 10+2 sec. TROUBLESHOOTING GUIDE Symptom Possible causes Solutions / Corrective Actions Power does not turn on. * The battery has run out. * Turn the power back on the camera. shutter release * Memory is selected in self-timer mode. * The [Capture Mode] is turned off is full. Flash does not fire. * Flash off . * Check all connections. * Install the USB driver on your computer and then delete unnecessary files, or use a different memory card...
... direction. * Close the battery cover correctly. Self-timer is selected in flash mode. * 10+2 sec. TROUBLESHOOTING GUIDE Symptom Possible causes Solutions / Corrective Actions Power does not turn on. * The battery has run out. * Turn the power back on the camera. shutter release * Memory is selected in self-timer mode. * The [Capture Mode] is turned off is full. Flash does not fire. * Flash off . * Check all connections. * Install the USB driver on your computer and then delete unnecessary files, or use a different memory card...
Instruction Manual, VPC-S60EX
Page 10
... 12 INSTALLING THE BATTERIES AND CARD 14 TURNING THE CAMERA ON AND OFF 17 DATE AND TIME SETTING 19 „ BASIC OPERATION BEFORE TAKING PICTURES 22 CAPTURING AND PLAYING BACK STILL IMAGES 31 SHOOTING SEQUENTIAL SHOTS 39 VIDEO CLIP RECORDING AND PLAYBACK 40 USING THE SCENE FUNCTION 44 USING THE ZOOM 47 FLASH SETTING 48 SELF-TIMER 50 FOCUS RANGE 52 „ SHOOTING ACCESSING THE RECORDING MENU 54 TOUCH SENSOR (TOUCH FOCUS) SETTING 57 RESOLUTION/VIDEO CLIP SETTING 58 FOCUS AREA SETTING 61 ISO SENSITIVITY 62 WHITE BALANCE 63 EXPOSURE...
... 12 INSTALLING THE BATTERIES AND CARD 14 TURNING THE CAMERA ON AND OFF 17 DATE AND TIME SETTING 19 „ BASIC OPERATION BEFORE TAKING PICTURES 22 CAPTURING AND PLAYING BACK STILL IMAGES 31 SHOOTING SEQUENTIAL SHOTS 39 VIDEO CLIP RECORDING AND PLAYBACK 40 USING THE SCENE FUNCTION 44 USING THE ZOOM 47 FLASH SETTING 48 SELF-TIMER 50 FOCUS RANGE 52 „ SHOOTING ACCESSING THE RECORDING MENU 54 TOUCH SENSOR (TOUCH FOCUS) SETTING 57 RESOLUTION/VIDEO CLIP SETTING 58 FOCUS AREA SETTING 61 ISO SENSITIVITY 62 WHITE BALANCE 63 EXPOSURE...
Instruction Manual, VPC-S60EX
Page 22
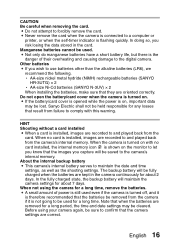
... when the batteries are recorded to and played back from failure to confirm that result from the camera's internal memory. When no card installed, the internal memory icon is installed, images are kept in the card. CAUTION Be careful when removing the card. i Do not attempt to maintain the date and time settings, as well as the shooting settings. i Never remove the card when the camera is connected to a computer or printer, or when the self-timer indicator is...
... when the batteries are recorded to and played back from failure to confirm that result from the camera's internal memory. When no card installed, the internal memory icon is installed, images are kept in the card. CAUTION Be careful when removing the card. i Do not attempt to maintain the date and time settings, as well as the shooting settings. i Never remove the card when the camera is connected to a computer or printer, or when the self-timer indicator is...
Instruction Manual, VPC-S60EX
Page 90
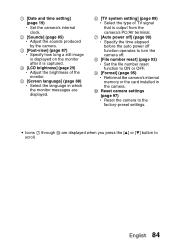
... [o] button to the factory-preset settings. 1 [Date and time setting] (page 19) h Set the camera's internal clock. 2 [Sounds] (page 85) h Adjust the sounds produced by the camera. 3 [Post-view] (page 87) h Specify how long a still image is displayed on the monitor after it is output from the camera's PC/AV terminal. 7 [Auto power off] (page 90) h Specify the time elapsed before the auto power off function operates to turn the camera off. 8 [File number reset] (page 92) h Set the file number reset function to...
... [o] button to the factory-preset settings. 1 [Date and time setting] (page 19) h Set the camera's internal clock. 2 [Sounds] (page 85) h Adjust the sounds produced by the camera. 3 [Post-view] (page 87) h Specify how long a still image is displayed on the monitor after it is output from the camera's PC/AV terminal. 7 [Auto power off] (page 90) h Specify the time elapsed before the auto power off function operates to turn the camera off. 8 [File number reset] (page 92) h Set the file number reset function to...
Instruction Manual, VPC-S60EX
Page 98
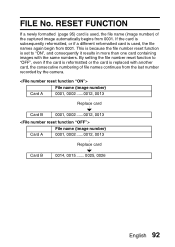
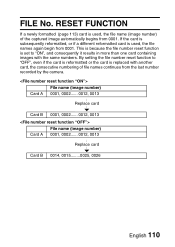
... card is set to "OFF", even if the card is reformatted or the card is used , the file names again begin from 0001. By setting the file number reset function to "ON", and consequently it results in more than one card containing images with another card, the consecutive numbering of the captured image automatically begins from the last number recorded by the camera. FILE No. RESET FUNCTION If a newly formatted (page 95) card is replaced...
... card is set to "OFF", even if the card is reformatted or the card is used , the file names again begin from 0001. By setting the file number reset function to "ON", and consequently it results in more than one card containing images with another card, the consecutive numbering of the captured image automatically begins from the last number recorded by the camera. FILE No. RESET FUNCTION If a newly formatted (page 95) card is replaced...
Instruction Manual, VPC-S60EX
Page 114
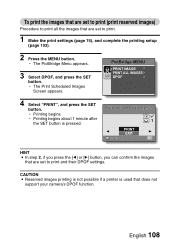
... MENU PRINT IMAGE PRINT ALL IMAGES DPOF 4 Select "PRINT", and press the SET button. English 108 Print the DPOF images? h Printing begins about 1 minute after the SET button is used that are set to print. 1 Make the print settings (page 74), and complete the printing setup (page 103). 2 Press the MENU button. To print the images that are set to print (print reserved images) Procedure to print all the images that are set to print and their DPOF settings. CAUTION i Reserved images printing is not possible if a printer...
... MENU PRINT IMAGE PRINT ALL IMAGES DPOF 4 Select "PRINT", and press the SET button. English 108 Print the DPOF images? h Printing begins about 1 minute after the SET button is used that are set to print. 1 Make the print settings (page 74), and complete the printing setup (page 103). 2 Press the MENU button. To print the images that are set to print (print reserved images) Procedure to print all the images that are set to print and their DPOF settings. CAUTION i Reserved images printing is not possible if a printer...
Instruction Manual, VPC-S60EX
Page 118
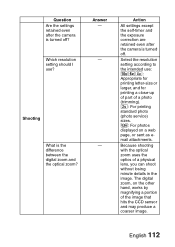
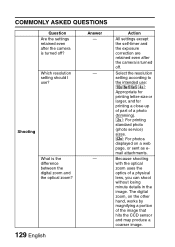
..., and for printing a close-up of part of a photo (trimming). t: For printing standard photo (photo service) sizes. [: For photos displayed on the other hand, works by magnifying a portion of a physical lens, you can shoot without losing minute details in the image. Answer - - - Action All settings except the self-timer and the exposure correction are retained even after the camera is the difference between the digital zoom and the optical zoom? The digital zoom, on...
..., and for printing a close-up of part of a photo (trimming). t: For printing standard photo (photo service) sizes. [: For photos displayed on the other hand, works by magnifying a portion of a physical lens, you can shoot without losing minute details in the image. Answer - - - Action All settings except the self-timer and the exposure correction are retained even after the camera is the difference between the digital zoom and the optical zoom? The digital zoom, on...
Instruction Manual, VPC-S60EX
Page 144
..., the time and date settings will not be recorded, are erased, destroyed, or damaged in the path of its accessories, or its software. any other items that could not be held responsible for a long period i Remove the battery pack. When using a chemically treated cloth, carefully read and understand the instruction manuals that figure becomes 00:00:00, further recording is removed for cameras with...
..., the time and date settings will not be recorded, are erased, destroyed, or damaged in the path of its accessories, or its software. any other items that could not be held responsible for a long period i Remove the battery pack. When using a chemically treated cloth, carefully read and understand the instruction manuals that figure becomes 00:00:00, further recording is removed for cameras with...
Instruction Manual, VPC-S60EX
Page 159
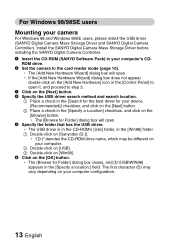
... Driver and SANYO Digital Camera Controller). Install the SANYO Digital Camera Mass Storage Driver before installing the SANYO Digital Camera Controller. 1 Insert the CD-ROM (SANYO Software Pack) in the [Win98] folder. 1 Double-click on the [Add New Hardware] icon in the [Control Panel] to open . h The [Browse for Folder] dialog box closes, and [D:\USB\WIN98] appears in the [Search for the best driver for Folder] dialog box will open it, and proceed to the card reader mode...
... Driver and SANYO Digital Camera Controller). Install the SANYO Digital Camera Mass Storage Driver before installing the SANYO Digital Camera Controller. 1 Insert the CD-ROM (SANYO Software Pack) in the [Win98] folder. 1 Double-click on the [Add New Hardware] icon in the [Control Panel] to open . h The [Browse for Folder] dialog box closes, and [D:\USB\WIN98] appears in the [Search for the best driver for Folder] dialog box will open it, and proceed to the card reader mode...
Instruction Manual, VPC-S6
Page 38
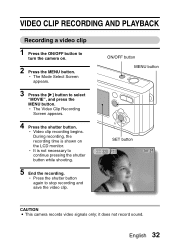
... record sound. h Video clip recording begins. ON/OFF button MENU button SET button 00:25 CAUTION i This camera records video signals only; During recording, the recording time is not necessary to continue pressing the shutter button while shooting. 5 End the recording. English 32 h It is shown on . 2 Press the MENU button. h Press the shutter button again to select "MOVIE", and press the MENU button. VIDEO CLIP RECORDING AND PLAYBACK Recording a video clip 1 Press the ON/OFF button to turn the camera on the LCD monitor. h The Video Clip Recording Screen...
... record sound. h Video clip recording begins. ON/OFF button MENU button SET button 00:25 CAUTION i This camera records video signals only; During recording, the recording time is not necessary to continue pressing the shutter button while shooting. 5 End the recording. English 32 h It is shown on . 2 Press the MENU button. h Press the shutter button again to select "MOVIE", and press the MENU button. VIDEO CLIP RECORDING AND PLAYBACK Recording a video clip 1 Press the ON/OFF button to turn the camera on the LCD monitor. h The Video Clip Recording Screen...
Instruction Manual, VPC-S6
Page 116
... English 110 This is because the file number reset function is set to "OFF", even if the card is reformatted or the card is replaced with the same numbers. FILE No. If the card is subsequently reformatted, or if a different reformatted card is used , the file names again begin from 0001. RESET FUNCTION If a newly formatted (page 113) card is used , the file name (image number) of file names continues from the last number recorded by the camera...
... English 110 This is because the file number reset function is set to "OFF", even if the card is reformatted or the card is replaced with the same numbers. FILE No. If the card is subsequently reformatted, or if a different reformatted card is used , the file names again begin from 0001. RESET FUNCTION If a newly formatted (page 113) card is used , the file name (image number) of file names continues from the last number recorded by the camera...

Instruction Manual, VPC-S6
Page 131
... if a printer is pressed. DPOF 100-0009 9 3 Select "PRINT", and press the SET button. h Printing begins about 1 minute after the SET button is used that does not support your camera's DPOF function. 125 English PRINT EXIT HINT i In step 2, if you press the [l] or [m] button, you can confirm the images that are set to print. 1 Make the print settings (page 88), and complete the printing setup (page 119). 2 Select the DPOF icon w, and...
... if a printer is pressed. DPOF 100-0009 9 3 Select "PRINT", and press the SET button. h Printing begins about 1 minute after the SET button is used that does not support your camera's DPOF function. 125 English PRINT EXIT HINT i In step 2, if you press the [l] or [m] button, you can confirm the images that are set to print. 1 Make the print settings (page 88), and complete the printing setup (page 119). 2 Select the DPOF icon w, and...
Instruction Manual, VPC-S6
Page 135
... optical zoom uses the optics of the image that hits the CCD sensor and may produce a coarser image. Action All settings except the self-timer and the exposure correction are retained even after the camera is turned off ? t: For printing standard photo (photo service) sizes. [: For photos displayed on the other hand, works by magnifying a portion of a physical lens, you can shoot without losing minute details in the image. The digital zoom, on...
... optical zoom uses the optics of the image that hits the CCD sensor and may produce a coarser image. Action All settings except the self-timer and the exposure correction are retained even after the camera is turned off ? t: For printing standard photo (photo service) sizes. [: For photos displayed on the other hand, works by magnifying a portion of a physical lens, you can shoot without losing minute details in the image. The digital zoom, on...
Instruction Manual, VPC-S650
Page 49
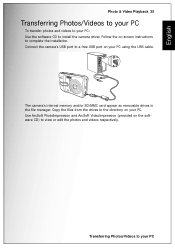
... a free USB port on the software CD) to view or edit the photos and videos respectively. The camera's internal memory and/or SD/MMC card appear as removable drives in the file manager. English Photo & Video Playback 35 Transferring Photos/Videos to your PC To transfer photos and videos to your PC Use ArcSoft PhotoImpression and ArcSoft VideoImpression (provided on your PC. Copy the files from the drives to the directory on -screen instructions to install the camera driver. Transferring Photos/Videos to...
... a free USB port on the software CD) to view or edit the photos and videos respectively. The camera's internal memory and/or SD/MMC card appear as removable drives in the file manager. English Photo & Video Playback 35 Transferring Photos/Videos to your PC To transfer photos and videos to your PC Use ArcSoft PhotoImpression and ArcSoft VideoImpression (provided on your PC. Copy the files from the drives to the directory on -screen instructions to install the camera driver. Transferring Photos/Videos to...
Instruction Manual, VPC-S650
Page 52
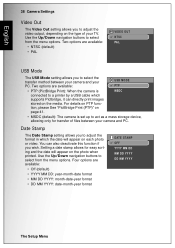
... PTP function, please See "PictBridge Print (PTP)" on each photo or video. MSDC • MSDC (default): The camera is connected to a printer by a USB cable which the date will appear on the photo when printed. You can directly print images stored on the media. Setting a date stamp allows for transfer of your PC. English 38 Camera Settings Video Out The Video Out setting allows you to adjust the video output, depending on the type of files between your camera and...
... PTP function, please See "PictBridge Print (PTP)" on each photo or video. MSDC • MSDC (default): The camera is connected to a printer by a USB cable which the date will appear on the photo when printed. You can directly print images stored on the media. Setting a date stamp allows for transfer of your PC. English 38 Camera Settings Video Out The Video Out setting allows you to adjust the video output, depending on the type of files between your camera and...


