Instruction Manual
Page 3
... to radio and television reception. Copyright This manual contains proprietary information protected by the manufacturer may void your new digital camera. About this equipment. Warning: A shielded-type power cord is no guarantee that to which can radiate radio frequency energy and, if not installed and used in accordance with the limits for help. If this equipment does cause harmful...
... to radio and television reception. Copyright This manual contains proprietary information protected by the manufacturer may void your new digital camera. About this equipment. Warning: A shielded-type power cord is no guarantee that to which can radiate radio frequency energy and, if not installed and used in accordance with the limits for help. If this equipment does cause harmful...
Instruction Manual
Page 4
... cloth. Windows is a trademark of battery(SANYO Li-ion battery, Type NP40, 3.7V, 720mAH). Operation is the trademark of their respective companies. Battery Information • Turn off the camera before installing or removing the battery. • Use only the type of Adobe Corporation. Safety and Handling Precautions Safety and Handling Precautions Camera Information • Do not take apart or attempt to service the camera yourself. •...
... cloth. Windows is a trademark of battery(SANYO Li-ion battery, Type NP40, 3.7V, 720mAH). Operation is the trademark of their respective companies. Battery Information • Turn off the camera before installing or removing the battery. • Use only the type of Adobe Corporation. Safety and Handling Precautions Safety and Handling Precautions Camera Information • Do not take apart or attempt to service the camera yourself. •...
Instruction Manual
Page 8
... and/or reused. Please, help us to questions or problems concerning camera operation in the sections Safety Instructions You many find the answers to conserve the environment we live in! Manufacturer and Address SANYO Electric Co., Ltd. 5-5, Keihan...SANYO FISHER Sales (Europe) GmbH Stahlgruberring 4, D-81829 Munich, Germany Symbols used electrical and electronic equipment, batteries and accumulators. Your SANYO product is printed beneath the symbol mark, this manual Points giving some extended instructions or special points to pay attention to. English vi Preface FOR EU USERS...
... and/or reused. Please, help us to questions or problems concerning camera operation in the sections Safety Instructions You many find the answers to conserve the environment we live in! Manufacturer and Address SANYO Electric Co., Ltd. 5-5, Keihan...SANYO FISHER Sales (Europe) GmbH Stahlgruberring 4, D-81829 Munich, Germany Symbols used electrical and electronic equipment, batteries and accumulators. Your SANYO product is printed beneath the symbol mark, this manual Points giving some extended instructions or special points to pay attention to. English vi Preface FOR EU USERS...
Instruction Manual
Page 12
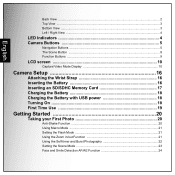
... View ...2 Top View ...3 Bottom View ...3 Left / Right View ...4 LED Indicators 4 Camera Buttons 5 Navigation Buttons ...5 The Scene Button ...8 Function Buttons ...9 LCD screen 10 Capture/Video Mode Display 10 Camera Setup 16 Attaching the Wrist Strap 16 Inserting the Battery 16 Inserting an SD/SDHC Memory Card 17 Charging the Battery 18 Charging the Battery with USB power 18 Turning On 18 First Time Use 19 Getting Started 20 Taking your First Photo 20 Anti-Shake Function ...20 Using Macro Mode ...21 Setting the Flash Mode 21 Using the Zoom in/out Function 21 Using the Self...
... View ...2 Top View ...3 Bottom View ...3 Left / Right View ...4 LED Indicators 4 Camera Buttons 5 Navigation Buttons ...5 The Scene Button ...8 Function Buttons ...9 LCD screen 10 Capture/Video Mode Display 10 Camera Setup 16 Attaching the Wrist Strap 16 Inserting the Battery 16 Inserting an SD/SDHC Memory Card 17 Charging the Battery 18 Charging the Battery with USB power 18 Turning On 18 First Time Use 19 Getting Started 20 Taking your First Photo 20 Anti-Shake Function ...20 Using Macro Mode ...21 Setting the Flash Mode 21 Using the Zoom in/out Function 21 Using the Self...
Instruction Manual
Page 14
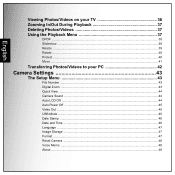
English Viewing Photos/Videos on your TV 36 Zooming In/Out During Playback 37 Deleting Photos/Videos 37 Using the Playback Menu 37 DPOF ...38 Slideshow ...39 Resize ...39 Rotate ...40 Protect ...40 Move ...41 Transferring Photos/Videos to your PC 42 Camera Settings 43 The Setup Menu 43 File Number ...43 Digital Zoom ...43 Quick View ...44 Camera Sound ...44 Auto LCD Off ...44 Auto Power Off ...45 Video Out ...45 USB Mode ...45 Date Stamp ...46 Date and Time ...46 Language ...47 Image Storage ...47 Format ...47 Reset Camera ...48 Voice Memo ...48 About ...48
English Viewing Photos/Videos on your TV 36 Zooming In/Out During Playback 37 Deleting Photos/Videos 37 Using the Playback Menu 37 DPOF ...38 Slideshow ...39 Resize ...39 Rotate ...40 Protect ...40 Move ...41 Transferring Photos/Videos to your PC 42 Camera Settings 43 The Setup Menu 43 File Number ...43 Digital Zoom ...43 Quick View ...44 Camera Sound ...44 Auto LCD Off ...44 Auto Power Off ...45 Video Out ...45 USB Mode ...45 Date Stamp ...46 Date and Time ...46 Language ...47 Image Storage ...47 Format ...47 Reset Camera ...48 Voice Memo ...48 About ...48

Instruction Manual
Page 17
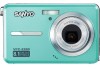
...; 15x zoom (Up to 3x optical zoom and 5x digital zoom) • 1/2.5 inch CCD image sensor • 2.7 inch TFT LCD monitor • 16MB internal flash memory, support SD/SDHC memory card from 32MB to 16GB. • Sleek and slim design • Easy-to-use button interface • PictBridge compatibility • Slideshow feature to review your pictures and movies • A/V output to view your pictures and movies on the purchase of your camera package.
...; 15x zoom (Up to 3x optical zoom and 5x digital zoom) • 1/2.5 inch CCD image sensor • 2.7 inch TFT LCD monitor • 16MB internal flash memory, support SD/SDHC memory card from 32MB to 16GB. • Sleek and slim design • Easy-to-use button interface • PictBridge compatibility • Slideshow feature to review your pictures and movies • A/V output to view your pictures and movies on the purchase of your camera package.
Instruction Manual
Page 21
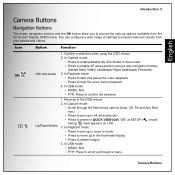
... the thumbnail display • Press to delete images 4. In Capture mode: • Press to enable/disable the Anti-Shake in QUICK VIEW (QV) "ON" at SETUP ( ) mode during mark appears on LCD. 3. In Capture mode: • Scroll through a menu Camera Buttons In Playback mode: • Press to pan up in zoom in mode • Press to move up in AF area selection • Press to delete in Auto mode • Press...
... the thumbnail display • Press to delete images 4. In Capture mode: • Press to enable/disable the Anti-Shake in QUICK VIEW (QV) "ON" at SETUP ( ) mode during mark appears on LCD. 3. In Capture mode: • Scroll through a menu Camera Buttons In Playback mode: • Press to pan up in zoom in mode • Press to move up in AF area selection • Press to delete in Auto mode • Press...

Instruction Manual
Page 24
... to Night Landscape mode. Video Scroll to Auto mode. Use the SCENE button to: Mode Type Icon Function Auto Scroll to Video mode. Portrait Scroll to Night Portrait mode. Night Portrait Scroll to Portrait mode. Landscape Scroll to Copy mode. Copy Scroll to Landscape mode. Sunset Scroll to Backlight mode. Backlight Scroll to Sunset mode. Snow Scroll to Fireworks mode. Fireworks Scroll to Snow mode. Beach Scroll to Sport mode. Camera Buttons Sport Scroll to...
... to Night Landscape mode. Video Scroll to Auto mode. Use the SCENE button to: Mode Type Icon Function Auto Scroll to Video mode. Portrait Scroll to Night Portrait mode. Night Portrait Scroll to Portrait mode. Landscape Scroll to Copy mode. Copy Scroll to Landscape mode. Sunset Scroll to Backlight mode. Backlight Scroll to Sunset mode. Snow Scroll to Fireworks mode. Fireworks Scroll to Snow mode. Beach Scroll to Sport mode. Camera Buttons Sport Scroll to...

Instruction Manual
Page 32
... in the strap eyelet. 2. Open the battery compartment on the left of the camera. 2. Inserting the Battery Follow these instructions to attach the wrist strap to your camera to facilitate easy carrying: 1. Note: Use SANYO Li-ion battery, Type NP40, 3.7V, 720mAH and the battery should be fully charged before using for the first time. Attaching the Wrist Strap English 16 Camera Setup Camera Setup Attaching the Wrist Strap...
... in the strap eyelet. 2. Open the battery compartment on the left of the camera. 2. Inserting the Battery Follow these instructions to attach the wrist strap to your camera to facilitate easy carrying: 1. Note: Use SANYO Li-ion battery, Type NP40, 3.7V, 720mAH and the battery should be fully charged before using for the first time. Attaching the Wrist Strap English 16 Camera Setup Camera Setup Attaching the Wrist Strap...

Instruction Manual
Page 33
.../SDHC Memory Card English Camera Setup 17 Inserting an SD/SDHC Memory Card The camera features 16 MB internal flash memory but you may also use an optional SD/SDHC memory card for additional storage. Pull out the card carefully. To remove the SD/SDHC card, gently push the card until it pops out. It will make unexpected error or image damaged. Follow these instructions to insert the SD/SDHC card. 1. Open the battery compartment...
.../SDHC Memory Card English Camera Setup 17 Inserting an SD/SDHC Memory Card The camera features 16 MB internal flash memory but you may also use an optional SD/SDHC memory card for additional storage. Pull out the card carefully. To remove the SD/SDHC card, gently push the card until it pops out. It will make unexpected error or image damaged. Follow these instructions to insert the SD/SDHC card. 1. Open the battery compartment...

Instruction Manual
Page 34
... to start charging.The power LED will turn off . Power LED blinks during the charging process. 3. The battery does not charge when room temperature exceeds 36 °C or falls below 6 °C. To turn on the camera. ON / OFF 3X OPTICAL ZOOM English 18 Camera Setup Charging the Battery 1. Charging the Battery The power LED will blink faster. To recharge the battery, plug out the DC power supply cable or USB cable and plug in the picture. 2. Connect the power adapter...
... to start charging.The power LED will turn off . Power LED blinks during the charging process. 3. The battery does not charge when room temperature exceeds 36 °C or falls below 6 °C. To turn on the camera. ON / OFF 3X OPTICAL ZOOM English 18 Camera Setup Charging the Battery 1. Charging the Battery The power LED will blink faster. To recharge the battery, plug out the DC power supply cable or USB cable and plug in the picture. 2. Connect the power adapter...

Instruction Manual
Page 40
... the selected focus mode. Press the OK button to delete the video clip if needed. Press the Up/Flash /Delete navigation button to select. 2. Then the camera automatically adjusts the 1/125 F3.5 focus point and exposure to locate Video mode. Use the Up/Down navigation buttons to the optimized value. Recording your subject's face, a white focus bracket will be set on the LCD screen. To record a video clip: 1. When the Shutter button is pressed halfway, the green focus frames...
... the selected focus mode. Press the OK button to delete the video clip if needed. Press the Up/Flash /Delete navigation button to select. 2. Then the camera automatically adjusts the 1/125 F3.5 focus point and exposure to locate Video mode. Use the Up/Down navigation buttons to the optimized value. Recording your subject's face, a white focus bracket will be set on the LCD screen. To record a video clip: 1. When the Shutter button is pressed halfway, the green focus frames...

Instruction Manual
Page 51
... the OK button at any time during playback to skip to begin playback of the clip. The most recent photo or video clip is displayed. 2. Listening to the previous/ next image. Viewing Photos/Videos on the LCD screen: 1. After the video clip finishes playing, the LCD screen displays the first frame of a video clip. 4. Viewing M-Burst Photos To view your photos and video files on the LCD Screen Press the Playback button . Use the Left/Right navigation buttons to pause the video. 7.
... the OK button at any time during playback to skip to begin playback of the clip. The most recent photo or video clip is displayed. 2. Listening to the previous/ next image. Viewing Photos/Videos on the LCD screen: 1. After the video clip finishes playing, the LCD screen displays the first frame of a video clip. 4. Viewing M-Burst Photos To view your photos and video files on the LCD Screen Press the Playback button . Use the Left/Right navigation buttons to pause the video. 7.

Instruction Manual
Page 53
... RESIZE ROTATE PROTECT Zooming In/Out During Playback Using the Playback Menu DELETE CANCEL THIS IMAGE ALL IMAGES Access the playback menu to display the menu options. Photo & Video Playback 37 English Zooming In/Out During Playback The camera's zoom feature can also be used during playback. This allows you to remove unwanted files stored on the left side of the Zoom button W to zoom in on saved photos: 1. Press the MENU button to view further information, configure printing settings, view a slideshow, or delete photos or movies. Use the Up...
... RESIZE ROTATE PROTECT Zooming In/Out During Playback Using the Playback Menu DELETE CANCEL THIS IMAGE ALL IMAGES Access the playback menu to display the menu options. Photo & Video Playback 37 English Zooming In/Out During Playback The camera's zoom feature can also be used during playback. This allows you to remove unwanted files stored on the left side of the Zoom button W to zoom in on saved photos: 1. Press the MENU button to view further information, configure printing settings, view a slideshow, or delete photos or movies. Use the Up...
Instruction Manual
Page 58
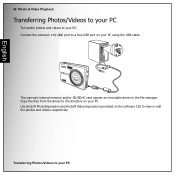
Use ArcSoft PhotoImpression and ArcSoft VideoImpression (provided on the software CD) to a free USB port on your PC 42 Photo & Video Playback Transferring Photos/Videos to your PC To transfer photos and videos to your PC: Connect the camera's port to view or edit the photos and videos respectively. Transferring Photos/Videos to the directory on your PC using the USB cable. English The camera's internal memory and/or SD/SDHC card appear as removable drives in the file manager. Copy the files from the drives to your PC.
Use ArcSoft PhotoImpression and ArcSoft VideoImpression (provided on the software CD) to a free USB port on your PC 42 Photo & Video Playback Transferring Photos/Videos to your PC To transfer photos and videos to your PC: Connect the camera's port to view or edit the photos and videos respectively. Transferring Photos/Videos to the directory on your PC using the USB cable. English The camera's internal memory and/or SD/SDHC card appear as removable drives in the file manager. Copy the files from the drives to your PC.
Instruction Manual
Page 59
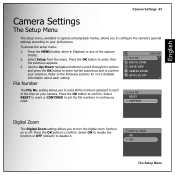
... disable it. Press the OK button to confirm your camera. Select ON to enable the function or OFF (default) to turn the digital zoom function on your selection. RESET CONTINUE Digital Zoom The Digital Zoom setting allows you to reset all file numbers assigned to the following sections for more detailed information about each of the capture modes. 2. Press the MENU button when in Playback or any of the files on or off. DIGITAL ZOOM QUICK VIEW CAMERA SOUND AUTO LCD OFF File Number...
... disable it. Press the OK button to confirm your camera. Select ON to enable the function or OFF (default) to turn the digital zoom function on your selection. RESET CONTINUE Digital Zoom The Digital Zoom setting allows you to reset all file numbers assigned to the following sections for more detailed information about each of the capture modes. 2. Press the MENU button when in Playback or any of the files on or off. DIGITAL ZOOM QUICK VIEW CAMERA SOUND AUTO LCD OFF File Number...
Instruction Manual
Page 61
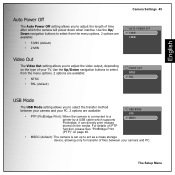
... The Video Out setting allows you to a printer by a USB cable which the camera will power down when inactive. English Auto Power Off The Auto Power Off setting allows you to adjust the video output, depending on the type of your TV. USB MODE PTP MSDC • MSDC (default): The camera is connected to adjust the length of time after which supports Pictbridge, it can directly print images stored on page 49. Use the Up/ Down navigation buttons...
... The Video Out setting allows you to a printer by a USB cable which the camera will power down when inactive. English Auto Power Off The Auto Power Off setting allows you to adjust the video output, depending on the type of your TV. USB MODE PTP MSDC • MSDC (default): The camera is connected to adjust the length of time after which supports Pictbridge, it can directly print images stored on page 49. Use the Up/ Down navigation buttons...

Instruction Manual
Page 62
... also deactivate this function if you wish. To set or adjust the date and time on your camera. Setting a date stamp allows for easy sorting and the date will appear on each photo or video. Use the Up/Down navigation buttons to select from the menu options. 4 options are available: • OFF (default) • YYYY MM DD: year-month-date format • MM DD YYYY: month-date-year format • DD...
... also deactivate this function if you wish. To set or adjust the date and time on your camera. Setting a date stamp allows for easy sorting and the date will appear on each photo or video. Use the Up/Down navigation buttons to select from the menu options. 4 options are available: • OFF (default) • YYYY MM DD: year-month-date format • MM DD YYYY: month-date-year format • DD...

Instruction Manual
Page 63
... OK button to erase all photos and videos are stored on the SD/SDHC card. English Camera Settings 47 Language The Language setting allows you to specify where photos and video clips will be stored. LANGUAGE ENGLISH DEUTSCH FRANCAIS ITALIANO ESPANOL Image Storage The Image Storage setting allows you can also insert an SD/SDHC card (See "Inserting an SD/SDHC Memory Card" on the SD/SDHC will be formatted. • INTERNAL MEMORY: All data...
... OK button to erase all photos and videos are stored on the SD/SDHC card. English Camera Settings 47 Language The Language setting allows you to specify where photos and video clips will be stored. LANGUAGE ENGLISH DEUTSCH FRANCAIS ITALIANO ESPANOL Image Storage The Image Storage setting allows you can also insert an SD/SDHC card (See "Inserting an SD/SDHC Memory Card" on the SD/SDHC will be formatted. • INTERNAL MEMORY: All data...

Instruction Manual
Page 72
... battery. Memory card is exhausted. Delete unnecessary images. Memory card format not recognized. Insufficient space in memory to the unlock position. Delete unnecessary images. Charge or replace the battery. • The battery is protected by a protect switch mechanism. Move the switch to rotate an image. Press the Power button again to turn on the LCD, when AUTO LCD OFF mode (30 SEC or 1 MIN) is achieved. Incorrect TV-out type was selected. Press any button to turn on the camera. Set...
... battery. Memory card is exhausted. Delete unnecessary images. Memory card format not recognized. Insufficient space in memory to the unlock position. Delete unnecessary images. Charge or replace the battery. • The battery is protected by a protect switch mechanism. Move the switch to rotate an image. Press the Power button again to turn on the LCD, when AUTO LCD OFF mode (30 SEC or 1 MIN) is achieved. Incorrect TV-out type was selected. Press any button to turn on the camera. Set...


