VPC-E2BL Owners Manual English
Page 4
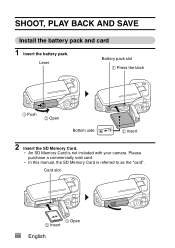
Lever Battery pack slot 1 Press the latch 1 Push 2 Open Bottom side 2 Insert 2 Insert the SD Memory Card. Card slot 1 Open 2 Insert iii English Please purchase a commercially sold card. h In this manual, the SD Memory Card is not included with your camera. SHOOT, PLAY BACK AND SAVE Install the battery pack and card 1 Insert the battery pack. h An SD Memory Card is referred to as the "card".
Lever Battery pack slot 1 Press the latch 1 Push 2 Open Bottom side 2 Insert 2 Insert the SD Memory Card. Card slot 1 Open 2 Insert iii English Please purchase a commercially sold card. h In this manual, the SD Memory Card is not included with your camera. SHOOT, PLAY BACK AND SAVE Install the battery pack and card 1 Insert the battery pack. h An SD Memory Card is referred to as the "card".

VPC-E2BL Owners Manual English
Page 16
... compartment cover, make sure that the camera accessories are not waterproof. k Cautions concerning use in water. i Do not open and close the battery/card compartment cover with JIS IPX8 (formerly JIS protection grade 8) waterproof standard and can be used in water i The waterproof properties of a splash, immediately wipe off any moisture. xv English Note...
... compartment cover, make sure that the camera accessories are not waterproof. k Cautions concerning use in water. i Do not open and close the battery/card compartment cover with JIS IPX8 (formerly JIS protection grade 8) waterproof standard and can be used in water i The waterproof properties of a splash, immediately wipe off any moisture. xv English Note...

VPC-E2BL Owners Manual English
Page 17
... recommended that the waterproof seals be replaced every year with your camera i Do not leave the camera unwashed after it has been immersed in water, use fresh water to it , and use soap or detergent to severe jolts, as doing so may deform the battery/card compartment cover... or camera body, thus compromising its waterproof capability. i After washing the camera, take care to completely drain it . For replacing the seals, please consult your dealer...
... recommended that the waterproof seals be replaced every year with your camera i Do not leave the camera unwashed after it has been immersed in water, use fresh water to it , and use soap or detergent to severe jolts, as doing so may deform the battery/card compartment cover... or camera body, thus compromising its waterproof capability. i After washing the camera, take care to completely drain it . For replacing the seals, please consult your dealer...

VPC-E2BL Owners Manual English
Page 18
... be used with this camera 15 What "card" means in this manual 15 SPECIAL FEATURES 16 Waterproof capability 16 Movable monitor for any shooting angle 17 Capture still shots while recording a video clip 18 Lots of accessories for optimal use of your captured images ....... 19 SYSTEM MAP 20 ...„ SETUP PARTS NAMES 21 CHARGING THE BATTERY PACK 23 Recharging the battery pack 24 INSTALLING THE BATTERY PACK AND CARD 25 Install the battery pack 25 Install the card 28 Warning concerning battery pack temperature 29 TURNING THE CAMERA ON AND OFF 30 Turning on the...
... be used with this camera 15 What "card" means in this manual 15 SPECIAL FEATURES 16 Waterproof capability 16 Movable monitor for any shooting angle 17 Capture still shots while recording a video clip 18 Lots of accessories for optimal use of your captured images ....... 19 SYSTEM MAP 20 ...„ SETUP PARTS NAMES 21 CHARGING THE BATTERY PACK 23 Recharging the battery pack 24 INSTALLING THE BATTERY PACK AND CARD 25 Install the battery pack 25 Install the card 28 Warning concerning battery pack temperature 29 TURNING THE CAMERA ON AND OFF 30 Turning on the...

VPC-E2BL Owners Manual English
Page 21
... IMAGE SIZE (RESIZE 109 CORRECTING THE RED-EYE EFFECT AND IMAGE BLUR 110 EDITING VIDEO CLIPS 112 Procedure to join video clips 113 Video clip cutting (extracting 114 Joining video clips 117 PRINTING INSTRUCTIONS 120 Display the Printing Instructions Screen 120 Specifying date imprinting and...148 RESETTING THE CAMERA SETTINGS 150 CHECKING THE REMAINING CARD MEMORY 151 Checking the remaining number of a video clip 112 Procedure to cut (extract) a portion of images and video recording time 151 For audio recordings 151 CHECKING THE REMAINING BATTERY PACK CHARGE 153 English 4
... IMAGE SIZE (RESIZE 109 CORRECTING THE RED-EYE EFFECT AND IMAGE BLUR 110 EDITING VIDEO CLIPS 112 Procedure to join video clips 113 Video clip cutting (extracting 114 Joining video clips 117 PRINTING INSTRUCTIONS 120 Display the Printing Instructions Screen 120 Specifying date imprinting and...148 RESETTING THE CAMERA SETTINGS 150 CHECKING THE REMAINING CARD MEMORY 151 Checking the remaining number of a video clip 112 Procedure to cut (extract) a portion of images and video recording time 151 For audio recordings 151 CHECKING THE REMAINING BATTERY PACK CHARGE 153 English 4
VPC-E2BL Owners Manual English
Page 22
of Images/Possible Shooting Time/ Possible Recording Time 189 Concerning the multi-indicator 190 Supplied battery pack charger 191 Supplied Li-ion battery pack 191 Others 192 Before capturing those important shots, be sure to first take a test shot to confirm that ... APPENDICES COMMONLY ASKED QUESTIONS 165 TROUBLESHOOTING 172 Camera 172 Notes regarding the Scene Select feature and filters 182 SPECIFICATIONS 184 Camera 184 Camera connectors 188 Battery life 188 Possible No. CONTENTS „ OTHER DEVICES AND CONNECTIONS CONNECTING TO A TV CONNECTING TO A TV 155 PLAYING BACK ON A TV...
of Images/Possible Shooting Time/ Possible Recording Time 189 Concerning the multi-indicator 190 Supplied battery pack charger 191 Supplied Li-ion battery pack 191 Others 192 Before capturing those important shots, be sure to first take a test shot to confirm that ... APPENDICES COMMONLY ASKED QUESTIONS 165 TROUBLESHOOTING 172 Camera 172 Notes regarding the Scene Select feature and filters 182 SPECIFICATIONS 184 Camera 184 Camera connectors 188 Battery life 188 Possible No. CONTENTS „ OTHER DEVICES AND CONNECTIONS CONNECTING TO A TV CONNECTING TO A TV 155 PLAYING BACK ON A TV...

VPC-E2BL Owners Manual English
Page 28
CHECKING THE INCLUDED ACCESSORIES i Handstrap and soft case (pages 13 and 14): 1 set i Xacti Software DVD (DVDROM) (page 4 in the Xacti Software DVD INSTRUCTION MANUAL): 1 i Li-ion battery pack (pages 23 and 25): 1 i Lithium-ion battery pack charger (page 23): 1 i Dedicated USB interface cable (page 157, page 9 in the Xacti Software DVD INSTRUCTION MANUAL): 1 i Dedicated AV interface cable (page 155): 1 11 English
CHECKING THE INCLUDED ACCESSORIES i Handstrap and soft case (pages 13 and 14): 1 set i Xacti Software DVD (DVDROM) (page 4 in the Xacti Software DVD INSTRUCTION MANUAL): 1 i Li-ion battery pack (pages 23 and 25): 1 i Lithium-ion battery pack charger (page 23): 1 i Dedicated USB interface cable (page 157, page 9 in the Xacti Software DVD INSTRUCTION MANUAL): 1 i Dedicated AV interface cable (page 155): 1 11 English

VPC-E2BL Owners Manual English
Page 39
SETUP Rear [ ] button MENU button [ ] button [G] button [W/P] button [T/]] button [H] button SET button Multi-indicator Monitor Tripod stand hole Battery/card compartment cover English 22
SETUP Rear [ ] button MENU button [ ] button [G] button [W/P] button [T/]] button [H] button SET button Multi-indicator Monitor Tripod stand hole Battery/card compartment cover English 22

VPC-E2BL Owners Manual English
Page 40
... Outlet prongs 2 Unfold the outlet prongs from the charger. h If you are finished using it. 1 Insert the battery pack in the direction indicated by the [o] mark on the battery pack. h Insert it from the power outlet. h The recharge time is lit red. h During recharging, the ...CHARGE indicator is approx. 90 minutes. 3 When the CHARGE indicator turns off, remove the battery pack from the charger body, and plug the charger into a power outlet. CHARGING THE BATTERY PACK Please charge the supplied battery pack before using the charger, unplug it in the...
... Outlet prongs 2 Unfold the outlet prongs from the charger. h If you are finished using it. 1 Insert the battery pack in the direction indicated by the [o] mark on the battery pack. h Insert it from the power outlet. h The recharge time is lit red. h During recharging, the ...CHARGE indicator is approx. 90 minutes. 3 When the CHARGE indicator turns off, remove the battery pack from the charger body, and plug the charger into a power outlet. CHARGING THE BATTERY PACK Please charge the supplied battery pack before using the charger, unplug it in the...

VPC-E2BL Owners Manual English
Page 41
... °C and 40 °C (32°F and 104°F). i When the battery pack temperature is high, it may not be warm. i It is interference to your camera. Due to the characteristics of the battery pack, at temperatures below 0 °C (32°F), it may take longer to ...i During recharging, the charger and battery pack will be possible to sufficiently recharge it . Recharge a battery pack in your TV or radio during recharging... SETUP Recharging the battery pack Be sure to fully charge the supplied or separately sold battery pack before using it whenever the remaining...
... °C and 40 °C (32°F and 104°F). i When the battery pack temperature is high, it may not be warm. i It is interference to your camera. Due to the characteristics of the battery pack, at temperatures below 0 °C (32°F), it may take longer to ...i During recharging, the charger and battery pack will be possible to sufficiently recharge it . Recharge a battery pack in your TV or radio during recharging... SETUP Recharging the battery pack Be sure to fully charge the supplied or separately sold battery pack before using it whenever the remaining...

VPC-E2BL Owners Manual English
Page 42
h While gently pressing the lever, open the battery/card compartment cover. Battery pack slot 1 Press the latch Bottom side 2 Insert 25 English Install the battery pack 1 Open the battery/card compartment cover. Lever 1 Push 2 Open 2 Insert the battery pack. h Press the latch, insert the battery pack, and firmly push it all the way in. INSTALLING THE BATTERY PACK AND CARD Make sure that the battery pack and the card orientation are correct.
h While gently pressing the lever, open the battery/card compartment cover. Battery pack slot 1 Press the latch Bottom side 2 Insert 25 English Install the battery pack 1 Open the battery/card compartment cover. Lever 1 Push 2 Open 2 Insert the battery pack. h Press the latch, insert the battery pack, and firmly push it all the way in. INSTALLING THE BATTERY PACK AND CARD Make sure that the battery pack and the card orientation are correct.

VPC-E2BL Owners Manual English
Page 43
Press the PUSH LOCK part to securely close the cover securely. h At the time of purchase the battery pack is not charged. h Press the PUSH LOCK part to fully charge the battery pack (page 23). SETUP English 26 h Press the latch securing the battery pack, and remove the battery pack. 1 Press the latch 2 Pull out 3 Close the battery/card compartment cover. Be sure to close the cover.
Press the PUSH LOCK part to securely close the cover securely. h At the time of purchase the battery pack is not charged. h Press the PUSH LOCK part to fully charge the battery pack (page 23). SETUP English 26 h Press the latch securing the battery pack, and remove the battery pack. 1 Press the latch 2 Pull out 3 Close the battery/card compartment cover. Be sure to close the cover.

VPC-E2BL Owners Manual English
Page 44
... continually recharge the battery when it may expand slightly when stored in a cool environment. 27 English When closing the battery/card compartment cover, make sure that the camera settings are correct. h Do not leave the battery under the hot summer sun or exposed to be waterproof. In the fully... charged state, the backup battery will be fully charged when the battery pack is not to other high-temperature environments. If you can ...
... continually recharge the battery when it may expand slightly when stored in a cool environment. 27 English When closing the battery/card compartment cover, make sure that the camera settings are correct. h Do not leave the battery under the hot summer sun or exposed to be waterproof. In the fully... charged state, the backup battery will be fully charged when the battery pack is not to other high-temperature environments. If you can ...

VPC-E2BL Owners Manual English
Page 45
h Firmly insert the card until it clicks into place. 1 Open 2 Insert 3 Close the battery/card compartment cover. 1 Open h To remove the card, press it out. 3 Pull out English 28 The 2 Push card will protrude slightly, and you can be used after it has been formatted with the camera (page 148). 1 Open the battery/card compartment cover. Card slot 2 Insert the card. SETUP Install the card The card can then pull it down, and then release.
h Firmly insert the card until it clicks into place. 1 Open 2 Insert 3 Close the battery/card compartment cover. 1 Open h To remove the card, press it out. 3 Pull out English 28 The 2 Push card will protrude slightly, and you can be used after it has been formatted with the camera (page 148). 1 Open the battery/card compartment cover. Card slot 2 Insert the card. SETUP Install the card The card can then pull it down, and then release.

VPC-E2BL Owners Manual English
Page 46
... camera should be saved to and played back from the camera's internal memory. In doing so, you attempt to turn on the camera when the battery pack temperature is too high, the temperature warning icon will blink and the camera will be turned off as soon as possible and the... battery pack allowed to cool before the camera is turned on the monitor to be used with no card is shown on again. i Note that the ...
... camera should be saved to and played back from the camera's internal memory. In doing so, you attempt to turn on the camera when the battery pack temperature is too high, the temperature warning icon will blink and the camera will be turned off as soon as possible and the... battery pack allowed to cool before the camera is turned on the monitor to be used with no card is shown on again. i Note that the ...

VPC-E2BL Owners Manual English
Page 47
... ON/OFF button for at least 1 second, the camera turns on the camera when the power save (sleep) function is active In order to preserve battery pack power, the power save (sleep) function will automatically turn off after about 1 hour, or when you can specify the time elapsed before the power...
... ON/OFF button for at least 1 second, the camera turns on the camera when the power save (sleep) function is active In order to preserve battery pack power, the power save (sleep) function will automatically turn off after about 1 hour, or when you can specify the time elapsed before the power...

VPC-E2BL Owners Manual English
Page 51
...lost (the backup will maintain the date and time settings. It is being replaced, an internal battery will last for about 7 days). h The current date and time settings are still correct after replacing the battery pack and before shooting or recording of any type (follow step 1). English 34 h The ...screen to change , and make the correction. HINT About the settings backup i Under normal conditions, while the battery pack is recommended to check that the date and time settings are shown. 4 Select the line you wish to change it in which the date...
...lost (the backup will maintain the date and time settings. It is being replaced, an internal battery will last for about 7 days). h The current date and time settings are still correct after replacing the battery pack and before shooting or recording of any type (follow step 1). English 34 h The ...screen to change , and make the correction. HINT About the settings backup i Under normal conditions, while the battery pack is recommended to check that the date and time settings are shown. 4 Select the line you wish to change it in which the date...

VPC-E2BL Owners Manual English
Page 59
... size will be 640 × 480 pixels, and the still image size will be 3264 × 2448 pixels. 6 : The video clip size will be 320 × 240 pixels, and the still image size will be 640 × 480 pixels. 2 Focus range (page 57) h Select the ... regardless of the conditions. ;: The flash does not operate even in dark situations. 4 (page 36) h Set to shoot. SETUP 1 Recording size (page 56) h Select the video clip size to record, and the still image size to the NORMAL mode. 5 Remaining battery power indication (page 153) English 42
... size will be 640 × 480 pixels, and the still image size will be 3264 × 2448 pixels. 6 : The video clip size will be 320 × 240 pixels, and the still image size will be 640 × 480 pixels. 2 Focus range (page 57) h Select the ... regardless of the conditions. ;: The flash does not operate even in dark situations. 4 (page 36) h Set to shoot. SETUP 1 Recording size (page 56) h Select the video clip size to record, and the still image size to the NORMAL mode. 5 Remaining battery power indication (page 153) English 42

VPC-E2BL Owners Manual English
Page 61
1 Slideshow (page 72) h Specify the slideshow settings and play the slideshow. 2 Playback volume (page 73) h Adjust the volume for video clip and audio file playback. 3 Delete (page 74) h Delete files. 4 (page 36) h Set to the NORMAL mode. 5 Remaining battery power indication (page 153) SETUP English 44
1 Slideshow (page 72) h Specify the slideshow settings and play the slideshow. 2 Playback volume (page 73) h Adjust the volume for video clip and audio file playback. 3 Delete (page 74) h Delete files. 4 (page 36) h Set to the NORMAL mode. 5 Remaining battery power indication (page 153) SETUP English 44

VPC-E2BL Owners Manual English
Page 63
d: Record at 640 × 480 pixels, 30 frames per second (standard bit rate). y: Shooting begins 2 seconds after the [ ] or [ ] button is pressed. 7 Remaining battery power (page 153) 8 S N (page 36) h Set to the SIMPLE mode. l: Record at 640 × 480 pixels, 30 frames per second (high bit rate). m:... The flash will detect the subject brightness and use the flash only when necessary. English 46 SETUP 1 Video clip settings (page 79) (: Record at 640 × 480 pixels, 60 frames per second. ): Record at 320 × 240 pixels, 30 frames per ...
d: Record at 640 × 480 pixels, 30 frames per second (standard bit rate). y: Shooting begins 2 seconds after the [ ] or [ ] button is pressed. 7 Remaining battery power (page 153) 8 S N (page 36) h Set to the SIMPLE mode. l: Record at 640 × 480 pixels, 30 frames per second (high bit rate). m:... The flash will detect the subject brightness and use the flash only when necessary. English 46 SETUP 1 Video clip settings (page 79) (: Record at 640 × 480 pixels, 60 frames per second. ): Record at 320 × 240 pixels, 30 frames per ...


