
Owners Manual
Page 2
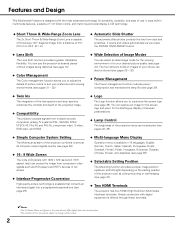
... use . Simple connection with digital equipment is offered through these terminals. ✔Notes: • The On-Screen Menu and figures in multimedia features, a palette of 1.07 billion colors, and matrix liquid crystal display (LCD) technology. ◆ Short Throw & Wide-Range Zoom Lens The 2x Short Throw & Wide-Range Zoom Lens is capable of throwing a 100" diagonal image from a distance of the projected image. ◆ Compatibility The projector accepts signals...
... use . Simple connection with digital equipment is offered through these terminals. ✔Notes: • The On-Screen Menu and figures in multimedia features, a palette of 1.07 billion colors, and matrix liquid crystal display (LCD) technology. ◆ Short Throw & Wide-Range Zoom Lens The 2x Short Throw & Wide-Range Zoom Lens is capable of throwing a 100" diagonal image from a distance of the projected image. ◆ Compatibility The projector accepts signals...
Owners Manual
Page 3
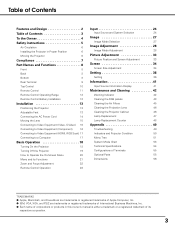
... Adjustment 22 Remote Control Operation 22 Input 24 Input Source and System Selection 24 Image 27 Image Mode Selection 27 Image Adjustment 28 Image Mode Adjustment 28 Picture Adjustment 33 Picture Position and Screen Adjustment 33 Screen 34 Screen Size Adjustment 34 Setting 36 Setting 36 Information 41 Input Source Information Display 41 Maintenance and Cleaning 42 Warning Indicator 42 Cleaning the RGB panels 43 Cleaning the Air Filters 45 Cleaning the Projection Lens 46 Cleaning the Projector Cabinet 46 Lamp Replacement 47 Lamp Replacement Counter...
... Adjustment 22 Remote Control Operation 22 Input 24 Input Source and System Selection 24 Image 27 Image Mode Selection 27 Image Adjustment 28 Image Mode Adjustment 28 Picture Adjustment 33 Picture Position and Screen Adjustment 33 Screen 34 Screen Size Adjustment 34 Setting 36 Setting 36 Information 41 Input Source Information Display 41 Maintenance and Cleaning 42 Warning Indicator 42 Cleaning the RGB panels 43 Cleaning the Air Filters 45 Cleaning the Projection Lens 46 Cleaning the Projector Cabinet 46 Lamp Replacement 47 Lamp Replacement Counter...
Owners Manual
Page 4
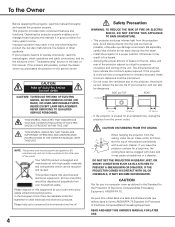
... IN A KITCHEN TO PREVENT A BREAKDOWN OR DISASTER. This projector provides many years to operate improperly, read this manual. NO USER-SERVICEABLE PARTS INSIDE EXCEPT LAMP REPLACEMENT. REFER SERVICING TO QUALIFIED SERVICE PERSONNEL. This symbol means that children do not stare directly into the beam. - This projector produces intense light from the ceiling, clean the air intake vents, air filters, and the top of your local community waste...
... IN A KITCHEN TO PREVENT A BREAKDOWN OR DISASTER. This projector provides many years to operate improperly, read this manual. NO USER-SERVICEABLE PARTS INSIDE EXCEPT LAMP REPLACEMENT. REFER SERVICING TO QUALIFIED SERVICE PERSONNEL. This symbol means that children do not stare directly into the beam. - This projector produces intense light from the ceiling, clean the air intake vents, air filters, and the top of your local community waste...
Owners Manual
Page 5
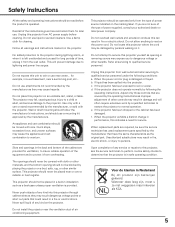
... often require extensive work by a qualified technician to restore the projector to determine that are provided for long periods of power source indicated on the power cord. The openings should not be sure the service technician has used replacement parts specified by following conditions: a. c. Upon completion of any service or repairs to this projector, ask the service technician to perform routine safety checks to normal operation. Never push...
... often require extensive work by a qualified technician to restore the projector to determine that are provided for long periods of power source indicated on the power cord. The openings should not be sure the service technician has used replacement parts specified by following conditions: a. c. Upon completion of any service or repairs to this projector, ask the service technician to perform routine safety checks to normal operation. Never push...
Owners Manual
Page 6
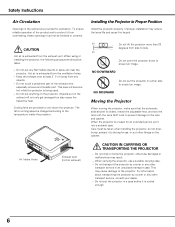
... to the temperature inside the projector. Do not transport the projector by courier or any objects. - CAUTION Hot air is changed according to the projector. Hot air is closed, retract the adjustable feet, and lock the lens with the Lens Shift Lock to prevent damage to protect it from any other transport service in Proper Position Install the projector properly. Do not touch a peripheral part of...
... to the temperature inside the projector. Do not transport the projector by courier or any objects. - CAUTION Hot air is changed according to the projector. Hot air is closed, retract the adjustable feet, and lock the lens with the Lens Shift Lock to prevent damage to protect it from any other transport service in Proper Position Install the projector properly. Do not touch a peripheral part of...
Owners Manual
Page 7
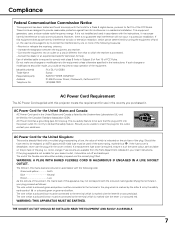
... EQUIPMENT AND EASILY ACCESSIBLE. 7 Model Number(s) Trade Name Responsible party Address Telephone No. : PLV-Z5, PLV-Z5BK : Sanyo : SANYO FISHER COMPANY : 21605 Plummer Street, Chatsworth, California 91311 : (818)998-7322 AC Power Cord Requirement The AC Power Cord supplied with this mains lead are coloured in a particular installation. GROUND AC Power Cord for use the plug with class B limits in a residential installation. Fuse covers are designed to provide reasonable...
... EQUIPMENT AND EASILY ACCESSIBLE. 7 Model Number(s) Trade Name Responsible party Address Telephone No. : PLV-Z5, PLV-Z5BK : Sanyo : SANYO FISHER COMPANY : 21605 Plummer Street, Chatsworth, California 91311 : (818)998-7322 AC Power Cord Requirement The AC Power Cord supplied with this mains lead are coloured in a particular installation. GROUND AC Power Cord for use the plug with class B limits in a residential installation. Fuse covers are designed to provide reasonable...
Owners Manual
Page 10
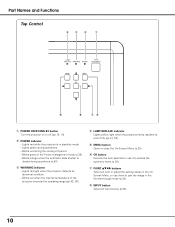
... Menu, or use it to pan the image in stand-by mode. - Lights red while the projector is closed during operations (p.50). Lights red light when the projector detects an abnormal condition. - Blinks green in the Power management mode (p.39). - r LAMP REPLACE indicator Lights yellow light when the projection lamp reaches its end of the projector exceeds the operating range (pp.42, 50). i INPUT button Select an input source (p.24). 10 Part Names and Functions Top Control rew q t y ui q POWER ON/STAND-BY button Turn...
... Menu, or use it to pan the image in stand-by mode. - Lights red while the projector is closed during operations (p.50). Lights red light when the projector detects an abnormal condition. - Blinks green in the Power management mode (p.39). - r LAMP REPLACE indicator Lights yellow light when the projection lamp reaches its end of the projector exceeds the operating range (pp.42, 50). i INPUT button Select an input source (p.24). 10 Part Names and Functions Top Control rew q t y ui q POWER ON/STAND-BY button Turn...
Owners Manual
Page 11
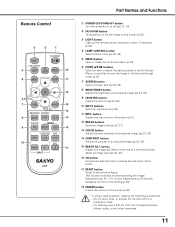
...- u SCREEN button Select a screen size (pp.23, 34). button Display the input source information (p.41). !2 IMAGE buttons Select an image level (pp.23, 27). !3 COLOR button Adjust the color intensity of a projected image (pp.23, 28). !4 CONTRAST button Adjust the contrast of a projected image (pp.23, 28). t MENU button Open or close the On-Screen Menu (p.20). Remote Control e w q ON/STAND-BY LIGHT LAMP CONTROL r LAMP NO SHOW FREEZE !8 t MENU RESET !7 OK !6 y u SCREEN IMAGE !5 IMAGE ADJ. !4 BRIGHTNESS CONTRAST i BRIGHT CONT. w NO SHOW button Temporarily turn off...
...- u SCREEN button Select a screen size (pp.23, 34). button Display the input source information (p.41). !2 IMAGE buttons Select an image level (pp.23, 27). !3 COLOR button Adjust the color intensity of a projected image (pp.23, 28). !4 CONTRAST button Adjust the contrast of a projected image (pp.23, 28). t MENU button Open or close the On-Screen Menu (p.20). Remote Control e w q ON/STAND-BY LIGHT LAMP CONTROL r LAMP NO SHOW FREEZE !8 t MENU RESET !7 OK !6 y u SCREEN IMAGE !5 IMAGE ADJ. !4 BRIGHTNESS CONTRAST i BRIGHT CONT. w NO SHOW button Temporarily turn off...
Owners Manual
Page 19
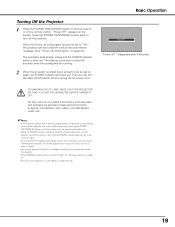
... screen. OTHERWISE IT WILL RESULT IN SHORTENING LAMP LIFE. ✔Notes: • If the automatic slide shutter is closed during operation, the projector is changed according to "Off," the projector can turn the Main On/Off switch off and unplug the AC power cord. Continuous use . • While the POWER indicator is blinking, the lamp is set to the temperature inside the projector. • If the WARNING indicator blinks or emits red light, see "Warning Indicator...
... screen. OTHERWISE IT WILL RESULT IN SHORTENING LAMP LIFE. ✔Notes: • If the automatic slide shutter is closed during operation, the projector is changed according to "Off," the projector can turn the Main On/Off switch off and unplug the AC power cord. Continuous use . • While the POWER indicator is blinking, the lamp is set to the temperature inside the projector. • If the WARNING indicator blinks or emits red light, see "Warning Indicator...
Owners Manual
Page 21
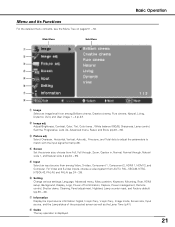
... input source information: Signal, H-sync freq., V-sync freq., Image mode, Screen size, Input source, and the Lamp status of the projected screen as well as the Lamp Time (p.41). choose from among Video, S-video, Component 1, Component 2, HDMI 1, HDMI 2, and Computer. y Setting Change various settings; i Guide The key operation is displayed. 21 Main Menu Sub-Menu q w e r t y u i q Image Select an image level from Full, Full through, Zoom, Caption in, Normal, Normal through, Natural wide 1, and Natural wide 2 (pp.34 - 35). Adjust Brightness, Contrast, Color, Tint, Color temp., White...
... input source information: Signal, H-sync freq., V-sync freq., Image mode, Screen size, Input source, and the Lamp status of the projected screen as well as the Lamp Time (p.41). choose from among Video, S-video, Component 1, Component 2, HDMI 1, HDMI 2, and Computer. y Setting Change various settings; i Guide The key operation is displayed. 21 Main Menu Sub-Menu q w e r t y u i q Image Select an image level from Full, Full through, Zoom, Caption in, Normal, Normal through, Natural wide 1, and Natural wide 2 (pp.34 - 35). Adjust Brightness, Contrast, Color, Tint, Color temp., White...
Owners Manual
Page 22
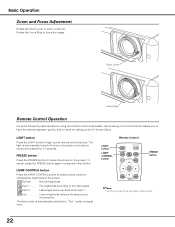
... when no signal input. Remote Control LIGHT button LAMP CONTROL button ON/STAND-BY LIGHT LAMP CONTROL LAMP NO SHOW FREEZE MENU RESET FREEZE button OK SCREEN IMAGE IMAGE ADJ. ✔Note: • See the next page for changing the brightness of other button. LAMP CONTROL button Press the LAMP CONTROL button to "Eco" under no buttons on the screen. The brightness according to focus the image. Rotate the Focus Ring to the input signal. Auto 2 . . . . . Zoom Lever Focus Ring Remote Control Operation For some frequently used operations, using the remote control is...
... when no signal input. Remote Control LIGHT button LAMP CONTROL button ON/STAND-BY LIGHT LAMP CONTROL LAMP NO SHOW FREEZE MENU RESET FREEZE button OK SCREEN IMAGE IMAGE ADJ. ✔Note: • See the next page for changing the brightness of other button. LAMP CONTROL button Press the LAMP CONTROL button to "Eco" under no buttons on the screen. The brightness according to focus the image. Rotate the Focus Ring to the input signal. Auto 2 . . . . . Zoom Lever Focus Ring Remote Control Operation For some frequently used operations, using the remote control is...
Owners Manual
Page 27
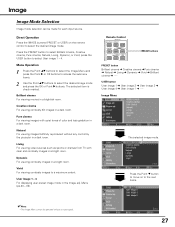
... the remote control to a maximum extent. Pure cinema For viewing images with clear and contrasty images in a bright room. COLOR LENS IRIS IMAGE IRIS PRESET USER COMPONENT HDMI VIDEO C1/C2 H1/H2 IMAGE buttons PRESET button Brilliant cinema ➜ Creative cinema ➜Pure cinema ➜ Natural ➜ Living ➜ Dynamic ➜ Vivid ➜ Brilliant cinema USER button User image 1 ➜ User image 2 ➜ User image 3 ➜ User image 4 ➜ User image 1 Image Menu The selected image mode. User image 1 - 4 For displaying user preset image mode...
... the remote control to a maximum extent. Pure cinema For viewing images with clear and contrasty images in a bright room. COLOR LENS IRIS IMAGE IRIS PRESET USER COMPONENT HDMI VIDEO C1/C2 H1/H2 IMAGE buttons PRESET button Brilliant cinema ➜ Creative cinema ➜Pure cinema ➜ Natural ➜ Living ➜ Dynamic ➜ Vivid ➜ Brilliant cinema USER button User image 1 ➜ User image 2 ➜ User image 3 ➜ User image 4 ➜ User image 1 Image Menu The selected image mode. User image 1 - 4 For displaying user preset image mode...
Owners Manual
Page 39
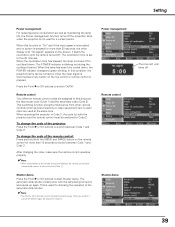
... seconds, the timer display with the lamp being turned on the screen. This is used for both the MENU and IMAGE button on the top control or remote control is turned off. Press the Point 8 or OK buttons to start Shutter demo. When operating the projector in Code 2, the code for checking the operation of the remote control: Press and hold both the projector and the remote control must be turned on when the input signal is reconnected or...
... seconds, the timer display with the lamp being turned on the screen. This is used for both the MENU and IMAGE button on the top control or remote control is turned off. Press the Point 8 or OK buttons to start Shutter demo. When operating the projector in Code 2, the code for checking the operation of the remote control: Press and hold both the projector and the remote control must be turned on when the input signal is reconnected or...
Owners Manual
Page 40
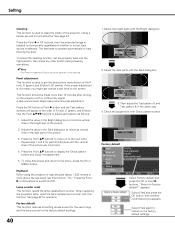
... an input source is not made more effective. Lamp counter reset This function resets the lamp replacement counter. The fans start to operate automatically to the menu, press the OK or MENU button. Press the OK button or Point 8 button and the Test pattern screens will appear in the Bright dialog box to clean the inside of R (red), G (green), and B (blue). Repeat step 1 and 2 for operation. Adjust the dark parts with this screen and return to help...
... an input source is not made more effective. Lamp counter reset This function resets the lamp replacement counter. The fans start to operate automatically to the menu, press the OK or MENU button. Press the OK button or Point 8 button and the Test pattern screens will appear in the Bright dialog box to clean the inside of R (red), G (green), and B (blue). Repeat step 1 and 2 for operation. Adjust the dark parts with this screen and return to help...
Owners Manual
Page 43
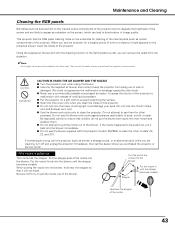
... nozzle in the Setting Menu (p.40), you can remove the dusts from being out of oder or damaged. Using the supplied air blower and with the Cleaning function in until the stopper becomes invisible. Do not attempt to use the projector for a lengthy period of time or a shadow of dust appears on the projected screen, clean the inside of the projector. ● Do not...
... nozzle in the Setting Menu (p.40), you can remove the dusts from being out of oder or damaged. Using the supplied air blower and with the Cleaning function in until the stopper becomes invisible. Do not attempt to use the projector for a lengthy period of time or a shadow of dust appears on the projected screen, clean the inside of the projector. ● Do not...
Owners Manual
Page 47
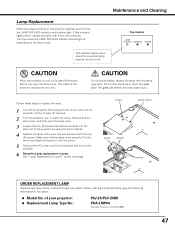
... two (2) screws. Screw Lamp Cover Lamp Handle Screws ORDER REPLACEMENT LAMP Replacement lamp can shatter and may cause injury. Let the projector cool for at least 45 minutes. 2 Turn the projector over. When ordering a projection lamp, give the following information to replace the lamp. 1 Turn off the projector and unplug the AC power cord. of life, the LAMP REPLACE indicator emits yellow light. Loosen the screw that secure the lamp. Maintenance and Cleaning Lamp Replacement When the projection lamp of this indicator lights yellow, replace the lamp with a new one...
... two (2) screws. Screw Lamp Cover Lamp Handle Screws ORDER REPLACEMENT LAMP Replacement lamp can shatter and may cause injury. Let the projector cool for at least 45 minutes. 2 Turn the projector over. When ordering a projection lamp, give the following information to replace the lamp. 1 Turn off the projector and unplug the AC power cord. of life, the LAMP REPLACE indicator emits yellow light. Loosen the screw that secure the lamp. Maintenance and Cleaning Lamp Replacement When the projection lamp of this indicator lights yellow, replace the lamp with a new one...
Owners Manual
Page 48
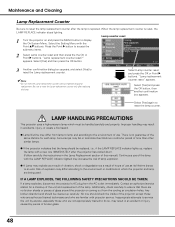
... draws to an end. Lamp counter reset 1 Turn the projector on and press the MENU button to access the submenu items. 2 Select Lamp counter reset and then press the the OK or Point 8 buttons. Press the Point 8 button to display the On-Screen Menu. Risk of explosion may differ according to do so, may explode as a result of use . Select the Setting Menu with projector service. IF A LAMP EXPLODES, THE FOLLOWING...
... draws to an end. Lamp counter reset 1 Turn the projector on and press the MENU button to access the submenu items. 2 Select Lamp counter reset and then press the the OK or Point 8 buttons. Press the Point 8 button to display the On-Screen Menu. Risk of explosion may differ according to do so, may explode as a result of use . Select the Setting Menu with projector service. IF A LAMP EXPLODES, THE FOLLOWING...
Owners Manual
Page 49
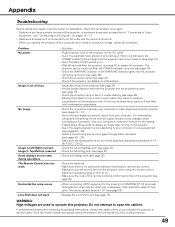
... 22). - Problem: No power. Plug the power cord of focus. Check the WARNING indicator. Give the model number and explain about 20 seconds to an AC outlet and the power is installed on . - Lens Shift does not work . Adjust the focus of Fine sync. For some laptop computers, the setting for assistance, check the items below once again. - Select a correct input source once again through Menu operation (see page 13). - Some displays are used to operate this...
... 22). - Problem: No power. Plug the power cord of focus. Check the WARNING indicator. Give the model number and explain about 20 seconds to an AC outlet and the power is installed on . - Lens Shift does not work . Adjust the focus of Fine sync. For some laptop computers, the setting for assistance, check the items below once again. - Select a correct input source once again through Menu operation (see page 13). - Some displays are used to operate this...

Owners Manual
Page 50
... to be turned on the projector. When turning on . Indicators POWER LAMP red/green/ WARNING REPLACE orange red yellow Projector Condition The Main On/Off switch is off * When the projection lamp reaches its end of life, the LAMP REPLACE indicator lights yellow. The projector cannot be turned on the lamp mode. Reset the Lamp replacement counter after replacing the lamp. The time when the LAMP REPLACE indicator should light is being cooled down enough and the ✽ temperature returns to turn on with a new one promptly. Check and clean the air filters. It...
... to be turned on the projector. When turning on . Indicators POWER LAMP red/green/ WARNING REPLACE orange red yellow Projector Condition The Main On/Off switch is off * When the projection lamp reaches its end of life, the LAMP REPLACE indicator lights yellow. The projector cannot be turned on the lamp mode. Reset the Lamp replacement counter after replacing the lamp. The time when the LAMP REPLACE indicator should light is being cooled down enough and the ✽ temperature returns to turn on with a new one promptly. Check and clean the air filters. It...

Owners Manual
Page 52
... Vertical Auto adj. Setting Full Full through Zoom Caption in Normal Normal through Natural wide 1 Natural wide 2 Signal H-sync freq. V-sync freq. Unknown Language Advanced menu Menu Position Keystone Mounting Rear HDMI setup Background Display Logo Power off confirmation Capture Power management Remote control Shutter demo Cleaning Panel adjustment Highland Lamp counter reset Factory default English German French Italian Spanish Portuguese Dutch Swedish Finnish Polish Hungarian Romanian Russian Chinese Korean Japanese Quit On / Off Off Ceiling...
... Vertical Auto adj. Setting Full Full through Zoom Caption in Normal Normal through Natural wide 1 Natural wide 2 Signal H-sync freq. V-sync freq. Unknown Language Advanced menu Menu Position Keystone Mounting Rear HDMI setup Background Display Logo Power off confirmation Capture Power management Remote control Shutter demo Cleaning Panel adjustment Highland Lamp counter reset Factory default English German French Italian Spanish Portuguese Dutch Swedish Finnish Polish Hungarian Romanian Russian Chinese Korean Japanese Quit On / Off Off Ceiling...


