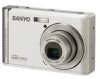
Instruction Manual, VPC-S1070
Page 3
..., which the receiver is connected. • Consult the dealer or an experienced radio/TV technician for a Class B digital device, pursuant to Part 15 of this Manual These limits are reserved. Warning: A shielded-type power cord is no guarantee that interference will not occur in using your warranty and service agreement. Operation is subject to change without prior written permission of...
..., which the receiver is connected. • Consult the dealer or an experienced radio/TV technician for a Class B digital device, pursuant to Part 15 of this Manual These limits are reserved. Warning: A shielded-type power cord is no guarantee that interference will not occur in using your warranty and service agreement. Operation is subject to change without prior written permission of...
Instruction Manual, VPC-S1070
Page 10
... includes primary product specifications, software, software drivers, and user's manual. This is a trademark. • Other names and products may be different from the actual design of Apple Computer, Inc. • SD™ is a trademark. • SDHC™ is due to change without notice. Occasionally a retailer will specify a unique product color, appearance, and internal memory capacity. Safety Instructions Products very often vary...
... includes primary product specifications, software, software drivers, and user's manual. This is a trademark. • Other names and products may be different from the actual design of Apple Computer, Inc. • SD™ is a trademark. • SDHC™ is due to change without notice. Occasionally a retailer will specify a unique product color, appearance, and internal memory capacity. Safety Instructions Products very often vary...
Instruction Manual, VPC-S1070
Page 11
... USERS ...vi Symbols used in this manual vi FCC Information ...vii Declaration of Conformity vii Canadian ICES-003 Information vii TRADEMARK INFORMATION viii READ THIS FIRST ...viii Introduction 1 System Requirements 1 Package Contents 1 Main Features ...1 Camera Views 2 Front View ...2 Back View ...2 Top View ...2 Bottom View ...3 Left / Right View ...3 LED Indicators 3 Camera Buttons 4 Navigation Buttons ...4 The Scene Button ...7 Function Buttons ...8 LCD screen ...9 Capture/Video Mode Display 9 Camera Setup 14 Attaching the Wrist Strap 14 Inserting the Battery...
... USERS ...vi Symbols used in this manual vi FCC Information ...vii Declaration of Conformity vii Canadian ICES-003 Information vii TRADEMARK INFORMATION viii READ THIS FIRST ...viii Introduction 1 System Requirements 1 Package Contents 1 Main Features ...1 Camera Views 2 Front View ...2 Back View ...2 Top View ...2 Bottom View ...3 Left / Right View ...3 LED Indicators 3 Camera Buttons 4 Navigation Buttons ...4 The Scene Button ...7 Function Buttons ...8 LCD screen ...9 Capture/Video Mode Display 9 Camera Setup 14 Attaching the Wrist Strap 14 Inserting the Battery...

Instruction Manual, VPC-S1070
Page 12
English Turning On ...15 First Time Use 16 Getting Started 17 Taking your First Photo 17 Anti-Shake Function ...17 Using Macro Mode ...17 Setting the Flash Mode ...17 Using the Zoom in/out Function 18 Using the Self-timer and Burst Photography 18 Using the AEB (Auto Exposure Bracketing) Function 19 Setting the Scene Mode 20 Face Detection AF/AE Function 21 Recording your First Video 21 Recording Voice Memos 21 Capture Settings 23 The Capture Menu 23 Image Resolution ...23 Image Quality ...24...
English Turning On ...15 First Time Use 16 Getting Started 17 Taking your First Photo 17 Anti-Shake Function ...17 Using Macro Mode ...17 Setting the Flash Mode ...17 Using the Zoom in/out Function 18 Using the Self-timer and Burst Photography 18 Using the AEB (Auto Exposure Bracketing) Function 19 Setting the Scene Mode 20 Face Detection AF/AE Function 21 Recording your First Video 21 Recording Voice Memos 21 Capture Settings 23 The Capture Menu 23 Image Resolution ...23 Image Quality ...24...

Instruction Manual, VPC-S1070
Page 13
English Zooming In/Out During Playback 33 Deleting Photos/Videos 33 Using the Playback Menu 33 DPOF ...34 Slideshow ...35 Resize ...35 Rotate ...36 Protect ...36 Move ...37 Back to AUTO memory mode 37 Transferring Photos/Videos to your PC 38 Camera Settings 39 The Setup Menu 39 LCD Brightness ...39 File Number ...39 Digital Zoom ...40 Quick View ...40 Continuous AF ...40 Camera Sound ...40 Auto LCD Off ...41 Auto Power Off ...41 Video Out ...41 USB Mode ...41 Date Stamp ...42 Date and Time ...42 Language ...42 Image Storage ...43 Format ...43 Reset ...43...
English Zooming In/Out During Playback 33 Deleting Photos/Videos 33 Using the Playback Menu 33 DPOF ...34 Slideshow ...35 Resize ...35 Rotate ...36 Protect ...36 Move ...37 Back to AUTO memory mode 37 Transferring Photos/Videos to your PC 38 Camera Settings 39 The Setup Menu 39 LCD Brightness ...39 File Number ...39 Digital Zoom ...40 Quick View ...40 Continuous AF ...40 Camera Sound ...40 Auto LCD Off ...41 Auto Power Off ...41 Video Out ...41 USB Mode ...41 Date Stamp ...42 Date and Time ...42 Language ...42 Image Storage ...43 Format ...43 Reset ...43...
Instruction Manual, VPC-S1070
Page 15
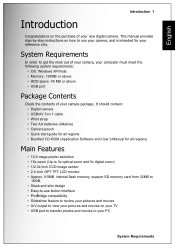
... digital camera. English Introduction 1 Introduction Congratulations on how to use button interface • PictBridge compatibility • Slideshow feature to review your pictures and movies • A/V output to view your pictures and movies on your TV • USB port to transfer photos and movies to your camera package. This manual provides step-by-step instructions on the purchase of your PC System Requirements It should contain: • Digital camera • USB/AV 3-in-1 cable...
... digital camera. English Introduction 1 Introduction Congratulations on how to use button interface • PictBridge compatibility • Slideshow feature to review your pictures and movies • A/V output to view your pictures and movies on your TV • USB port to transfer photos and movies to your camera package. This manual provides step-by-step instructions on the purchase of your PC System Requirements It should contain: • Digital camera • USB/AV 3-in-1 cable...
Instruction Manual, VPC-S1070
Page 17
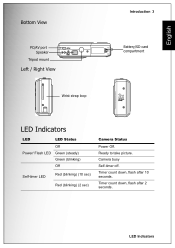
English Bottom View PC/AV port Speaker Tripod mount Left / Right View Wrist strap loop Introduction 3 Battery/SD card compartment LED Indicators LED LED Status Off Power/ Flash LED Green (steady) Green (blinking) Off Self-timer LED Red (blinking) (10 sec) Red (blinking) (2 sec) Camera Status Power Off. LED Indicators Timer count down , flash after 10 seconds. Camera busy Self-timer off. Timer count down , flash after 2 seconds. Ready to take picture.
English Bottom View PC/AV port Speaker Tripod mount Left / Right View Wrist strap loop Introduction 3 Battery/SD card compartment LED Indicators LED LED Status Off Power/ Flash LED Green (steady) Green (blinking) Off Self-timer LED Red (blinking) (10 sec) Red (blinking) (2 sec) Camera Status Power Off. LED Indicators Timer count down , flash after 10 seconds. Camera busy Self-timer off. Timer count down , flash after 2 seconds. Ready to take picture.
Instruction Manual, VPC-S1070
Page 18
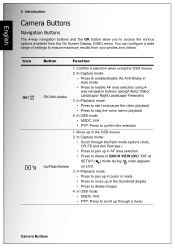
... from your photos and videos. In Playback mode: • Press to pan up in zoom in mode • Press to move up through the flash mode options (Auto, Off, Fill and Anti Red-eye.) • Press to pan up in the thumbnail display • Press to delete images 4. In USB mode: • MSDC: N/A • PTP: Press to ensure maximum results from the On Screen Display (OSD) menu. In USB mode: •...
... from your photos and videos. In Playback mode: • Press to pan up in zoom in mode • Press to move up through the flash mode options (Auto, Off, Fill and Anti Red-eye.) • Press to pan up in the thumbnail display • Press to delete images 4. In USB mode: • MSDC: N/A • PTP: Press to ensure maximum results from the On Screen Display (OSD) menu. In USB mode: •...
Instruction Manual, VPC-S1070
Page 29
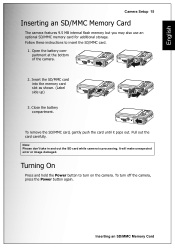
... card while camera is processing. It will make unexpected error or image damaged. To remove the SD/MMC card, gently push the card until it pops out. Inserting an SD/MMC Memory Card Open the battery compartment at the bottom of the camera. 2. Follow these instructions to turn off the camera, press the Power button again. English Camera Setup 15 Inserting an SD/MMC Memory Card The camera features 9.5 MB internal flash memory but you may also use...
... card while camera is processing. It will make unexpected error or image damaged. To remove the SD/MMC card, gently push the card until it pops out. Inserting an SD/MMC Memory Card Open the battery compartment at the bottom of the camera. 2. Follow these instructions to turn off the camera, press the Power button again. English Camera Setup 15 Inserting an SD/MMC Memory Card The camera features 9.5 MB internal flash memory but you may also use...
Instruction Manual, VPC-S1070
Page 31
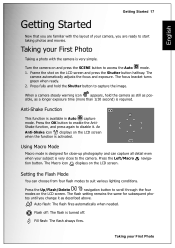
... focus and exposure. Using Macro Mode Macro mode is designed for subsequent pho- Taking your camera, you are ready to access the Auto mode. 1. Frame the shot on the LCD screen when the function is activated. When a camera steady warning icon appears, hold the Shutter button to disable it as a longer exposure time (more than 1/30 second) is required. An Anti-Shake icon displays on the LCD screen and press the Shutter button halfway. Auto flash: The flash fires automatically when needed. Flash...
... focus and exposure. Using Macro Mode Macro mode is designed for subsequent pho- Taking your camera, you are ready to access the Auto mode. 1. Frame the shot on the LCD screen when the function is activated. When a camera steady warning icon appears, hold the Shutter button to disable it as a longer exposure time (more than 1/30 second) is required. An Anti-Shake icon displays on the LCD screen and press the Shutter button halfway. Auto flash: The flash fires automatically when needed. Flash...
Instruction Manual, VPC-S1070
Page 35
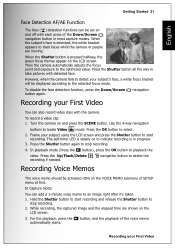
... to take pictures with the camera. To disable the face detection function, press the Down/Screen button again. Press the OK button to playback the video. In playback mode (Press the button), press the OK button to select. 2. Hold the Shutter button to start recording. Use the 4-way navigation buttons to the selected focus mode. Press the Shutter button again to stop recording. 2. In Capture mode: You can be displayed according to locate Video mode. While recording, the captured image and...
... to take pictures with the camera. To disable the face detection function, press the Down/Screen button again. Press the OK button to playback the video. In playback mode (Press the button), press the OK button to select. 2. Hold the Shutter button to start recording. Use the 4-way navigation buttons to the selected focus mode. Press the Shutter button again to stop recording. 2. In Capture mode: You can be displayed according to locate Video mode. While recording, the captured image and...
Instruction Manual, VPC-S1070
Page 46
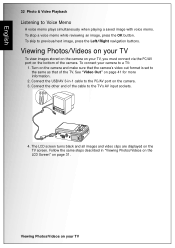
... buttons. Connect the other end of the TV. See "Video Out" on the TV screen. Follow the same steps described in -1 cable to the PC/AV port on the camera and make sure that the camera's video out format is set to the same as that of the cable to Voice Memo A voice memo plays simultaneously when playing a saved image with voice memo. Turn on the camera. 3. English 32 Photo & Video Playback...
... buttons. Connect the other end of the TV. See "Video Out" on the TV screen. Follow the same steps described in -1 cable to the PC/AV port on the camera and make sure that the camera's video out format is set to the same as that of the cable to Voice Memo A voice memo plays simultaneously when playing a saved image with voice memo. Turn on the camera. 3. English 32 Photo & Video Playback...
Instruction Manual, VPC-S1070
Page 47
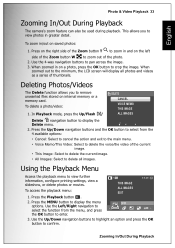
.... English Photo & Video Playback 33 Zooming In/Out During Playback The camera's zoom feature can also be used during playback. Use the 4-way navigation buttons to the minimum, the LCD screen will display all images. When zoomed out to pan across the image. 3. To delete a photo/video: 1. Press the MENU button to view further information, configure printing settings, view a slideshow, or delete photos or movies. Using the Playback Menu Access the playback menu to display the menu DPOF options. Use the Left/Right navigation to select the function from...
.... English Photo & Video Playback 33 Zooming In/Out During Playback The camera's zoom feature can also be used during playback. Use the 4-way navigation buttons to the minimum, the LCD screen will display all images. When zoomed out to pan across the image. 3. To delete a photo/video: 1. Press the MENU button to view further information, configure printing settings, view a slideshow, or delete photos or movies. Using the Playback Menu Access the playback menu to display the menu DPOF options. Use the Left/Right navigation to select the function from...
Instruction Manual, VPC-S1070
Page 52
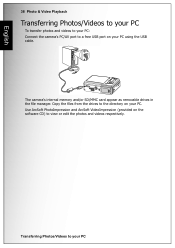
Use ArcSoft PhotoImpression and ArcSoft VideoImpression (provided on the software CD) to the directory on your PC using the USB cable. Copy the files from the drives to view or edit the photos and videos respectively. The camera's internal memory and/or SD/MMC card appear as removable drives in the file manager. English 38 Photo & Video Playback Transferring Photos/Videos to your PC To transfer photos and videos to your PC: Connect the camera's PC/AV port to your PC Transferring Photos/Videos to a free USB port on your PC.
Use ArcSoft PhotoImpression and ArcSoft VideoImpression (provided on the software CD) to the directory on your PC using the USB cable. Copy the files from the drives to view or edit the photos and videos respectively. The camera's internal memory and/or SD/MMC card appear as removable drives in the file manager. English 38 Photo & Video Playback Transferring Photos/Videos to your PC To transfer photos and videos to your PC: Connect the camera's PC/AV port to your PC Transferring Photos/Videos to a free USB port on your PC.
Instruction Manual, VPC-S1070
Page 54
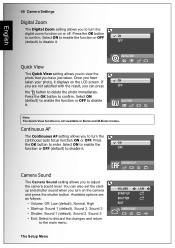
... Quick View setting allows you to disable it displays on the camera and press the shutter button. Press the OK button to delete the photo immediately. If you are as follows: • Volume: Off, Low (default), Normal, High • Start-up: Sound 1 (default), Sound 2, Sound 3 • Shutter: Sound 1 (default), Sound 2, Sound 3 • Exit: Select to discard the changes and return to confirm. Select ON (default) to enable the function or OFF to turn the continuous auto focus function ON or OFF. DIGITAL ZOOM...
... Quick View setting allows you to disable it displays on the camera and press the shutter button. Press the OK button to delete the photo immediately. If you are as follows: • Volume: Off, Low (default), Normal, High • Start-up: Sound 1 (default), Sound 2, Sound 3 • Shutter: Sound 1 (default), Sound 2, Sound 3 • Exit: Select to discard the changes and return to confirm. Select ON (default) to enable the function or OFF to turn the continuous auto focus function ON or OFF. DIGITAL ZOOM...
Instruction Manual, VPC-S1070
Page 55
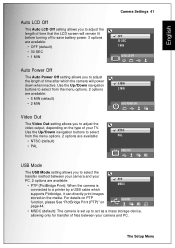
... the LCD screen will power down when inactive. The Setup Menu Use the Up/Down navigation buttons to select from the menu options. 2 options are available: • NTSC (default) • PAL Camera Settings 41 OFF 30 SEC 1 MIN AUTO LCD OFF 5 MIN 2 MIN AUTO POWER OFF NTSC PAL VIDEO OUT USB Mode The USB Mode setting allows you to adjust the video output, depending on the type of time after which supports Pictbridge, it can directly print images...
... the LCD screen will power down when inactive. The Setup Menu Use the Up/Down navigation buttons to select from the menu options. 2 options are available: • NTSC (default) • PAL Camera Settings 41 OFF 30 SEC 1 MIN AUTO LCD OFF 5 MIN 2 MIN AUTO POWER OFF NTSC PAL VIDEO OUT USB Mode The USB Mode setting allows you to adjust the video output, depending on the type of time after which supports Pictbridge, it can directly print images...
Instruction Manual, VPC-S1070
Page 56
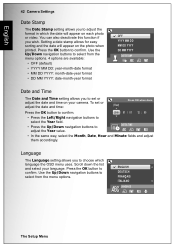
... Setup Menu You can also deactivate this function if you to set or adjust the date and time: (Year) Press OK when done Press the OK button to confirm. • Press the Left/Right navigation buttons to select the Year field. • Press the Up/Down navigation buttons to confirm. Language The Language setting allows you to adjust the format in which language the OSD menu uses. English 42 Camera Settings Date Stamp...
... Setup Menu You can also deactivate this function if you to set or adjust the date and time: (Year) Press OK when done Press the OK button to confirm. • Press the Left/Right navigation buttons to select the Year field. • Press the Up/Down navigation buttons to confirm. Language The Language setting allows you to adjust the format in which language the OSD menu uses. English 42 Camera Settings Date Stamp...
Instruction Manual, VPC-S1070
Page 61
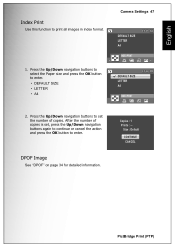
.... English Index Print Use this function to enter. • DEFAULT SIZE • LETTER • A4 Camera Settings 47 DEFAULT SIZE LETTER A4 1/140 INDEX PRINT DEFAULT SIZE LETTER A4 1/140 INDEX PRINT 2. Press the Up/Down navigation buttons to select the Paper size and press the OK button to print all images in index format. 1. After the number of copies is set the number of copies. Size : Default CONTINUE CANCEL PictBridge Print (PTP) Copies : 1 Prints : -- Press the Up/Down navigation buttons to set...
.... English Index Print Use this function to enter. • DEFAULT SIZE • LETTER • A4 Camera Settings 47 DEFAULT SIZE LETTER A4 1/140 INDEX PRINT DEFAULT SIZE LETTER A4 1/140 INDEX PRINT 2. Press the Up/Down navigation buttons to select the Paper size and press the OK button to print all images in index format. 1. After the number of copies is set the number of copies. Size : Default CONTINUE CANCEL PictBridge Print (PTP) Copies : 1 Prints : -- Press the Up/Down navigation buttons to set...
Instruction Manual, VPC-S1070
Page 63
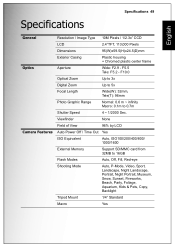
... None Field of View 96% by LCD Auto Power Off / Time Out Yes ISO Equivalent Auto, ISO100/200/400/800/ 1000/1600 External Memory Support SD/MMC card from 32MB to 0.7m Shutter Speed 4 ~ 1/2000 Sec. F10.0 Optical Zoom Up to 3x Digital Zoom Up to 5x Focal Length Wide(W): 32mm, Tele(T): 96mm Photo Graphic Range Normal: 0.6 m ~ infinity Macro: 0.1m to 16GB Flash Modes Auto, Off, Fill, Red-eye Shooting Mode Auto, P-Mode, Video, Sport, Landscape, Night...
... None Field of View 96% by LCD Auto Power Off / Time Out Yes ISO Equivalent Auto, ISO100/200/400/800/ 1000/1600 External Memory Support SD/MMC card from 32MB to 0.7m Shutter Speed 4 ~ 1/2000 Sec. F10.0 Optical Zoom Up to 3x Digital Zoom Up to 5x Focal Length Wide(W): 32mm, Tele(T): 96mm Photo Graphic Range Normal: 0.6 m ~ infinity Macro: 0.1m to 16GB Flash Modes Auto, Off, Fill, Red-eye Shooting Mode Auto, P-Mode, Video, Sport, Landscape, Night...
Instruction Manual, VPC-S1070
Page 66
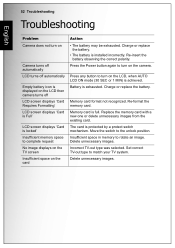
... Troubleshooting Troubleshooting English Problem Camera does not turn on the LCD, when AUTO LCD ON mode (30 SEC or 1 MIN) is achieved. Press any button to turn on Camera turns off automatically LCD turns off automatically Empty battery icon is displayed on the LCD then camera turns off LCD screen displays 'Card Requires Formatting' LCD screen displays 'Card is Full' LCD screen displays 'Card is locked' Insufficient memory space to complete request No image displays on the TV screen Insufficient space on the camera. Move the switch to rotate an image. Charge or replace the battery...
... Troubleshooting Troubleshooting English Problem Camera does not turn on the LCD, when AUTO LCD ON mode (30 SEC or 1 MIN) is achieved. Press any button to turn on Camera turns off automatically LCD turns off automatically Empty battery icon is displayed on the LCD then camera turns off LCD screen displays 'Card Requires Formatting' LCD screen displays 'Card is Full' LCD screen displays 'Card is locked' Insufficient memory space to complete request No image displays on the TV screen Insufficient space on the camera. Move the switch to rotate an image. Charge or replace the battery...


