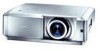

Owners Manual
Page 2
... 22, 29). ◆ Simple Computer System Setting The Multi-scan system of the projector conforms to almost all computer output signals quickly (see page 26). ◆ 16 : 9 Wide Screen The wide LCD panels with digital equipment is offered through these terminals. ✔Notes: • The...the actual product. • The contents of 9.8' (3.0 m) to customize the screen logo (see page 37). ◆ Two HDMI Terminals The projector has two HDMI (High Definition Multimedia Interface) terminals. It uses built-in this manual may differ slightly from a distance of this manual are subject ...
... 22, 29). ◆ Simple Computer System Setting The Multi-scan system of the projector conforms to almost all computer output signals quickly (see page 26). ◆ 16 : 9 Wide Screen The wide LCD panels with digital equipment is offered through these terminals. ✔Notes: • The...the actual product. • The contents of 9.8' (3.0 m) to customize the screen logo (see page 37). ◆ Two HDMI Terminals The projector has two HDMI (High Definition Multimedia Interface) terminals. It uses built-in this manual may differ slightly from a distance of this manual are subject ...
Owners Manual
Page 3
... 8 Rear Terminal 9 Top Control 10 Remote Control 11 Remote Control Operating Range 12 Remote Control Battery Installation 12 Installation 13 Positioning the Projector 13 Adjustable Feet 13 Connecting the AC Power Cord 14 Moving the Lens 15 Connecting to Video Equipment (Video, S-Video) 16 Connecting ...Connecting to Video Equipment (HDMI, RGB Scart) 17 Connecting to a Computer 17 Basic Operation 18 Turning On the Projector 18 Turning Off the Projector 19 How to Operate the On-Screen Menu 20 Menu and its Functions 21 Zoom and Focus Adjustment 22 Remote Control...
... 8 Rear Terminal 9 Top Control 10 Remote Control 11 Remote Control Operating Range 12 Remote Control Battery Installation 12 Installation 13 Positioning the Projector 13 Adjustable Feet 13 Connecting the AC Power Cord 14 Moving the Lens 15 Connecting to Video Equipment (Video, S-Video) 16 Connecting ...Connecting to Video Equipment (HDMI, RGB Scart) 17 Connecting to a Computer 17 Basic Operation 18 Turning On the Projector 18 Turning Off the Projector 19 How to Operate the On-Screen Menu 20 Menu and its Functions 21 Zoom and Focus Adjustment 22 Remote Control...
Owners Manual
Page 4
... electrical and electronic products. If you leave the projector unclean for a long time, the cooling fans can reduce the service life of the unit. Your SANYO product is critical for many convenient features and functions. This projector produces intense light from the ceiling, clean the ...air intake vents, air filters, and the top of the projector periodically with dust, and it may result...
... electrical and electronic products. If you leave the projector unclean for a long time, the cooling fans can reduce the service life of the unit. Your SANYO product is critical for many convenient features and functions. This projector produces intense light from the ceiling, clean the ...air intake vents, air filters, and the top of the projector periodically with dust, and it may result...

Owners Manual
Page 5
...operating instructions should be read before cleaning. This will often require extensive work by a qualified technician to restore the projector to this projector where the cord may be sure the service technician has used replacement parts specified by following conditions: a. Wall or...unless proper ventilation is operated. An appliance and cart combination should never be blocked by the manufacturer, or sold with the projector. Unplug this projector from wall outlet and refer servicing to persons. Wanneer deze leeg zijn, moet u ze niet weggooien maar inleveren als KCA....
...operating instructions should be read before cleaning. This will often require extensive work by a qualified technician to restore the projector to this projector where the cord may be sure the service technician has used replacement parts specified by following conditions: a. Wall or...unless proper ventilation is operated. An appliance and cart combination should never be blocked by the manufacturer, or sold with the projector. Unplug this projector from wall outlet and refer servicing to persons. Wanneer deze leeg zijn, moet u ze niet weggooien maar inleveren als KCA....
Owners Manual
Page 6
...cooled enough. 6 Do not put anything on either side to project an image. For information about transporting the projector by courier or any objects. - Do not put the projector on the projector. To ensure reliable operation of the exhaust vent, especially screws and metallic part. Hot air is closed, ... the adjustable feet, and lock the lens with the Lens Shift Lock to prevent damage to the lens and cabinet. Do not put the projector in a case before it into a suitable case. Cooling fans are provided for an extended period, put other things on the cabinet will ...
...cooled enough. 6 Do not put anything on either side to project an image. For information about transporting the projector by courier or any objects. - Do not put the projector on the projector. To ensure reliable operation of the exhaust vent, especially screws and metallic part. Hot air is closed, ... the adjustable feet, and lock the lens with the Lens Shift Lock to prevent damage to the lens and cabinet. Do not put the projector in a case before it into a suitable case. Cooling fans are provided for an extended period, put other things on the cabinet will ...
Owners Manual
Page 7
...Part 15 of the FCC Rules. Reorient or relocate the receiving antenna. - Model Number(s) Trade Name Responsible party Address Telephone No. : PLV-Z5, PLV-Z5BK : Sanyo : SANYO FISHER COMPANY : 21605 Plummer Street, Chatsworth, California 91311 : (818)998-7322 AC Power Cord Requirement The AC Power Cord supplied with this...radiate radio frequency energy. GROUND AC Power Cord for the United Kingdom: This cord is encouraged to try to defeat this projector meets the requirement for use the plug with the cover omitted. Do not make any changes or modifications to radio communications....
...Part 15 of the FCC Rules. Reorient or relocate the receiving antenna. - Model Number(s) Trade Name Responsible party Address Telephone No. : PLV-Z5, PLV-Z5BK : Sanyo : SANYO FISHER COMPANY : 21605 Plummer Street, Chatsworth, California 91311 : (818)998-7322 AC Power Cord Requirement The AC Power Cord supplied with this...radiate radio frequency energy. GROUND AC Power Cord for the United Kingdom: This cord is encouraged to try to defeat this projector meets the requirement for use the plug with the cover omitted. Do not make any changes or modifications to radio communications....
Owners Manual
Page 8
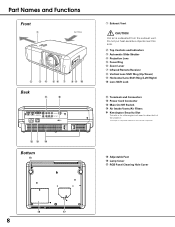
... w e r t y u i o !0 Back !1 ✽ S-VIDEO COMPONENT 1 HDMI 1 HDMI 2 COMPUTER COMPONENT 2 VIDEO Y Pb/Cb Pr/Cr SERVICEPORT !2 !3 !4 Bottom !5 q Exhaust Vent CAUTION Hot air is a registered trademark of the projector. *Kensington is exhausted from the exhaust vent.
... w e r t y u i o !0 Back !1 ✽ S-VIDEO COMPONENT 1 HDMI 1 HDMI 2 COMPUTER COMPONENT 2 VIDEO Y Pb/Cb Pr/Cr SERVICEPORT !2 !3 !4 Bottom !5 q Exhaust Vent CAUTION Hot air is a registered trademark of the projector. *Kensington is exhausted from the exhaust vent.
Owners Manual
Page 9
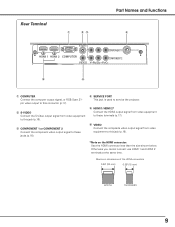
... Connect the S-Video output signal from video equipment to this connector (p.17). t HDMI 1/HDMI 2* Connect the HDMI output signal from video equipment to service the projector.
... Connect the S-Video output signal from video equipment to this connector (p.17). t HDMI 1/HDMI 2* Connect the HDMI output signal from video equipment to service the projector.
Owners Manual
Page 10
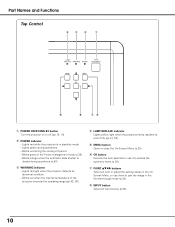
... mode (p.39). - Blinks red during operations (p.50). r LAMP REPLACE indicator Lights yellow light when the projection lamp reaches its end of the projector exceeds the operating range (pp.42, 50). Lights green during operations. - i INPUT button Select an input source (p.24). 10 e WARNING... indicator - Lights red light when the projector detects an abnormal condition. - t MENU button Open or close the On-Screen Menu (p.20). y OK button Execute the item selected or use...
... mode (p.39). - Blinks red during operations (p.50). r LAMP REPLACE indicator Lights yellow light when the projection lamp reaches its end of the projector exceeds the operating range (pp.42, 50). Lights green during operations. - i INPUT button Select an input source (p.24). 10 e WARNING... indicator - Lights red light when the projector detects an abnormal condition. - t MENU button Open or close the On-Screen Menu (p.20). y OK button Execute the item selected or use...
Owners Manual
Page 11
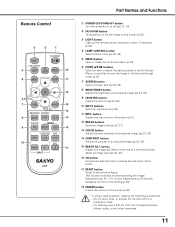
... Menu (p.20). To ensure safe operation, observe the following precautions: - S-VIDEO PC !1 INPUT CXVT Part Names and Functions q POWER ON/STAND-BY button Turn the projector on the screen (p.23). i BRIGHTNESS button Adjust the brightness of a projected image (pp.23, 28). !5 IMAGE ADJ. This function is limited to pan the image...
... Menu (p.20). To ensure safe operation, observe the following precautions: - S-VIDEO PC !1 INPUT CXVT Part Names and Functions q POWER ON/STAND-BY button Turn the projector on the screen (p.23). i BRIGHTNESS button Adjust the brightness of a projected image (pp.23, 28). !5 IMAGE ADJ. This function is limited to pan the image...
Owners Manual
Page 12
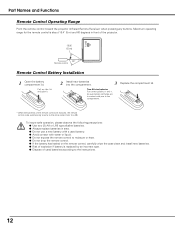
Part Names and Functions Remote Control Operating Range Point the remote control toward the projector (Infrared Remote Receiver) when pressing any buttons. Maximum operating range for the remote control is replaced by an incorrect type. ● Dispose... of used battery. ● Avoid contact with pins in the compartment. * When the batteries of the projector. 16.4' (5 m) 60° Remote control Remote Control Battery Installation 1 Open the battery compartment lid. To insure safe operation, please observe the following precautions:...
Part Names and Functions Remote Control Operating Range Point the remote control toward the projector (Infrared Remote Receiver) when pressing any buttons. Maximum operating range for the remote control is replaced by an incorrect type. ● Dispose... of used battery. ● Avoid contact with pins in the compartment. * When the batteries of the projector. 16.4' (5 m) 60° Remote control Remote Control Battery Installation 1 Open the battery compartment lid. To insure safe operation, please observe the following precautions:...
Owners Manual
Page 13
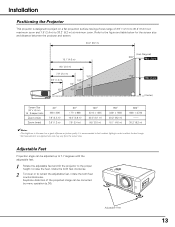
... the adjustable feet, rotate the both feet clockwise. 2 To lower or to the figure and table below for the screen size and distance between the projector and screen. 30.2' (9.2 m) 15.1' (4.6 m) 9.8' (3.0 m) 7.9' (2.4 m) 3.9' (1.2 m) 40" 100" 80" 50" 40" 150" 75" (Inch Diagonal) 300" Max. ... be adjusted up to 7.7 degrees with the adjustable feet. 1 Rotate the adjustable feet and tilt the projector to the proper height; Installation Positioning the Projector This projector is recommended to limit ambient lighting in the room has a great influence on a flat projection surface having...
... the adjustable feet, rotate the both feet clockwise. 2 To lower or to the figure and table below for the screen size and distance between the projector and screen. 30.2' (9.2 m) 15.1' (4.6 m) 9.8' (3.0 m) 7.9' (2.4 m) 3.9' (1.2 m) 40" 100" 80" 50" 40" 150" 75" (Inch Diagonal) 300" Max. ... be adjusted up to 7.7 degrees with the adjustable feet. 1 Rotate the adjustable feet and tilt the projector to the proper height; Installation Positioning the Projector This projector is recommended to limit ambient lighting in the room has a great influence on a flat projection surface having...
Owners Manual
Page 14
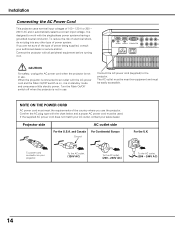
... HDMI 1 HDMI 2 COMPUTER CO VIDEO Y Pb/Cb Pr/Cr CAUTION For safety, unplug the AC power cord when the projector is not in stand-by mode and consumes a little electric power. Projector side For the U.S.A. The AC outlet must be near this equipment and must meet the requirements of the country where... you are not sure of the type of power system. If the supplied AC power cord does not match your AC outlet, contact your projector. If you use . To the AC outlet. (120V AC) To the AC outlet. (200 - 240V AC) To the AC outlet. (200 - 240V AC) 14 Connect...
... HDMI 1 HDMI 2 COMPUTER CO VIDEO Y Pb/Cb Pr/Cr CAUTION For safety, unplug the AC power cord when the projector is not in stand-by mode and consumes a little electric power. Projector side For the U.S.A. The AC outlet must be near this equipment and must meet the requirements of the country where... you are not sure of the type of power system. If the supplied AC power cord does not match your AC outlet, contact your projector. If you use . To the AC outlet. (120V AC) To the AC outlet. (200 - 240V AC) To the AC outlet. (200 - 240V AC) 14 Connect...
Owners Manual
Page 16
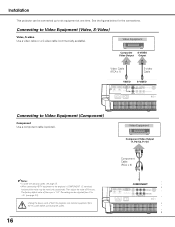
Installation This projector can be adjusted from the AC outlet before connecting the cables. 16 Component Cable (RCA x 3) COMPONENT S-VIDEO COMPONENT 1 HDMI 1 HDMI 2 COMPUTER COMPONENT 2 VIDEO Y Pb/Cb ...;Notes: • To order the optional cables, see page 33). The factory default value of both the projector and external equipment from 0 to +31 (see page 55. • When connecting HDTV equipment to the projector's COMPONENT 1/2 terminals, horizontal line noise may be connected up to six equipment at one time. Unplug the...
Installation This projector can be adjusted from the AC outlet before connecting the cables. 16 Component Cable (RCA x 3) COMPONENT S-VIDEO COMPONENT 1 HDMI 1 HDMI 2 COMPUTER COMPONENT 2 VIDEO Y Pb/Cb ...;Notes: • To order the optional cables, see page 33). The factory default value of both the projector and external equipment from 0 to +31 (see page 55. • When connecting HDTV equipment to the projector's COMPONENT 1/2 terminals, horizontal line noise may be connected up to six equipment at one time. Unplug the...
Owners Manual
Page 17
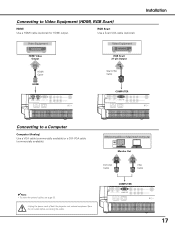
... Monitor Out DVI-VGA Cable VGA Cable ✔Note: • To order the optional cables, see page 55. Unplug the power cords of both the projector and external equipment from the AC outlet before connecting the cables. Connecting to a Computer Computer (Analog) Use a VGA cable (commercially available) or a DVI-VGA cable...
... Monitor Out DVI-VGA Cable VGA Cable ✔Note: • To order the optional cables, see page 55. Unplug the power cords of both the projector and external equipment from the AC outlet before connecting the cables. Connecting to a Computer Computer (Analog) Use a VGA cable (commercially available) or a DVI-VGA cable...

Owners Manual
Page 18
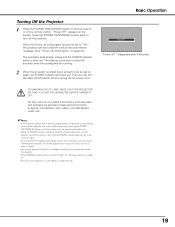
...Control NO SHOW FREEZE Remote Control Main On/Off switch ✔Notes: • If the automatic slide shutter does not open properly, the projector will blink orange. As the automatic slide shutter opens, a preparation display appears on the screen and the countdown starts. 4 After the countdown... on and the POWER indicator will not be displayed on . Basic Operation Turning On the Projector 1 Complete peripheral connections (with a computer, VCR, etc.) before turning on the projector. 2 Connect the projector's AC power cord into an AC outlet and turn the Main On/Off switch on the...
...Control NO SHOW FREEZE Remote Control Main On/Off switch ✔Notes: • If the automatic slide shutter does not open properly, the projector will blink orange. As the automatic slide shutter opens, a preparation display appears on the screen and the countdown starts. 4 After the countdown... on and the POWER indicator will not be displayed on . Basic Operation Turning On the Projector 1 Complete peripheral connections (with a computer, VCR, etc.) before turning on the projector. 2 Connect the projector's AC power cord into an AC outlet and turn the Main On/Off switch on the...
Owners Manual
Page 19
... blinking continues for about 60 seconds while the cooling fans are running speed of cooling fans is changed according to the temperature inside the projector. • If the WARNING indicator blinks or emits red light, see "Warning Indicator" on . disappears after use may result in ...a case before it is automatically turned off confirmation" on again. • Do not operate the projector continuously without the confirmation message. (See "Power off for safety. DO NOT UNPLUG AC POWER CORD WHILE COOLING FANS ARE RUNNING OR BEFORE POWER...
... blinking continues for about 60 seconds while the cooling fans are running speed of cooling fans is changed according to the temperature inside the projector. • If the WARNING indicator blinks or emits red light, see "Warning Indicator" on . disappears after use may result in ...a case before it is automatically turned off confirmation" on again. • Do not operate the projector continuously without the confirmation message. (See "Power off for safety. DO NOT UNPLUG AC POWER CORD WHILE COOLING FANS ARE RUNNING OR BEFORE POWER...
Owners Manual
Page 20
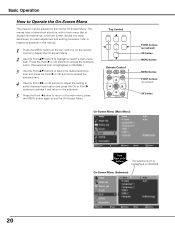
press the MENU button again to Operate the On-Screen Menu The projector can be adjusted or set via the On-Screen Menu. POINT buttons (arrowhead) OK button MENU button MENU button POINT buttons (arrowhead) OK button On-...
press the MENU button again to Operate the On-Screen Menu The projector can be adjusted or set via the On-Screen Menu. POINT buttons (arrowhead) OK button MENU button MENU button POINT buttons (arrowhead) OK button On-...
Owners Manual
Page 25
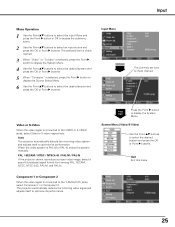
...marked. Input Menu Input The currently set item is connected to select the desired source and press the OK or Point 8 buttons. The projector automatically detects the incoming video signal and adjusts itself to optimize its performance. System Menu (Video/S-Video) Use the Point ed buttons to ...8 buttons. Quit Exit this menu. 25 Video or S-Video When the video signal is connected to display the System Menu. Auto The projector automatically detects the incoming video system and adjusts itself to optimize its performance. PAL / SECAM / NTSC / NTSC4.43 / PAL-M / PAL-N If ...
...marked. Input Menu Input The currently set item is connected to select the desired source and press the OK or Point 8 buttons. The projector automatically detects the incoming video signal and adjusts itself to optimize its performance. System Menu (Video/S-Video) Use the Point ed buttons to ...8 buttons. Quit Exit this menu. 25 Video or S-Video When the video signal is connected to display the System Menu. Auto The projector automatically detects the incoming video system and adjusts itself to optimize its performance. PAL / SECAM / NTSC / NTSC4.43 / PAL-M / PAL-N If ...
Owners Manual
Page 26
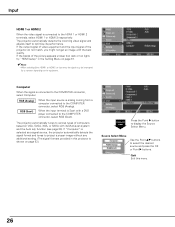
... Computer Input Press the Point 8 button to display the Source Select Menu. If "Computer" is selected as a signal source, the projector automatically detects the signal format and tunes to project a proper image without any additional setting. (The signal formats provided in the Setting ...37. ✔Note: • When switching from a computer connected to the COMPUTER connector, select RGB (Scart). The projector automatically tunes to various types of the projector do not match, you might not get an image with a DVD player connected to the COMPUTER connector, select RGB (Analog...
... Computer Input Press the Point 8 button to display the Source Select Menu. If "Computer" is selected as a signal source, the projector automatically detects the signal format and tunes to project a proper image without any additional setting. (The signal formats provided in the Setting ...37. ✔Note: • When switching from a computer connected to the COMPUTER connector, select RGB (Scart). The projector automatically tunes to various types of the projector do not match, you might not get an image with a DVD player connected to the COMPUTER connector, select RGB (Analog...


