Owners Manual
Page 2
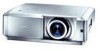
...that converts an interlaced signal into a progressively-scanned one (see page 29). ◆ Multi-language Menu Display Operation menu is capable of the projector conforms to customize the screen logo (see page 38). Simple connection with digital equipment is offered through these terminals. ✔Notes: • The... quickly (see page 26). ◆ 16 : 9 Wide Screen The wide LCD panels with the most advanced technology for the starting-up /down and left/right) depending on the setting position of the projector such as you to adjust the details of picture colors to suit your desired ...
...that converts an interlaced signal into a progressively-scanned one (see page 29). ◆ Multi-language Menu Display Operation menu is capable of the projector conforms to customize the screen logo (see page 38). Simple connection with digital equipment is offered through these terminals. ✔Notes: • The... quickly (see page 26). ◆ 16 : 9 Wide Screen The wide LCD panels with the most advanced technology for the starting-up /down and left/right) depending on the setting position of the projector such as you to adjust the details of picture colors to suit your desired ...
Owners Manual
Page 3
... 8 Rear Terminal 9 Top Control 10 Remote Control 11 Remote Control Operating Range 12 Remote Control Battery Installation 12 Installation 13 Positioning the Projector 13 Adjustable Feet 13 Connecting the AC Power Cord 14 Moving the Lens 15 Connecting to Video Equipment (Video, S-Video) 16 Connecting ...Connecting to Video Equipment (HDMI, RGB Scart) 17 Connecting to a Computer 17 Basic Operation 18 Turning On the Projector 18 Turning Off the Projector 19 How to Operate the On-Screen Menu 20 Menu and its Functions 21 Zoom and Focus Adjustment 22 Remote Control...
... 8 Rear Terminal 9 Top Control 10 Remote Control 11 Remote Control Operating Range 12 Remote Control Battery Installation 12 Installation 13 Positioning the Projector 13 Adjustable Feet 13 Connecting the AC Power Cord 14 Moving the Lens 15 Connecting to Video Equipment (Video, S-Video) 16 Connecting ...Connecting to Video Equipment (HDMI, RGB Scart) 17 Connecting to a Computer 17 Basic Operation 18 Turning On the Projector 18 Turning Off the Projector 19 How to Operate the On-Screen Menu 20 Menu and its Functions 21 Zoom and Focus Adjustment 22 Remote Control...
Owners Manual
Page 4
Operating the projector properly enables you to be built into a compartment or similarly enclosed, these minimum distances must be maintained. - Your SANYO product is to manage those features and maintain it in good condition for a long time, the cooling fans can also...3' (1 m) 1.5' (50 cm) 1.5' (50 cm) - Otherwise it may cause a breakdown or a disaster. CAUTION ON HANGING FROM THE CEILING When hanging the projector from your projector, and can be dangerous. Ne peut être utilisé dans une salle d'ordinateurs telle que définie dans la norme ANSI/NFPA 75...
Operating the projector properly enables you to be built into a compartment or similarly enclosed, these minimum distances must be maintained. - Your SANYO product is to manage those features and maintain it in good condition for a long time, the cooling fans can also...3' (1 m) 1.5' (50 cm) 1.5' (50 cm) - Otherwise it may cause a breakdown or a disaster. CAUTION ON HANGING FROM THE CEILING When hanging the projector from your projector, and can be dangerous. Ne peut être utilisé dans une salle d'ordinateurs telle que définie dans la norme ANSI/NFPA 75...
Owners Manual
Page 5
...operation of any service or repairs to this unit to determine that have the same characteristics as the original part. Do not expose this projector, ask the service technician to perform routine safety checks to rain or use liquid or aerosol cleaners. Quick stops, excessive force, and... are covered by the operating instructions as improper adjustment of other materials, and the bottom opening or removing covers may cause hazards. This projector should be moved with cloth or other controls may fall, causing serious injury to a child or adult, and serious damage to rain or...
...operation of any service or repairs to this unit to determine that have the same characteristics as the original part. Do not expose this projector, ask the service technician to perform routine safety checks to rain or use liquid or aerosol cleaners. Quick stops, excessive force, and... are covered by the operating instructions as improper adjustment of other materials, and the bottom opening or removing covers may cause hazards. This projector should be moved with cloth or other controls may fall, causing serious injury to a child or adult, and serious damage to rain or...
Owners Manual
Page 6
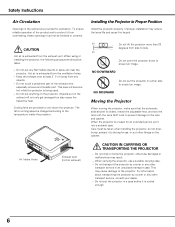
... exhausted from any other transport service, consult your dealer. - Do not put anything on the cabinet will become hot while the projector is closed, retract the adjustable feet, and lock the lens with the Lens Shift Lock to prevent damage to the temperature inside the... projector. CAUTION IN CARRYING OR TRANSPORTING THE PROJECTOR - Keep the exhaust vent at least 3' (1 m) away from the ventilation holes. - Safety Instructions Air Circulation Openings in the...
... exhausted from any other transport service, consult your dealer. - Do not put anything on the cabinet will become hot while the projector is closed, retract the adjustable feet, and lock the lens with the Lens Shift Lock to prevent damage to the temperature inside the... projector. CAUTION IN CARRYING OR TRANSPORTING THE PROJECTOR - Keep the exhaust vent at least 3' (1 m) away from the ventilation holes. - Safety Instructions Air Circulation Openings in the...
Owners Manual
Page 7
... help. Consult the dealer or an experienced radio/TV technician for the United States and Canada: AC Power Cord used of this projector meets the requirement for a Class B digital device, pursuant to the terminal in the instructions. If the fuse cover is required,... SHOULD BE INSTALLED NEAR THE EQUIPMENT AND EASILY ACCESSIBLE. 7 If it . Model Number(s) Trade Name Responsible party Address Telephone No. : PLV-Z5, PLV-Z5BK : Sanyo : SANYO FISHER COMPANY : 21605 Plummer Street, Chatsworth, California 91311 : (818)998-7322 AC Power Cord Requirement The AC Power Cord supplied with this...
... help. Consult the dealer or an experienced radio/TV technician for the United States and Canada: AC Power Cord used of this projector meets the requirement for a Class B digital device, pursuant to the terminal in the instructions. If the fuse cover is required,... SHOULD BE INSTALLED NEAR THE EQUIPMENT AND EASILY ACCESSIBLE. 7 If it . Model Number(s) Trade Name Responsible party Address Telephone No. : PLV-Z5, PLV-Z5BK : Sanyo : SANYO FISHER COMPANY : 21605 Plummer Street, Chatsworth, California 91311 : (818)998-7322 AC Power Cord Requirement The AC Power Cord supplied with this...
Owners Manual
Page 8
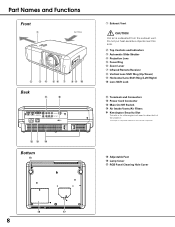
... !3 Main On/Off Switch !4 Air Intake Vents/Air Filters ✽ Kensington Security Slot This slot is for a Kensington lock used to deter theft of the projector. *Kensington is exhausted from the exhaust vent.
... !3 Main On/Off Switch !4 Air Intake Vents/Air Filters ✽ Kensington Security Slot This slot is for a Kensington lock used to deter theft of the projector. *Kensington is exhausted from the exhaust vent.
Owners Manual
Page 9
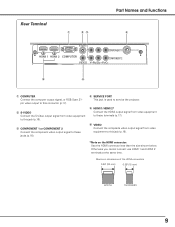
...). Otherwise you cannot connect use HDMI 1 and HDMI 2 terminals at the same time. e COMPONENT 1 or COMPONENT 2 Connect the component video output signal to service the projector. w S-VIDEO Connect the S-Video output signal from video equipment to these jacks (p.16). y VIDEO Connect the composite video output signal from video equipment to this...
...). Otherwise you cannot connect use HDMI 1 and HDMI 2 terminals at the same time. e COMPONENT 1 or COMPONENT 2 Connect the component video output signal to service the projector. w S-VIDEO Connect the S-Video output signal from video equipment to these jacks (p.16). y VIDEO Connect the composite video output signal from video equipment to this...
Owners Manual
Page 10
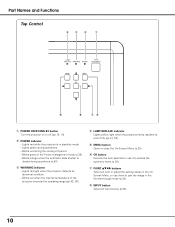
... values in the Normal through mode (p.35). Part Names and Functions Top Control rew q t y ui q POWER ON/STAND-BY button Turn the projector on or off period. - y OK button Execute the item selected or use them to pan the image in the OnScreen Menu, or use it ... closed during operations (p.50). Lights green during the cooling-off (pp.18, 19). Blinks red during operations. - Lights red light when the projector detects an abnormal condition. - t MENU button Open or close the On-Screen Menu (p.20). e WARNING indicator - w POWER indicator - Blinks orange when the...
... values in the Normal through mode (p.35). Part Names and Functions Top Control rew q t y ui q POWER ON/STAND-BY button Turn the projector on or off period. - y OK button Execute the item selected or use them to pan the image in the OnScreen Menu, or use it ... closed during operations (p.50). Lights green during the cooling-off (pp.18, 19). Blinks red during operations. - Lights red light when the projector detects an abnormal condition. - t MENU button Open or close the On-Screen Menu (p.20). e WARNING indicator - w POWER indicator - Blinks orange when the...
Owners Manual
Page 11
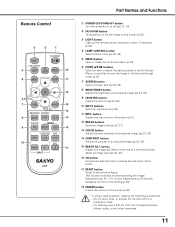
... RESET !7 OK !6 y u SCREEN IMAGE !5 IMAGE ADJ. !4 BRIGHTNESS CONTRAST i BRIGHT CONT. S-VIDEO PC !1 INPUT CXVT Part Names and Functions q POWER ON/STAND-BY button Turn the projector on or off the image on the screen (p.22). u SCREEN button Select a screen size (pp.23, 34). r LAMP CONTROL button Select a lamp mode (pp.22...
... RESET !7 OK !6 y u SCREEN IMAGE !5 IMAGE ADJ. !4 BRIGHTNESS CONTRAST i BRIGHT CONT. S-VIDEO PC !1 INPUT CXVT Part Names and Functions q POWER ON/STAND-BY button Turn the projector on or off the image on the screen (p.22). u SCREEN button Select a screen size (pp.23, 34). r LAMP CONTROL button Select a lamp mode (pp.22...
Owners Manual
Page 12
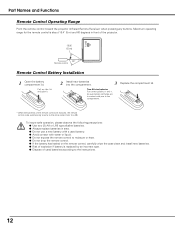
... the following precautions: ● Use two (2) AA or LR6 type alkaline batteries. ● Always replace batteries in front of the projector. 16.4' (5 m) 60° Remote control Remote Control Battery Installation 1 Open the battery compartment lid. Part Names and Functions Remote Control... Operating Range Point the remote control toward the projector (Infrared Remote Receiver) when pressing any buttons. Maximum operating range for the remote control is about 16.4' (5 m) and 60 ...
... the following precautions: ● Use two (2) AA or LR6 type alkaline batteries. ● Always replace batteries in front of the projector. 16.4' (5 m) 60° Remote control Remote Control Battery Installation 1 Open the battery compartment lid. Part Names and Functions Remote Control... Operating Range Point the remote control toward the projector (Infrared Remote Receiver) when pressing any buttons. Maximum operating range for the remote control is about 16.4' (5 m) and 60 ...
Owners Manual
Page 13
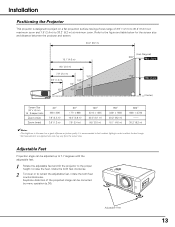
... the adjustable feet, rotate the both feet clockwise. 2 To lower or to the figure and table below for the screen size and distance between the projector and screen. 30.2' (9.2 m) 15.1' (4.6 m) 9.8' (3.0 m) 7.9' (2.4 m) 3.9' (1.2 m) 40" 100" 80" 50" 40" 150" 75" (Inch Diagonal) 300" Max. ... 7.9' (2.4 m) to 30.2' (9.2 m) at minimum zoom. to raise the feet, rotate the both feet counterclockwise. Installation Positioning the Projector This projector is recommended to limit ambient lighting in the room has a great influence on a flat projection surface having a focus range of the ...
... the adjustable feet, rotate the both feet clockwise. 2 To lower or to the figure and table below for the screen size and distance between the projector and screen. 30.2' (9.2 m) 15.1' (4.6 m) 9.8' (3.0 m) 7.9' (2.4 m) 3.9' (1.2 m) 40" 100" 80" 50" 40" 150" 75" (Inch Diagonal) 300" Max. ... 7.9' (2.4 m) to 30.2' (9.2 m) at minimum zoom. to raise the feet, rotate the both feet counterclockwise. Installation Positioning the Projector This projector is recommended to limit ambient lighting in the room has a great influence on a flat projection surface having a focus range of the ...
Owners Manual
Page 14
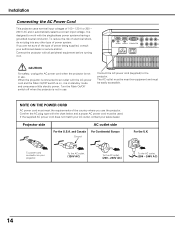
... it automatically selects a correct input voltage. If the supplied AC power cord does not match your AC outlet, contact your authorized dealer or service station. Projector side For the U.S.A. To the AC outlet. (120V AC) To the AC outlet. (200 - 240V AC) To the AC outlet. (200 - 240V AC) 14 ...power cord connector on . S-VIDEO CO HDMI 1 HDMI 2 COMPUTER CO VIDEO Y Pb/Cb Pr/Cr CAUTION For safety, unplug the AC power cord when the projector is not in use . Connect the AC power cord (supplied) to work with all peripheral equipment before turning it is connected to an outlet with...
... it automatically selects a correct input voltage. If the supplied AC power cord does not match your AC outlet, contact your authorized dealer or service station. Projector side For the U.S.A. To the AC outlet. (120V AC) To the AC outlet. (200 - 240V AC) To the AC outlet. (200 - 240V AC) 14 ...power cord connector on . S-VIDEO CO HDMI 1 HDMI 2 COMPUTER CO VIDEO Y Pb/Cb Pr/Cr CAUTION For safety, unplug the AC power cord when the projector is not in use . Connect the AC power cord (supplied) to work with all peripheral equipment before turning it is connected to an outlet with...
Owners Manual
Page 16
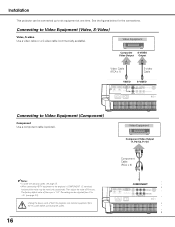
... S-video Cable VIDEO S-VIDEO S-VIDEO COMPONENT 1 HDMI 1 HDMI 2 COMPUTER COMPONENT 2 VIDEO Y Pb/Cb Pr/Cr SERVICEPOR Connecting to the projector's COMPONENT 1/2 terminals, horizontal line noise may be noted only occasionally. The factory default value of Fine sync. Unplug the power cords of both the... projector and external equipment from 0 to Video Equipment (Video, S-Video) Video, S-video Use a video cable or a S-video cable (commercially ...
... S-video Cable VIDEO S-VIDEO S-VIDEO COMPONENT 1 HDMI 1 HDMI 2 COMPUTER COMPONENT 2 VIDEO Y Pb/Cb Pr/Cr SERVICEPOR Connecting to the projector's COMPONENT 1/2 terminals, horizontal line noise may be noted only occasionally. The factory default value of Fine sync. Unplug the power cords of both the... projector and external equipment from 0 to Video Equipment (Video, S-Video) Video, S-video Use a video cable or a S-video cable (commercially ...
Owners Manual
Page 17
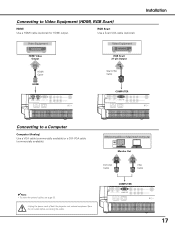
Unplug the power cords of both the projector and external equipment from the AC outlet before connecting the cables. COMPUTER S-VIDEO COMPONENT 1 HDMI 1 HDMI 2 COMPUTER COMPONENT 2 VIDEO Y Pb/Cb Pr/Cr SERVICEPORT 17 ...
Unplug the power cords of both the projector and external equipment from the AC outlet before connecting the cables. COMPUTER S-VIDEO COMPONENT 1 HDMI 1 HDMI 2 COMPUTER COMPONENT 2 VIDEO Y Pb/Cb Pr/Cr SERVICEPORT 17 ...

Owners Manual
Page 18
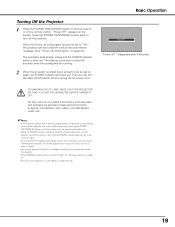
...NO SHOW FREEZE Remote Control Main On/Off switch ✔Notes: • If the automatic slide shutter does not open properly, the projector will not be displayed on the screen (p.38). • During the countdown period, all operations are invalid. The POWER indicator turns green...Input Source Automatic Slide Shutter Use this could cause injury or the projector to operate. Basic Operation Turning On the Projector 1 Complete peripheral connections (with a computer, VCR, etc.) before turning on the projector. 2 Connect the projector's AC power cord into an AC outlet and turn the Main On...
...NO SHOW FREEZE Remote Control Main On/Off switch ✔Notes: • If the automatic slide shutter does not open properly, the projector will not be displayed on the screen (p.38). • During the countdown period, all operations are invalid. The POWER indicator turns green...Input Source Automatic Slide Shutter Use this could cause injury or the projector to operate. Basic Operation Turning On the Projector 1 Complete peripheral connections (with a computer, VCR, etc.) before turning on the projector. 2 Connect the projector's AC power cord into an AC outlet and turn the Main On...
Owners Manual
Page 19
...WAIT AT LEAST FIVE (5) MINUTES BEFORE TURNING IT OFF. Wait until the POWER indicator becomes red to turn the Main On/Off switch off the projector. "Power off for safety. appears on the remote control. Then you can be turned on . DO NOT UNPLUG AC POWER CORD WHILE COOLING FANS... set to blink red. disappears after use may result in a case before it is being cooled down enough to the temperature inside the projector. • If the WARNING indicator blinks or emits red light, see "Warning Indicator" on the remote control after 4 seconds. Basic Operation "Power off ...
...WAIT AT LEAST FIVE (5) MINUTES BEFORE TURNING IT OFF. Wait until the POWER indicator becomes red to turn the Main On/Off switch off the projector. "Power off for safety. appears on the remote control. Then you can be turned on . DO NOT UNPLUG AC POWER CORD WHILE COOLING FANS... set to blink red. disappears after use may result in a case before it is being cooled down enough to the temperature inside the projector. • If the WARNING indicator blinks or emits red light, see "Warning Indicator" on the remote control after 4 seconds. Basic Operation "Power off ...
Owners Manual
Page 20
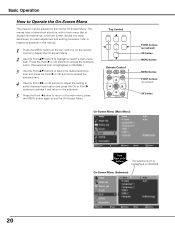
.... The menus have a hierarchical structure, with a main menu that is highlighted in ORANGE. press the MENU button again to Operate the On-Screen Menu The projector can be adjusted or set via the On-Screen Menu. POINT buttons (arrowhead) OK button MENU button MENU button POINT buttons (arrowhead) OK button On...
.... The menus have a hierarchical structure, with a main menu that is highlighted in ORANGE. press the MENU button again to Operate the On-Screen Menu The projector can be adjusted or set via the On-Screen Menu. POINT buttons (arrowhead) OK button MENU button MENU button POINT buttons (arrowhead) OK button On...
Owners Manual
Page 25
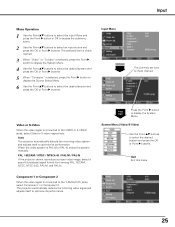
...When the video signal is connected to display the System Menu. PAL / SECAM / NTSC / NTSC4.43 / PAL-M / PAL-N If the projector cannot reproduce a proper video image, select a specific broadcast signal format from among PAL, SECAM, NTSC, NTSC 4.43, PAL-M, and PAL-N. System...2. When the video system is check marked. Quit Exit this menu. 25 The projector automatically detects the incoming video signal and adjusts itself to optimize its performance. Auto The projector automatically detects the incoming video system and adjusts itself to optimize its performance. Component...
...When the video signal is connected to display the System Menu. PAL / SECAM / NTSC / NTSC4.43 / PAL-M / PAL-N If the projector cannot reproduce a proper video image, select a specific broadcast signal format from among PAL, SECAM, NTSC, NTSC 4.43, PAL-M, and PAL-N. System...2. When the video system is check marked. Quit Exit this menu. 25 The projector automatically detects the incoming video signal and adjusts itself to optimize its performance. Auto The projector automatically detects the incoming video system and adjusts itself to optimize its performance. Component...
Owners Manual
Page 26
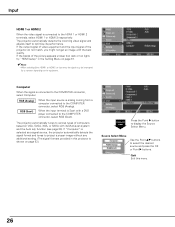
Computer When the signal is connected to the COMPUTER connector, select RGB (Scart). If "Computer" is selected as a signal source, the projector automatically detects the signal format and tunes to project a proper image without any additional setting. (The signal formats provided in the Setting Menu... 8 buttons. Source Select Menu Use the Point ed buttons to the HDMI 1 or HDMI 2 terminals, select HDMI 1 or HDMI 2 respectively. Quit Exit this projector is shown on the equipment. If the blacks of the picture appears unclear (too dark or too light), try "HDMI setup" in this menu. 26...
Computer When the signal is connected to the COMPUTER connector, select RGB (Scart). If "Computer" is selected as a signal source, the projector automatically detects the signal format and tunes to project a proper image without any additional setting. (The signal formats provided in the Setting Menu... 8 buttons. Source Select Menu Use the Point ed buttons to the HDMI 1 or HDMI 2 terminals, select HDMI 1 or HDMI 2 respectively. Quit Exit this projector is shown on the equipment. If the blacks of the picture appears unclear (too dark or too light), try "HDMI setup" in this menu. 26...


