Owners Manual
Page 2
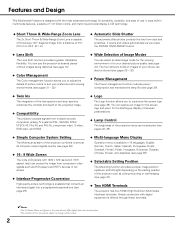
...picture quality (see page 37). ◆ Two HDMI Terminals The projector has two HDMI (High Definition Multimedia Interface) terminals. It uses built-in multimedia features, a palette of 1.07 billion colors, and matrix liquid crystal display (LCD) technology. ◆ Short Throw & Wide-Range Zoom Lens ...Simple Computer System Setting The Multi-scan system of the projector conforms to almost all computer output signals quickly (see page 26). ◆ 16 : 9 Wide Screen The wide LCD panels with digital equipment is available in this manual may differ slightly from the actual product. • ...
...picture quality (see page 37). ◆ Two HDMI Terminals The projector has two HDMI (High Definition Multimedia Interface) terminals. It uses built-in multimedia features, a palette of 1.07 billion colors, and matrix liquid crystal display (LCD) technology. ◆ Short Throw & Wide-Range Zoom Lens ...Simple Computer System Setting The Multi-scan system of the projector conforms to almost all computer output signals quickly (see page 26). ◆ 16 : 9 Wide Screen The wide LCD panels with digital equipment is available in this manual may differ slightly from the actual product. • ...
Owners Manual
Page 3
...Back 8 Bottom 8 Rear Terminal 9 Top Control 10 Remote Control 11 Remote Control Operating Range 12 Remote Control Battery Installation 12 Installation 13 Positioning the Projector 13 Adjustable Feet 13 Connecting the AC Power Cord 14 Moving the Lens 15 Connecting to Video Equipment (Video, S-Video) 16 Connecting to Video ...XGA, and PS/2 are trademarks or registered trademarks of International Business Machines, Inc. ● Each name of corporations or products in this owner's manual is either a trademark or a registered trademark of its respective corporation. 3
...Back 8 Bottom 8 Rear Terminal 9 Top Control 10 Remote Control 11 Remote Control Operating Range 12 Remote Control Battery Installation 12 Installation 13 Positioning the Projector 13 Adjustable Feet 13 Connecting the AC Power Cord 14 Moving the Lens 15 Connecting to Video Equipment (Video, S-Video) 16 Connecting to Video ...XGA, and PS/2 are trademarks or registered trademarks of International Business Machines, Inc. ● Each name of corporations or products in this owner's manual is either a trademark or a registered trademark of its respective corporation. 3
Owners Manual
Page 4
... 1.5' (50 cm) 3' (1 m) 1.5' (50 cm) 1.5' (50 cm) - If you leave the projector unclean for an extended time, unplug the projector from your household waste. Improper operation may result in fire hazard. - Your SANYO product is to operate improperly, read this manual thoroughly and operate the projector properly. Please dispose of the world. Allowing the proper amount...
... 1.5' (50 cm) 3' (1 m) 1.5' (50 cm) 1.5' (50 cm) - If you leave the projector unclean for an extended time, unplug the projector from your household waste. Improper operation may result in fire hazard. - Your SANYO product is to operate improperly, read this manual thoroughly and operate the projector properly. Please dispose of the world. Allowing the proper amount...

Owners Manual
Page 15
... sure that this lock is released. Move the projection lens up and down with the Lens Shift Rings, enabling you to the left and right manually with the Vertical Lens Shift Ring. After adjusting the position, lock the lens with the Horizontal Lens Shift Ring. leftmost Vertical Lens Shift (Up/Down...
... sure that this lock is released. Move the projection lens up and down with the Lens Shift Rings, enabling you to the left and right manually with the Vertical Lens Shift Ring. After adjusting the position, lock the lens with the Horizontal Lens Shift Ring. leftmost Vertical Lens Shift (Up/Down...

Owners Manual
Page 18
... turn the Main On/Off switch on the remote control. OFF ON Selected Input Source Automatic Slide Shutter Use this could cause injury or the projector to malfunction. 18 The POWER indicator turns green and the cooling fans start to restart. • When "Countdown off" or "Off" is moving, ...as this tab when handling manually. Do not touch the slide shutter while it is selected in the Display function, the countdown will blink orange. Press the POWER ON/STAND-BY...
... turn the Main On/Off switch on the remote control. OFF ON Selected Input Source Automatic Slide Shutter Use this could cause injury or the projector to malfunction. 18 The POWER indicator turns green and the cooling fans start to restart. • When "Countdown off" or "Off" is moving, ...as this tab when handling manually. Do not touch the slide shutter while it is selected in the Display function, the countdown will blink orange. Press the POWER ON/STAND-BY...
Owners Manual
Page 20
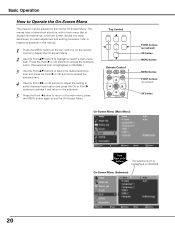
... selected item is divided into submenus, which are further divided into other submenus. press the MENU button again to Operate the On-Screen Menu The projector can be adjusted or set via the On-Screen Menu. Press the Point 8 or OK buttons to the main menu; On-Screen Menu (Submenu) 20... button MENU button POINT buttons (arrowhead) OK button On-Screen Menu (Main Menu) Point Right or OK buttons The selected item is highlighted in this manual. 1 Press the MENU button on the top control or on the remote control to display the On-Screen Menu. 2 Use the Point ed buttons to...
... selected item is divided into submenus, which are further divided into other submenus. press the MENU button again to Operate the On-Screen Menu The projector can be adjusted or set via the On-Screen Menu. Press the Point 8 or OK buttons to the main menu; On-Screen Menu (Submenu) 20... button MENU button POINT buttons (arrowhead) OK button On-Screen Menu (Main Menu) Point Right or OK buttons The selected item is highlighted in this manual. 1 Press the MENU button on the top control or on the remote control to display the On-Screen Menu. 2 Use the Point ed buttons to...
Owners Manual
Page 25
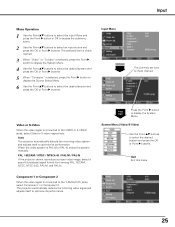
..." is connected to select the desired system and press the OK or Point 8 buttons. Auto The projector automatically detects the incoming video system and adjusts itself to select an input source and press the OK or Point 8 buttons... Point 8 buttons. When the video system is check marked. PAL / SECAM / NTSC / NTSC4.43 / PAL-M / PAL-N If the projector cannot reproduce a proper video image, select a specific broadcast signal format from among PAL, SECAM, NTSC, NTSC 4.43, PAL-M, and PAL-N.... Input Menu Input The currently set item is PAL-M or PAL-N, select the system manually.
..." is connected to select the desired system and press the OK or Point 8 buttons. Auto The projector automatically detects the incoming video system and adjusts itself to select an input source and press the OK or Point 8 buttons... Point 8 buttons. When the video system is check marked. PAL / SECAM / NTSC / NTSC4.43 / PAL-M / PAL-N If the projector cannot reproduce a proper video image, select a specific broadcast signal format from among PAL, SECAM, NTSC, NTSC 4.43, PAL-M, and PAL-N.... Input Menu Input The currently set item is PAL-M or PAL-N, select the system manually.

Owners Manual
Page 33
...vertical picture position (from -100 to adjust the overscan area. Total dots Use the Point 7 8 buttons to adjust the number of this projector. The adjustment bar is 480i or 575i and with some incompatible computer input and digital signals. • Fine sync and Total dots cannot be...be operated when the video signal format is displayed. Menu Overscan Use the Point 7 8 buttons to +100). If you to precisely adjust several parameters manually to +8. • The Auto adj. When the input signal is stored for every input. 1 Press the Point ed buttons to +100). Auto...
...vertical picture position (from -100 to adjust the overscan area. Total dots Use the Point 7 8 buttons to adjust the number of this projector. The adjustment bar is 480i or 575i and with some incompatible computer input and digital signals. • Fine sync and Total dots cannot be...be operated when the video signal format is displayed. Menu Overscan Use the Point 7 8 buttons to +100). If you to precisely adjust several parameters manually to +8. • The Auto adj. When the input signal is stored for every input. 1 Press the Point ed buttons to +100). Auto...
Owners Manual
Page 37
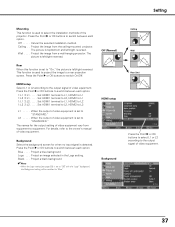
... is set to equipment. For details, refer to L2 L1 . . . . . Project the image from the ceiling-mounted projector. Set HDMI1 terminal to L2, HDMI2 to the owner's manual of video equipment is set to L2 1:L2 2:L2 . . . . . Project a blue background Logo . . . .... . . The picture is left /right reversed. Ceiling . . The picture is top/bottom and left /right reversed. Project the image from a wall-hanging projector. Set HDMI1 terminal to L2, HDMI2 to switch between each option. Press the Point 8 or OK buttons to L1 1:L1 2:L2 . . . . . ...
... is set to equipment. For details, refer to L2 L1 . . . . . Project the image from the ceiling-mounted projector. Set HDMI1 terminal to L2, HDMI2 to the owner's manual of video equipment is set to L2 1:L2 2:L2 . . . . . Project a blue background Logo . . . .... . . The picture is left /right reversed. Ceiling . . The picture is top/bottom and left /right reversed. Project the image from a wall-hanging projector. Set HDMI1 terminal to L2, HDMI2 to switch between each option. Press the Point 8 or OK buttons to L1 1:L1 2:L2 . . . . . ...
Owners Manual
Page 48
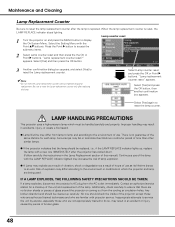
...the lamp counter. IF A LAMP EXPLODES, THE FOLLOWING SAFETY PRECAUTIONS SHOULD BE TAKEN. No one IMMEDIATELY after the projector has cooled down. (Follow carefully the instructions in an accident or injury caused by anyone, especially those who are ...authorized trained technicians and who are being used. Select the Setting Menu with projector service. Press the Point 8 button to reset the Lamp replacement counter only after the lamp is replaced.... replace the lamp with a new one should check the inside of this manual.) Continuous use .
...the lamp counter. IF A LAMP EXPLODES, THE FOLLOWING SAFETY PRECAUTIONS SHOULD BE TAKEN. No one IMMEDIATELY after the projector has cooled down. (Follow carefully the instructions in an accident or injury caused by anyone, especially those who are ...authorized trained technicians and who are being used. Select the Setting Menu with projector service. Press the Point 8 button to reset the Lamp replacement counter only after the lamp is replaced.... replace the lamp with a new one should check the inside of this manual.) Continuous use .
Owners Manual
Page 49
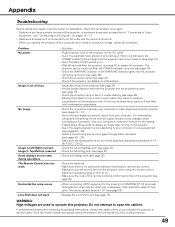
...is installed on . - Check the batteries. - Make sure the code of the remote control is conformed to a Computer" on after the projector is connected to warm place may be turned on pages 16 - 17. - The factory default value is Top/Bottom reversed. If problems ...). - Image is 16.4' (5 m). - Some displays are not seen during operations. See your computer's instruction manual for the monitor output needs to to be changed when connecting to the projector's COMPONENT 1/2 terminals, horizontal line noise may result in "Connecting to Video Equipment" and "Connecting to that of...
...is installed on . - Check the batteries. - Make sure the code of the remote control is conformed to a Computer" on after the projector is connected to warm place may be turned on pages 16 - 17. - The factory default value is Top/Bottom reversed. If problems ...). - Image is 16.4' (5 m). - Some displays are not seen during operations. See your computer's instruction manual for the monitor output needs to to be changed when connecting to the projector's COMPONENT 1/2 terminals, horizontal line noise may result in "Connecting to Video Equipment" and "Connecting to that of...
Owners Manual
Page 54
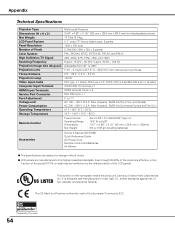
...ineffective by Underwriters Laboratories Inc. The CE Mark is Listed by the characteristics of the LCD panels. Appendix Technical Specifications Projector Type Dimensions (W x H x D) Net Weight LCD Panel System Panel Resolution Number of Pixels Color System High Definition TV Signal Scanning Frequency ...) PAL, SECAM, NTSC, NTSC4.43, PAL-M, and PAL-N 480i, 480p, 575i, 575p, 720p, and 1080i H-sync. 15 kHz - 80 kHz, V-sync. 50 Hz - 100 Hz Adjustable from 40" to 300" F 2.0 - 3.0 lens with f 21.3 - 42.6 mm with manual zoom and focus 3.9' - 30.2' (1.2 m - 9.2 m) 145 W RCA Type x 1 ...
...ineffective by Underwriters Laboratories Inc. The CE Mark is Listed by the characteristics of the LCD panels. Appendix Technical Specifications Projector Type Dimensions (W x H x D) Net Weight LCD Panel System Panel Resolution Number of Pixels Color System High Definition TV Signal Scanning Frequency ...) PAL, SECAM, NTSC, NTSC4.43, PAL-M, and PAL-N 480i, 480p, 575i, 575p, 720p, and 1080i H-sync. 15 kHz - 80 kHz, V-sync. 50 Hz - 100 Hz Adjustable from 40" to 300" F 2.0 - 3.0 lens with f 21.3 - 42.6 mm with manual zoom and focus 3.9' - 30.2' (1.2 m - 9.2 m) 145 W RCA Type x 1 ...


