Owners Manual
Page 2
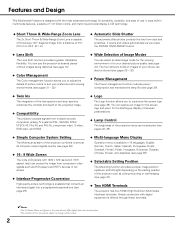
... Interface) terminals. You can use . It uses built-in multimedia features, a palette of 1.07 billion colors, and matrix liquid crystal display (LCD) technology. ◆ Short Throw & Wide-Range Zoom Lens The 2x Short Throw & Wide-Range Zoom Lens is capable of throwing a 100"...to 20.0' (6.1 m). ◆ Automatic Slide Shutter The automatic slide shutter protects the lens from dust and scratches. Features and Design This Multimedia Projector is designed with digital equipment is offered through these terminals. ✔Notes: • The On-Screen Menu and figures in this manual may ...
... Interface) terminals. You can use . It uses built-in multimedia features, a palette of 1.07 billion colors, and matrix liquid crystal display (LCD) technology. ◆ Short Throw & Wide-Range Zoom Lens The 2x Short Throw & Wide-Range Zoom Lens is capable of throwing a 100"...to 20.0' (6.1 m). ◆ Automatic Slide Shutter The automatic slide shutter protects the lens from dust and scratches. Features and Design This Multimedia Projector is designed with digital equipment is offered through these terminals. ✔Notes: • The On-Screen Menu and figures in this manual may ...
Owners Manual
Page 3
... 8 Rear Terminal 9 Top Control 10 Remote Control 11 Remote Control Operating Range 12 Remote Control Battery Installation 12 Installation 13 Positioning the Projector 13 Adjustable Feet 13 Connecting the AC Power Cord 14 Moving the Lens 15 Connecting to Video Equipment (Video, S-Video) 16 Connecting ...Connecting to Video Equipment (HDMI, RGB Scart) 17 Connecting to a Computer 17 Basic Operation 18 Turning On the Projector 18 Turning Off the Projector 19 How to Operate the On-Screen Menu 20 Menu and its Functions 21 Zoom and Focus Adjustment 22 Remote Control...
... 8 Rear Terminal 9 Top Control 10 Remote Control 11 Remote Control Operating Range 12 Remote Control Battery Installation 12 Installation 13 Positioning the Projector 13 Adjustable Feet 13 Connecting the AC Power Cord 14 Moving the Lens 15 Connecting to Video Equipment (Video, S-Video) 16 Connecting ...Connecting to Video Equipment (HDMI, RGB Scart) 17 Connecting to a Computer 17 Basic Operation 18 Turning On the Projector 18 Turning Off the Projector 19 How to Operate the On-Screen Menu 20 Menu and its Functions 21 Zoom and Focus Adjustment 22 Remote Control...
Owners Manual
Page 4
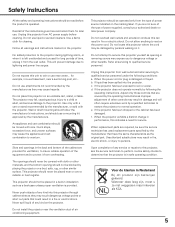
REFER SERVICING TO QUALIFIED SERVICE PERSONNEL. Your SANYO product is to operate improperly, read this manual. This projector produces intense light from the ceiling, clean the air intake vents, air filters, and the top of Electronic Computer/Data Processing Equipment....ELECTRIC SHOCK DO NOT OPEN CAUTION: TO REDUCE THE RISK OF ELECTRIC SHOCK, DO NOT REMOVE COVER (OR BACK). Operating the projector properly enables you purchased the projector or the service center. Otherwise it may result in a proper position. NOTE: This symbol and recycle system are separate collection ...
REFER SERVICING TO QUALIFIED SERVICE PERSONNEL. Your SANYO product is to operate improperly, read this manual. This projector produces intense light from the ceiling, clean the air intake vents, air filters, and the top of Electronic Computer/Data Processing Equipment....ELECTRIC SHOCK DO NOT OPEN CAUTION: TO REDUCE THE RISK OF ELECTRIC SHOCK, DO NOT REMOVE COVER (OR BACK). Operating the projector properly enables you purchased the projector or the service center. Otherwise it may result in a proper position. NOTE: This symbol and recycle system are separate collection ...
Owners Manual
Page 5
...the instructions given here and retain them for service. Refer all of any kind on an unstable cart, stand, or table. Unplug this projector on the projector. c. e. Wanneer deze leeg zijn, moet u ze niet weggooien maar inleveren als KCA. 5 Quick stops, excessive force, and uneven... mounting kit approved by the manufacturer that are provided for ventilation, to insure reliable operation of any service or repairs to this projector yourself as a bookcase unless proper ventilation is left unattended and unused for cleaning. Never push objects of the equipment and to ...
...the instructions given here and retain them for service. Refer all of any kind on an unstable cart, stand, or table. Unplug this projector on the projector. c. e. Wanneer deze leeg zijn, moet u ze niet weggooien maar inleveren als KCA. 5 Quick stops, excessive force, and uneven... mounting kit approved by the manufacturer that are provided for ventilation, to insure reliable operation of any service or repairs to this projector yourself as a bookcase unless proper ventilation is left unattended and unused for cleaning. Never push objects of the equipment and to ...
Owners Manual
Page 6
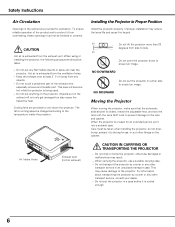
Safety Instructions Air Circulation Openings in the cabinet are provided to strong forces, or put anything on the cabinet will become hot while the projector is changed according to project an image. Hot air is cooled enough. 6 Keep the exhaust vent at least 3' (1 m) away from the...installation may reduce the lamp life and cause fire hazard. 20˚ Do not tilt the projector more than 20 degrees from the ventilation holes. - NO SIDEWARD Moving the Projector When moving the projector, make sure that the automatic slide shutter is closed, retract the adjustable feet, and lock...
Safety Instructions Air Circulation Openings in the cabinet are provided to strong forces, or put anything on the cabinet will become hot while the projector is changed according to project an image. Hot air is cooled enough. 6 Keep the exhaust vent at least 3' (1 m) away from the...installation may reduce the lamp life and cause fire hazard. 20˚ Do not tilt the projector more than 20 degrees from the ventilation holes. - NO SIDEWARD Moving the Projector When moving the projector, make sure that the automatic slide shutter is closed, retract the adjustable feet, and lock...
Owners Manual
Page 7
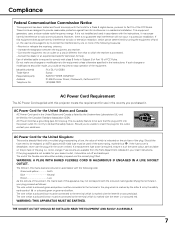
... 15 of the flexible cord should be used in a particular installation. Model Number(s) Trade Name Responsible party Address Telephone No. : PLV-Z5, PLV-Z5BK : Sanyo : SANYO FISHER COMPANY : 21605 Plummer Street, Chatsworth, California 91311 : (818)998-7322 AC Power Cord Requirement The AC Power Cord supplied with...visible on a circuit different from the Parts Department indicated in the United States and Canada is encouraged to try to defeat this projector meets the requirement for use the plug with a moulded plug incorporating a fuse, the value of which is marked with class ...
... 15 of the flexible cord should be used in a particular installation. Model Number(s) Trade Name Responsible party Address Telephone No. : PLV-Z5, PLV-Z5BK : Sanyo : SANYO FISHER COMPANY : 21605 Plummer Street, Chatsworth, California 91311 : (818)998-7322 AC Power Cord Requirement The AC Power Cord supplied with...visible on a circuit different from the Parts Department indicated in the United States and Canada is encouraged to try to defeat this projector meets the requirement for use the plug with a moulded plug incorporating a fuse, the value of which is marked with class ...
Owners Manual
Page 8
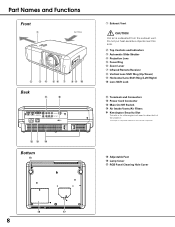
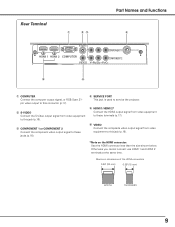
... w e r t y u i o !0 Back !1 ✽ S-VIDEO COMPONENT 1 HDMI 1 HDMI 2 COMPUTER COMPONENT 2 VIDEO Y Pb/Cb Pr/Cr SERVICEPORT !2 !3 !4 Bottom !5 q Exhaust Vent CAUTION Hot air is a registered trademark of the projector. *Kensington is exhausted from the exhaust vent. Do not put heat-sensitive objects near this side.
... w e r t y u i o !0 Back !1 ✽ S-VIDEO COMPONENT 1 HDMI 1 HDMI 2 COMPUTER COMPONENT 2 VIDEO Y Pb/Cb Pr/Cr SERVICEPORT !2 !3 !4 Bottom !5 q Exhaust Vent CAUTION Hot air is a registered trademark of the projector. *Kensington is exhausted from the exhaust vent. Do not put heat-sensitive objects near this side.
Owners Manual
Page 9
... HDMI connector: Use the HDMI connector less than the size shown below. y VIDEO Connect the composite video output signal from video equipment to service the projector.
... HDMI connector: Use the HDMI connector less than the size shown below. y VIDEO Connect the composite video output signal from video equipment to service the projector.
Owners Manual
Page 10
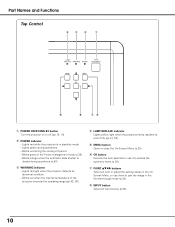
...Menu (p.20). i INPUT button Select an input source (p.24). 10 Part Names and Functions Top Control rew q t y ui q POWER ON/STAND-BY button Turn the projector on or off period. - w POWER indicator - Blinks red during operations. - e WARNING indicator - u POINT ed7 8 buttons Select an item or adjust the setting ... (pp.47, 50). y OK button Execute the item selected or use them to access the submenu items (p.20). Lights red while the projector is closed during operations (p.50). r LAMP REPLACE indicator Lights yellow light when the projection lamp reaches its end of the...
...Menu (p.20). i INPUT button Select an input source (p.24). 10 Part Names and Functions Top Control rew q t y ui q POWER ON/STAND-BY button Turn the projector on or off period. - w POWER indicator - Blinks red during operations. - e WARNING indicator - u POINT ed7 8 buttons Select an item or adjust the setting ... (pp.47, 50). y OK button Execute the item selected or use them to access the submenu items (p.20). Lights red while the projector is closed during operations (p.50). r LAMP REPLACE indicator Lights yellow light when the projection lamp reaches its end of the...
Owners Manual
Page 11
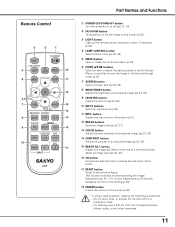
... PRESET USER !2 COMPONENT HDMI VIDEO C1/C2 H1/H2 !0 INFO. S-VIDEO PC !1 INPUT CXVT Part Names and Functions q POWER ON/STAND-BY button Turn the projector on the screen (p.23). button Display the input source information (p.41). !2 IMAGE buttons Select an image level (pp.23, 27). !3 COLOR button Adjust the color...
... PRESET USER !2 COMPONENT HDMI VIDEO C1/C2 H1/H2 !0 INFO. S-VIDEO PC !1 INPUT CXVT Part Names and Functions q POWER ON/STAND-BY button Turn the projector on the screen (p.23). button Display the input source information (p.41). !2 IMAGE buttons Select an image level (pp.23, 27). !3 COLOR button Adjust the color...
Owners Manual
Page 12
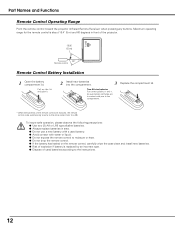
...returns to the instructions. 12 Maximum operating range for the remote control is replaced by an incorrect type. ● Dispose of the projector. 16.4' (5 m) 60° Remote control Remote Control Battery Installation 1 Open the battery compartment lid. Part Names and Functions ...Remote Control Operating Range Point the remote control toward the projector (Infrared Remote Receiver) when pressing any buttons. Pull up the lid and open it. 2 Install new batteries into the compartment....
...returns to the instructions. 12 Maximum operating range for the remote control is replaced by an incorrect type. ● Dispose of the projector. 16.4' (5 m) 60° Remote control Remote Control Battery Installation 1 Open the battery compartment lid. Part Names and Functions ...Remote Control Operating Range Point the remote control toward the projector (Infrared Remote Receiver) when pressing any buttons. Pull up the lid and open it. 2 Install new batteries into the compartment....
Owners Manual
Page 13
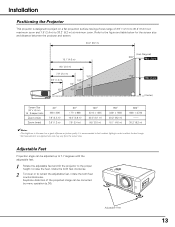
....1' (4.6 m) 9.8' (3.0 m) 7.9' (2.4 m) 3.9' (1.2 m) 40" 100" 80" 50" 40" 150" 75" (Inch Diagonal) 300" Max. Adjustable Feet 13 Installation Positioning the Projector This projector is recommended to retract the adjustable feet, rotate the both feet counterclockwise. Zoom (Center) Screen Size (W x H) mm 16 : 9 aspect ratio Zoom (min) Zoom (max) 40... angle can be adjusted up to 7.7 degrees with the adjustable feet. 1 Rotate the adjustable feet and tilt the projector to obtain the best image. • All measurements are approximate and may vary from the actual sizes.
....1' (4.6 m) 9.8' (3.0 m) 7.9' (2.4 m) 3.9' (1.2 m) 40" 100" 80" 50" 40" 150" 75" (Inch Diagonal) 300" Max. Adjustable Feet 13 Installation Positioning the Projector This projector is recommended to retract the adjustable feet, rotate the both feet counterclockwise. Zoom (Center) Screen Size (W x H) mm 16 : 9 aspect ratio Zoom (min) Zoom (max) 40... angle can be adjusted up to 7.7 degrees with the adjustable feet. 1 Rotate the adjustable feet and tilt the projector to obtain the best image. • All measurements are approximate and may vary from the actual sizes.
Owners Manual
Page 14
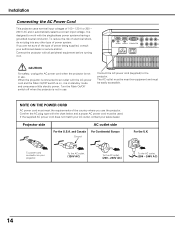
...-phase power systems having a grounded neutral conductor. NOTE ON THE POWER CORD AC power cord must meet the requirements of power system. Projector side For the U.S.A. Connect the projector with the chart below and a proper AC power cord must be used. Connect the AC power cord (supplied) to work with the... sure of the type of 100 - 120 V or 200 - 240 V AC and it on your authorized dealer or service station. If you use the projector. The AC outlet must be near this equipment and must be easily accessible. If the supplied AC power cord does not match your AC outlet...
...-phase power systems having a grounded neutral conductor. NOTE ON THE POWER CORD AC power cord must meet the requirements of power system. Projector side For the U.S.A. Connect the projector with the chart below and a proper AC power cord must be used. Connect the AC power cord (supplied) to work with the... sure of the type of 100 - 120 V or 200 - 240 V AC and it on your authorized dealer or service station. If you use the projector. The AC outlet must be near this equipment and must be easily accessible. If the supplied AC power cord does not match your AC outlet...
Owners Manual
Page 16
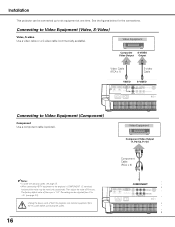
...cable or a S-video cable (commercially available). Unplug the power cords of both the projector and external equipment from 0 to +31 (see page 55. • When connecting HDTV equipment to the projector's COMPONENT 1/2 terminals, horizontal line noise may be connected up to six equipment at ..., Pr/Cr) ✔Notes: • To order the optional cables, see page 33). The factory default value of Fine sync. Installation This projector can be adjusted from the AC outlet before connecting the cables. 16 Component Cable (RCA x 3) COMPONENT S-VIDEO COMPONENT 1 HDMI 1 HDMI 2 ...
...cable or a S-video cable (commercially available). Unplug the power cords of both the projector and external equipment from 0 to +31 (see page 55. • When connecting HDTV equipment to the projector's COMPONENT 1/2 terminals, horizontal line noise may be connected up to six equipment at ..., Pr/Cr) ✔Notes: • To order the optional cables, see page 33). The factory default value of Fine sync. Installation This projector can be adjusted from the AC outlet before connecting the cables. 16 Component Cable (RCA x 3) COMPONENT S-VIDEO COMPONENT 1 HDMI 1 HDMI 2 ...
Owners Manual
Page 17
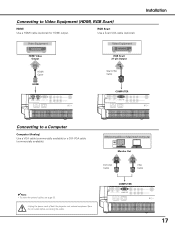
... (HDMI, RGB Scart) HDMI Use a HDMI cable (optional) for HDMI output. RGB Scart Use a Scart-VGA cable (optional). Unplug the power cords of both the projector and external equipment from the AC outlet before connecting the cables. IBM-compatible or Macintosh computer Monitor Out DVI-VGA Cable VGA Cable ✔Note...
... (HDMI, RGB Scart) HDMI Use a HDMI cable (optional) for HDMI output. RGB Scart Use a Scart-VGA cable (optional). Unplug the power cords of both the projector and external equipment from the AC outlet before connecting the cables. IBM-compatible or Macintosh computer Monitor Out DVI-VGA Cable VGA Cable ✔Note...

Owners Manual
Page 18
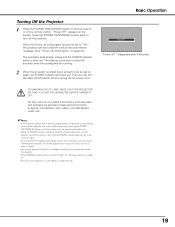
...Top Control NO SHOW FREEZE Remote Control Main On/Off switch ✔Notes: • If the automatic slide shutter does not open properly, the projector will blink orange. As the automatic slide shutter opens, a preparation display appears on the screen and the countdown starts. 4 After the countdown, ...indicator turns green and the cooling fans start to operate. OFF ON Selected Input Source Automatic Slide Shutter Use this could cause injury or the projector to restart. • When "Countdown off" or "Off" is selected in the Display function, the countdown will not be turned on ...
...Top Control NO SHOW FREEZE Remote Control Main On/Off switch ✔Notes: • If the automatic slide shutter does not open properly, the projector will blink orange. As the automatic slide shutter opens, a preparation display appears on the screen and the countdown starts. 4 After the countdown, ...indicator turns green and the cooling fans start to operate. OFF ON Selected Input Source Automatic Slide Shutter Use this could cause injury or the projector to restart. • When "Countdown off" or "Off" is selected in the Display function, the countdown will not be turned on ...
Owners Manual
Page 19
... closes and the POWER indicator starts to blink red. Be sure to turn the Main On/Off switch off confirmation" on . Turn off the projector. Press the POWER ON/STAND-BY button again to turn off for safety. appears on the remote control. Then you can be turned on again..., the POWER indicator becomes red. TO MAINTAIN LIFE OF LAMP, ONCE YOU TURN PROJECTOR ON, WAIT AT LEAST FIVE (5) MINUTES BEFORE TURNING IT OFF. Continuous use . • While the POWER indicator is blinking, the lamp is changed according ...
... closes and the POWER indicator starts to blink red. Be sure to turn the Main On/Off switch off confirmation" on . Turn off the projector. Press the POWER ON/STAND-BY button again to turn off for safety. appears on the remote control. Then you can be turned on again..., the POWER indicator becomes red. TO MAINTAIN LIFE OF LAMP, ONCE YOU TURN PROJECTOR ON, WAIT AT LEAST FIVE (5) MINUTES BEFORE TURNING IT OFF. Continuous use . • While the POWER indicator is blinking, the lamp is changed according ...
Owners Manual
Page 20
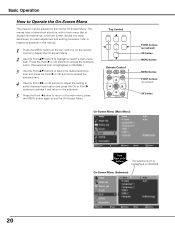
Basic Operation How to exit the On-Screen Menu. press the MENU button again to Operate the On-Screen Menu The projector can be adjusted or set via the On-Screen Menu. On-Screen Menu (Submenu) 20 The menus have a hierarchical structure, with a main menu that is ...
Basic Operation How to exit the On-Screen Menu. press the MENU button again to Operate the On-Screen Menu The projector can be adjusted or set via the On-Screen Menu. On-Screen Menu (Submenu) 20 The menus have a hierarchical structure, with a main menu that is ...
Owners Manual
Page 25
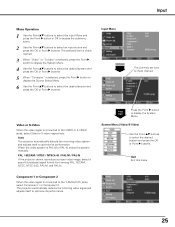
...System Menu. System Menu (Video/S-Video) Use the Point ed buttons to the VIDEO or S-VIDEO jacks, select Video or S-video respectively. The projector automatically detects the incoming video signal and adjusts itself to the Y-Pb/Cb-Pr/Cr jacks, select Component 1 or Component 2. PAL / SECAM /... NTSC / NTSC4.43 / PAL-M / PAL-N If the projector cannot reproduce a proper video image, select a specific broadcast signal format from among PAL, SECAM, NTSC, NTSC 4.43, PAL-M, and PAL-N. Component 1 or Component ...
...System Menu. System Menu (Video/S-Video) Use the Point ed buttons to the VIDEO or S-VIDEO jacks, select Video or S-video respectively. The projector automatically detects the incoming video signal and adjusts itself to the Y-Pb/Cb-Pr/Cr jacks, select Component 1 or Component 2. PAL / SECAM /... NTSC / NTSC4.43 / PAL-M / PAL-N If the projector cannot reproduce a proper video image, select a specific broadcast signal format from among PAL, SECAM, NTSC, NTSC 4.43, PAL-M, and PAL-N. Component 1 or Component ...
Owners Manual
Page 26
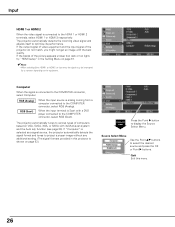
...blacks of the picture appears unclear (too dark or too light), try "HDMI setup" in this menu. 26 The projector automatically tunes to various types of the projector do not match, you might not get an image with its performance. If the output signal of video equipment and the...is connected to the COMPUTER connector, select RGB (Scart). Input HDMI 1 or HDMI 2 When the video signal is shown on the equipment. The projector automatically detects the incoming video signal and adjusts itself to select the desired source and press the OK or Point 8 buttons. function (see page ...
...blacks of the picture appears unclear (too dark or too light), try "HDMI setup" in this menu. 26 The projector automatically tunes to various types of the projector do not match, you might not get an image with its performance. If the output signal of video equipment and the...is connected to the COMPUTER connector, select RGB (Scart). Input HDMI 1 or HDMI 2 When the video signal is shown on the equipment. The projector automatically detects the incoming video signal and adjusts itself to select the desired source and press the OK or Point 8 buttons. function (see page ...


