Owners Manual
Page 2
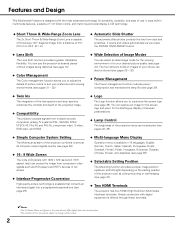
...pages 22, 29). ◆ Simple Computer System Setting The Multi-scan system of the projector conforms to almost all computer output signals quickly (see page 26). ◆ 16 : 9 Wide Screen The wide LCD panels with 1280 x 720 resolution (16:9 aspect ratio) can select an ideal image mode... for the viewing environment or for portability, durability, and ease of 9.8' (3.0 m) to suit your desired picture quality (see page 37). ◆ Two HDMI Terminals The projector has two HDMI (...
...pages 22, 29). ◆ Simple Computer System Setting The Multi-scan system of the projector conforms to almost all computer output signals quickly (see page 26). ◆ 16 : 9 Wide Screen The wide LCD panels with 1280 x 720 resolution (16:9 aspect ratio) can select an ideal image mode... for the viewing environment or for portability, durability, and ease of 9.8' (3.0 m) to suit your desired picture quality (see page 37). ◆ Two HDMI Terminals The projector has two HDMI (...
Owners Manual
Page 3
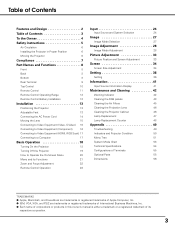
... 8 Rear Terminal 9 Top Control 10 Remote Control 11 Remote Control Operating Range 12 Remote Control Battery Installation 12 Installation 13 Positioning the Projector 13 Adjustable Feet 13 Connecting the AC Power Cord 14 Moving the Lens 15 Connecting to Video Equipment (Video, S-Video) 16 Connecting ...Connecting to Video Equipment (HDMI, RGB Scart) 17 Connecting to a Computer 17 Basic Operation 18 Turning On the Projector 18 Turning Off the Projector 19 How to Operate the On-Screen Menu 20 Menu and its Functions 21 Zoom and Focus Adjustment 22 Remote Control...
... 8 Rear Terminal 9 Top Control 10 Remote Control 11 Remote Control Operating Range 12 Remote Control Battery Installation 12 Installation 13 Positioning the Projector 13 Adjustable Feet 13 Connecting the AC Power Cord 14 Moving the Lens 15 Connecting to Video Equipment (Video, S-Video) 16 Connecting ...Connecting to Video Equipment (HDMI, RGB Scart) 17 Connecting to a Computer 17 Basic Operation 18 Turning On the Projector 18 Turning Off the Projector 19 How to Operate the On-Screen Menu 20 Menu and its Functions 21 Zoom and Focus Adjustment 22 Remote Control...
Owners Manual
Page 4
... CAUTION Not for a long time, the cooling fans can be maintained. - Be especially careful that electrical and electronic equipment, at your projector, and can be built into the beam. - The dimensions shown here indicate the minimum space required. CAUTION ON HANGING FROM THE CEILING ... Electronic Computer/Data Processing Equipment. Heat buildup can reduce the service life of your local community waste collection/recycling centre. Your SANYO product is to conserve the environment we live in! 4 Safety Precaution WARNING: TO REDUCE THE RISK OF FIRE OR ELECTRIC SHOCK...
... CAUTION Not for a long time, the cooling fans can be maintained. - Be especially careful that electrical and electronic equipment, at your projector, and can be built into the beam. - The dimensions shown here indicate the minimum space required. CAUTION ON HANGING FROM THE CEILING ... Electronic Computer/Data Processing Equipment. Heat buildup can reduce the service life of your local community waste collection/recycling centre. Your SANYO product is to conserve the environment we live in! 4 Safety Precaution WARNING: TO REDUCE THE RISK OF FIRE OR ELECTRIC SHOCK...
Owners Manual
Page 5
... power supplied, consult your authorized dealer or local power company. for later use near the ventilation duct of power source indicated on the projector. Use only with a cart or stand recommended by following conditions: a. Wall or shelf mounting should follow the manufacturer's instructions, and ... instructions. Do not overload wall outlets and extension cords as a bookcase unless proper ventilation is damaged or frayed. Unplug this projector yourself as they may touch dangerous voltage points or short out parts that are provided for long periods of other materials, and...
... power supplied, consult your authorized dealer or local power company. for later use near the ventilation duct of power source indicated on the projector. Use only with a cart or stand recommended by following conditions: a. Wall or shelf mounting should follow the manufacturer's instructions, and ... instructions. Do not overload wall outlets and extension cords as a bookcase unless proper ventilation is damaged or frayed. Unplug this projector yourself as they may touch dangerous voltage points or short out parts that are provided for long periods of other materials, and...
Owners Manual
Page 6
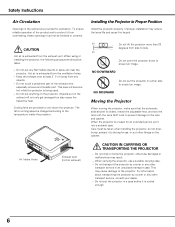
... side. 20˚ Do not point the projector down the projector. NO DOWNWARD Do not put the projector in an unsuitable transport case. CAUTION IN CARRYING OR TRANSPORTING THE PROJECTOR - Do not put the projector on the cabinet will become hot while the projector is exhausted from the exhaust vent. To ensure...a peripheral part of the product and to protect it to strong forces, or put on either side to the temperature inside the projector. The fan's running speed is exhausted from overheating, these openings must be blocked or covered. For information about transporting the...
... side. 20˚ Do not point the projector down the projector. NO DOWNWARD Do not put the projector in an unsuitable transport case. CAUTION IN CARRYING OR TRANSPORTING THE PROJECTOR - Do not put the projector on the cabinet will become hot while the projector is exhausted from the exhaust vent. To ensure...a peripheral part of the product and to protect it to strong forces, or put on either side to the temperature inside the projector. The fan's running speed is exhausted from overheating, these openings must be blocked or covered. For information about transporting the...

Owners Manual
Page 7
... be used of the plug. Reorient or relocate the receiving antenna. - Model Number(s) Trade Name Responsible party Address Telephone No. : PLV-Z5, PLV-Z5BK : Sanyo : SANYO FISHER COMPANY : 21605 Plummer Street, Chatsworth, California 91311 : (818)998-7322 AC Power Cord Requirement The AC Power Cord supplied with...any changes or modifications to provide reasonable protection against harmful interference in the plug which is indicated on the pin face of this projector meets the requirement for help. AC Power Cord has a grounding-type AC line plug. This is a safety feature to ...
... be used of the plug. Reorient or relocate the receiving antenna. - Model Number(s) Trade Name Responsible party Address Telephone No. : PLV-Z5, PLV-Z5BK : Sanyo : SANYO FISHER COMPANY : 21605 Plummer Street, Chatsworth, California 91311 : (818)998-7322 AC Power Cord Requirement The AC Power Cord supplied with...any changes or modifications to provide reasonable protection against harmful interference in the plug which is indicated on the pin face of this projector meets the requirement for help. AC Power Cord has a grounding-type AC line plug. This is a safety feature to ...
Owners Manual
Page 8
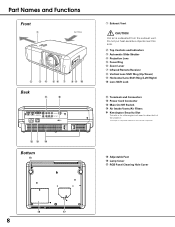
... !3 Main On/Off Switch !4 Air Intake Vents/Air Filters ✽ Kensington Security Slot This slot is for a Kensington lock used to deter theft of the projector. *Kensington is exhausted from the exhaust vent. Part Names and Functions Front q Air flow w e r t y u i o !0 Back !1 ✽ S-VIDEO COMPONENT 1 HDMI 1 HDMI 2 COMPUTER COMPONENT 2 VIDEO Y Pb/Cb...
... !3 Main On/Off Switch !4 Air Intake Vents/Air Filters ✽ Kensington Security Slot This slot is for a Kensington lock used to deter theft of the projector. *Kensington is exhausted from the exhaust vent. Part Names and Functions Front q Air flow w e r t y u i o !0 Back !1 ✽ S-VIDEO COMPONENT 1 HDMI 1 HDMI 2 COMPUTER COMPONENT 2 VIDEO Y Pb/Cb...
Owners Manual
Page 9
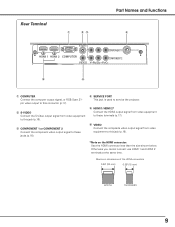
... 1 HDMI 1 HDMI 2 COMPUTER COMPONENT 2 VIDEO Y Pb/Cb Pr/Cr SERVICEPORT t y q COMPUTER Connect the computer output signal, or RGB Scart 21pin video output to service the projector. e COMPONENT 1 or COMPONENT 2 Connect the component video output signal to this connector (p.17). w S-VIDEO Connect the S-Video output signal from video equipment to these jacks...
... 1 HDMI 1 HDMI 2 COMPUTER COMPONENT 2 VIDEO Y Pb/Cb Pr/Cr SERVICEPORT t y q COMPUTER Connect the computer output signal, or RGB Scart 21pin video output to service the projector. e COMPONENT 1 or COMPONENT 2 Connect the component video output signal to this connector (p.17). w S-VIDEO Connect the S-Video output signal from video equipment to these jacks...
Owners Manual
Page 10
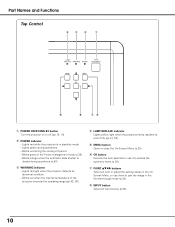
...slide shutter is in the OnScreen Menu, or use it to pan the image in the Power management mode (p.39). - Lights red light when the projector detects an abnormal condition. - u POINT ed7 8 buttons Select an item or adjust the setting values in stand-by mode. - Blinks red during ...operations. - r LAMP REPLACE indicator Lights yellow light when the projection lamp reaches its end of the projector exceeds the operating range (pp.42, 50). i INPUT button Select an input source (p.24). 10 Blinks red when the internal temperature of life...
...slide shutter is in the OnScreen Menu, or use it to pan the image in the Power management mode (p.39). - Lights red light when the projector detects an abnormal condition. - u POINT ed7 8 buttons Select an item or adjust the setting values in stand-by mode. - Blinks red during ...operations. - r LAMP REPLACE indicator Lights yellow light when the projection lamp reaches its end of the projector exceeds the operating range (pp.42, 50). i INPUT button Select an input source (p.24). 10 Blinks red when the internal temperature of life...
Owners Manual
Page 11
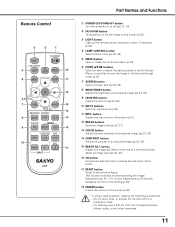
... PRESET USER !2 COMPONENT HDMI VIDEO C1/C2 H1/H2 !0 INFO. S-VIDEO PC !1 INPUT CXVT Part Names and Functions q POWER ON/STAND-BY button Turn the projector on or off the image on the screen (p.22). e LIGHT button Light up the remote control buttons for about 10 seconds (p.22). u SCREEN button Select...
... PRESET USER !2 COMPONENT HDMI VIDEO C1/C2 H1/H2 !0 INFO. S-VIDEO PC !1 INPUT CXVT Part Names and Functions q POWER ON/STAND-BY button Turn the projector on or off the image on the screen (p.22). e LIGHT button Light up the remote control buttons for about 10 seconds (p.22). u SCREEN button Select...
Owners Manual
Page 12
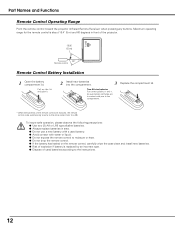
... battery is about 16.4' (5 m) and 60 degrees in the compartment. * When the batteries of used battery. ● Avoid contact with pins in front of the projector. 16.4' (5 m) 60° Remote control Remote Control Battery Installation 1 Open the battery compartment lid. Maximum operating range for the remote control is replaced by an... battery with a used batteries according to the initial code (Code 1) (p.39). Part Names and Functions Remote Control Operating Range Point the remote control toward the projector (Infrared Remote Receiver) when pressing any buttons.
... battery is about 16.4' (5 m) and 60 degrees in the compartment. * When the batteries of used battery. ● Avoid contact with pins in front of the projector. 16.4' (5 m) 60° Remote control Remote Control Battery Installation 1 Open the battery compartment lid. Maximum operating range for the remote control is replaced by an... battery with a used batteries according to the initial code (Code 1) (p.39). Part Names and Functions Remote Control Operating Range Point the remote control toward the projector (Infrared Remote Receiver) when pressing any buttons.
Owners Manual
Page 13
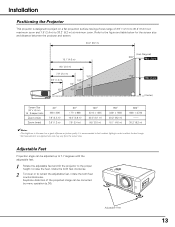
... raise the feet, rotate the both feet clockwise. 2 To lower or to the figure and table below for the screen size and distance between the projector and screen. 30.2' (9.2 m) 15.1' (4.6 m) 9.8' (3.0 m) 7.9' (2.4 m) 3.9' (1.2 m) 40" 100" 80" 50" 40" 150" 75" (Inch Diagonal) 300" Max....be adjusted up to 7.7 degrees with the adjustable feet. 1 Rotate the adjustable feet and tilt the projector to the proper height; Installation Positioning the Projector This projector is recommended to limit ambient lighting in the room has a great influence on a flat projection surface having...
... raise the feet, rotate the both feet clockwise. 2 To lower or to the figure and table below for the screen size and distance between the projector and screen. 30.2' (9.2 m) 15.1' (4.6 m) 9.8' (3.0 m) 7.9' (2.4 m) 3.9' (1.2 m) 40" 100" 80" 50" 40" 150" 75" (Inch Diagonal) 300" Max....be adjusted up to 7.7 degrees with the adjustable feet. 1 Rotate the adjustable feet and tilt the projector to the proper height; Installation Positioning the Projector This projector is recommended to limit ambient lighting in the room has a great influence on a flat projection surface having...
Owners Manual
Page 14
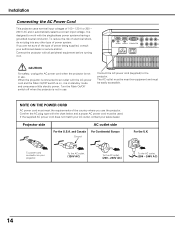
... you are not sure of the type of power being supplied, consult your authorized dealer or service station. Installation Connecting the AC Power Cord This projector uses nominal input voltages of 100 - 120 V or 200 - 240 V AC and it on. If the supplied AC power cord does not match your... . S-VIDEO CO HDMI 1 HDMI 2 COMPUTER CO VIDEO Y Pb/Cb Pr/Cr CAUTION For safety, unplug the AC power cord when the projector is designed to the projector. When the projector is connected to an outlet with the chart below and a proper AC power cord must be used. Confirm the AC plug type...
... you are not sure of the type of power being supplied, consult your authorized dealer or service station. Installation Connecting the AC Power Cord This projector uses nominal input voltages of 100 - 120 V or 200 - 240 V AC and it on. If the supplied AC power cord does not match your... . S-VIDEO CO HDMI 1 HDMI 2 COMPUTER CO VIDEO Y Pb/Cb Pr/Cr CAUTION For safety, unplug the AC power cord when the projector is designed to the projector. When the projector is connected to an outlet with the chart below and a proper AC power cord must be used. Confirm the AC plug type...
Owners Manual
Page 16
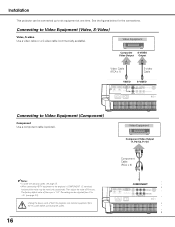
...Video Equipment Component Video Output (Y, Pb/Cb, Pr/Cr) ✔Notes: • To order the optional cables, see page 33). Installation This projector can be noted only occasionally. Video Equipment Composite S-VIDEO Video Output Output Video Cable (RCA x 1) S-video Cable VIDEO S-VIDEO S-VIDEO COMPONENT 1.... • When connecting HDTV equipment to six equipment at one time. The factory default value of both the projector and external equipment from 0 to Video Equipment (Component) Component Use a component cable (optional). The setting can be connected up to the...
...Video Equipment Component Video Output (Y, Pb/Cb, Pr/Cr) ✔Notes: • To order the optional cables, see page 33). Installation This projector can be noted only occasionally. Video Equipment Composite S-VIDEO Video Output Output Video Cable (RCA x 1) S-video Cable VIDEO S-VIDEO S-VIDEO COMPONENT 1.... • When connecting HDTV equipment to six equipment at one time. The factory default value of both the projector and external equipment from 0 to Video Equipment (Component) Component Use a component cable (optional). The setting can be connected up to the...
Owners Manual
Page 17
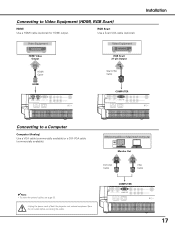
... Pr/Cr SERVICEPORT Connecting to Video Equipment (HDMI, RGB Scart) HDMI Use a HDMI cable (optional) for HDMI output. Unplug the power cords of both the projector and external equipment from the AC outlet before connecting the cables. IBM-compatible or Macintosh computer Monitor Out DVI-VGA Cable VGA Cable ✔Note...
... Pr/Cr SERVICEPORT Connecting to Video Equipment (HDMI, RGB Scart) HDMI Use a HDMI cable (optional) for HDMI output. Unplug the power cords of both the projector and external equipment from the AC outlet before connecting the cables. IBM-compatible or Macintosh computer Monitor Out DVI-VGA Cable VGA Cable ✔Note...

Owners Manual
Page 18
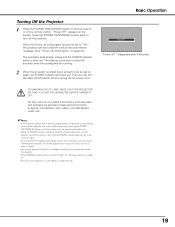
Press the POWER ON/STAND-BY button again to operate. OFF ON Selected Input Source Automatic Slide Shutter Use this could cause injury or the projector to malfunction. 18 Do not touch the slide shutter while it is selected in the Display function, the countdown will blink orange. As the ... Top Control NO SHOW FREEZE Remote Control Main On/Off switch ✔Notes: • If the automatic slide shutter does not open properly, the projector will not be turned on and the POWER indicator will not be displayed on . The POWER indicator lights red. 3 Press the POWER ON/STAND-...
Press the POWER ON/STAND-BY button again to operate. OFF ON Selected Input Source Automatic Slide Shutter Use this could cause injury or the projector to malfunction. 18 Do not touch the slide shutter while it is selected in the Display function, the countdown will blink orange. As the ... Top Control NO SHOW FREEZE Remote Control Main On/Off switch ✔Notes: • If the automatic slide shutter does not open properly, the projector will not be turned on and the POWER indicator will not be displayed on . The POWER indicator lights red. 3 Press the POWER ON/STAND-...
Owners Manual
Page 19
... function is cooled enough. 19 disappears after use may result in every 24 hours. • The running . 2 When the projector is cooled down and the projector cannot be turned off without rest. Wait until the POWER indicator becomes red to turn off and unplug the AC power cord.... Basic Operation "Power off ?" Turn off confirmation" on again. • Do not operate the projector continuously without the confirmation message. (See "Power off the projector and let stand for about an hour in shortening the lamp life. "Power off ?" Then you can be turned ...
... function is cooled enough. 19 disappears after use may result in every 24 hours. • The running . 2 When the projector is cooled down and the projector cannot be turned off without rest. Wait until the POWER indicator becomes red to turn off and unplug the AC power cord.... Basic Operation "Power off ?" Turn off confirmation" on again. • Do not operate the projector continuously without the confirmation message. (See "Power off the projector and let stand for about an hour in shortening the lamp life. "Power off ?" Then you can be turned ...
Owners Manual
Page 20
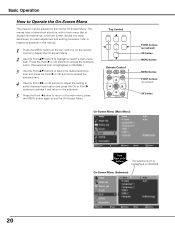
... switch between each adjustment and setting procedure, refer to respective sections in ORANGE. press the MENU button again to Operate the On-Screen Menu The projector can be adjusted or set via the On-Screen Menu. For each option and press the OK or Point 8 buttons to activate it and return...
... switch between each adjustment and setting procedure, refer to respective sections in ORANGE. press the MENU button again to Operate the On-Screen Menu The projector can be adjusted or set via the On-Screen Menu. For each option and press the OK or Point 8 buttons to activate it and return...
Owners Manual
Page 25
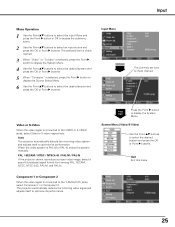
... or S-video respectively. Quit Exit this menu. 25 Video or S-Video When the video signal is connected to display the System Menu. The projector automatically detects the incoming video signal and adjusts itself to select the desired source and press the OK or Point 8 buttons. Component 1 or ... Source Select Menu. 6 Use the Point ed buttons to optimize its performance. PAL / SECAM / NTSC / NTSC4.43 / PAL-M / PAL-N If the projector cannot reproduce a proper video image, select a specific broadcast signal format from among PAL, SECAM, NTSC, NTSC 4.43, PAL-M, and PAL-N. Auto The...
... or S-video respectively. Quit Exit this menu. 25 Video or S-Video When the video signal is connected to display the System Menu. The projector automatically detects the incoming video signal and adjusts itself to select the desired source and press the OK or Point 8 buttons. Component 1 or ... Source Select Menu. 6 Use the Point ed buttons to optimize its performance. PAL / SECAM / NTSC / NTSC4.43 / PAL-M / PAL-N If the projector cannot reproduce a proper video image, select a specific broadcast signal format from among PAL, SECAM, NTSC, NTSC 4.43, PAL-M, and PAL-N. Auto The...
Owners Manual
Page 26
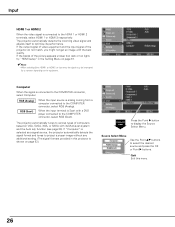
... to display the Source Select Menu. Computer When the signal is Scart with a DVD player connected to the COMPUTER connector, select RGB (Scart). The projector automatically tunes to various types of computers based on VGA, SVGA, XGA, or SXGA with the best quality. Source Select Menu Use the Point ed... buttons to the COMPUTER connector, select RGB (Analog). If the blacks of the projector do not match, you might not get an image with its performance. Input HDMI 1 or HDMI 2 When the video signal is analog coming ...
... to display the Source Select Menu. Computer When the signal is Scart with a DVD player connected to the COMPUTER connector, select RGB (Scart). The projector automatically tunes to various types of computers based on VGA, SVGA, XGA, or SXGA with the best quality. Source Select Menu Use the Point ed... buttons to the COMPUTER connector, select RGB (Analog). If the blacks of the projector do not match, you might not get an image with its performance. Input HDMI 1 or HDMI 2 When the video signal is analog coming ...


