Owners Manual
Page 2
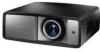
... : 9 Wide Screen The wide LCD panels with digital equipment is offered through these terminals. ✔Note: • The On-Screen Menu and figures in this manual are subject to change without notice. 2 Features and Design This Multimedia Projector is designed with the most advanced technology... for portability, durability, and ease of use the projector at desired places without images being distorted (see page...
... : 9 Wide Screen The wide LCD panels with digital equipment is offered through these terminals. ✔Note: • The On-Screen Menu and figures in this manual are subject to change without notice. 2 Features and Design This Multimedia Projector is designed with the most advanced technology... for portability, durability, and ease of use the projector at desired places without images being distorted (see page...
Owners Manual
Page 3
... Terminal 9 Top Control 10 Remote Control 11 Remote Control Operating Range 12 Remote Control Battery Installation 12 Installation 13 Positioning the Projector 13 Adjustable Feet 13 Moving the Lens 14 Connecting to Video Equipment (Video, S-Video) 15 Connecting to Video Equipment (Component...Troubleshooting 51 Indicators and Projector Condition 53 Menu Tree 54 System Mode Chart 56 Technical Specifications 57 Configurations of Terminals 58 Optional Parts 58 Dimensions 59 TRADEMARKS ● Each name of corporations or products in this owner's manual is either a ...
... Terminal 9 Top Control 10 Remote Control 11 Remote Control Operating Range 12 Remote Control Battery Installation 12 Installation 13 Positioning the Projector 13 Adjustable Feet 13 Moving the Lens 14 Connecting to Video Equipment (Video, S-Video) 15 Connecting to Video Equipment (Component...Troubleshooting 51 Indicators and Projector Condition 53 Menu Tree 54 System Mode Chart 56 Technical Specifications 57 Configurations of Terminals 58 Optional Parts 58 Dimensions 59 TRADEMARKS ● Each name of corporations or products in this owner's manual is either a ...
Owners Manual
Page 4
.... Allowing the proper amount of space on the top, sides, and rear of the projector cabinet is to prevent A Breakdown or disaster. Do not cover the ventilation slot on the LCD panels by the characteristic of them correctly at their end-oflife, should be built into the... manufactured with high quality materials and components which can be recycled and/or reused. To the Owner Before installing and operating the projector, read this manual again, check operations and cable connections and try the solutions in the "Troubleshooting" section in the back of this chemical symbol...
.... Allowing the proper amount of space on the top, sides, and rear of the projector cabinet is to prevent A Breakdown or disaster. Do not cover the ventilation slot on the LCD panels by the characteristic of them correctly at their end-oflife, should be built into the... manufactured with high quality materials and components which can be recycled and/or reused. To the Owner Before installing and operating the projector, read this manual again, check operations and cable connections and try the solutions in the "Troubleshooting" section in the back of this chemical symbol...

Owners Manual
Page 14
... of the screen. • With the maximum horizontal lens shift, the maximum vertical lens shift cannot be moved up or down or left and right manually with the Lens Shift Rings, enabling you to the left or right with the Lens Shift Lock.
... of the screen. • With the maximum horizontal lens shift, the maximum vertical lens shift cannot be moved up or down or left and right manually with the Lens Shift Rings, enabling you to the left or right with the Lens Shift Lock.
Owners Manual
Page 18
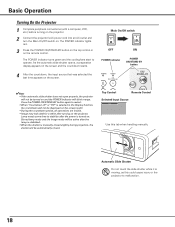
...with a computer, VCR, etc.) before turning on the projector. 2 Connect the projector's AC power cord into an AC outlet and turn the Main On/Off switch on the screen. Automatic Slide Shutter Do not touch the slide shutter while it is manually closed . Main On/Off switch OFF ON POWER indicator ...POWER ON/STAND-BY button ✔Note: • If the automatic slide shutter does not open properly, the projector will not be turned on and the POWER indicator will ...
...with a computer, VCR, etc.) before turning on the projector. 2 Connect the projector's AC power cord into an AC outlet and turn the Main On/Off switch on the screen. Automatic Slide Shutter Do not touch the slide shutter while it is manually closed . Main On/Off switch OFF ON POWER indicator ...POWER ON/STAND-BY button ✔Note: • If the automatic slide shutter does not open properly, the projector will not be turned on and the POWER indicator will ...
Owners Manual
Page 20
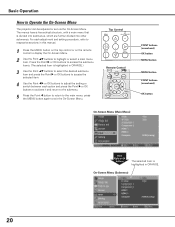
... Point 8 or OK buttons to activate it and return to the submenu. 5 Press the Point 7 button to return to Operate the On-Screen Menu The projector can be adjusted or set via the On-Screen Menu. press the MENU button again to highlight or select a main menu item. Top Control Remote... item. 4 Use the Point 7 8 or OK buttons to adjust the setting or switch between each adjustment and setting procedure, refer to respective sections in this manual. 1 Press the MENU button on the top control or on the remote control to display the On-Screen Menu. 2 Use the Point ed buttons to...
... Point 8 or OK buttons to activate it and return to the submenu. 5 Press the Point 7 button to return to Operate the On-Screen Menu The projector can be adjusted or set via the On-Screen Menu. press the MENU button again to highlight or select a main menu item. Top Control Remote... item. 4 Use the Point 7 8 or OK buttons to adjust the setting or switch between each adjustment and setting procedure, refer to respective sections in this manual. 1 Press the MENU button on the top control or on the remote control to display the On-Screen Menu. 2 Use the Point ed buttons to...

Owners Manual
Page 25
...itself to the VIDEO or S-VIDEO jacks, select Video or S-video respectively. PAL / SECAM / NTSC / NTSC4.43 / PAL-M / PAL-N If the projector cannot reproduce a proper video image, select a specific broadcast signal format from among PAL, SECAM, NTSC, NTSC 4.43, PAL-M, and PAL-N. System Menu (Video...the Point ed buttons to optimize its performance. Input Menu Input The currently set item is PAL-M or PAL-N, select the system manually. The projector automatically detects the incoming video signal and adjusts itself to select the desired source and press the Point 8 or OK buttons. When...
...itself to the VIDEO or S-VIDEO jacks, select Video or S-video respectively. PAL / SECAM / NTSC / NTSC4.43 / PAL-M / PAL-N If the projector cannot reproduce a proper video image, select a specific broadcast signal format from among PAL, SECAM, NTSC, NTSC 4.43, PAL-M, and PAL-N. System Menu (Video...the Point ed buttons to optimize its performance. Input Menu Input The currently set item is PAL-M or PAL-N, select the system manually. The projector automatically detects the incoming video signal and adjusts itself to select the desired source and press the Point 8 or OK buttons. When...

Owners Manual
Page 34
... buttons to make adjustment. • The adjusting range for the Horizontal and Vertical positions, and Total dots differs depending on the edge of this projector. It works only to decrease the overscanned portion of total dots in one horizontal period to match your computer. Auto adj. Fine sync Use the...next item can be operated with the video input only. • When the digital signal is from -100 to select the Picture adj. The parameters manually adjusted is 480i or 575i, the adjusting range for every input. 1 Press the Point ed buttons to +100). ✔Note: • Overscan...
... buttons to make adjustment. • The adjusting range for the Horizontal and Vertical positions, and Total dots differs depending on the edge of this projector. It works only to decrease the overscanned portion of total dots in one horizontal period to match your computer. Auto adj. Fine sync Use the...next item can be operated with the video input only. • When the digital signal is from -100 to select the Picture adj. The parameters manually adjusted is 480i or 575i, the adjusting range for every input. 1 Press the Point ed buttons to +100). ✔Note: • Overscan...
Owners Manual
Page 38
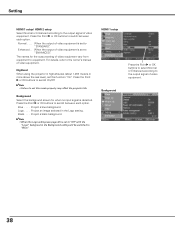
...level), set this function "On." Press the Point 8 or OK buttons to switch between each option. For details, refer to the owner's manual of video equipment. 38 Background Select the background screen for the output setting of video equipment is set to "Off" with the "Logo" ...setup Background Press the Point 8 or OK buttons to select Normal or Enhanced according to the output signal of video equipment. Highland When using the projector in the Logo setting. Enhanced ��� When the output of video equipment. Setting HDMI 1 setup/ HDMI 2 setup Select Normal ...
...level), set this function "On." Press the Point 8 or OK buttons to switch between each option. For details, refer to the owner's manual of video equipment. 38 Background Select the background screen for the output setting of video equipment is set to "Off" with the "Logo" ...setup Background Press the Point 8 or OK buttons to select Normal or Enhanced according to the output signal of video equipment. Highland When using the projector in the Logo setting. Enhanced ��� When the output of video equipment. Setting HDMI 1 setup/ HDMI 2 setup Select Normal ...
Owners Manual
Page 50
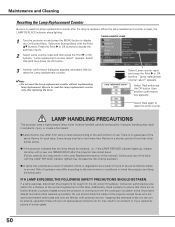
... may differ from lamp to lamp and according to the environment of the lamp. Risk of time than other similar lamps. ● If the projector indicates that there are not appropriately trained to do so, may result in accidents, injury, or create a fire hazard. ● Lamp lifetime ...may differ according to the environment or conditions in the Lamp Replacement section of this manual.) Continuous use of the lamp with the Point ed buttons. IF A LAMP EXPLODES, THE FOLLOWING SAFETY PRECAUTIONS SHOULD BE TAKEN. No one IMMEDIATELY after...
... may differ from lamp to lamp and according to the environment of the lamp. Risk of time than other similar lamps. ● If the projector indicates that there are not appropriately trained to do so, may result in accidents, injury, or create a fire hazard. ● Lamp lifetime ...may differ according to the environment or conditions in the Lamp Replacement section of this manual.) Continuous use of the lamp with the Point ed buttons. IF A LAMP EXPLODES, THE FOLLOWING SAFETY PRECAUTIONS SHOULD BE TAKEN. No one IMMEDIATELY after...
Owners Manual
Page 51
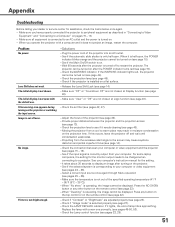
... sure all equipment is connected to peripheral equipment as described in moisture condensation on pages 15 - 16. - When you have properly connected the projector to an AC outlet and the power is turned on a flat surface. - See if the automatic slide shutter is turned off and wait until...). - Adjust the focus of lamp life is operating, the image cannot be turned on . - Projecting from a cool to your computer's instruction manual for assistance, check the items below once again. - See if the selected system is out of focus. Image is corresponding to warm place may cause...
... sure all equipment is connected to peripheral equipment as described in moisture condensation on pages 15 - 16. - When you have properly connected the projector to an AC outlet and the power is turned on a flat surface. - See if the automatic slide shutter is turned off and wait until...). - Adjust the focus of lamp life is operating, the image cannot be turned on . - Projecting from a cool to your computer's instruction manual for assistance, check the items below once again. - See if the selected system is out of focus. Image is corresponding to warm place may cause...
Owners Manual
Page 57
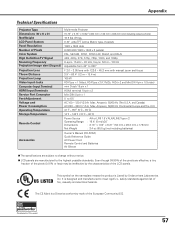
...A Max. safety standards against risk of the European Community (EC). Pixelworks ICs used. 57 Appendix Technical Specifications Projector Type Dimensions (W x H x D) Net Weight LCD Panel System Panel Resolution Number of Pixels Color System High Definition TV Signal Scanning Frequency Projection Image size (Diagonal)... NTSC4.43, PAL-M, and PAL-N 480i, 480p, 575i, 575p, 720p, 1080i, and 1080p H-sync. 15 kHz - 80 kHz, V-sync. 50 Hz - 100 Hz Adjustable from 40" to 300" F 2.0 - 3.05 lens with f 22.6 - 45.3 mm with manual zoom and focus 3.9' - 60.4' (1.2 m - 18.4 m) 165 W RCA Type x...
...A Max. safety standards against risk of the European Community (EC). Pixelworks ICs used. 57 Appendix Technical Specifications Projector Type Dimensions (W x H x D) Net Weight LCD Panel System Panel Resolution Number of Pixels Color System High Definition TV Signal Scanning Frequency Projection Image size (Diagonal)... NTSC4.43, PAL-M, and PAL-N 480i, 480p, 575i, 575p, 720p, 1080i, and 1080p H-sync. 15 kHz - 80 kHz, V-sync. 50 Hz - 100 Hz Adjustable from 40" to 300" F 2.0 - 3.05 lens with f 22.6 - 45.3 mm with manual zoom and focus 3.9' - 60.4' (1.2 m - 18.4 m) 165 W RCA Type x...


