

Owners Manual
Page 2
..., Dutch, Swedish, Finnish, Polish, Hungarian, Romanian, Russian, Chinese, Korean, and Japanese (see page 37). ◆ Two HDMI Terminals The projector has two HDMI (High Definition Multimedia Interface) terminals. Simple connection with the most advanced technology for your desired picture quality (see page 27). It...manual may differ slightly from the actual product. • The contents of the projector conforms to almost all computer output signals quickly (see page 26). ◆ 16 : 9 Wide Screen The wide LCD panels with 1920 x 1080 resolution (16:9 aspect ratio) can also be ...
..., Dutch, Swedish, Finnish, Polish, Hungarian, Romanian, Russian, Chinese, Korean, and Japanese (see page 37). ◆ Two HDMI Terminals The projector has two HDMI (High Definition Multimedia Interface) terminals. Simple connection with the most advanced technology for your desired picture quality (see page 27). It...manual may differ slightly from the actual product. • The contents of the projector conforms to almost all computer output signals quickly (see page 26). ◆ 16 : 9 Wide Screen The wide LCD panels with 1920 x 1080 resolution (16:9 aspect ratio) can also be ...
Owners Manual
Page 3
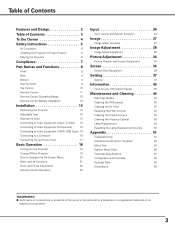
...Bottom 8 Rear Terminal 9 Top Control 10 Remote Control 11 Remote Control Operating Range 12 Remote Control Battery Installation 12 Installation 13 Positioning the Projector 13 Adjustable Feet 13 Moving the Lens 14 Connecting to Video Equipment (Video, S-Video) 15 Connecting to Video Equipment (Component) 15 ... Scart) 16 Connecting to a Computer 16 Connecting the AC Power Cord 17 Basic Operation 18 Turning On the Projector 18 Turning Off the Projector 19 How to Operate the On-Screen Menu 20 Menu and its Functions 21 Zoom and Focus Adjustment 22 Remote...
...Bottom 8 Rear Terminal 9 Top Control 10 Remote Control 11 Remote Control Operating Range 12 Remote Control Battery Installation 12 Installation 13 Positioning the Projector 13 Adjustable Feet 13 Moving the Lens 14 Connecting to Video Equipment (Video, S-Video) 15 Connecting to Video Equipment (Component) 15 ... Scart) 16 Connecting to a Computer 16 Connecting the AC Power Cord 17 Basic Operation 18 Turning On the Projector 18 Turning Off the Projector 19 How to Operate the On-Screen Menu 20 Menu and its Functions 21 Zoom and Focus Adjustment 22 Remote...
Owners Manual
Page 4
...local community waste collection/recycling centre. CAUTION Not for many convenient features and functions. To the Owner Before operating this projector, read this manual again, check operations and cable connections, and try the solutions in the "Troubleshooting" section in the...features and maintain it may cause a breakdown or a disaster. Your SANYO product is unused for Protection of separately from the projection lens. Be especially careful that electrical and electronic equipment, at your projector, and can be maintained. - Otherwise it in fire hazard. -...
...local community waste collection/recycling centre. CAUTION Not for many convenient features and functions. To the Owner Before operating this projector, read this manual again, check operations and cable connections, and try the solutions in the "Troubleshooting" section in the...features and maintain it may cause a breakdown or a disaster. Your SANYO product is unused for Protection of separately from the projection lens. Be especially careful that electrical and electronic equipment, at your projector, and can be maintained. - Otherwise it in fire hazard. -...

Owners Manual
Page 5
... rest on the power cord. Refer all warnings and instructions marked on an unstable cart, stand, or table. e. When the projector exhibits a distinct change in fire or electric shock. Safety Instructions All the safety and operating instructions should be read before cleaning. ...Do not use near a swimming pool, etc... Follow all servicing to the projector. Quick stops, excessive force, and uneven surfaces may fall, causing serious injury to a child or adult, and serious damage to qualified...
... rest on the power cord. Refer all warnings and instructions marked on an unstable cart, stand, or table. e. When the projector exhibits a distinct change in fire or electric shock. Safety Instructions All the safety and operating instructions should be read before cleaning. ...Do not use near a swimming pool, etc... Follow all servicing to the projector. Quick stops, excessive force, and uneven surfaces may fall, causing serious injury to a child or adult, and serious damage to qualified...

Owners Manual
Page 6
...according to project an image. Objects put anything on the cabinet will become hot while the projector is unused for ventilation. When the projector is being used. - For information about transporting the projector by courier or any other transport service, consult your dealer. - Improper installation may reduce ... and lock the lens with the Lens Shift Lock to prevent damage to project an image. NO UPWARD Do not point the projector down the projector. Care must not be taken. - CAUTION Hot air is exhausted from the exhaust vent. This area will not only get ...
...according to project an image. Objects put anything on the cabinet will become hot while the projector is unused for ventilation. When the projector is being used. - For information about transporting the projector by courier or any other transport service, consult your dealer. - Improper installation may reduce ... and lock the lens with the Lens Shift Lock to prevent damage to project an image. NO UPWARD Do not point the projector down the projector. Care must not be taken. - CAUTION Hot air is exhausted from the exhaust vent. This area will not only get ...

Owners Manual
Page 7
...Underwriters Laboratories (UL) and certified by turning the equipment off and destroyed. Model Number(s) Trade Name Responsible party Address Telephone No. : PLV-Z2000 : Sanyo : SANYO FISHER COMPANY : 21605 Plummer Street, Chatsworth, California 91311 : (818)998-7322 AC Power Cord Requirement The AC Power Cord supplied ... required to stop operation of the equipment. If a replacement fuse cover is required, ensure it may not correspond with this projector meets the requirement for the United Kingdom: This cord is already fitted with the instructions, it is of the same colour ...
...Underwriters Laboratories (UL) and certified by turning the equipment off and destroyed. Model Number(s) Trade Name Responsible party Address Telephone No. : PLV-Z2000 : Sanyo : SANYO FISHER COMPANY : 21605 Plummer Street, Chatsworth, California 91311 : (818)998-7322 AC Power Cord Requirement The AC Power Cord supplied ... required to stop operation of the equipment. If a replacement fuse cover is required, ensure it may not correspond with this projector meets the requirement for the United Kingdom: This cord is already fitted with the instructions, it is of the same colour ...

Owners Manual
Page 8
...-sensitive objects near this side. Part Names and Functions Front q w Air flow Back !2 e r ty u i o !0 !1 !3 !4 !5 Bottom !6 q Exhaust Vent CAUTION Hot air is a registered trademark of the projector. *Kensington is exhausted from the exhaust vent.
...-sensitive objects near this side. Part Names and Functions Front q w Air flow Back !2 e r ty u i o !0 !1 !3 !4 !5 Bottom !6 q Exhaust Vent CAUTION Hot air is a registered trademark of the projector. *Kensington is exhausted from the exhaust vent.

Owners Manual
Page 9
... 1 or COMPONENT 2 Connect the component video output signal to these jacks (p.15). y VIDEO Connect the composite video output signal from video equipment to service the projector. Rear Terminal q we Part Names and Functions r t y q COMPUTER Connect the computer output signal, or RGB Scart 21-pin video output to this jack (p.15). * Note...
... 1 or COMPONENT 2 Connect the component video output signal to these jacks (p.15). y VIDEO Connect the composite video output signal from video equipment to service the projector. Rear Terminal q we Part Names and Functions r t y q COMPUTER Connect the computer output signal, or RGB Scart 21-pin video output to this jack (p.15). * Note...
Owners Manual
Page 10
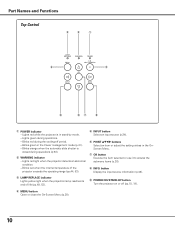
...-off (pp.18, 19). Blinks orange when the automatic slide shutter is in stand-by mode. - w WARNING indicator - Lights red light when the projector detects an abnormal condition. - r MENU button Open or close the On-Screen Menu (p.20). 10 Blinks red during operations. - e LAMP REPLACE indicator... Lights yellow light when the projection lamp reaches its end of the projector exceeds the operating range (pp.44, 53). u OK button Execute the item selected or use it to access the submenu items (p.20). ...
...-off (pp.18, 19). Blinks orange when the automatic slide shutter is in stand-by mode. - w WARNING indicator - Lights red light when the projector detects an abnormal condition. - r MENU button Open or close the On-Screen Menu (p.20). 10 Blinks red during operations. - e LAMP REPLACE indicator... Lights yellow light when the projection lamp reaches its end of the projector exceeds the operating range (pp.44, 53). u OK button Execute the item selected or use it to access the submenu items (p.20). ...
Owners Manual
Page 11
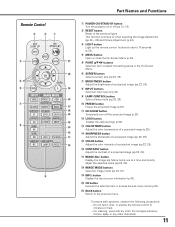
... the On-Screen Menu. @0 y SCREEN button Select a screen size (pp.22, 35). Remote Control e w q r t y u i o Part Names and Functions q POWER ON/STAND-BY button Turn the projector on or off the projected image (p.23). !2 LOGO button !4 Display the captured logo (p.23). !3 !3 COLOR TEMP. Menu items one at a time and directly adjust the...
... the On-Screen Menu. @0 y SCREEN button Select a screen size (pp.22, 35). Remote Control e w q r t y u i o Part Names and Functions q POWER ON/STAND-BY button Turn the projector on or off the projected image (p.23). !2 LOGO button !4 Display the captured logo (p.23). !3 !3 COLOR TEMP. Menu items one at a time and directly adjust the...
Owners Manual
Page 12
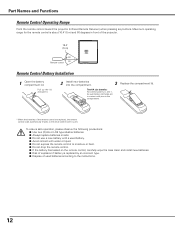
... battery is about 16.4' (5 m) and 60 degrees in sets. ● Do not use a new battery with pins in the compartment. * When the batteries of the projector. 16.4' (5 m) 30° Remote control 30° Remote Control Battery Installation 1 Open the battery compartment lid. Part Names and Functions Remote Control Operating Range Point...
... battery is about 16.4' (5 m) and 60 degrees in sets. ● Do not use a new battery with pins in the compartment. * When the batteries of the projector. 16.4' (5 m) 30° Remote control 30° Remote Control Battery Installation 1 Open the battery compartment lid. Part Names and Functions Remote Control Operating Range Point...
Owners Manual
Page 13
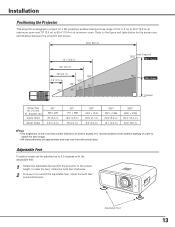
... Feet Projection angle can be adjusted up to 6.5 degrees with the adjustable feet. 1 Rotate the adjustable feet and tilt the projector to obtain the best image. • All measurements are approximate and may vary from the actual sizes. It is designed to... project on picture quality. Adjustable Feet 13 Installation Positioning the Projector This projector is recommended to limit ambient lighting in the room has a great influence on a flat projection surface having a focus range of 3.9' (1.2 m) to...
... Feet Projection angle can be adjusted up to 6.5 degrees with the adjustable feet. 1 Rotate the adjustable feet and tilt the projector to obtain the best image. • All measurements are approximate and may vary from the actual sizes. It is designed to... project on picture quality. Adjustable Feet 13 Installation Positioning the Projector This projector is recommended to limit ambient lighting in the room has a great influence on a flat projection surface having a focus range of 3.9' (1.2 m) to...
Owners Manual
Page 15
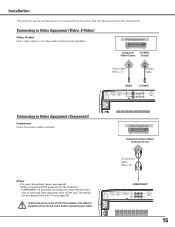
...power cords of Fine sync. See the figures below for the connections. Then adjust the value of both the projector and external equipment from 0 to six equipment at one time. Connecting to the projector's COMPONENT 1/2 terminals, horizontal line noise may be noted only occasionally. The setting can be connected up to ...video Use a video cable or a S-video cable (commercially available). Video Equipment Component Video Output (Y, Pb/Cb, Pr/Cr) Component Cable (RCA x 3) COMPONENT 15 Installation This projector can be adjusted from the AC outlet before connecting the cables.
...power cords of Fine sync. See the figures below for the connections. Then adjust the value of both the projector and external equipment from 0 to six equipment at one time. Connecting to the projector's COMPONENT 1/2 terminals, horizontal line noise may be noted only occasionally. The setting can be connected up to ...video Use a video cable or a S-video cable (commercially available). Video Equipment Component Video Output (Y, Pb/Cb, Pr/Cr) Component Cable (RCA x 3) COMPONENT 15 Installation This projector can be adjusted from the AC outlet before connecting the cables.

Owners Manual
Page 16
Unplug the power cords of both the projector and external equipment from the AC outlet before connecting the cables. 16 COMPUTER Connecting to a Computer Computer (Analog) Use a VGA cable (commercially available) or a DVI-...
Unplug the power cords of both the projector and external equipment from the AC outlet before connecting the cables. 16 COMPUTER Connecting to a Computer Computer (Analog) Use a VGA cable (commercially available) or a DVI-...
Owners Manual
Page 17
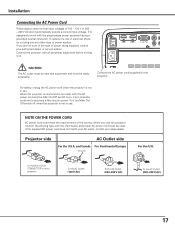
... outlet with all peripheral equipment before turning it automatically selects a correct input voltage. If you use . For safety, unplug the AC power cord when the projector is designed to work with the chart below and proper AC power cord must be used. Turn the Main On/ Off switch off when the... projector is in stand-by mode and consumes a little electric power. To reduce the risk of electrical shock, do not plug into any other type of ...
... outlet with all peripheral equipment before turning it automatically selects a correct input voltage. If you use . For safety, unplug the AC power cord when the projector is designed to work with the chart below and proper AC power cord must be used. Turn the Main On/ Off switch off when the... projector is in stand-by mode and consumes a little electric power. To reduce the risk of electrical shock, do not plug into any other type of ...
Owners Manual
Page 18
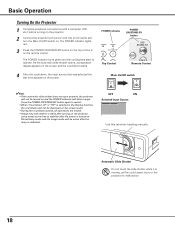
...STAND-BY button Top Control Remote Control Main On/Off switch ✔Note: • If the automatic slide shutter does not open properly, the projector will not be active after the power is moving, as this tab when handling manually. Lamp needs some time to restart. • When "... period, all operations are invalid. • Image may look dark for a while after turning on and the POWER indicator will be turned on the projector. As the automatic slide shutter opens, a preparation display appears on the screen and the countdown starts. 4 After the countdown, the input source that ...
...STAND-BY button Top Control Remote Control Main On/Off switch ✔Note: • If the automatic slide shutter does not open properly, the projector will not be active after the power is moving, as this tab when handling manually. Lamp needs some time to restart. • When "... period, all operations are invalid. • Image may look dark for a while after turning on and the POWER indicator will be turned on the projector. As the automatic slide shutter opens, a preparation display appears on the screen and the countdown starts. 4 After the countdown, the input source that ...

Owners Manual
Page 19
...LET STAND FOR ABOUT AN HOUR IN EVERY 24 HOURS. ✔Note: • If the automatic slide shutter is closed during operation, the projector is set to be turned on. When the Power off confirmation function is automatically turned off and unplug the AC power cord. Be sure to...If the WARNING indicator blinks or emits red light, see "Warning Indicator" on again. • The running . 2 When the projector is being cooled down enough to "Off," the projector can turn off the projector by pressing the POWER ON/STAND-BY button on the top control or on again, the POWER indicator stops...
...LET STAND FOR ABOUT AN HOUR IN EVERY 24 HOURS. ✔Note: • If the automatic slide shutter is closed during operation, the projector is set to be turned on. When the Power off confirmation function is automatically turned off and unplug the AC power cord. Be sure to...If the WARNING indicator blinks or emits red light, see "Warning Indicator" on again. • The running . 2 When the projector is being cooled down enough to "Off," the projector can turn off the projector by pressing the POWER ON/STAND-BY button on the top control or on again, the POWER indicator stops...
Owners Manual
Page 20
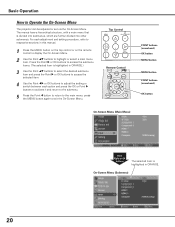
... selected item is divided into submenus, which are further divided into other submenus. press the MENU button again to Operate the On-Screen Menu The projector can be adjusted or set via the On-Screen Menu. The menus have a hierarchical structure, with a main menu that is highlighted in this manual. 1 Press...
... selected item is divided into submenus, which are further divided into other submenus. press the MENU button again to Operate the On-Screen Menu The projector can be adjusted or set via the On-Screen Menu. The menus have a hierarchical structure, with a main menu that is highlighted in this manual. 1 Press...
Owners Manual
Page 25
...to select an input source and press the Point 8 or OK buttons. Video Input Press the Point 8 button to optimize its performance. The projector automatically detects the incoming video signal and adjusts itself to the VIDEO or S-VIDEO jacks, select Video or S-video respectively. PAL / SECAM .../ NTSC / NTSC4.43 / PAL-M / PAL-N If the projector cannot reproduce a proper video image, select a specific broadcast signal format from among PAL, SECAM, NTSC, NTSC 4.43, PAL-M, and PAL-N. Quit Exit ...
...to select an input source and press the Point 8 or OK buttons. Video Input Press the Point 8 button to optimize its performance. The projector automatically detects the incoming video signal and adjusts itself to the VIDEO or S-VIDEO jacks, select Video or S-video respectively. PAL / SECAM .../ NTSC / NTSC4.43 / PAL-M / PAL-N If the projector cannot reproduce a proper video image, select a specific broadcast signal format from among PAL, SECAM, NTSC, NTSC 4.43, PAL-M, and PAL-N. Quit Exit ...
Owners Manual
Page 26
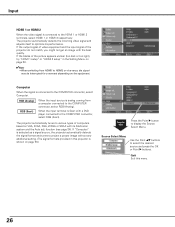
...tunes to project a proper image without any additional setting. (The signal formats provided in the Setting Menu on the equipment. The projector automatically tunes to display the Source Select Menu. When the input terminal is analog coming from HDMI1 to the COMPUTER connector, select ... Scart with the best quality. Source Select Menu Use the Point ed buttons to the COMPUTER connector, select RGB (Analog). The projector automatically detects the incoming video signal and adjusts itself to the COMPUTER connector, select Computer. Computer When the signal is connected to ...
...tunes to project a proper image without any additional setting. (The signal formats provided in the Setting Menu on the equipment. The projector automatically tunes to display the Source Select Menu. When the input terminal is analog coming from HDMI1 to the COMPUTER connector, select ... Scart with the best quality. Source Select Menu Use the Point ed buttons to the COMPUTER connector, select RGB (Analog). The projector automatically detects the incoming video signal and adjusts itself to the COMPUTER connector, select Computer. Computer When the signal is connected to ...


