
Owners Manual
Page 2
...; Lamp Control The brightness of the projection lamp can also be selected (see pages 23, 29). ◆ Simple Computer System Setting The Multi-scan system of the projector conforms to almost all computer output signals quickly (see page 37). ◆ Two HDMI Terminals The projector has two HDMI (High Definition Multimedia Interface) terminals. You can capture an image for the screen logo and use it...
...; Lamp Control The brightness of the projection lamp can also be selected (see pages 23, 29). ◆ Simple Computer System Setting The Multi-scan system of the projector conforms to almost all computer output signals quickly (see page 37). ◆ Two HDMI Terminals The projector has two HDMI (High Definition Multimedia Interface) terminals. You can capture an image for the screen logo and use it...
Owners Manual
Page 3
... 22 Remote Control Operation 22 Input 24 Input Source and System Selection 24 Image 27 Image Mode Selection 27 Image Adjustment 28 Image Mode Adjustment 28 Picture Adjustment 34 Picture Position and Screen Adjustment 34 Screen 35 Screen Size Adjustment 35 Setting 37 Setting 37 Information 43 Input Source Information Display 43 Maintenance and Cleaning 44 Warning Indicator 44 Cleaning the RGB panels 45 Cleaning the Air Filter 47 Resetting the Filter Counter 48 Cleaning the Projection Lens 48 Cleaning the Projector Cabinet 48 Lamp Replacement 49...
... 22 Remote Control Operation 22 Input 24 Input Source and System Selection 24 Image 27 Image Mode Selection 27 Image Adjustment 28 Image Mode Adjustment 28 Picture Adjustment 34 Picture Position and Screen Adjustment 34 Screen 35 Screen Size Adjustment 35 Setting 37 Setting 37 Information 43 Input Source Information Display 43 Maintenance and Cleaning 44 Warning Indicator 44 Cleaning the RGB panels 45 Cleaning the Air Filter 47 Resetting the Filter Counter 48 Cleaning the Projection Lens 48 Cleaning the Projector Cabinet 48 Lamp Replacement 49...
Owners Manual
Page 4
... WITHIN THIS UNIT. THIS SYMBOL INDICATES THAT THERE ARE IMPORTANT OPERATING AND MAINTENANCE INSTRUCTIONS IN THE OWNER'S MANUAL WITH THIS UNIT. This projector provides many years to the countries in contact with a vacuum cleaner. CAUTION ON HANGING FROM THE CEILING When hanging the projector from the projection lens. To the Owner Before operating this projector, read this manual again, check operations and cable connections, and try the solutions...
... WITHIN THIS UNIT. THIS SYMBOL INDICATES THAT THERE ARE IMPORTANT OPERATING AND MAINTENANCE INSTRUCTIONS IN THE OWNER'S MANUAL WITH THIS UNIT. This projector provides many years to the countries in contact with a vacuum cleaner. CAUTION ON HANGING FROM THE CEILING When hanging the projector from the projection lens. To the Owner Before operating this projector, read this manual again, check operations and cable connections, and try the solutions...
Owners Manual
Page 5
... safety and operating instructions should be read before cleaning. Follow all of power supplied, consult your authorized dealer or local power company. for later use attachments not recommended by placing the projector on the power cord. The openings should never be covered with a cart or stand recommended by following conditions: a. This projector should never be sure the service technician has used replacement parts specified by the operating instructions as...
... safety and operating instructions should be read before cleaning. Follow all of power supplied, consult your authorized dealer or local power company. for later use attachments not recommended by placing the projector on the power cord. The openings should never be covered with a cart or stand recommended by following conditions: a. This projector should never be sure the service technician has used replacement parts specified by the operating instructions as...
Owners Manual
Page 7
.... Model Number(s) Trade Name Responsible party Address Telephone No. : PLV-Z2000 : Sanyo : SANYO FISHER COMPANY : 21605 Plummer Street, Chatsworth, California 91311 : (818)998-7322 AC Power Cord Requirement The AC Power Cord supplied with this mains lead are coloured in the mains lead of the following code: Green-and-yellow Earth Blue Neutral Brown Live As the colours of the wires in accordance with the cover omitted...
.... Model Number(s) Trade Name Responsible party Address Telephone No. : PLV-Z2000 : Sanyo : SANYO FISHER COMPANY : 21605 Plummer Street, Chatsworth, California 91311 : (818)998-7322 AC Power Cord Requirement The AC Power Cord supplied with this mains lead are coloured in the mains lead of the following code: Green-and-yellow Earth Blue Neutral Brown Live As the colours of the wires in accordance with the cover omitted...
Owners Manual
Page 10
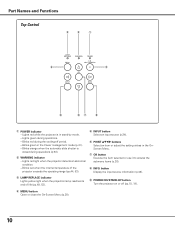
... i q POWER indicator - Blinks green in stand-by mode. - Blinks red when the internal temperature of life (pp.49, 53). t INPUT button Select an input source (p.24). Lights red while the projector is closed during operations. - y POINT ed7 8 buttons Select an item or adjust the setting values in the OnScreen Menu. Blinks orange when the automatic slide shutter is in the Power management mode (p.41). - w WARNING indicator - o POWER ON/STAND-BY button Turn the projector on or off period. - i INFO. e LAMP REPLACE indicator Lights yellow light when the projection lamp...
... i q POWER indicator - Blinks green in stand-by mode. - Blinks red when the internal temperature of life (pp.49, 53). t INPUT button Select an input source (p.24). Lights red while the projector is closed during operations. - y POINT ed7 8 buttons Select an item or adjust the setting values in the OnScreen Menu. Blinks orange when the automatic slide shutter is in the Power management mode (p.41). - w WARNING indicator - o POWER ON/STAND-BY button Turn the projector on or off period. - i INFO. e LAMP REPLACE indicator Lights yellow light when the projection lamp...
Owners Manual
Page 11
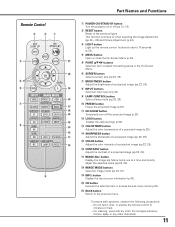
Remote Control e w q r t y u i o Part Names and Functions q POWER ON/STAND-BY button Turn the projector on or off the projected image (p.23). !2 LOGO button !4 Display the captured logo (p.23). !3 !3 COLOR TEMP. button Adjust the color temperature of a projected image (p.28). !2 !4 SHARPNESS button !1 Adjust the sharpness of a projected image (pp.23, 29). !5 COLOR button !0 Adjust the color intensity of a projected image (pp.23, 28). !6 CONTRAST button Adjust the contrast of a projected image (pp.23, 28). !9 i INPUT buttons Select an input source (p.24). Do not ...
Remote Control e w q r t y u i o Part Names and Functions q POWER ON/STAND-BY button Turn the projector on or off the projected image (p.23). !2 LOGO button !4 Display the captured logo (p.23). !3 !3 COLOR TEMP. button Adjust the color temperature of a projected image (p.28). !2 !4 SHARPNESS button !1 Adjust the sharpness of a projected image (pp.23, 29). !5 COLOR button !0 Adjust the color intensity of a projected image (pp.23, 28). !6 CONTRAST button Adjust the contrast of a projected image (pp.23, 28). !9 i INPUT buttons Select an input source (p.24). Do not ...
Owners Manual
Page 17
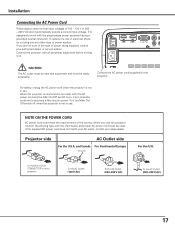
...the U.K. If you use the projector. For safety, unplug the AC power cord when the projector is not in use . Turn the Main On/ Off switch off when the projector is not in stand-by mode and consumes a little electric power. To the AC...17 Connect the projector with the chart below and proper AC power cord must be used. Connect the AC power cord (supplied) to work with the single-phase power systems having a grounded neutral conductor. To POWER CORD CONNECTOR on your authorized dealer or service station. Installation Connecting the AC Power Cord This projector uses nominal input ...
...the U.K. If you use the projector. For safety, unplug the AC power cord when the projector is not in use . Turn the Main On/ Off switch off when the projector is not in stand-by mode and consumes a little electric power. To the AC...17 Connect the projector with the chart below and proper AC power cord must be used. Connect the AC power cord (supplied) to work with the single-phase power systems having a grounded neutral conductor. To POWER CORD CONNECTOR on your authorized dealer or service station. Installation Connecting the AC Power Cord This projector uses nominal input ...
Owners Manual
Page 18
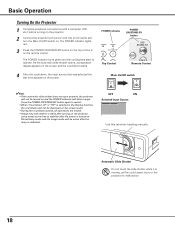
The POWER indicator lights red. 3 Press the POWER ON/STAND-BY button on the top control or on . OFF ON Selected Input Source Use this could cause injury or the projector to stabilize after the lamp is turned on the screen. Basic Operation Turning On the Projector 1 Complete peripheral connections (with a computer, VCR, etc.) before turning on the projector. 2 Connect the projector's AC power cord into an AC outlet and turn the Main On/Off switch on...
The POWER indicator lights red. 3 Press the POWER ON/STAND-BY button on the top control or on . OFF ON Selected Input Source Use this could cause injury or the projector to stabilize after the lamp is turned on the screen. Basic Operation Turning On the Projector 1 Complete peripheral connections (with a computer, VCR, etc.) before turning on the projector. 2 Connect the projector's AC power cord into an AC outlet and turn the Main On/Off switch on...
Owners Manual
Page 21
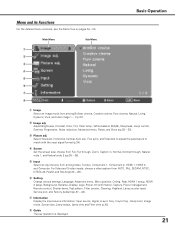
... Overscan, Horizontal, Vertical, Auto adj., Fine sync, and Total dots to adjust the parameters to match with the input signal format (p.34). t Input Select an input source from AUTO, PAL, SECAM, NTSC, NTSC4.43, PAL-M, and PAL-N (pp.24 - 26). Language, Advanced menu, Menu position, Ceiling, Rear, HDMI 1 setup, HDMI 2 setup, Background, Rename, Display, Logo, Power off confirmation, Capture, Power management, Remote control, Shutter demo, Test pattern, Filter counter, Cleaning, Highland, Lamp counter reset, Service port, and Factory default (pp.37 - 42...
... Overscan, Horizontal, Vertical, Auto adj., Fine sync, and Total dots to adjust the parameters to match with the input signal format (p.34). t Input Select an input source from AUTO, PAL, SECAM, NTSC, NTSC4.43, PAL-M, and PAL-N (pp.24 - 26). Language, Advanced menu, Menu position, Ceiling, Rear, HDMI 1 setup, HDMI 2 setup, Background, Rename, Display, Logo, Power off confirmation, Capture, Power management, Remote control, Shutter demo, Test pattern, Filter counter, Cleaning, Highland, Lamp counter reset, Service port, and Factory default (pp.37 - 42...
Owners Manual
Page 27
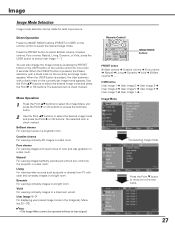
... viewing images faithfully reproduced without an input signal. Vivid For viewing contrasty images to select the desired image mode and press the Point 8 or OK buttons. The selected item is pressed, the User submenu with a check mark on the currently set image mode appears. Image Image Mode Selection Image mode selection can also change the Image mode by the projector in a bright room. Direct Operation Press the IMAGE MODE buttons (PRESET or USER) on to select User image 1 - 7. press the USER button...
... viewing images faithfully reproduced without an input signal. Vivid For viewing contrasty images to select the desired image mode and press the Point 8 or OK buttons. The selected item is pressed, the User submenu with a check mark on the currently set image mode appears. Image Image Mode Selection Image mode selection can also change the Image mode by the projector in a bright room. Direct Operation Press the IMAGE MODE buttons (PRESET or USER) on to select User image 1 - 7. press the USER button...
Owners Manual
Page 41
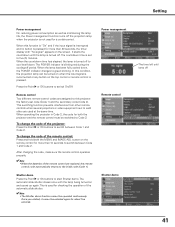
... the projection lamp when the projector is not used at the same time. When the countdown time has elapsed, the lamp is turned off period. The POWER indicator is turned off 41 To change the code of the remote control are replaced, the remote control code automatically returns to switch between Code 1 and Code 2. button on the screen. Once you started, it cannot be switched to switch between Code 1 and Code 2. Power management Remote control Shutter demo The time left until the lamp is blinking red...
... the projection lamp when the projector is not used at the same time. When the countdown time has elapsed, the lamp is turned off period. The POWER indicator is turned off 41 To change the code of the remote control are replaced, the remote control code automatically returns to switch between Code 1 and Code 2. button on the screen. Once you started, it cannot be switched to switch between Code 1 and Code 2. Power management Remote control Shutter demo The time left until the lamp is blinking red...
Owners Manual
Page 42
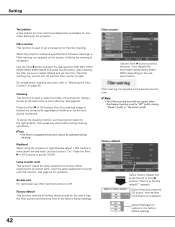
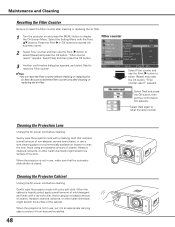
... or Point 8 buttons. Filter counter This function is used to clean the inside of whether or not an input source is selected. The Filter warning icon will not appear when the Display function is set a frequency for the user's logo, the filter counter and the lamp time to the factory default settings. 42 Filter counter Use the Point 8 button to the factory default settings. Using a blower at a set the timer. When replacing the projection lamp, reset the lamp replacement counter with this function to Factory default?" Factory default This function...
... or Point 8 buttons. Filter counter This function is used to clean the inside of whether or not an input source is selected. The Filter warning icon will not appear when the Display function is set a frequency for the user's logo, the filter counter and the lamp time to the factory default settings. 42 Filter counter Use the Point 8 button to the factory default settings. Using a blower at a set the timer. When replacing the projection lamp, reset the lamp replacement counter with this function to Factory default?" Factory default This function...
Owners Manual
Page 48
"Filter counter reset?" appears. Be sure to reset the Filter counter. ✔Note: • Do not reset the Filter counter without cleaning or replacing the air filter. Cleaning the Projection Lens Unplug the AC power cord before cleaning. When the projector is closed. Filter counter 3 Another confirmation dialog box appears, and select [Yes] to reset the Filter counter only after cleaning or replacing the air filter. 1 Turn the projector on and press the MENU button to reset the lamp counter. Select [Yes] and press the OK button, then...
"Filter counter reset?" appears. Be sure to reset the Filter counter. ✔Note: • Do not reset the Filter counter without cleaning or replacing the air filter. Cleaning the Projection Lens Unplug the AC power cord before cleaning. When the projector is closed. Filter counter 3 Another confirmation dialog box appears, and select [Yes] to reset the Filter counter only after cleaning or replacing the air filter. 1 Turn the projector on and press the MENU button to reset the lamp counter. Select [Yes] and press the OK button, then...

Owners Manual
Page 49
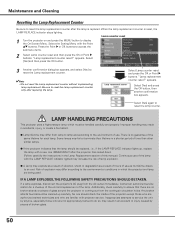
... information to replace the lamp. 1 Turn off the projector and unplug the AC power cord. Follow these steps to the dealer. ● Model No. Pull out the lamp by using the built in handle. 4 Replace the lamp with a new one promptly. Lamp Replacement When the projection lamp of this indicator lights yellow, replace the lamp with the two (2) screws. The glass can be ordered through your projector: ● Replacement Lamp Type No.: PLV-Z2000 POA-LMP114 (Service Parts No...
... information to replace the lamp. 1 Turn off the projector and unplug the AC power cord. Follow these steps to the dealer. ● Model No. Pull out the lamp by using the built in handle. 4 Replace the lamp with a new one promptly. Lamp Replacement When the projection lamp of this indicator lights yellow, replace the lamp with the two (2) screws. The glass can be ordered through your projector: ● Replacement Lamp Type No.: PLV-Z2000 POA-LMP114 (Service Parts No...
Owners Manual
Page 50
... Setting Menu with projector service. "Lamp replacement counter reset?" Select [Yes] and press the OK button, then another confirmation box appears. "Lamp replacement counter reset?" Some lamps may fail or terminate their lifetime in accidents, injury, or create a fire hazard. ● Lamp lifetime may result in a shorter period of time than other similar lamps. ● If the projector indicates that there are being used. When the lamp replacement counter is replaced. Maintenance and Cleaning Resetting the Lamp Replacement Counter...
... Setting Menu with projector service. "Lamp replacement counter reset?" Select [Yes] and press the OK button, then another confirmation box appears. "Lamp replacement counter reset?" Some lamps may fail or terminate their lifetime in accidents, injury, or create a fire hazard. ● Lamp lifetime may result in a shorter period of time than other similar lamps. ● If the projector indicates that there are being used. When the lamp replacement counter is replaced. Maintenance and Cleaning Resetting the Lamp Replacement Counter...
Owners Manual
Page 51
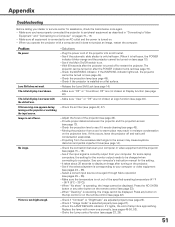
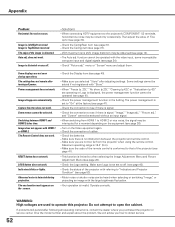
... or service center for the setting. - Filter warning icon appears during turning on (see pages 24 - 26). - Provide proper distance between your computer or video equipment and the projector (see page 42). - Select a correct input source once again through Menu operation (see page 14). - Replace the lamp with a new one . Press any other button on the remote control (see pages 15 - 16). - Lens Shift does not work. Check the WARNING indicator. Check the projection lamp (see...
... or service center for the setting. - Filter warning icon appears during turning on (see pages 24 - 26). - Provide proper distance between your computer or video equipment and the projector (see page 42). - Select a correct input source once again through Menu operation (see page 14). - Replace the lamp with a new one . Press any other button on the remote control (see pages 15 - 16). - Lens Shift does not work. Check the WARNING indicator. Check the projection lamp (see...
Owners Manual
Page 52
... switching "Image," or projecting an image with the video input, some incompatible computer input and digital signals (see page 34). - When switching from the projector when using the remote control. Turn on the screen. - Make sure you selected "Store" after adjusting settings. Do not attempt to operate this projector. does not work . The setting does not remain after following all operating instructions, contact the dealer where you how to "Indicators and Projector Condition" (see page 40). - RESET button...
... switching "Image," or projecting an image with the video input, some incompatible computer input and digital signals (see page 34). - When switching from the projector when using the remote control. Turn on the screen. - Make sure you selected "Store" after adjusting settings. Do not attempt to operate this projector. does not work . The setting does not remain after following all operating instructions, contact the dealer where you how to "Indicators and Projector Condition" (see page 40). - RESET button...
Owners Manual
Page 53
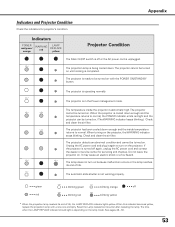
... operating normally. ✽ The projector is off * When the projection lamp reaches its end of life, the LAMP REPLACE indicator lights yellow. The projector cannot be turned ✽ on until cooling is completed. ✽ The projector is ready to normal, the POWER indicator emits red light and the projector can be turned on . Check and clean the air filter. Indicators POWER red/green/ orange WARNING red LAMP REPLACE yellow Projector Condition The Main On/Off switch is in the Power management mode. The projector cannot be turned on with a new...
... operating normally. ✽ The projector is off * When the projection lamp reaches its end of life, the LAMP REPLACE indicator lights yellow. The projector cannot be turned ✽ on until cooling is completed. ✽ The projector is ready to normal, the POWER indicator emits red light and the projector can be turned on . Check and clean the air filter. Indicators POWER red/green/ orange WARNING red LAMP REPLACE yellow Projector Condition The Main On/Off switch is in the Power management mode. The projector cannot be turned on with a new...
Owners Manual
Page 55
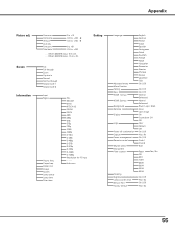
... Advanced menu Menu Position Ceiling Rear HDMI 1 setup HDMI 2 setup Background Rename Display Logo Power off confirmation Capture Power management Remote control Shutter demo Test pattern Filter counter Cleaning Highland Lamp counter reset Service Port Factory default English German French Italian Spanish Portuguese Dutch Swedish Finnish Polish Hungarian Romanian Russian Chinese Korean Japanese Quit On / Off On / Off On / Off Normal Enhanced Normal Enhanced Blue / Logo / Black Input User image On Countdown Off Off User Default Off On...
... Advanced menu Menu Position Ceiling Rear HDMI 1 setup HDMI 2 setup Background Rename Display Logo Power off confirmation Capture Power management Remote control Shutter demo Test pattern Filter counter Cleaning Highland Lamp counter reset Service Port Factory default English German French Italian Spanish Portuguese Dutch Swedish Finnish Polish Hungarian Romanian Russian Chinese Korean Japanese Quit On / Off On / Off On / Off Normal Enhanced Normal Enhanced Blue / Logo / Black Input User image On Countdown Off Off User Default Off On...


