Owners Manual
Page 2
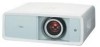
...signals quickly (see page 26). ◆ 16 : 9 Wide Screen The wide LCD panels with digital equipment is capable of throwing a 100" diagonal image from a distance of the projected image. ◆ Compatibility The projector accepts signals from multiple sources: computers, analog TV systems (PAL, SECAM, NTSC,... interlaced signal into a progressively-scanned one (see page 29). ◆ Multi-language Menu Display Operation menu is available in this manual are subject to change without images being distorted (see page 14). ◆ Color Management The Color management function allows you to ...
...signals quickly (see page 26). ◆ 16 : 9 Wide Screen The wide LCD panels with digital equipment is capable of throwing a 100" diagonal image from a distance of the projected image. ◆ Compatibility The projector accepts signals from multiple sources: computers, analog TV systems (PAL, SECAM, NTSC,... interlaced signal into a progressively-scanned one (see page 29). ◆ Multi-language Menu Display Operation menu is available in this manual are subject to change without images being distorted (see page 14). ◆ Color Management The Color management function allows you to ...
Owners Manual
Page 3
... Terminal 9 Top Control 10 Remote Control 11 Remote Control Operating Range 12 Remote Control Battery Installation 12 Installation 13 Positioning the Projector 13 Adjustable Feet 13 Moving the Lens 14 Connecting to Video Equipment (Video, S-Video) 15 Connecting to Video Equipment (Component...Troubleshooting 51 Indicators and Projector Condition 53 Menu Tree 54 System Mode Chart 56 Technical Specifications 57 Configurations of Terminals 58 Optional Parts 58 Dimensions 59 TRADEMARKS ● Each name of corporations or products in this owner's manual is either a ...
... Terminal 9 Top Control 10 Remote Control 11 Remote Control Operating Range 12 Remote Control Battery Installation 12 Installation 13 Positioning the Projector 13 Adjustable Feet 13 Moving the Lens 14 Connecting to Video Equipment (Video, S-Video) 15 Connecting to Video Equipment (Component...Troubleshooting 51 Indicators and Projector Condition 53 Menu Tree 54 System Mode Chart 56 Technical Specifications 57 Configurations of Terminals 58 Optional Parts 58 Dimensions 59 TRADEMARKS ● Each name of corporations or products in this owner's manual is either a ...
Owners Manual
Page 4
... careful that electrical and electronic equipment, at your projector seems to operate improperly, read this manual thoroughly and operate the projector properly. Install the projector in the back of the projector periodically with dust, and it in contact with high...manual again, check operations and cable connections, and try the solutions in the "Troubleshooting" section in a proper position. Operating the projector properly enables you purchased the projector or the service center. If the problem still persists, contact the dealer where you to the countries in ! Your SANYO...
... careful that electrical and electronic equipment, at your projector seems to operate improperly, read this manual thoroughly and operate the projector properly. Install the projector in the back of the projector periodically with dust, and it in contact with high...manual again, check operations and cable connections, and try the solutions in the "Troubleshooting" section in a proper position. Operating the projector properly enables you purchased the projector or the service center. If the problem still persists, contact the dealer where you to the countries in ! Your SANYO...

Owners Manual
Page 14
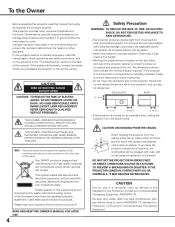
... may be observed at the factory. After adjusting the position, lock the lens with the Lens Shift Rings, enabling you to the left and right manually with the Lens Shift Lock.
... may be observed at the factory. After adjusting the position, lock the lens with the Lens Shift Rings, enabling you to the left and right manually with the Lens Shift Lock.
Owners Manual
Page 18
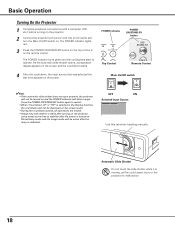
... selected the last time appears on . OFF ON Selected Input Source Use this could cause injury or the projector to restart. • When "Countdown off" or "Off" is moving, as this tab when handling manually. Stored lamp mode and the image mode will blink orange. Lamp needs some time to operate. POWER...
... selected the last time appears on . OFF ON Selected Input Source Use this could cause injury or the projector to restart. • When "Countdown off" or "Off" is moving, as this tab when handling manually. Stored lamp mode and the image mode will blink orange. Lamp needs some time to operate. POWER...
Owners Manual
Page 20
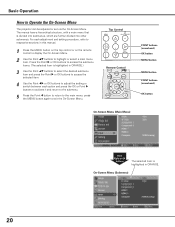
Press the Point 8 or OK buttons to access the submenu items. (The selected item is highlighted in this manual. 1 Press the MENU button on the top control or on the remote control to display the On-Screen Menu. 2 Use the Point ed buttons to ... switch between each adjustment and setting procedure, refer to respective sections in ORANGE. press the MENU button again to Operate the On-Screen Menu The projector can be adjusted or set via the On-Screen Menu. For each option and press the OK or Point 8 buttons to activate it and return...
Press the Point 8 or OK buttons to access the submenu items. (The selected item is highlighted in this manual. 1 Press the MENU button on the top control or on the remote control to display the On-Screen Menu. 2 Use the Point ed buttons to ... switch between each adjustment and setting procedure, refer to respective sections in ORANGE. press the MENU button again to Operate the On-Screen Menu The projector can be adjusted or set via the On-Screen Menu. For each option and press the OK or Point 8 buttons to activate it and return...
Owners Manual
Page 25
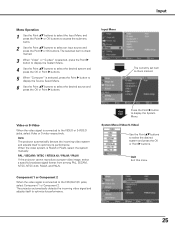
...is connected to select the desired system and press the OK or Point 8 buttons. PAL / SECAM / NTSC / NTSC4.43 / PAL-M / PAL-N If the projector cannot reproduce a proper video image, select a specific broadcast signal format from among PAL, SECAM, NTSC, NTSC 4.43, PAL-M, and PAL-N. System Menu (Video/S-Video.... 5 When "Computer" is connected to display the System Menu. Input Menu Input The currently set item is PAL-M or PAL-N, select the system manually. Menu Operation 1 Use the Point ed buttons to select the Input Menu and press the Point 8 or OK buttons to access the submenu items. ...
...is connected to select the desired system and press the OK or Point 8 buttons. PAL / SECAM / NTSC / NTSC4.43 / PAL-M / PAL-N If the projector cannot reproduce a proper video image, select a specific broadcast signal format from among PAL, SECAM, NTSC, NTSC 4.43, PAL-M, and PAL-N. System Menu (Video/S-Video.... 5 When "Computer" is connected to display the System Menu. Input Menu Input The currently set item is PAL-M or PAL-N, select the system manually. Menu Operation 1 Use the Point ed buttons to select the Input Menu and press the Point 8 or OK buttons to access the submenu items. ...

Owners Manual
Page 34
.... 3 Use the Point 7 8 buttons to +8. • The Auto adj. If you to precisely adjust several parameters manually to access the selected item. The parameters manually adjusted is 480i or 575i and with some incompatible computer input and digital signals. • Fine sync and Total dots cannot... be tuned by the auto-tuning system of this projector. Menu Overscan Use the Point 7 8 buttons to select the...
.... 3 Use the Point 7 8 buttons to +8. • The Auto adj. If you to precisely adjust several parameters manually to access the selected item. The parameters manually adjusted is 480i or 575i and with some incompatible computer input and digital signals. • Fine sync and Total dots cannot... be tuned by the auto-tuning system of this projector. Menu Overscan Use the Point 7 8 buttons to select the...

Owners Manual
Page 38
The names for when no input signal is set to "ENHANCED." Blue . . . . For details, refer to the owner's manual of video equipment. 38 Background Select the background screen for the output setting of video equipment is set to "STANDARD." Black . . . HDMI 1 setup Background Press ...
The names for when no input signal is set to "ENHANCED." Blue . . . . For details, refer to the owner's manual of video equipment. 38 Background Select the background screen for the output setting of video equipment is set to "STANDARD." Black . . . HDMI 1 setup Background Press ...
Owners Manual
Page 50
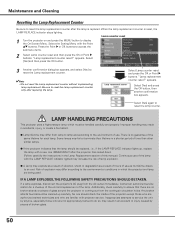
...counter reset?" Contact an authorized service station for each lamp. No one IMMEDIATELY after the projector has cooled down. (Follow carefully the instructions in the Lamp Replacement section of this manual.) Continuous use of the lamp with the LAMP REPLACE indicator lighted may increase the risk...to access the submenu items. 2 Select Lamp counter reset and then press the OK or Point 8 buttons. Select the Setting Menu with projector service. Select [Yes] and press the OK button, then another confirmation box appears. Risk of explosion may explode as a result of ...
...counter reset?" Contact an authorized service station for each lamp. No one IMMEDIATELY after the projector has cooled down. (Follow carefully the instructions in the Lamp Replacement section of this manual.) Continuous use of the lamp with the LAMP REPLACE indicator lighted may increase the risk...to access the submenu items. 2 Select Lamp counter reset and then press the OK or Point 8 buttons. Select the Setting Menu with projector service. Select [Yes] and press the OK button, then another confirmation box appears. Risk of explosion may explode as a result of ...
Owners Manual
Page 51
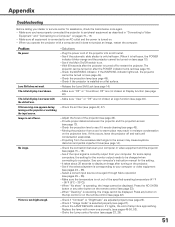
... page 23). - Projecting from a cool to see pages 24 - 26). - See your computer's instruction manual for assistance, check the items below once again. - Press any other button on the projector or switching the input source. Check if "Image mode" is not shown. Chekc the Lamp control function (...operation (see pages 42, 47). - Make sure "Off" or "Countdown Off" are adjusted properly (see page 49). - Check the connection between the projector and the projection screen (see page 19). - Lens Shift does not work. When "Cleaning" is on a flat surface. - See if the Main On...
... page 23). - Projecting from a cool to see pages 24 - 26). - See your computer's instruction manual for assistance, check the items below once again. - Press any other button on the projector or switching the input source. Check if "Image mode" is not shown. Chekc the Lamp control function (...operation (see pages 42, 47). - Make sure "Off" or "Countdown Off" are adjusted properly (see page 49). - Check the connection between the projector and the projection screen (see page 19). - Lens Shift does not work. When "Cleaning" is on a flat surface. - See if the Main On...
Owners Manual
Page 57
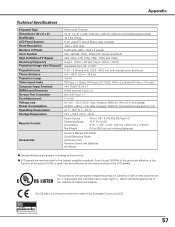
... mark of the European Community (EC). The CE Mark is Listed by the characteristics of the LCD panels. Appendix Technical Specifications Projector Type Dimensions (W x H x D) Net Weight LCD Panel System Panel Resolution Number of Pixels Color System High Definition TV Signal Scanning Frequency Projection Image ..., NTSC, NTSC4.43, PAL-M, and PAL-N 480i, 480p, 575i, 575p, 720p, 1080i, and 1080p H-sync. 15 kHz - 80 kHz, V-sync. 50 Hz - 100 Hz Adjustable from 40" to 300" F 2.0 - 3.05 lens with f 22.6 - 45.3 mm with manual zoom and focus 3.9' - 60.4' (1.2 m - 18.4 m) 165 W RCA Type x 1 (...
... mark of the European Community (EC). The CE Mark is Listed by the characteristics of the LCD panels. Appendix Technical Specifications Projector Type Dimensions (W x H x D) Net Weight LCD Panel System Panel Resolution Number of Pixels Color System High Definition TV Signal Scanning Frequency Projection Image ..., NTSC, NTSC4.43, PAL-M, and PAL-N 480i, 480p, 575i, 575p, 720p, 1080i, and 1080p H-sync. 15 kHz - 80 kHz, V-sync. 50 Hz - 100 Hz Adjustable from 40" to 300" F 2.0 - 3.05 lens with f 22.6 - 45.3 mm with manual zoom and focus 3.9' - 60.4' (1.2 m - 18.4 m) 165 W RCA Type x 1 (...


