Owners Manual
Page 2
...Names and Functions Front Back Bottom Terminal Top Remote Control Remote Control Operating Range Remote Control Batteries Installation Installation Positioning the Projector Adjustable Feet Moving the Lens Connecting to Video Equipment (Video, S-Video) Connecting to Video Equipment (Component, DVI ...compatible with HDCP) Connecting to Video Equipment (RGB Scart) Connecting to a Computer Basic Operation Turning On the Projector Turning Off the Projector Zoom Adjustment Focus Adjustment Aperture (Contrast) Adjustment Keystone Adjustment My Picture Function No Show Function On-Screen Menu Menus...
...Names and Functions Front Back Bottom Terminal Top Remote Control Remote Control Operating Range Remote Control Batteries Installation Installation Positioning the Projector Adjustable Feet Moving the Lens Connecting to Video Equipment (Video, S-Video) Connecting to Video Equipment (Component, DVI ...compatible with HDCP) Connecting to Video Equipment (RGB Scart) Connecting to a Computer Basic Operation Turning On the Projector Turning Off the Projector Zoom Adjustment Focus Adjustment Aperture (Contrast) Adjustment Keystone Adjustment My Picture Function No Show Function On-Screen Menu Menus...
Owners Manual
Page 3
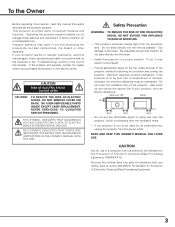
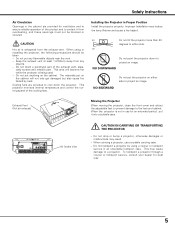
...and cable connections and try the solutions in the "Troubleshooting" section in the end of this manual thoroughly and operate the projector properly. THIS SYMBOL INDICATES THAT THERE ARE IMPORTANT OPERATING AND MAINTENANCE INSTRUCTIONS IN THE OWNER'S MANUAL WITH THIS UNIT. Do ...computer room as possible. CAUTION Not for use in the Standard for allowing air circulation and cooling the projector. Operating the projector properly enables you purchased the projector or the service center. SIDE and TOP REAR 20cm 50cm 50cm 50cm - Be especially careful that children...
...and cable connections and try the solutions in the "Troubleshooting" section in the end of this manual thoroughly and operate the projector properly. THIS SYMBOL INDICATES THAT THERE ARE IMPORTANT OPERATING AND MAINTENANCE INSTRUCTIONS IN THE OWNER'S MANUAL WITH THIS UNIT. Do ...computer room as possible. CAUTION Not for use in the Standard for allowing air circulation and cooling the projector. Operating the projector properly enables you purchased the projector or the service center. SIDE and TOP REAR 20cm 50cm 50cm 50cm - Be especially careful that children...
Owners Manual
Page 4
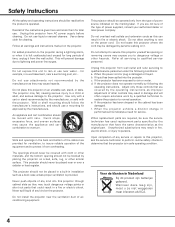
... cleaning. for service. Do not overload wall outlets and extension cords as the original part. c. When the projector exhibits a distinct change in performance-this projector on the projector. Voor de klanten in fire, electric shock, or injury to rain or use . Do not place this ...electric shock. Adjust only those controls that are provided for long periods of the equipment and to determine that the projector is damaged or frayed. Unplug this projector where the cord may fall, causing serious injury to a child or adult, and serious damage to rest on ...
... cleaning. for service. Do not overload wall outlets and extension cords as the original part. c. When the projector exhibits a distinct change in performance-this projector on the projector. Voor de klanten in fire, electric shock, or injury to rain or use . Do not place this ...electric shock. Adjust only those controls that are provided for long periods of the equipment and to determine that the projector is damaged or frayed. Unplug this projector where the cord may fall, causing serious injury to a child or adult, and serious damage to rest on ...
Owners Manual
Page 5
...Keep the exhaust vent at least 1.5'(50cm) away from any flammable objects near the vent. - Installing the Projector in an unsuitable transport case. This may result. - To transport a projector through a courier or transport service, consult your dealer for an extended period, put it from the exhaust... vent. Do not put the projector on either side. 20˚ Do not point the projector down the projector. Do not drop or bump a projector, otherwise damages or malfunctions may cause damage to a projector. Do not put on the cabinet. cially screws and ...
...Keep the exhaust vent at least 1.5'(50cm) away from any flammable objects near the vent. - Installing the Projector in an unsuitable transport case. This may result. - To transport a projector through a courier or transport service, consult your dealer for an extended period, put it from the exhaust... vent. Do not put the projector on either side. 20˚ Do not point the projector down the projector. Do not drop or bump a projector, otherwise damages or malfunctions may cause damage to a projector. Do not put on the cabinet. cially screws and ...
Owners Manual
Page 6
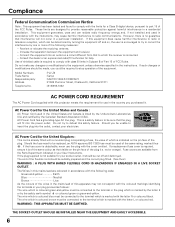
If this projector meets the requirement for the United Kingdom : This cord is already fitted with this equipment does cause harmful interference to radio or television reception, which ... the plug with the letter L or coloured red. Increase the separation between the equipment and receiver. - Model Numbers Trade Name Responsible party Address Telephone No. : PLV-Z2 : Sanyo : SANYO FISHER COMPANY : 21605 Plummer Street, Chatsworth, California 91311 : (818)998-7322 AC POWER CORD REQUIREMENT The AC Power Cord supplied with a moulded plug incorporating a fuse...
If this projector meets the requirement for the United Kingdom : This cord is already fitted with this equipment does cause harmful interference to radio or television reception, which ... the plug with the letter L or coloured red. Increase the separation between the equipment and receiver. - Model Numbers Trade Name Responsible party Address Telephone No. : PLV-Z2 : Sanyo : SANYO FISHER COMPANY : 21605 Plummer Street, Chatsworth, California 91311 : (818)998-7322 AC POWER CORD REQUIREMENT The AC Power Cord supplied with a moulded plug incorporating a fuse...

Owners Manual
Page 7
...(200 - 240 V AC) 7 Connecting the AC Power Cord This projector uses nominal input voltages of power system. This projector automatically selects the correct input voltage. The AC outlet must be near this projector is connected to the projector. Projector side AC outlet side For the U.S.A. NOTE ON THE POWER CORD AC...V or 200-240 V AC. Consult your sales dealer. It is not in use. Connect the projector with AC power cord and the Main On/Off switch is on your projector. If supplied AC power cord does not match your AC outlet, contact your authorized dealer or service ...
...(200 - 240 V AC) 7 Connecting the AC Power Cord This projector uses nominal input voltages of power system. This projector automatically selects the correct input voltage. The AC outlet must be near this projector is connected to the projector. Projector side AC outlet side For the U.S.A. NOTE ON THE POWER CORD AC...V or 200-240 V AC. Consult your sales dealer. It is not in use. Connect the projector with AC power cord and the Main On/Off switch is on your projector. If supplied AC power cord does not match your AC outlet, contact your authorized dealer or service ...

Owners Manual
Page 8
...want to with DVI 29-pin terminal for the starting display of 16.77 million colors, and matrix liquid crystal display (LCD) technology. The projector has the function to adjust the brightness according to use it at desired places without a distorted image. G RGB Scart ...See page 41.) N Multilanguage Menu Display Operation menu is available with LCD panels (1280 x 720 resolution) of use the projector where you to 13.1' (4.0m). This projector utilizes built-in positioning the projector. N Short Zoom Lens This projector is equipped with the MY PICTURE (MY-P) button on the remote ...
...want to with DVI 29-pin terminal for the starting display of 16.77 million colors, and matrix liquid crystal display (LCD) technology. The projector has the function to adjust the brightness according to use it at desired places without a distorted image. G RGB Scart ...See page 41.) N Multilanguage Menu Display Operation menu is available with LCD panels (1280 x 720 resolution) of use the projector where you to 13.1' (4.0m). This projector utilizes built-in positioning the projector. N Short Zoom Lens This projector is equipped with the MY PICTURE (MY-P) button on the remote ...

Owners Manual
Page 10
... restart the unit. Do not use the RESET function excessively. 10 Pb/Cb - e VIDEO Connect the composite video output from video equipment to service this projector.
... restart the unit. Do not use the RESET function excessively. 10 Pb/Cb - e VIDEO Connect the composite video output from video equipment to service this projector.

Owners Manual
Page 11
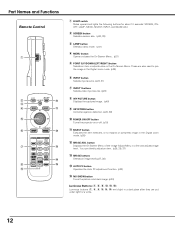
... also used to be turned on or off. (p18) t MENU button Opens or closes the On-Screen Menu. (p21) w POWER indicator Flashes red until the projector gets ready to pan the image in Digital zoom mode. (p38) i INPUT button Selects input source. (p23, 31) 11 Top Part Names and Functions q wer... ON-OFF POWER WARNING LAMP REPLACE MENU SELECT INPUT ty u i q POWER ON-OFF button Turns the projector on or when the front cover is under operation. It remains green while the...
... also used to be turned on or off. (p18) t MENU button Opens or closes the On-Screen Menu. (p21) w POWER indicator Flashes red until the projector gets ready to pan the image in Digital zoom mode. (p38) i INPUT button Selects input source. (p23, 31) 11 Top Part Names and Functions q wer... ON-OFF POWER WARNING LAMP REPLACE MENU SELECT INPUT ty u i q POWER ON-OFF button Turns the projector on or when the front cover is under operation. It remains green while the...
Owners Manual
Page 12
... video input source. (p23) i MY PICTURE button Displays the captured image. (p40) o KEYSTONE button Corrects keystone distortion. (p20, 39) !0 POWER ON-OFF button Turns the projector on or off. (p18) !1 SELECT button Executes the item selected, or to expand or compress image in the Digital zoom mode. (p38) !2 IMAGE ADJ. w SCREEN...
... video input source. (p23) i MY PICTURE button Displays the captured image. (p40) o KEYSTONE button Corrects keystone distortion. (p20, 39) !0 POWER ON-OFF button Turns the projector on or off. (p18) !1 SELECT button Executes the item selected, or to expand or compress image in the Digital zoom mode. (p38) !2 IMAGE ADJ. w SCREEN...
Owners Manual
Page 13
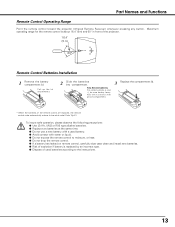
... battery is about 16.4' (5m) and 60° in compartment. 3 Replace the compartment lid. * When the batteries of the projector. 16.4' (5 m) 60° Remote Control Batteries Installation 1 Remove the battery compartment lid. Part Names and Functions Remote Control Operating ...Range Point the remote control toward the projector (Infrared Remote Receiver) whenever pressing any button. Maximum operating range for the remote control is replaced by an incorrect type. G...
... battery is about 16.4' (5m) and 60° in compartment. 3 Replace the compartment lid. * When the batteries of the projector. 16.4' (5 m) 60° Remote Control Batteries Installation 1 Remove the battery compartment lid. Part Names and Functions Remote Control Operating ...Range Point the remote control toward the projector (Infrared Remote Receiver) whenever pressing any button. Maximum operating range for the remote control is replaced by an incorrect type. G...
Owners Manual
Page 14
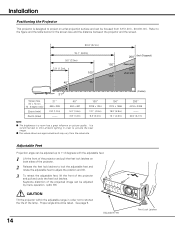
... pull and undo the feet lock latches. Refer to the figure and the table below for the screen size and the distance between the projector and the screen. 20.0' (6.1m) 15.1' (4.6m) 9.8' (3.0m) 3.9' (1.2m) 100" 40" 76" 150" 116" 200" (Inch Diagonal) Zoom (max) 154" Zoom (min) ...884 x 497 5.2' (1.6m) 3.9' (1.2m) 100" 2209 x 1244 13.1' (4.0m) 9.8' (3.0m) NOTE G The brightness in a room has a great influence on both sides of the projector. 2 Release the feet lock latches to lock the adjustable feet and rotate the adjustable feet to adjust the position and tilt. 3 To retract the adjustable...
... pull and undo the feet lock latches. Refer to the figure and the table below for the screen size and the distance between the projector and the screen. 20.0' (6.1m) 15.1' (4.6m) 9.8' (3.0m) 3.9' (1.2m) 100" 40" 76" 150" 116" 200" (Inch Diagonal) Zoom (max) 154" Zoom (min) ...884 x 497 5.2' (1.6m) 3.9' (1.2m) 100" 2209 x 1244 13.1' (4.0m) 9.8' (3.0m) NOTE G The brightness in a room has a great influence on both sides of the projector. 2 Release the feet lock latches to lock the adjustable feet and rotate the adjustable feet to adjust the position and tilt. 3 To retract the adjustable...

Owners Manual
Page 16
... Video Output Output (Y, Pb/Cb, Pr/Cr) NOTE G See page 55 for component. NOTE When connecting the cable, the power cords of connecting both the projector and the external equipment should be disconnected from AC outlet. 16 DVI Cable Component Cable (RCA x 3) ComponentDVI-I RGB/COMPONENT DVI Cable Component Cable (RCA x 3) Y-Pb...
... Video Output Output (Y, Pb/Cb, Pr/Cr) NOTE G See page 55 for component. NOTE When connecting the cable, the power cords of connecting both the projector and the external equipment should be disconnected from AC outlet. 16 DVI Cable Component Cable (RCA x 3) ComponentDVI-I RGB/COMPONENT DVI Cable Component Cable (RCA x 3) Y-Pb...

Owners Manual
Page 17
... a DVI cable (option) for digital. Use a DVI-VGA cable (option) for ordering optional cables. NOTE When connecting the cable, the power cords of both the projector and the external equipment should be disconnected from AC outlet. 17 IBM-compatible or Macintosh computer Monitor Out DVI Cable DVI-I RGB/COMPONENT Connecting to...
... a DVI cable (option) for digital. Use a DVI-VGA cable (option) for ordering optional cables. NOTE When connecting the cable, the power cords of both the projector and the external equipment should be disconnected from AC outlet. 17 IBM-compatible or Macintosh computer Monitor Out DVI Cable DVI-I RGB/COMPONENT Connecting to...
Owners Manual
Page 18
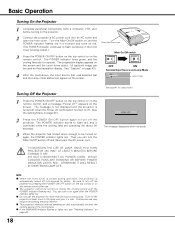
... Be sure to turn it continues while the cooling fans are operating (for Lamp mode.) The message disappears after 4 seconds. Continuous use the projector for safety. appears on the screen. G Do not use may result in 24 hours and give it a rest. G If the WARNING ...indicator lights red. DO NOT DISCONNECT AC POWER CORD WHILE COOLING FANS ARE RUNNING OR BEFORE POWER INDICATOR LIGHTS RED. Basic Operation Turning On the Projector 1 Complete peripheral connections (with the POWER indicator flashing red. NOTE G When the front cover is closed . ) 3 Press the POWER ON...
... Be sure to turn it continues while the cooling fans are operating (for Lamp mode.) The message disappears after 4 seconds. Continuous use the projector for safety. appears on the screen. G Do not use may result in 24 hours and give it a rest. G If the WARNING ...indicator lights red. DO NOT DISCONNECT AC POWER CORD WHILE COOLING FANS ARE RUNNING OR BEFORE POWER INDICATOR LIGHTS RED. Basic Operation Turning On the Projector 1 Complete peripheral connections (with the POWER indicator flashing red. NOTE G When the front cover is closed . ) 3 Press the POWER ON...

Owners Manual
Page 21
... by pressing the Point Up/Down button, and activate the item that you are selecting. 21 On-Screen Menu You can control and adjust this projector through the On-Screen Menu. When you are selecting a sub-menu or an item displayed in a line, pressing the MENU button takes you back to...
... by pressing the Point Up/Down button, and activate the item that you are selecting. 21 On-Screen Menu You can control and adjust this projector through the On-Screen Menu. When you are selecting a sub-menu or an item displayed in a line, pressing the MENU button takes you back to...

Owners Manual
Page 23
... COMPO button on the next page. It is connected to optimize its performance. Remote Control AUTO When selecting the AUTO button, the projector automatically detects incoming video signal, and adjusts itself to video input. VIDEO When video input signal is convenient for you to select the... these buttons, correct input source should be selected through the INPUT 1 buttons on the remote control or through menu operation as the projector automatically detects incoming video signal, and adjust itself to the VIDEO jack, select Video. S-VIDEO When video input signal is connected to...
... COMPO button on the next page. It is connected to optimize its performance. Remote Control AUTO When selecting the AUTO button, the projector automatically detects incoming video signal, and adjusts itself to video input. VIDEO When video input signal is convenient for you to select the... these buttons, correct input source should be selected through the INPUT 1 buttons on the remote control or through menu operation as the projector automatically detects incoming video signal, and adjust itself to the VIDEO jack, select Video. S-VIDEO When video input signal is connected to...

Owners Manual
Page 24
... Operation 1 Select the Input Menu with the Point Up/Down button and then press the Point Right button. Auto When selecting the AUTO button, the projector automatically detects incoming video signal, and adjusts itself to the Y-Pb/Cb(component) Pr/Cr jacks, select Y,Pb/Cb,Pr/Cr. S-Video When video ... menu. 24 The Source Select Menu will appear. 3 Move the pointer to the source that you want to enter the sub-menu. However, the projector selects connection in the following order under the condition of connecting more than one input source: 1st Y-Pb/Cb-Pr/Cr 2nd S-VIDEO 3rd VIDEO...
... Operation 1 Select the Input Menu with the Point Up/Down button and then press the Point Right button. Auto When selecting the AUTO button, the projector automatically detects incoming video signal, and adjusts itself to the Y-Pb/Cb(component) Pr/Cr jacks, select Y,Pb/Cb,Pr/Cr. S-Video When video ... menu. 24 The Source Select Menu will appear. 3 Move the pointer to the source that you want to enter the sub-menu. However, the projector selects connection in the following order under the condition of connecting more than one input source: 1st Y-Pb/Cb-Pr/Cr 2nd S-VIDEO 3rd VIDEO...

Owners Manual
Page 25
... and controlled by HDCP. Source Selection Menu pointer Closes the source selection menu. 25 Before using these buttons, correct input source should be changed, this projector may not display the digital content protected by Digital Content Protection, LLC. minal, select RGB (AV HDCP). Video Input Input Source Selection (INPUT 2 Terminal/HDCP...
... and controlled by HDCP. Source Selection Menu pointer Closes the source selection menu. 25 Before using these buttons, correct input source should be changed, this projector may not display the digital content protected by Digital Content Protection, LLC. minal, select RGB (AV HDCP). Video Input Input Source Selection (INPUT 2 Terminal/HDCP...

Owners Manual
Page 26
...AV System Menu (Component) NOTE G The AV System Menu cannot be selected when selecting RGB(Scart). 26 Component Video Signal Format If the projector cannot reproduce proper video image, it is necessary to select a specific component video signal format among PAL, SECAM, NTSC, NTSC 4.43,..., and 1080i. PAL / SECAM / NTSC / NTSC4.43 / PAL-M / PAL-N If the projector cannot reproduce proper video image, it is PAL-M or PAL-N, select system manually. Component Auto The projector automatically detects incoming video signal, and adjusts itself to select with the Point Up/Down button and...
...AV System Menu (Component) NOTE G The AV System Menu cannot be selected when selecting RGB(Scart). 26 Component Video Signal Format If the projector cannot reproduce proper video image, it is necessary to select a specific component video signal format among PAL, SECAM, NTSC, NTSC 4.43,..., and 1080i. PAL / SECAM / NTSC / NTSC4.43 / PAL-M / PAL-N If the projector cannot reproduce proper video image, it is PAL-M or PAL-N, select system manually. Component Auto The projector automatically detects incoming video signal, and adjusts itself to select with the Point Up/Down button and...


