Owners Manual
Page 2
...and Design Part Names and Functions Front Back Bottom Terminal Top Remote Control Remote Control Operating Range Remote Control Batteries Installation Installation Positioning the Projector Adjustable Feet Moving the Lens Connecting to Video Equipment (Video, S-Video) Connecting to Video Equipment (Component, DVI compatible with HDCP) ...are registered trademarks of Microsoft Corporation. Table of Contents Table of Contents To the Owner Safety Instructions Air Circulation Installing the Projector in the owner's manual is a trademark or a registered trademark of its respective corporation. 2
...and Design Part Names and Functions Front Back Bottom Terminal Top Remote Control Remote Control Operating Range Remote Control Batteries Installation Installation Positioning the Projector Adjustable Feet Moving the Lens Connecting to Video Equipment (Video, S-Video) Connecting to Video Equipment (Component, DVI compatible with HDCP) ...are registered trademarks of Microsoft Corporation. Table of Contents Table of Contents To the Owner Safety Instructions Air Circulation Installing the Projector in the owner's manual is a trademark or a registered trademark of its respective corporation. 2
Owners Manual
Page 3
...the solutions in the "Troubleshooting" section in the end of this manual thoroughly and operate the projector properly. This projector provides many convenient features and functions. Operating the projector properly enables you purchased the projector or the service center. Improper operation may result in a proper ...THAT THERE ARE IMPORTANT OPERATING AND MAINTENANCE INSTRUCTIONS IN THE OWNER'S MANUAL WITH THIS UNIT. Minimum clearance must be maintained. Heat build- up can reduce the service life of your projector seems to manage those features and maintains it may result in ...
...the solutions in the "Troubleshooting" section in the end of this manual thoroughly and operate the projector properly. This projector provides many convenient features and functions. Operating the projector properly enables you purchased the projector or the service center. Improper operation may result in a proper ...THAT THERE ARE IMPORTANT OPERATING AND MAINTENANCE INSTRUCTIONS IN THE OWNER'S MANUAL WITH THIS UNIT. Minimum clearance must be maintained. Heat build- up can reduce the service life of your projector seems to manage those features and maintains it may result in ...

Owners Manual
Page 15
... easy to the limit, the lens does not move the lens leftward / rightward. Turn the lens shift ring (left/right) left , and right with the manual lens shift function. Installation Moving the Lens The projection lens can be moved up /down , left /right to move to the limit, the lens does...
... easy to the limit, the lens does not move the lens leftward / rightward. Turn the lens shift ring (left/right) left , and right with the manual lens shift function. Installation Moving the Lens The projection lens can be moved up /down , left /right to move to the limit, the lens does...

Owners Manual
Page 26
...among 480i, 575i, 480p, 575p, 720p, 1035i, and 1080i. Component Auto The projector automatically detects incoming video signal, and adjusts itself to optimize its performance. Video or S-Video Auto The projector automatically detects incoming video system, and adjusts itself to optimize its performance. AV System ...System Menu cannot be selected when selecting RGB(Scart). 26 PAL / SECAM / NTSC / NTSC4.43 / PAL-M / PAL-N If the projector cannot reproduce proper video image, it is necessary to select with the Point Up/Down button and then press the SELECT button. Component Video ...
...among 480i, 575i, 480p, 575p, 720p, 1035i, and 1080i. Component Auto The projector automatically detects incoming video signal, and adjusts itself to optimize its performance. Video or S-Video Auto The projector automatically detects incoming video system, and adjusts itself to optimize its performance. AV System ...System Menu cannot be selected when selecting RGB(Scart). 26 PAL / SECAM / NTSC / NTSC4.43 / PAL-M / PAL-N If the projector cannot reproduce proper video image, it is necessary to select with the Point Up/Down button and then press the SELECT button. Component Video ...
Owners Manual
Page 32
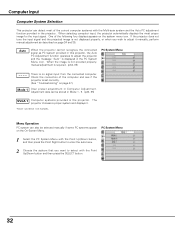
...SELECT button. 32 There is required. (p34, 35) PC System Menu - - - - The projector chooses a proper system and displays it manually, perform manual adjustment as PC system provided in this projector, the Auto PC Adjustment function operates to select with the Multi-scan system and the Auto PC ...Menu. One of the computer and see if the projector is not displayed properly, or when you want to adjust the projector and the message "Auto" is displayed in the projector. When the image is not provided properly, manual adjustment is no signal input from the connected computer...
...SELECT button. 32 There is required. (p34, 35) PC System Menu - - - - The projector chooses a proper system and displays it manually, perform manual adjustment as PC system provided in this projector, the Auto PC Adjustment function operates to select with the Multi-scan system and the Auto PC ...Menu. One of the computer and see if the projector is not displayed properly, or when you want to adjust the projector and the message "Auto" is displayed in the projector. When the image is not provided properly, manual adjustment is no signal input from the connected computer...

Owners Manual
Page 34
... signal formats. Clamp Adjusts clamp level. When the image has dark bars, try this projector. The projector has 5 independent memory areas to show the information of total dots in one horizontal period. This projector has Manual PC Adjustment to enable you use it. 1 Select the PC Adjust Menu with the... item with the Point Up/Down button and press the Point Left/Right button to adjust the next item. Computer Input Computer Adjustment (Manual) Some computers employ special signal formats which may not be tuned by Multi-scan system of the selected Mode. Press the Point Left/Right...
... signal formats. Clamp Adjusts clamp level. When the image has dark bars, try this projector. The projector has 5 independent memory areas to show the information of total dots in one horizontal period. This projector has Manual PC Adjustment to enable you use it. 1 Select the PC Adjust Menu with the... item with the Point Up/Down button and press the Point Left/Right button to adjust the next item. Computer Input Computer Adjustment (Manual) Some computers employ special signal formats which may not be tuned by Multi-scan system of the selected Mode. Press the Point Left/Right...

Owners Manual
Page 46
... Maintenance and Cleaning Lamp Replace Counter Be sure to reset the lamp replace counter after the projector has cooled down. ( Follow carefully the instructions in the Lamp Replacement section of this manual. ) Continuous use of the lamp with the LAMP REPLACE indicator lighted may increase the risk... G Lamp lifetime may fail or terminate their lifetime in accidents, injury, or create a fire hazard. If a lamp explodes, disconnect the projector's AC plug from lamp to lamp and according to reset the Lamp replace counter only after replacing the lamp. Contact an authorized service station ...
... Maintenance and Cleaning Lamp Replace Counter Be sure to reset the lamp replace counter after the projector has cooled down. ( Follow carefully the instructions in the Lamp Replacement section of this manual. ) Continuous use of the lamp with the LAMP REPLACE indicator lighted may increase the risk... G Lamp lifetime may fail or terminate their lifetime in accidents, injury, or create a fire hazard. If a lamp explodes, disconnect the projector's AC plug from lamp to lamp and according to reset the Lamp replace counter only after replacing the lamp. Contact an authorized service station ...

Owners Manual
Page 47
Appendix Troubleshooting Before calling your computer's owner's manual for setting. - Problem: - Try these solutions. The projector can be turned on. (See "Warning Indicator" on the projection lens. Provide proper distance between video equipment or your computer and the projector. - Check the projection lens to see if it ...(See page 44.) - Check the Display item. (See "Setting" on page 40.) reversed. Make sure all equipment is not out of the projector into the AC outlet. - No power - See if the front cover is Left/Right - Check the WARNING indicator. No image - Check the ...
Appendix Troubleshooting Before calling your computer's owner's manual for setting. - Problem: - Try these solutions. The projector can be turned on. (See "Warning Indicator" on the projection lens. Provide proper distance between video equipment or your computer and the projector. - Check the projection lens to see if it ...(See page 44.) - Check the Display item. (See "Setting" on page 40.) reversed. Make sure all equipment is not out of the projector into the AC outlet. - No power - See if the front cover is Left/Right - Check the WARNING indicator. No image - Check the ...
Owners Manual
Page 53
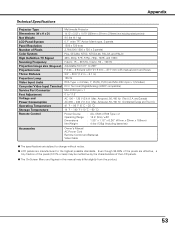
... possible standards. Ampere), 50 / 60 Hz (The U.S.A. G The On-Screen Menu and figures in this manual may be ineffective by the characteristics of the LCD panels. G LCD panels are subject to 11.8˚ AC 100 ~ 120 V (2.4 A Max. Even though 99.99% of...mm with manual zoom and focus 3.9' ~ 20.0' (1.2 m ~ 6.1 m) 135 W RCA Type x 4 (Video, Y, Pb/Cb, Pr/Cr) and Mini DIN 4 pin x 1 (S-Video) DVI-I Terminal (Digital/Analog) (HDCP compatible) Mini DIN 8 pin x 1 0˚ to change without notice. Appendix Technical Specifications Projector Type Dimensions (W x H x D) Net Weight LCD Panel ...
... possible standards. Ampere), 50 / 60 Hz (The U.S.A. G The On-Screen Menu and figures in this manual may be ineffective by the characteristics of the LCD panels. G LCD panels are subject to 11.8˚ AC 100 ~ 120 V (2.4 A Max. Even though 99.99% of...mm with manual zoom and focus 3.9' ~ 20.0' (1.2 m ~ 6.1 m) 135 W RCA Type x 4 (Video, Y, Pb/Cb, Pr/Cr) and Mini DIN 4 pin x 1 (S-Video) DVI-I Terminal (Digital/Analog) (HDCP compatible) Mini DIN 8 pin x 1 0˚ to change without notice. Appendix Technical Specifications Projector Type Dimensions (W x H x D) Net Weight LCD Panel ...


