Owners Manual
Page 2
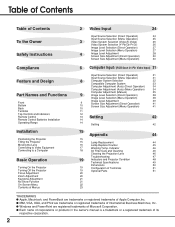
...34 Computer Adjustment (Auto) (Menu Operation) 34 Computer Adjustment (Manual) 35 9 Image Level Selection (Direct Operation) 38 Image Level Selection (Menu Operation) 38 Image Level Adjustment 39 9 Screen Size Adjustment (Direct Operation) 41 10 Screen Size Adjustment (Menu Operation) 41 10 11 12 13 Setting 42 14 14 Setting 42 15 Appendix 44 15 15 Lamp Replacement 44 16 Lamp Replace Counter 45 17 Warning Temp. Indicator 46 18 Air Filter Care and Cleaning 46 Cleaning the Projection Lens 46 Troubleshooting 47 19 Indicators and Projector Condition...
...34 Computer Adjustment (Auto) (Menu Operation) 34 Computer Adjustment (Manual) 35 9 Image Level Selection (Direct Operation) 38 Image Level Selection (Menu Operation) 38 Image Level Adjustment 39 9 Screen Size Adjustment (Direct Operation) 41 10 Screen Size Adjustment (Menu Operation) 41 10 11 12 13 Setting 42 14 14 Setting 42 15 Appendix 44 15 15 Lamp Replacement 44 16 Lamp Replace Counter 45 17 Warning Temp. Indicator 46 18 Air Filter Care and Cleaning 46 Cleaning the Projection Lens 46 Troubleshooting 47 19 Indicators and Projector Condition...
Owners Manual
Page 3
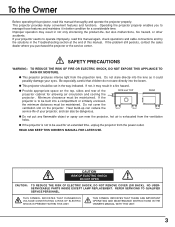
... projector, hot air is not to operate improperly, read this manual again, check operations and cable connections and try the solutions in the Troubleshooting section at the end of your eyes. G This projector should be maintained. Do not cover the ventilation slot on the top, sides and rear of the projector cabinet for an extended time, unplug the projector from the projection lens. REFER SERVICING TO QUALIFIED SERVICE...
... projector, hot air is not to operate improperly, read this manual again, check operations and cable connections and try the solutions in the Troubleshooting section at the end of your eyes. G This projector should be maintained. Do not cover the ventilation slot on the top, sides and rear of the projector cabinet for an extended time, unplug the projector from the projection lens. REFER SERVICING TO QUALIFIED SERVICE...

Owners Manual
Page 4
... sure the service technician has used replacement parts specified by a qualified technician to restore the projector to protect it . Never spill liquid of power source indicated on it from the wall outlet. Voor de klanten in a wet basement, near water... Follow all warnings and instructions marked on the projector. This will often require extensive work by the manufacturer that the projector is damaged...
... sure the service technician has used replacement parts specified by a qualified technician to restore the projector to protect it . Never spill liquid of power source indicated on it from the wall outlet. Voor de klanten in a wet basement, near water... Follow all warnings and instructions marked on the projector. This will often require extensive work by the manufacturer that the projector is damaged...
Owners Manual
Page 5
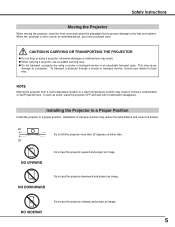
... result. Installing the Projector in a Proper Position Install the projector in an unsuitable transport case. G Do not transport a projector by using a courier or transport service in a proper position. To transport a projector through a courier or transport service, consult your dealer for an extended period, put the projector upward and project an image. NOTE Moving the projector from a cool temperature location to a warm temperature location may reduce the lamp lifetime...
... result. Installing the Projector in a Proper Position Install the projector in an unsuitable transport case. G Do not transport a projector by using a courier or transport service in a proper position. To transport a projector through a courier or transport service, consult your dealer for an extended period, put the projector upward and project an image. NOTE Moving the projector from a cool temperature location to a warm temperature location may reduce the lamp lifetime...
Owners Manual
Page 6
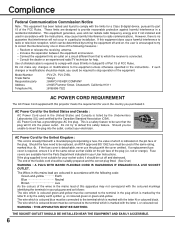
... be used in the United States and Canada is required to comply with class B limits in a residential installation. This is a safety feature to be sure that to which is connected. - Model Number Trade Name Responsible party Address Telephone No. : PLV-Z1, PLV-Z1BL : Sanyo : SANYO FISHER COMPANY : 21605 Plummer Street, Chatsworth, California 91311 : (818)998-7322 AC POWER CORD REQUIREMENT The AC Power Cord supplied with...
... be used in the United States and Canada is required to comply with class B limits in a residential installation. This is a safety feature to be sure that to which is connected. - Model Number Trade Name Responsible party Address Telephone No. : PLV-Z1, PLV-Z1BL : Sanyo : SANYO FISHER COMPANY : 21605 Plummer Street, Chatsworth, California 91311 : (818)998-7322 AC POWER CORD REQUIREMENT The AC Power Cord supplied with...
Owners Manual
Page 8
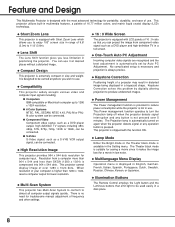
... colors, and matrix liquid crystal display (LCD) technology. G Component Video Component video signal, such as a S-VHS VCR output signal, can be connected. N High Resolution Image This projector provides 964 x 544 dots resolution for seeing a movie since it at desired places without a distorted image. When resolution of your computer is automatically set by digitally altering projection to turn the Projection lamp off when the projector detects signal interruption and any operation button is pressed. N 16 : 9 Wide Screen The projector...
... colors, and matrix liquid crystal display (LCD) technology. G Component Video Component video signal, such as a S-VHS VCR output signal, can be connected. N High Resolution Image This projector provides 964 x 544 dots resolution for seeing a movie since it at desired places without a distorted image. When resolution of your computer is automatically set by digitally altering projection to turn the Projection lamp off when the projector detects signal interruption and any operation button is pressed. N 16 : 9 Wide Screen The projector...

Owners Manual
Page 12
... select input source. (p24, 31) MENU BUTTON Used to open or close the on -screen menu. They are also used to expand the image in Digital zoom mode. (p41) POINT BUTTONS Used to select an item or adjust value in Power management mode. (p43) WARNING TEMP. READY LAMP REPLACE ON-OFF LAMP LAMP INDICATOR Becomes dim when the projector is ready to pan the image in stand-by mode. INDICATOR Flashes red when internal projector temperature is too high. (p46) READY INDICATOR Lights green when the projector is turned...
... select input source. (p24, 31) MENU BUTTON Used to open or close the on -screen menu. They are also used to expand the image in Digital zoom mode. (p41) POINT BUTTONS Used to select an item or adjust value in Power management mode. (p43) WARNING TEMP. READY LAMP REPLACE ON-OFF LAMP LAMP INDICATOR Becomes dim when the projector is ready to pan the image in stand-by mode. INDICATOR Flashes red when internal projector temperature is too high. (p46) READY INDICATOR Lights green when the projector is turned...

Owners Manual
Page 13
Remote Control Part Names and Functions LIGHT BUTTON Used to select an item or adjust value in the onscreen menu. AUTO MENU SCREEN SELECT INPUT IMAGE VIDEO IMAGE AUTO NO SHOW 1 VIDEO 2 KEYSTONE S-VIDEO 3 COMPONENT COMPO 4 POWER ON-OFF BUTTON Used to turn the picture into black image. (p21) VIDEO BUTTON Used to select video input source. (p24) LUMINOUS BUTTONS The luminous buttons in the frame emit light in a dark place after they are also used to expand the image in Digital zoom mode. (p41) SELECT BUTTON Used to moisture or heat...
Remote Control Part Names and Functions LIGHT BUTTON Used to select an item or adjust value in the onscreen menu. AUTO MENU SCREEN SELECT INPUT IMAGE VIDEO IMAGE AUTO NO SHOW 1 VIDEO 2 KEYSTONE S-VIDEO 3 COMPONENT COMPO 4 POWER ON-OFF BUTTON Used to turn the picture into black image. (p21) VIDEO BUTTON Used to select video input source. (p24) LUMINOUS BUTTONS The luminous buttons in the frame emit light in a dark place after they are also used to expand the image in Digital zoom mode. (p41) SELECT BUTTON Used to moisture or heat...

Owners Manual
Page 18
Installation Connecting to a Computer Cables used for connection • VGA Cable (HDB 15 pin) ✽ • MAC Adapter (When connecting to Macintosh computer) ✽ ✽ option IBM-compatible computer or Macintosh computer (VGA / SVGA / XGA / SXGA) Desktop type Laptop type Monitor Output MAC Adapter ✽ Set slide switches according to use before the computer is switched on RESOLUTION MODE that you turn on projector and computer. ON OFF ON DIP 123456 1 2 3 4 56 13" MODE (640...
Installation Connecting to a Computer Cables used for connection • VGA Cable (HDB 15 pin) ✽ • MAC Adapter (When connecting to Macintosh computer) ✽ ✽ option IBM-compatible computer or Macintosh computer (VGA / SVGA / XGA / SXGA) Desktop type Laptop type Monitor Output MAC Adapter ✽ Set slide switches according to use before the computer is switched on RESOLUTION MODE that you turn on projector and computer. ON OFF ON DIP 123456 1 2 3 4 56 13" MODE (640...

Owners Manual
Page 19
... use the projector for more than 24 hours continuously. The LAMP indicator lights red, and the READY indicator lights green. appears on a screen after the count-down starts (for about 90 seconds. Close the front cover after 4 seconds. Refer to operate. Turn off the Projection lamp automatically. When the WARNING TEMP. The READY indicator does not light green with the front cover closed in shortening the lamp lifetime. The cooling fans operate for 30 seconds). 4 The input source...
... use the projector for more than 24 hours continuously. The LAMP indicator lights red, and the READY indicator lights green. appears on a screen after the count-down starts (for about 90 seconds. Close the front cover after 4 seconds. Refer to operate. Turn off the Projection lamp automatically. When the WARNING TEMP. The READY indicator does not light green with the front cover closed in shortening the lamp lifetime. The cooling fans operate for 30 seconds). 4 The input source...
Owners Manual
Page 23
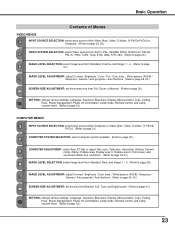
...Keystone, Blue back, Display, Menu position, Logo, Ceiling, Rear, Power management, Power off confirmation, Lamp mode, Remote control, and Lamp counter reset. (Refer to page 32.) COMPUTER ADJUSTMENT: select Auto PC Adj. Language, Keystone, Blue back, Display, Menu position, Logo, Ceiling, Rear, Power management, Power off confirmation, Lamp mode, Remote control, and Lamp counter reset. (Refer to page 42.) COMPUTER MENUS INPUT SOURCE SELECTION: select input source either Video [Auto, Video, S-Video, (Y-Pb/Cb-Pr/Cr)] or Computer. (Refer to page 24, 25.) VIDEO SYSTEM SELECTION: select Video...
...Keystone, Blue back, Display, Menu position, Logo, Ceiling, Rear, Power management, Power off confirmation, Lamp mode, Remote control, and Lamp counter reset. (Refer to page 32.) COMPUTER ADJUSTMENT: select Auto PC Adj. Language, Keystone, Blue back, Display, Menu position, Logo, Ceiling, Rear, Power management, Power off confirmation, Lamp mode, Remote control, and Lamp counter reset. (Refer to page 42.) COMPUTER MENUS INPUT SOURCE SELECTION: select input source either Video [Auto, Video, S-Video, (Y-Pb/Cb-Pr/Cr)] or Computer. (Refer to page 24, 25.) VIDEO SYSTEM SELECTION: select Video...

Owners Manual
Page 31
... video input, select the RGB (Scart). Source Selection menu Close the source selection menu. 31 ON-OFF LAMP INPUT button (The input source that you want to the source that is selected last is selected when the projector is available in video equipment, connect the Scart connector to enter the sub-menu. REMOTE CONTROL INPUT IMAGE VIDEO IMAGE AUTO NO SHOW 1 VIDEO 2 INPUT button Input Source Selection (Menu Operation) 1 Press the MENU button, and the main menu appears. The Source selection menu appears. Close the source...
... video input, select the RGB (Scart). Source Selection menu Close the source selection menu. 31 ON-OFF LAMP INPUT button (The input source that you want to the source that is selected last is selected when the projector is available in video equipment, connect the Scart connector to enter the sub-menu. REMOTE CONTROL INPUT IMAGE VIDEO IMAGE AUTO NO SHOW 1 VIDEO 2 INPUT button Input Source Selection (Menu Operation) 1 Press the MENU button, and the main menu appears. The Source selection menu appears. Close the source...
Owners Manual
Page 41
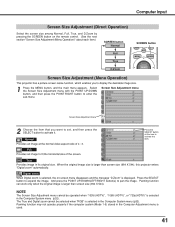
... remote control. (See the next section "Screen Size Adjustment (Menu Operation)" about each item.) SCREEN button Normal Full True D.Zoom SCREEN button LIGHT AUTO PC ADJ. Normal Provides an image at this projector enters "Digital zoom" automatically. True Provides image in the Computer System menu (p32). Panning function may not operate properly if the computer system (Mode 1-5) stored in the Computer Adjustment menu is selected in the Computer System menu (p32). Computer Input Screen Size Adjustment (Direct Operation) Select the screen size...
... remote control. (See the next section "Screen Size Adjustment (Menu Operation)" about each item.) SCREEN button Normal Full True D.Zoom SCREEN button LIGHT AUTO PC ADJ. Normal Provides an image at this projector enters "Digital zoom" automatically. True Provides image in the Computer System menu (p32). Panning function may not operate properly if the computer system (Mode 1-5) stored in the Computer Adjustment menu is selected in the Computer System menu (p32). Computer Input Screen Size Adjustment (Direct Operation) Select the screen size...

Owners Manual
Page 43
... READY indicator starts to flash after cooling down for a certain period in order to project the image from a ceiling mounted projector. When operating the projector in the Setting menu to the initial code (Code 2). NOTE : When the batteries of the Remote Control; Power management This function turns the Projection lamp off the projector is "On," the projector displays our logo when starting up. Time left / right reversed. After counting down the Projection lamp for 5 minutes). 2. To change the code...
... READY indicator starts to flash after cooling down for a certain period in order to project the image from a ceiling mounted projector. When operating the projector in the Setting menu to the initial code (Code 2). NOTE : When the batteries of the Remote Control; Power management This function turns the Projection lamp off the projector is "On," the projector displays our logo when starting up. Time left / right reversed. After counting down the Projection lamp for 5 minutes). 2. To change the code...
Owners Manual
Page 44
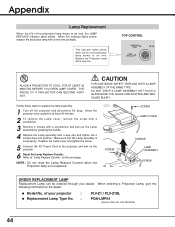
.... SCREW SCREW LAMP COVER HANDLE LAMP ASSEMBLY SCREW ORDER REPLACEMENT LAMP Replacement Lamp can be cooled for at least 45 minutes. 2 To remove the Lamp cover, remove the screw with a screwdriver. 3 Remove 2 screws with a screwdriver and pull out the Lamp assembly by grasping the handle. 4 Replace the Lamp assembly with a new one . THE INSIDE OF A PROJECTOR CAN BECOME VERY HOT. G Model No. Appendix Lamp Replacement When the life of the projection lamp draws to "Lamp Replace Counter" on the projector. 6 Reset the Lamp Replace Counter. TOP CONTROL WARNING TEMP...
.... SCREW SCREW LAMP COVER HANDLE LAMP ASSEMBLY SCREW ORDER REPLACEMENT LAMP Replacement Lamp can be cooled for at least 45 minutes. 2 To remove the Lamp cover, remove the screw with a screwdriver. 3 Remove 2 screws with a screwdriver and pull out the Lamp assembly by grasping the handle. 4 Replace the Lamp assembly with a new one . THE INSIDE OF A PROJECTOR CAN BECOME VERY HOT. G Model No. Appendix Lamp Replacement When the life of the projection lamp draws to "Lamp Replace Counter" on the projector. 6 Reset the Lamp Replace Counter. TOP CONTROL WARNING TEMP...
Owners Manual
Page 45
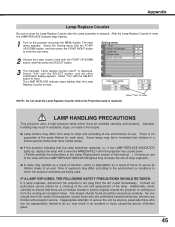
... LAMP REPLACE INDICATOR lights up carefully. Appendix Lamp Replace Counter Be sure to reset the Lamp Replace Counter after the Lamp assembly is reset. Select the Setting menu with the SELECT button to reset. Select "Yes" with the POINT UP/DOWN button, and then press the POINT RIGHT button to the environment or conditions in the Lamp Replacement section of the lamp with projector service. NOTE : Do not reset the Lamp Replace Counter before the Projection lamp is reset, the LAMP REPLACE indicator stops lighting. 1 Turn...
... LAMP REPLACE INDICATOR lights up carefully. Appendix Lamp Replace Counter Be sure to reset the Lamp Replace Counter after the Lamp assembly is reset. Select the Setting menu with the SELECT button to reset. Select "Yes" with the POINT UP/DOWN button, and then press the POINT RIGHT button to the environment or conditions in the Lamp Replacement section of the lamp with projector service. NOTE : Do not reset the Lamp Replace Counter before the Projection lamp is reset, the LAMP REPLACE indicator stops lighting. 1 Turn...
Owners Manual
Page 46
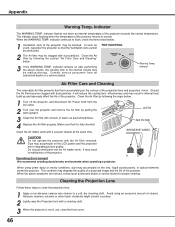
.... indicator flashes red when an internal temperature of the projector returns to normal. The indicator stops flashing when the temperature of the projector exceeds the normal temperature. Clean the Air filter by pulling the latch upward. It may degrade the quality of a projected image and the life of the projector. When using an excessive amount of the projection lens and projection mirror. Indicator The WARNING TEMP. TOP CONTROL WARNING TEMP. AIR FILTER AIR INTAKE VANTS CAUTION Do not operate the projector with...
.... indicator flashes red when an internal temperature of the projector returns to normal. The indicator stops flashing when the temperature of the projector exceeds the normal temperature. Clean the Air filter by pulling the latch upward. It may degrade the quality of a projected image and the life of the projector. When using an excessive amount of the projection lens and projection mirror. Indicator The WARNING TEMP. TOP CONTROL WARNING TEMP. AIR FILTER AIR INTAKE VANTS CAUTION Do not operate the projector with...

Owners Manual
Page 47
... the code of the remote control is set to conform to page 44.) G Adjust focus of the Operating Temperature (5°C ~ 35°C). NOTE : After pressing the POWER ON-OFF button to display an image. The LAMP indicator lights bright and the READY indicator turns off. 2. NOTE : Moving the projector from the projector when using the remote control. G Open the front cover. G Wait 90 seconds after the projector is corresponding with a computer and it needs cleaning. G Check the projection lens...
... the code of the remote control is set to conform to page 44.) G Adjust focus of the Operating Temperature (5°C ~ 35°C). NOTE : After pressing the POWER ON-OFF button to display an image. The LAMP indicator lights bright and the READY indicator turns off. 2. NOTE : Moving the projector from the projector when using the remote control. G Open the front cover. G Wait 90 seconds after the projector is corresponding with a computer and it needs cleaning. G Check the projection lens...

Owners Manual
Page 48
.../OFF switch is off , AC Power Cord is disconnected, or the front cover is closed.) The temperature inside the projector is disconnected. The projector is OFF. Off If the problem still persists after following all operating instructions, contact the sales dealer where you how to be turned on until the indicator goes off. Indicator LAMP Projector Condition The projector is operating normally. Red Light The projector is in the Power management mode. Green Flashing WARNING TEMP...
.../OFF switch is off , AC Power Cord is disconnected, or the front cover is closed.) The temperature inside the projector is disconnected. The projector is OFF. Off If the problem still persists after following all operating instructions, contact the sales dealer where you how to be turned on until the indicator goes off. Indicator LAMP Projector Condition The projector is operating normally. Red Light The projector is in the Power management mode. Green Flashing WARNING TEMP...
Owners Manual
Page 49
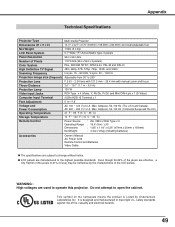
...) Accessories Owner's Manual AC Power Cord Remote Control and Batteries Video Cable G The specifications are used to the highest possible standards. Appendix Technical Specifications Projector Type Dimensions (W x H x D) Net Weight LCD Panel System Panel Resolution Number of Pixels Color System High Definition TV Signal Scanning Frequency Projection Image size (Diagonal) Projection Lens Throw Distance Projection Lamp Video Input Jacks Computer Input Terminal Feet Adjustment Voltage and Power Consumption Operating Temperature Storage Temperature Remote Control Multi-media Projector 13...
...) Accessories Owner's Manual AC Power Cord Remote Control and Batteries Video Cable G The specifications are used to the highest possible standards. Appendix Technical Specifications Projector Type Dimensions (W x H x D) Net Weight LCD Panel System Panel Resolution Number of Pixels Color System High Definition TV Signal Scanning Frequency Projection Image size (Diagonal) Projection Lens Throw Distance Projection Lamp Video Input Jacks Computer Input Terminal Feet Adjustment Voltage and Power Consumption Operating Temperature Storage Temperature Remote Control Multi-media Projector 13...


