Instruction Manual, PLV-80L
Page 2
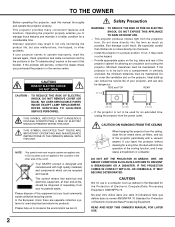
...3.3' (1m) 3.3' (1m) 3.3' (1m) - If you purchased the projector or the service center. DO NOT SET THE PROJECTOR IN GREASY, WET, OR SMOKY CONDITIONS SUCH AS IN A KITCHEN TO PREVENT A BREAKDOWN OR A DISASTER. Your SANYO product is not to be built into a compartment or similarly enclosed, the minimum... the Protection of Electronic Computer/Data Processing Equipment, ANSI/NFPA 75. If not, it in better condition for Protection of your projector, and can also be maintained. Minimum clearances must be dangerous. Ne peut être utilisé dans une salle d'ordinateurs...
...3.3' (1m) 3.3' (1m) 3.3' (1m) - If you purchased the projector or the service center. DO NOT SET THE PROJECTOR IN GREASY, WET, OR SMOKY CONDITIONS SUCH AS IN A KITCHEN TO PREVENT A BREAKDOWN OR A DISASTER. Your SANYO product is not to be built into a compartment or similarly enclosed, the minimum... the Protection of Electronic Computer/Data Processing Equipment, ANSI/NFPA 75. If not, it in better condition for Protection of your projector, and can also be maintained. Minimum clearances must be dangerous. Ne peut être utilisé dans une salle d'ordinateurs...
Instruction Manual, PLV-80L
Page 3
... damage to lightning and power line surges. Read all of power source indicated on an unstable cart, stand, or table. Unplug this projector through cabinet slots as this indicates a need for ventilation, to dangerous voltage or other hazards. For added protection to protect it is ... controls that are required, be sure the service technician has used replacement parts specified by the manufacturer, or sold with care. If the projector has been dropped or the cabinet has been damaged. f. Upon completion of other similar surface. Wanneer deze leeg zijn, moet u ze ...
... damage to lightning and power line surges. Read all of power source indicated on an unstable cart, stand, or table. Unplug this projector through cabinet slots as this indicates a need for ventilation, to dangerous voltage or other hazards. For added protection to protect it is ... controls that are required, be sure the service technician has used replacement parts specified by the manufacturer, or sold with care. If the projector has been dropped or the cabinet has been damaged. f. Upon completion of other similar surface. Wanneer deze leeg zijn, moet u ze ...
Instruction Manual, PLV-80L
Page 4
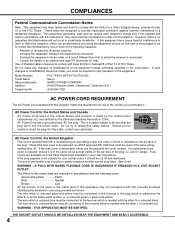
... equipment and receiver. - Model Number Trade Name Responsible party Address Telephone No. : PLV-75/PLV-80/PLV-75L/PLV-80L : Sanyo : SANYO FISHER COMPANY : 21605 Plummer Street, Chatsworth, California 91311 : (818)998-7322 AC POWER CORD REQUIREMENT The AC Power Cord supplied with this projector meets the requirement for the United Kingdom : This cord is already fitted with...
... equipment and receiver. - Model Number Trade Name Responsible party Address Telephone No. : PLV-75/PLV-80/PLV-75L/PLV-80L : Sanyo : SANYO FISHER COMPANY : 21605 Plummer Street, Chatsworth, California 91311 : (818)998-7322 AC POWER CORD REQUIREMENT The AC Power Cord supplied with this projector meets the requirement for the United Kingdom : This cord is already fitted with...

Instruction Manual, PLV-80L
Page 5
...38 FLOW OF ON-SCREEN MENU OPERATION 18 MENU BAR 19 APPENDIX 44 BASIC OPERATION TURNING ON / OFF PROJECTOR TURNING ON THE PROJECTOR TURNING OFF THE PROJECTOR ADJUSTING SCREEN ZOOM ADJUSTMENT FOCUS ADJUSTMENT LENS SHIFT ADJUSTMENT KEYSTONE ADJUSTMENT PICTURE FREEZE FUNCTION NO SHOW FUNCTION SOUND ... LAMP REPLACE COUNTER 47 22 TROUBLESHOOTING 48 22 MENU TREE 50 22 COMPATIBLE COMPUTER SPECIFICATIONS 52 22 22 23 INDICATORS AND PROJECTOR CONDITION TECHNICAL SPECIFICATIONS 53 55 23 PJ LINK NOTICE 56 23 CONFIGURATIONS OF TERMINALS 57 OPTIONAL PARTS 58 LENS REPLACEMENT 58...
...38 FLOW OF ON-SCREEN MENU OPERATION 18 MENU BAR 19 APPENDIX 44 BASIC OPERATION TURNING ON / OFF PROJECTOR TURNING ON THE PROJECTOR TURNING OFF THE PROJECTOR ADJUSTING SCREEN ZOOM ADJUSTMENT FOCUS ADJUSTMENT LENS SHIFT ADJUSTMENT KEYSTONE ADJUSTMENT PICTURE FREEZE FUNCTION NO SHOW FUNCTION SOUND ... LAMP REPLACE COUNTER 47 22 TROUBLESHOOTING 48 22 MENU TREE 50 22 COMPATIBLE COMPUTER SPECIFICATIONS 52 22 22 23 INDICATORS AND PROJECTOR CONDITION TECHNICAL SPECIFICATIONS 53 55 23 PJ LINK NOTICE 56 23 CONFIGURATIONS OF TERMINALS 57 OPTIONAL PARTS 58 LENS REPLACEMENT 58...
Instruction Manual, PLV-80L
Page 6
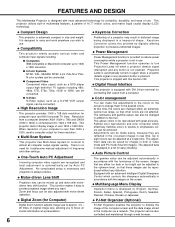
... designed to carry and work anywhere you wish to reduce power consumption while a projector is pressed. This projector cannot display image of 16.77 million colors, and matrix liquid crystal display (LCD) technology. ◆ Compact Design ◆ Keystone Correction This projector is displayed in a list for images in both in size and weight. Positioning...
... designed to carry and work anywhere you wish to reduce power consumption while a projector is pressed. This projector cannot display image of 16.77 million colors, and matrix liquid crystal display (LCD) technology. ◆ Compact Design ◆ Keystone Correction This projector is displayed in a list for images in both in size and weight. Positioning...
Instruction Manual, PLV-80L
Page 7
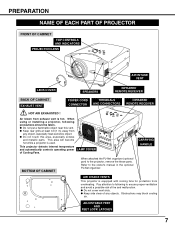
.... ● Keep side clear of Cooling Fans. ADJUSTABLE FEET AND FEET LOCK LATCHES 7 PREPARATION NAME OF EACH PART OF PROJECTOR FRONT OF CABINET TOP CONTROLS AND INDICATORS PROJECTION LENS AIR INTAKE VENT LENS COVER SPEAKERS INFRARED REMOTE RECEIVER BACK OF CABINET EXHAUST ...VENT POWER CORD CONNECTOR TERMINALS AND CONNECTORS INFRARED REMOTE RECEIVER HOT AIR EXHAUSTED ! This projector detects internal temperature and automatically controls operating power of any object, especially heat-sensitive object. ● Do not touch this ...
.... ● Keep side clear of Cooling Fans. ADJUSTABLE FEET AND FEET LOCK LATCHES 7 PREPARATION NAME OF EACH PART OF PROJECTOR FRONT OF CABINET TOP CONTROLS AND INDICATORS PROJECTION LENS AIR INTAKE VENT LENS COVER SPEAKERS INFRARED REMOTE RECEIVER BACK OF CABINET EXHAUST ...VENT POWER CORD CONNECTOR TERMINALS AND CONNECTORS INFRARED REMOTE RECEIVER HOT AIR EXHAUSTED ! This projector detects internal temperature and automatically controls operating power of any object, especially heat-sensitive object. ● Do not touch this ...
Instruction Manual, PLV-80L
Page 8
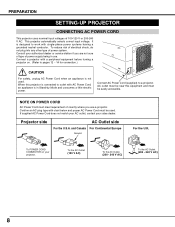
... AC Power Cord (supplied) to work with AC Power Cord, an appliance is designed to a projector. NOTE ON POWER CORD AC Power Cord must be easily accessible. Projector side AC Outlet side For the U.S.A. It is in use a projector. This projector automatically selects correct input voltage. AC outlet must be used . PREPARATION SETTING-UP...
... AC Power Cord (supplied) to work with AC Power Cord, an appliance is designed to a projector. NOTE ON POWER CORD AC Power Cord must be easily accessible. Projector side AC Outlet side For the U.S.A. It is in use a projector. This projector automatically selects correct input voltage. AC outlet must be used . PREPARATION SETTING-UP...
Instruction Manual, PLV-80L
Page 9
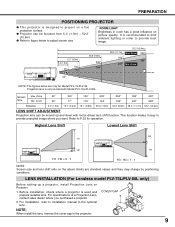
...15.9m) LENS SHIFT ADJUSTMENT Projection lens can be moved up a projector, install Projection Lens on a flat projection surface. ● Projector can be focused from 5.0' (1.5m) ~ 52.2' (15.9m). ● Refer to P 22 for Model PLV-75/PLV-80. Highest Lens Shift Lowest Lens Shift H3 H1 H2 H4 H1 ...154" 52.2'(15.9m) 38.4'(11.7m) Max. ROOM LIGHT Brightness in the projector. 9 LENS INSTALLATION (For Lensless model PLV-75L/PLV-80L only) Before setting up and down with Model PLV-75L/PLV-80L. COVER CAP NOTE; Projection lens is recommended to limit ambient lighting in order to...
...15.9m) LENS SHIFT ADJUSTMENT Projection lens can be moved up a projector, install Projection Lens on a flat projection surface. ● Projector can be focused from 5.0' (1.5m) ~ 52.2' (15.9m). ● Refer to P 22 for Model PLV-75/PLV-80. Highest Lens Shift Lowest Lens Shift H3 H1 H2 H4 H1 ...154" 52.2'(15.9m) 38.4'(11.7m) Max. ROOM LIGHT Brightness in the projector. 9 LENS INSTALLATION (For Lensless model PLV-75L/PLV-80L only) Before setting up and down with Model PLV-75L/PLV-80L. COVER CAP NOTE; Projection lens is recommended to limit ambient lighting in order to...
Instruction Manual, PLV-80L
Page 10
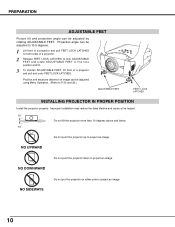
...LOCK LATCHES to lock ADJUSTABLE FEET and rotate ADJUSTABLE FEET to P 22 and 38.) ADJUSTABLE FEET FEET LOCK LATCHES INSTALLING PROJECTOR IN PROPER POSITION Install the projector properly. Projection angle can be adjusted to 10.5 degrees. 1 Lift front of image can be adjusted using Menu ...Operation. (Refer to fine tune position and tilt. 3 To shorten ADJUSTABLE FEET, lift front of a projector and pull and undo FEET LOCK LATCHES. PREPARATION ADJUSTABLE FEET Picture tilt and projection angle can be adjusted by rotating ADJUSTABLE FEET. Improper ...
...LOCK LATCHES to lock ADJUSTABLE FEET and rotate ADJUSTABLE FEET to P 22 and 38.) ADJUSTABLE FEET FEET LOCK LATCHES INSTALLING PROJECTOR IN PROPER POSITION Install the projector properly. Projection angle can be adjusted to 10.5 degrees. 1 Lift front of image can be adjusted using Menu ...Operation. (Refer to fine tune position and tilt. 3 To shorten ADJUSTABLE FEET, lift front of a projector and pull and undo FEET LOCK LATCHES. PREPARATION ADJUSTABLE FEET Picture tilt and projection angle can be adjusted by rotating ADJUSTABLE FEET. Improper ...
Instruction Manual, PLV-80L
Page 11
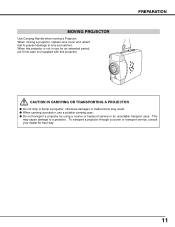
... a courier or transport service in an unsuitable transport case. When moving a Projector. MOVING PROJECTOR Use Carrying Handle when moving a projector, replace lens cover and retract feet to prevent damage to a projector. PREPARATION CAUTION IN CARRYING OR TRANSPORTING A PROJECTOR ● Do not drop or bump a projector, otherwise damages or malfunctions may cause damage to lens and cabinet.
... a courier or transport service in an unsuitable transport case. When moving a Projector. MOVING PROJECTOR Use Carrying Handle when moving a projector, replace lens cover and retract feet to prevent damage to a projector. PREPARATION CAUTION IN CARRYING OR TRANSPORTING A PROJECTOR ● Do not drop or bump a projector, otherwise damages or malfunctions may cause damage to lens and cabinet.
Instruction Manual, PLV-80L
Page 12
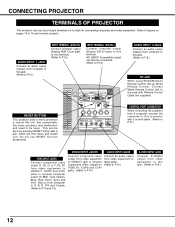
...equipment. HD (HDCP Compatible) signal can be reset. Sync and Vert. This can also be connected. (Refer to P13.) RESET BUTTON This projector uses a micro processor to control this unit, and occasionally, this jack with a pen, which will shut down and restart unit. Do not... use RESET function excessively. CONTROL PORT CONNECTOR When controlling the projector from a computer, connect the computer to this connector with a control cable. (Refer to P13.) 5 BNC INPUT JACKS Connect component video output (Y, ...
...equipment. HD (HDCP Compatible) signal can be reset. Sync and Vert. This can also be connected. (Refer to P13.) RESET BUTTON This projector uses a micro processor to control this unit, and occasionally, this jack with a pen, which will shut down and restart unit. Do not... use RESET function excessively. CONTROL PORT CONNECTOR When controlling the projector from a computer, connect the computer to this connector with a control cable. (Refer to P13.) 5 BNC INPUT JACKS Connect component video output (Y, ...
Instruction Manual, PLV-80L
Page 13
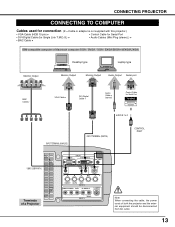
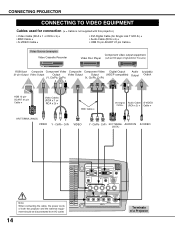
...stereo) ) ✽ • BNC Cable ✽ IBM-compatible computer or Macintosh computer (VGA / SVGA / XGA / SXGA/SXGA+/WXGA/UXGA) Desktop type Laptop type Monitor Output Monitor Output Monitor Output Audio Output Serial port BNC Cable ✽ VGA Cable ✽ DVI-...stereo) Control Cable for Serial Port Terminal AUDIO IN 1 or 2 INPUT TERMINAL (ANALOG) INPUT TERMINAL (DIGITAL) CONTROL PORT 5 BNC (G/B/R/HV/V) Terminals of a Projector ANALOG INPUT 1 DIGITAL(DVI-D) R/C JACK AUDIO 1 RESET CONTROL PORT AUDIO 2 G B R H/V V VIDEO/Y Cb/Pb Cr/Pr INPUT 2 VIDEO/Y Cb...
...stereo) ) ✽ • BNC Cable ✽ IBM-compatible computer or Macintosh computer (VGA / SVGA / XGA / SXGA/SXGA+/WXGA/UXGA) Desktop type Laptop type Monitor Output Monitor Output Monitor Output Audio Output Serial port BNC Cable ✽ VGA Cable ✽ DVI-...stereo) Control Cable for Serial Port Terminal AUDIO IN 1 or 2 INPUT TERMINAL (ANALOG) INPUT TERMINAL (DIGITAL) CONTROL PORT 5 BNC (G/B/R/HV/V) Terminals of a Projector ANALOG INPUT 1 DIGITAL(DVI-D) R/C JACK AUDIO 1 RESET CONTROL PORT AUDIO 2 G B R H/V V VIDEO/Y Cb/Pb Cr/Pr INPUT 2 VIDEO/Y Cb...
Instruction Manual, PLV-80L
Page 14
...Cr/Pr VIDEO Y - Cr/Pr INPUT TERMINAL AUDIO IN S-VIDEO (DIGITAL) Note: When connecting the cable, the power cords of both the projector and the external equipment should be disconnected from AC outlet. 14 ANALOG INPUT 1 DIGITAL(DVI-D) R/C JACK AUDIO 1 RESET CONTROL PORT AUDIO 2 G... B R H/V V VIDEO/Y Cb/Pb Cr/Pr INPUT 2 VIDEO/Y Cb/Pb Cr/Pr R-AUDIO-L S-VIDEO (MONO) INPUT 3 Terminals of a Projector Cb/Pb - Video Disc Player (such as DVD player or high-definition TV source.) RGB Scart Composite Component Video Composite Component Video Digital Output Audio...
...Cr/Pr VIDEO Y - Cr/Pr INPUT TERMINAL AUDIO IN S-VIDEO (DIGITAL) Note: When connecting the cable, the power cords of both the projector and the external equipment should be disconnected from AC outlet. 14 ANALOG INPUT 1 DIGITAL(DVI-D) R/C JACK AUDIO 1 RESET CONTROL PORT AUDIO 2 G... B R H/V V VIDEO/Y Cb/Pb Cr/Pr INPUT 2 VIDEO/Y Cb/Pb Cr/Pr R-AUDIO-L S-VIDEO (MONO) INPUT 3 Terminals of a Projector Cb/Pb - Video Disc Player (such as DVD player or high-definition TV source.) RGB Scart Composite Component Video Composite Component Video Digital Output Audio...
Instruction Manual, PLV-80L
Page 15
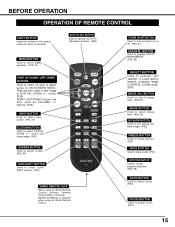
... AUTO PC - BUTTON Used to adjust image level. (P35-37) IMAGE BUTTON Used to select image level. (P29, 33) NO SHOW BUTTON Used to turn projector on the remote control for about 10 seconds. SELECT INPUT INPUT IMAGE 1 I SELECTION 2 D.ZOOM I AUTO MENU COLOR M. MUTE L F Z LENS FOCUS ZOOM L F Z CXTW WIRED REMOTE JACK...
... AUTO PC - BUTTON Used to adjust image level. (P35-37) IMAGE BUTTON Used to select image level. (P29, 33) NO SHOW BUTTON Used to turn projector on the remote control for about 10 seconds. SELECT INPUT INPUT IMAGE 1 I SELECTION 2 D.ZOOM I AUTO MENU COLOR M. MUTE L F Z LENS FOCUS ZOOM L F Z CXTW WIRED REMOTE JACK...
Instruction Manual, PLV-80L
Page 16
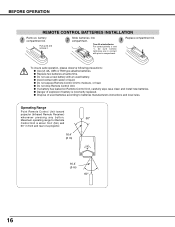
... Remote Receiver) whenever pressing any button. 60° Maximum operating range for Remote Control Unit is incorrectly replaced. ● Dispose of a projector. 16.4' (5 m) 16.4' (5 m) 60° 16 To insure safe operation, please observe following precautions : ● Use (2) AA, UM3 or R06 type alkaline batteries. ● Replace two ...
... Remote Receiver) whenever pressing any button. 60° Maximum operating range for Remote Control Unit is incorrectly replaced. ● Dispose of a projector. 16.4' (5 m) 16.4' (5 m) 60° 16 To insure safe operation, please observe following precautions : ● Use (2) AA, UM3 or R06 type alkaline batteries. ● Replace two ...
Instruction Manual, PLV-80L
Page 17
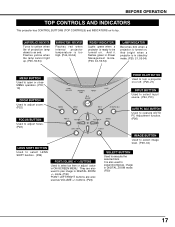
... CONTROL BUTTONS (TOP CONTROLS) and INDICATORS on . mode. (P30) POINT LEFT/RIGHT buttons are also used to execute the selected item. And bright when a projector is ready to select an item or adjust value in stand-by mode. (P20, 21, 53-54) MENU BUTTON Used to open or close MENU ... select image level. (P29, 33) SELECT BUTTON Used to expand/compress image in Power Management mode. (P40, 44, 53-54) LAMP INDICATOR Becomes dim when a projector is also used to select input source. (P24, P31) AUTO PC ADJ. LAMP REPLACE INDICATOR Turns to yellow when life of projection lamp draws to...
... CONTROL BUTTONS (TOP CONTROLS) and INDICATORS on . mode. (P30) POINT LEFT/RIGHT buttons are also used to execute the selected item. And bright when a projector is ready to select an item or adjust value in stand-by mode. (P20, 21, 53-54) MENU BUTTON Used to open or close MENU ... select image level. (P29, 33) SELECT BUTTON Used to expand/compress image in Power Management mode. (P40, 44, 53-54) LAMP INDICATOR Becomes dim when a projector is also used to select input source. (P24, P31) AUTO PC ADJ. LAMP REPLACE INDICATOR Turns to yellow when life of projection lamp draws to...
Instruction Manual, PLV-80L
Page 18
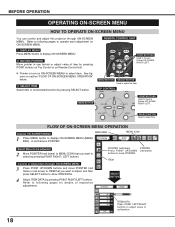
... to move a Pointer UP/ DOWN/ RIGHT/ LEFT. BEFORE OPERATION OPERATING ON-SCREEN MENU HOW TO OPERATE ON-SCREEN MENU You can control and adjust this projector through ON-SCREEN MENU 3 Press POINT UP/DOWN buttons and move POINTER. VOLUME+ ✽ Pointer is POINTER. SELECTION TOP CONTRO2 L D.ZOOM I AUTO MENU COLOR M. Control...
... to move a Pointer UP/ DOWN/ RIGHT/ LEFT. BEFORE OPERATION OPERATING ON-SCREEN MENU HOW TO OPERATE ON-SCREEN MENU You can control and adjust this projector through ON-SCREEN MENU 3 Press POINT UP/DOWN buttons and move POINTER. VOLUME+ ✽ Pointer is POINTER. SELECTION TOP CONTRO2 L D.ZOOM I AUTO MENU COLOR M. Control...
Instruction Manual, PLV-80L
Page 19
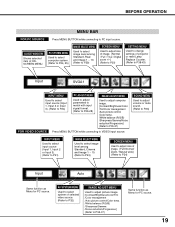
..., 25) IMAGE SELECT MENU Used to select image level among Standard, Cinema and Image 1 ~ 10. (Refer to P33) SCREEN MENU Used to adjust size of projector or reset Lamp Replace Counter. (Refer to P38-43) Input SVGA1 INPUT MENU Used to select input source (Input 1, Input 2 or Input 3). (Refer to P24...
..., 25) IMAGE SELECT MENU Used to select image level among Standard, Cinema and Image 1 ~ 10. (Refer to P33) SCREEN MENU Used to adjust size of projector or reset Lamp Replace Counter. (Refer to P38-43) Input SVGA1 INPUT MENU Used to select input source (Input 1, Input 2 or Input 3). (Refer to P24...

Instruction Manual, PLV-80L
Page 20
... the count-down, the input source that you can start to ON. Enter the PIN code as instructed below. Lamp control status For model PLV-80/PLV-80L only. (See page 40 for locking operation of a four-digit number. The number will turn red and disappear. What is fixed, the ...pointer will automatically move the pointer to "✳". PIN code Input Dialog Box Pointer After the OK icon disappears, you can operate the projector. Should the...
... the count-down, the input source that you can start to ON. Enter the PIN code as instructed below. Lamp control status For model PLV-80/PLV-80L only. (See page 40 for locking operation of a four-digit number. The number will turn red and disappear. What is fixed, the ...pointer will automatically move the pointer to "✳". PIN code Input Dialog Box Pointer After the OK icon disappears, you can operate the projector. Should the...
Instruction Manual, PLV-80L
Page 21
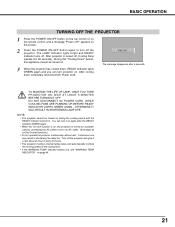
... 40 for 90 seconds). After cooling down , READY Indicator lights GREEN again and you can turn off the projector. Continuous use may result in every 24 hours. • This projector monitors internal temperature and automatically controls the running speed of the cooling fans. • If the WARNING TEMP .... DO NOT DISCONNECT AC POWER CORD WHILE COOLING FANS ARE RUNNING OR BEFORE READY INDICATOR LIGHTS GREEN AGAIN. BASIC OPERATION TURNING OFF THE PROJECTOR 1 Press the POWER ON-OFF button on the top control or on during the cooling period with the READY indicator turned off. The...
... 40 for 90 seconds). After cooling down , READY Indicator lights GREEN again and you can turn off the projector. Continuous use may result in every 24 hours. • This projector monitors internal temperature and automatically controls the running speed of the cooling fans. • If the WARNING TEMP .... DO NOT DISCONNECT AC POWER CORD WHILE COOLING FANS ARE RUNNING OR BEFORE READY INDICATOR LIGHTS GREEN AGAIN. BASIC OPERATION TURNING OFF THE PROJECTOR 1 Press the POWER ON-OFF button on the top control or on during the cooling period with the READY indicator turned off. The...


