Owners Manual
Page 2
Your SANYO product is designed and manufactured with a vacuum cleaner. This projector produces intense light from the power outlet. Eye damage could result. Heat build-up can reduce the service life of the world. This ... as much as defined in a proper position. TO THE OWNER Before operating this projector, read this manual thoroughly and operate the projector properly. Install the projector in the Standard for allowing air circulation and cooling the projector. DO NOT SET THE PROJECTOR IN GREASY, WET, OR SMOKY CONDITIONS SUCH AS IN A KITCHEN TO PREVENT A...
Your SANYO product is designed and manufactured with a vacuum cleaner. This projector produces intense light from the power outlet. Eye damage could result. Heat build-up can reduce the service life of the world. This ... as much as defined in a proper position. TO THE OWNER Before operating this projector, read this manual thoroughly and operate the projector properly. Install the projector in the Standard for allowing air circulation and cooling the projector. DO NOT SET THE PROJECTOR IN GREASY, WET, OR SMOKY CONDITIONS SUCH AS IN A KITCHEN TO PREVENT A...
Owners Manual
Page 5
...7 SELECTING COMPUTER SYSTEM PC ADJUSTMENT 24 26 AUTO PC ADJUSTMENT 26 NAME OF EACH PART OF PROJECTOR 7 MANUAL PC ADJUSTMENT 27 SETTING-UP PROJECTOR CONNECTING AC POWER CORD POSITIONING PROJECTOR LENS INSTALLATION ADJUSTABLE FEET 8 PICTURE IMAGE SELECT 29 8 IMAGE LEVEL SELECT 29 9 PICTURE SCREEN...OF ON-SCREEN MENU OPERATION 18 MENU BAR 19 APPENDIX 44 BASIC OPERATION TURNING ON / OFF PROJECTOR TURNING ON THE PROJECTOR TURNING OFF THE PROJECTOR ADJUSTING SCREEN ZOOM ADJUSTMENT FOCUS ADJUSTMENT LENS SHIFT ADJUSTMENT KEYSTONE ADJUSTMENT PICTURE FREEZE FUNCTION NO SHOW FUNCTION...
...7 SELECTING COMPUTER SYSTEM PC ADJUSTMENT 24 26 AUTO PC ADJUSTMENT 26 NAME OF EACH PART OF PROJECTOR 7 MANUAL PC ADJUSTMENT 27 SETTING-UP PROJECTOR CONNECTING AC POWER CORD POSITIONING PROJECTOR LENS INSTALLATION ADJUSTABLE FEET 8 PICTURE IMAGE SELECT 29 8 IMAGE LEVEL SELECT 29 9 PICTURE SCREEN...OF ON-SCREEN MENU OPERATION 18 MENU BAR 19 APPENDIX 44 BASIC OPERATION TURNING ON / OFF PROJECTOR TURNING ON THE PROJECTOR TURNING OFF THE PROJECTOR ADJUSTING SCREEN ZOOM ADJUSTMENT FOCUS ADJUSTMENT LENS SHIFT ADJUSTMENT KEYSTONE ADJUSTMENT PICTURE FREEZE FUNCTION NO SHOW FUNCTION...
Owners Manual
Page 6
... of the screen. When resolution of frequency and other colors are reflected in real time. There is no need for troublesome manual adjustment of your computer is not pressed. This function makes it easy to almost all computer output signals quickly. Zoom and ... can be adjusted automatically in multimedia features, a palette of 16.77 million colors, and matrix liquid crystal display (LCD) technology. ◆ Compact Design ◆ Keystone Correction This projector is compressed into 1024 x 768 dots. This Power Management function operates to reduce power consumption while...
... of the screen. When resolution of frequency and other colors are reflected in real time. There is no need for troublesome manual adjustment of your computer is not pressed. This function makes it easy to almost all computer output signals quickly. Zoom and ... can be adjusted automatically in multimedia features, a palette of 16.77 million colors, and matrix liquid crystal display (LCD) technology. ◆ Compact Design ◆ Keystone Correction This projector is compressed into 1024 x 768 dots. This Power Management function operates to reduce power consumption while...
Owners Manual
Page 7
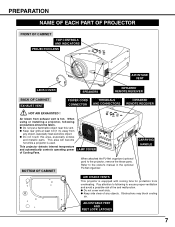
.... ● Do not cover vent slots. ● Keep side clear of Cooling Fans. ADJUSTABLE FEET AND FEET LOCK LATCHES 7 When using or installing a projector, following to the owner's manual in the optional PJ-Net organizer. Pay attention to following precautions should be taken. ● Do not put a flammable object near this area...
.... ● Do not cover vent slots. ● Keep side clear of Cooling Fans. ADJUSTABLE FEET AND FEET LOCK LATCHES 7 When using or installing a projector, following to the owner's manual in the optional PJ-Net organizer. Pay attention to following precautions should be taken. ● Do not put a flammable object near this area...

Owners Manual
Page 9
... to provide projected image where you purchased a projector. 2. For specifications of a Projection Lens, contact sales dealer where you want. For installation, refer to installation manual in room has a great influence on picture quality. Screen Max. This function makes it easy to P 22 for Model PLV-75/PLV-80. When install the lens, remove the cover...
... to provide projected image where you purchased a projector. 2. For specifications of a Projection Lens, contact sales dealer where you want. For installation, refer to installation manual in room has a great influence on picture quality. Screen Max. This function makes it easy to P 22 for Model PLV-75/PLV-80. When install the lens, remove the cover...
Owners Manual
Page 20
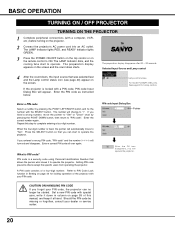
... is PIN code? The preparation display disappears after 20 ~ 30 seconds. Repeat this manual, and keep it at hand. Setting PIN code prevents others except the specific users from operating the projector. The LAMP Indicator lights RED, and READY Indicator lights GREEN. 3 Press the POWER... etc.) before turning on the screen. If you fixed a wrong number, move to operate the projector. Lamp control status For model PLV-80/PLV-80L only. (See page 40 for locking operation of the projector with a PIN code, PIN code Input Dialog Box will automatically move the pointer to "Set" ...
... is PIN code? The preparation display disappears after 20 ~ 30 seconds. Repeat this manual, and keep it at hand. Setting PIN code prevents others except the specific users from operating the projector. The LAMP Indicator lights RED, and READY Indicator lights GREEN. 3 Press the POWER... etc.) before turning on the screen. If you fixed a wrong number, move to operate the projector. Lamp control status For model PLV-80/PLV-80L only. (See page 40 for locking operation of the projector with a PIN code, PIN code Input Dialog Box will automatically move the pointer to "Set" ...
Owners Manual
Page 25
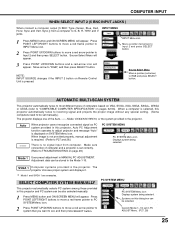
... changes if the INPUT 2 button on pages 52-53). AUTOMATIC MULTI-SCAN SYSTEM This projector automatically tunes to most different types of computers based on VGA, SVGA, XGA, SXGA, SXGA+, WXGA or UXGA (refer to Input 2 and press SELECT button. 3 Press POINT UP/DOWN... and press SELECT button. Source Select Menu Move a pointer (red arrow) to INPUT Menu icon. Custom Mode (1~10) set manually.) The projector displays one of computer and a projector is required. (Refer to "RGB", and then press SELECT button. Sync.)] from computer. NOTE; PC SYSTEM MENU System Mode...
... changes if the INPUT 2 button on pages 52-53). AUTOMATIC MULTI-SCAN SYSTEM This projector automatically tunes to most different types of computers based on VGA, SVGA, XGA, SXGA, SXGA+, WXGA or UXGA (refer to Input 2 and press SELECT button. 3 Press POINT UP/DOWN... and press SELECT button. Source Select Menu Move a pointer (red arrow) to INPUT Menu icon. Custom Mode (1~10) set manually.) The projector displays one of computer and a projector is required. (Refer to "RGB", and then press SELECT button. Sync.)] from computer. NOTE; PC SYSTEM MENU System Mode...

Owners Manual
Page 26
... to move a red frame pointer to your computer. PC ADJUST MENU Auto PC adj. PC ADJUST Menu icon Move a red frame pointer to MANUAL PC ADJUSTMENT section (P27-28). Adjustment parameters from Auto PC Adjustment can be operated in Digital Signal input on DVI terminal and "480p", "575p...in this Auto PC Adjustment function. NOTE ● Fine sync, Total dots and Picture Position of some computers can be fully adjusted with this projector. Auto PC Adjustment function can not be operated as follows. Auto PC Adj. 1 Press MENU button and ON-SCREEN MENU will appear. icon...
... to move a red frame pointer to your computer. PC ADJUST MENU Auto PC adj. PC ADJUST Menu icon Move a red frame pointer to MANUAL PC ADJUSTMENT section (P27-28). Adjustment parameters from Auto PC Adjustment can be operated in Digital Signal input on DVI terminal and "480p", "575p...in this Auto PC Adjustment function. NOTE ● Fine sync, Total dots and Picture Position of some computers can be fully adjusted with this projector. Auto PC Adjustment function can not be operated as follows. Auto PC Adj. 1 Press MENU button and ON-SCREEN MENU will appear. icon...

Owners Manual
Page 27
This projector has a Manual PC Adjustment to enable you use it. ...vertical area displayed with this projector. PC ADJUST MENU Auto PC adj. Position V Adjusts vertical picture position. COMPUTER INPUT MANUAL PC ADJUSTMENT This projector can automatically tune to display signals from display. This projector has 10 independent memory areas...Mode. Press POINT LEFT/RIGHT buttons to adjust position. Adjustment dialog box will appear. If this happens, projector cannot reproduce a proper image and image may not be operated when in one horizontal period. Clamp Adjusts...
This projector has a Manual PC Adjustment to enable you use it. ...vertical area displayed with this projector. PC ADJUST MENU Auto PC adj. Position V Adjusts vertical picture position. COMPUTER INPUT MANUAL PC ADJUSTMENT This projector can automatically tune to display signals from display. This projector has 10 independent memory areas...Mode. Press POINT LEFT/RIGHT buttons to adjust position. Adjustment dialog box will appear. If this happens, projector cannot reproduce a proper image and image may not be operated when in one horizontal period. Clamp Adjusts...

Owners Manual
Page 32
...PAL-N. Move a pointer (red arrow) to select and then press SELECT button. PAL / SECAM / NTSC / NTSC4.43 / PAL-M / PAL-N If projector cannot reproduce proper video image, it is necessary to select a specific broadcast signal format among 480i, 575i, 480p, 575p, 720p, 1035i and 1080i. VIDEO... button. Move a pointer (red arrow) to optimize its performance. COMPONENT VIDEO SIGNAL FORMAT If projector cannot reproduce proper video image, it is 1035i or 1080i, select system manually first. AV SYSTEM MENU (COMPONENT VIDEO) System Auto AV SYSTEM Menu icon This box indicates system...
...PAL-N. Move a pointer (red arrow) to select and then press SELECT button. PAL / SECAM / NTSC / NTSC4.43 / PAL-M / PAL-N If projector cannot reproduce proper video image, it is necessary to select a specific broadcast signal format among 480i, 575i, 480p, 575p, 720p, 1035i and 1080i. VIDEO... button. Move a pointer (red arrow) to optimize its performance. COMPONENT VIDEO SIGNAL FORMAT If projector cannot reproduce proper video image, it is 1035i or 1080i, select system manually first. AV SYSTEM MENU (COMPONENT VIDEO) System Auto AV SYSTEM Menu icon This box indicates system...

Owners Manual
Page 37
... button. L2 ···· Noise reduction mode to previous figure. Film ···· Effective on 3:2 pulldown video sources. Store To store manually preset image, move a red frame pointer to OFF. Move a red frame pointer to Image 1 to 10 where you want to store the adjustment. 37 Off...
... button. L2 ···· Noise reduction mode to previous figure. Film ···· Effective on 3:2 pulldown video sources. Store To store manually preset image, move a red frame pointer to OFF. Move a red frame pointer to Image 1 to 10 where you want to store the adjustment. 37 Off...
Owners Manual
Page 47
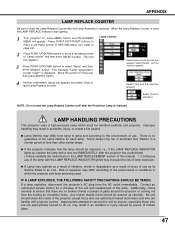
...counter reset?" Select Lamp counter and this manual. ) Continuous use of glass around the projector or coming out from the cooling air circulation holes. IF A LAMP EXPLODES, THE FOLLOWING SAFETY PRECAUTIONS SHOULD BE TAKEN. If a lamp explodes, disconnect the projector's AC plug from lamp to lamp and ...button. Some lamps may fail or terminate their lifetime in a shorter period of time than other similar lamps. ● If the projector indicates that there are being used. Inappropriate attempts to service the unit by pieces of explosion may differ from the AC outlet immediately...
...counter reset?" Select Lamp counter and this manual. ) Continuous use of glass around the projector or coming out from the cooling air circulation holes. IF A LAMP EXPLODES, THE FOLLOWING SAFETY PRECAUTIONS SHOULD BE TAKEN. If a lamp explodes, disconnect the projector's AC plug from lamp to lamp and ...button. Some lamps may fail or terminate their lifetime in a shorter period of time than other similar lamps. ● If the projector indicates that there are being used. Inappropriate attempts to service the unit by pieces of explosion may differ from the AC outlet immediately...
Owners Manual
Page 55
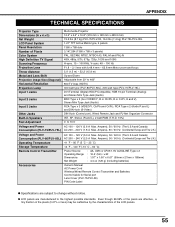
... (including batteries) Accessories Owner's Manual AC Power Cord Wireless/Wired Remote Control Transmitter and Batteries Control Cable for Serial port Lens Cover (PLV-75/PLV-80) PIN Code Label ● Specifications are subject to change without notice. ● LCD panels are effective, a tiny ...; Voltage and Power AC 100 ~ 120 V (3.6 A Max. APPENDIX TECHNICAL SPECIFICATIONS Projector Type Dimensions (W x H x D) Net Weight LCD Panel System Panel Resolution Number of the LCD panels. 55 Ampere), 50 / 60 Hz (The U.S.A and Canada) Consumption (PLV-80/PLV-80L) AC 200 ~ 240 V (2.5 A Max.
... (including batteries) Accessories Owner's Manual AC Power Cord Wireless/Wired Remote Control Transmitter and Batteries Control Cable for Serial port Lens Cover (PLV-75/PLV-80) PIN Code Label ● Specifications are subject to change without notice. ● LCD panels are effective, a tiny ...; Voltage and Power AC 100 ~ 120 V (3.6 A Max. APPENDIX TECHNICAL SPECIFICATIONS Projector Type Dimensions (W x H x D) Net Weight LCD Panel System Panel Resolution Number of the LCD panels. 55 Ampere), 50 / 60 Hz (The U.S.A and Canada) Consumption (PLV-80/PLV-80L) AC 200 ~ 240 V (2.5 A Max.

Owners Manual
Page 59
... number be changed, the factory set No: 1 2 3 4* Logo PIN Code Lock No. If you forgot or lost the number and unable to operate the projector, contact the service station. PIN Code Lock No. APPENDIX PIN CODE NUMBER MEMO Write down the PIN code number in the column below (supplied) on... in a prominent place of the projector's body while it with this manual securely. Put the label below and keep it is locked with a PIN code. 59 Factory default set number will be invalid. While...
... number be changed, the factory set No: 1 2 3 4* Logo PIN Code Lock No. If you forgot or lost the number and unable to operate the projector, contact the service station. PIN Code Lock No. APPENDIX PIN CODE NUMBER MEMO Write down the PIN code number in the column below (supplied) on... in a prominent place of the projector's body while it with this manual securely. Put the label below and keep it is locked with a PIN code. 59 Factory default set number will be invalid. While...


