Owners Manual
Page 5
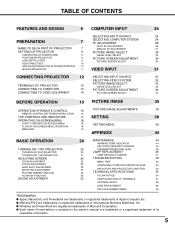
... PICTURE IMAGE SELECT 33 TERMINALS OF PROJECTOR 12 IMAGE LEVEL SELECT 33 CONNECTING TO COMPUTER 13 PICTURE SCREEN ADJUSTMENT 34 CONNECTING TO VIDEO EQUIPMENT 14 PICTURE SCREEN SELECT 34 BEFORE OPERATION 15 PICTURE IMAGE 35 OPERATION OF REMOTE CONTROL 15 PICTURE IMAGE ADJUSTMENTS 35 REMOTE CONTROL BATTERIES INSTALLATION 16 TOP CONTROLS AND INDICATORS 17 SETTING 38...
... PICTURE IMAGE SELECT 33 TERMINALS OF PROJECTOR 12 IMAGE LEVEL SELECT 33 CONNECTING TO COMPUTER 13 PICTURE SCREEN ADJUSTMENT 34 CONNECTING TO VIDEO EQUIPMENT 14 PICTURE SCREEN SELECT 34 BEFORE OPERATION 15 PICTURE IMAGE 35 OPERATION OF REMOTE CONTROL 15 PICTURE IMAGE ADJUSTMENTS 35 REMOTE CONTROL BATTERIES INSTALLATION 16 TOP CONTROLS AND INDICATORS 17 SETTING 38...
Owners Manual
Page 12
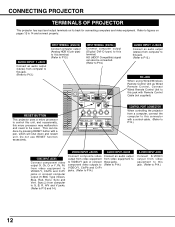
... component video output (Y, Cb, Cr or Y, Pb, Pr) from video equipment to be done by pressing RESET button with Remote Control Cable (not supplied). CONTROL PORT CONNECTOR When controlling the projector from a computer, connect the computer to this micro processor may malfunction and need to this jack with a pen, which will.... AUDIO INPUT 1 JACK Connect an audio output (stereo) from computer to this jack. (Refer to P13.) R/C JACK When using Wired/Wireless Remote Control Unit as Wired Remote Control, Connect Wired Remote Control Unit to this jack. (Refer to 14 and connect properly.
... component video output (Y, Cb, Cr or Y, Pb, Pr) from video equipment to be done by pressing RESET button with Remote Control Cable (not supplied). CONTROL PORT CONNECTOR When controlling the projector from a computer, connect the computer to this micro processor may malfunction and need to this jack with a pen, which will.... AUDIO INPUT 1 JACK Connect an audio output (stereo) from computer to this jack. (Refer to P13.) R/C JACK When using Wired/Wireless Remote Control Unit as Wired Remote Control, Connect Wired Remote Control Unit to this jack. (Refer to 14 and connect properly.
Owners Manual
Page 15
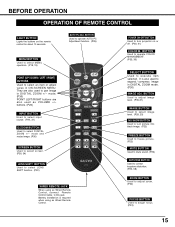
...COLOR M. It is required when using as VOLUME +/- They are also used to this jack. Battery installation is also used as Wired Remote Control, connect Remote Control Cable to expand / compress image in ON-SCREEN MENU. AUTO PC ADJ. BUTTON Used to operate COLOR MANAGEMENT. (P35, 36) ... keystone distortion. (P22, 38) ZOOM BUTTON Used to adjust zoom. (P22) FOCUS BUTTON Used to turn projector on the remote control for about 10 seconds. BEFORE OPERATION OPERATION OF REMOTE CONTROL LIGHT BUTTON Lights the buttons on or off. (P20, 21) COLOR M. BUTTON Used to operate AUTO PC...
...COLOR M. It is required when using as VOLUME +/- They are also used to this jack. Battery installation is also used as Wired Remote Control, connect Remote Control Cable to expand / compress image in ON-SCREEN MENU. AUTO PC ADJ. BUTTON Used to operate COLOR MANAGEMENT. (P35, 36) ... keystone distortion. (P22, 38) ZOOM BUTTON Used to adjust zoom. (P22) FOCUS BUTTON Used to turn projector on the remote control for about 10 seconds. BEFORE OPERATION OPERATION OF REMOTE CONTROL LIGHT BUTTON Lights the buttons on or off. (P20, 21) COLOR M. BUTTON Used to operate AUTO PC...
Owners Manual
Page 16
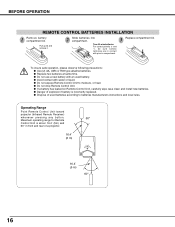
... up lid and remove it. 2 Slide batteries into compartment. 3 Replace compartment lid. Operating Range Point Remote Control Unit toward projector (Infrared Remote Receiver) whenever pressing any button. 60° Maximum operating range for Remote Control Unit is incorrectly replaced. ● Dispose of a projector. 16.4' (5 m) 16.4' (5 m) 60° 16 Two AA size batteries For correct polarity (+ and -), be...
... up lid and remove it. 2 Slide batteries into compartment. 3 Replace compartment lid. Operating Range Point Remote Control Unit toward projector (Infrared Remote Receiver) whenever pressing any button. 60° Maximum operating range for Remote Control Unit is incorrectly replaced. ● Dispose of a projector. 16.4' (5 m) 16.4' (5 m) 60° 16 Two AA size batteries For correct polarity (+ and -), be...

Owners Manual
Page 18
... UP/ DOWN/ RIGHT/ LEFT. SELECT POINT BUTTONS Used to adjust value or set selected function by pressing POINT buttons on Top Control or on Remote Control Unit. VOLUME+ ✽ Pointer is POINTER. MENU BUTTON INPUT MENU BUTTIONNPUT SELECIMTABGUETTON 1 Used to select item. FLOW OF ON... to move a Pointer UP/ DOWN/ RIGHT/ LEFT. BEFORE OPERATION OPERATING ON-SCREEN MENU HOW TO OPERATE ON-SCREEN MENU You can control and adjust this projector through ON-SCREEN MENU 3 Press POINT UP/DOWN buttons and move POINTER. SELECTION TOP CONTRO2 L D.ZOOM I AUTO MENU COLOR M. ...
... UP/ DOWN/ RIGHT/ LEFT. SELECT POINT BUTTONS Used to adjust value or set selected function by pressing POINT buttons on Top Control or on Remote Control Unit. VOLUME+ ✽ Pointer is POINTER. MENU BUTTON INPUT MENU BUTTIONNPUT SELECIMTABGUETTON 1 Used to select item. FLOW OF ON... to move a Pointer UP/ DOWN/ RIGHT/ LEFT. BEFORE OPERATION OPERATING ON-SCREEN MENU HOW TO OPERATE ON-SCREEN MENU You can control and adjust this projector through ON-SCREEN MENU 3 Press POINT UP/DOWN buttons and move POINTER. SELECTION TOP CONTRO2 L D.ZOOM I AUTO MENU COLOR M. ...
Owners Manual
Page 20
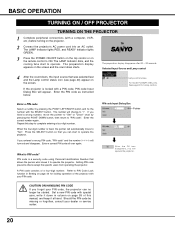
...code be started. Selected Input Source and Lamp control 4 After the count-down, the input source that was selected last and the Lamp control status icon (see page 40) appear on the remote control to "PIN code". If the projector is PIN code? If you forget your ...dealer or service center. 20 The LAMP Indicator dims, and the cooling fans start to complete entering a four-digit number. Enter the correct number again. Repeat this manual, and keep it at hand. Lamp control status For model PLV-80/PLV...
...code be started. Selected Input Source and Lamp control 4 After the count-down, the input source that was selected last and the Lamp control status icon (see page 40) appear on the remote control to "PIN code". If the projector is PIN code? If you forget your ...dealer or service center. 20 The LAMP Indicator dims, and the cooling fans start to complete entering a four-digit number. Enter the correct number again. Repeat this manual, and keep it at hand. Lamp control status For model PLV-80/PLV...
Owners Manual
Page 21
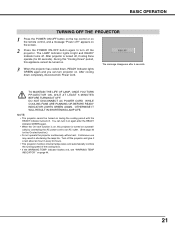
... the POWER ON-OFF button on the top control or on the remote control, and a message "Power off , Cooling Fans operate (for the On start function is on, this appliance cannot be turned on during the cooling period with the READY indicator turned off the projector and give it on page 44. 21 After...
... the POWER ON-OFF button on the top control or on the remote control, and a message "Power off , Cooling Fans operate (for the On start function is on, this appliance cannot be turned on during the cooling period with the READY indicator turned off the projector and give it on page 44. 21 After...

Owners Manual
Page 22
...direction being corrected turn(s) red. • Arrow(s) disappear(s) at the maximum correction. • If you press the KEYSTONE button on Remote Control Unit once more while the keystone dialog box is displayed. 2 Adjust focus of the image, and press POINT DOWN button to page 38... OPERATION ADJUSTING SCREEN ZOOM ADJUSTMENT 1 Press ZOOM button on Top Control or ZOOM ▲/▼ button on Remote Control Unit. FOCUS ADJUSTMENT 1 Press FOCUS button on Top Control or FOCUS ▲/▼ button on Remote Control Unit. Message disappears after 4 seconds. Press POINT UP button to...
...direction being corrected turn(s) red. • Arrow(s) disappear(s) at the maximum correction. • If you press the KEYSTONE button on Remote Control Unit once more while the keystone dialog box is displayed. 2 Adjust focus of the image, and press POINT DOWN button to page 38... OPERATION ADJUSTING SCREEN ZOOM ADJUSTMENT 1 Press ZOOM button on Top Control or ZOOM ▲/▼ button on Remote Control Unit. FOCUS ADJUSTMENT 1 Press FOCUS button on Top Control or FOCUS ▲/▼ button on Remote Control Unit. Message disappears after 4 seconds. Press POINT UP button to...

Owners Manual
Page 23
... button again or press any other button. Dialog box display is cut off. BASIC OPERATION PICTURE FREEZE FUNCTION Press FREEZE button on Remote Control Unit to "On" and sound is changed to freeze picture on-screen. SOUND ADJUSTMENT DIRECT OPERATION Indicates roughly level of volume. Volume... Press VOLUME (+/-) buttons on Top Control or on Remote Control Unit to set Mute function On or Off. Press MUTE button to adjust volume. MENU OPERATION 1 Press MENU button and ON...
... button again or press any other button. Dialog box display is cut off. BASIC OPERATION PICTURE FREEZE FUNCTION Press FREEZE button on Remote Control Unit to "On" and sound is changed to freeze picture on-screen. SOUND ADJUSTMENT DIRECT OPERATION Indicates roughly level of volume. Volume... Press VOLUME (+/-) buttons on Top Control or on Remote Control Unit to set Mute function On or Off. Press MUTE button to adjust volume. MENU OPERATION 1 Press MENU button and ON...

Owners Manual
Page 24
... When your computer is connected to INPUT 1 (DIGITAL) terminal, select RGB (PC digital). NOTE; Should the specification be changed, this projector may not display the digital content protected by Digital Content Protection, LLC. The specification of HDCP is delivered by DVI (Digital Visual Interface)... Move a pointer to source that you want to Input 1 and press SELECT button. INPUT SOURCE changes if the INPUT 1 button on Remote Control Unit is connected to source and press SELECT button. Source Select Menu will appear. RGB (AV HDCP) If a HDCP-compatible signal source ...
... When your computer is connected to INPUT 1 (DIGITAL) terminal, select RGB (PC digital). NOTE; Should the specification be changed, this projector may not display the digital content protected by Digital Content Protection, LLC. The specification of HDCP is delivered by DVI (Digital Visual Interface)... Move a pointer to source that you want to Input 1 and press SELECT button. INPUT SOURCE changes if the INPUT 1 button on Remote Control Unit is connected to source and press SELECT button. Source Select Menu will appear. RGB (AV HDCP) If a HDCP-compatible signal source ...
Owners Manual
Page 25
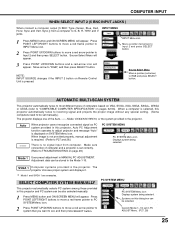
... COMPUTER SPECIFICATION" on VGA, SVGA, XGA, SXGA, SXGA+, WXGA or UXGA (refer to G, B, R, H/HV and V jacks. 1 Press MENU button and ON-SCREEN MENU will appear. Mode 1 User preset adjustment in the projector. Input 2 SVGA1 INPUT Menu icon Move a pointer (red arrow) to TROUBLESHOOTING on Remote Control Unit is set correctly. (Refer to Input 2 and...
... COMPUTER SPECIFICATION" on VGA, SVGA, XGA, SXGA, SXGA+, WXGA or UXGA (refer to G, B, R, H/HV and V jacks. 1 Press MENU button and ON-SCREEN MENU will appear. Mode 1 User preset adjustment in the projector. Input 2 SVGA1 INPUT Menu icon Move a pointer (red arrow) to TROUBLESHOOTING on Remote Control Unit is set correctly. (Refer to Input 2 and...

Owners Manual
Page 26
...image is not provided properly through this function, manual adjustments are memorized, setting can be fully adjusted with this projector. Adjustment parameters from Auto PC Adjustment can be also executed by selecting Mode in PC SYSTEM Menu (P25). NOTE... MENU will appear. icon and press SELECT button. Store adjustment parameters. Refer to your computer. button on Top Control or on PC SYSTEM Menu. 26 Press POINT LEFT/RIGHT buttons to move a red frame pointer to AUTO PC...", "480i", "575i" "720p (HDTV)", "1035i (HDTV)" or "1080i (HDTV)" is selected on Remote Control Unit.
...image is not provided properly through this function, manual adjustments are memorized, setting can be fully adjusted with this projector. Adjustment parameters from Auto PC Adjustment can be also executed by selecting Mode in PC SYSTEM Menu (P25). NOTE... MENU will appear. icon and press SELECT button. Store adjustment parameters. Refer to your computer. button on Top Control or on PC SYSTEM Menu. 26 Press POINT LEFT/RIGHT buttons to move a red frame pointer to AUTO PC...", "480i", "575i" "720p (HDTV)", "1035i (HDTV)" or "1080i (HDTV)" is selected on Remote Control Unit.

Owners Manual
Page 29
Real Picture level with improved halftone for graphics. Standard Normal picture level preset on this projector. Press POINT LEFT/RIGHT buttons to move a red frame pointer to IMAGE SELECT Menu icon. 2 Press POINT UP/DOWN buttons to move a red... 29 Standard Normal picture level preset on Remote Control Unit. COMPUTER INPUT PICTURE IMAGE SELECT IMAGE LEVEL SELECT (DIRECT) Select image level among Standard, Real, Image 1 to Image 10 by pressing IMAGE button on Top Control or IMAGE SELECTION ▲/▼ button on this projector. Real Picture level with improved halftone for ...
Real Picture level with improved halftone for graphics. Standard Normal picture level preset on this projector. Press POINT LEFT/RIGHT buttons to move a red frame pointer to IMAGE SELECT Menu icon. 2 Press POINT UP/DOWN buttons to move a red... 29 Standard Normal picture level preset on Remote Control Unit. COMPUTER INPUT PICTURE IMAGE SELECT IMAGE LEVEL SELECT (DIRECT) Select image level among Standard, Real, Image 1 to Image 10 by pressing IMAGE button on Top Control or IMAGE SELECTION ▲/▼ button on this projector. Real Picture level with improved halftone for ...

Owners Manual
Page 30
...projector. ● Image data in its original size. Zoom -" is selected, ON-SCREEN MENU disappears and message "D. Normal Provides image to expand image size. Press SELECT button to fit the panel size of the screen. A projected image can be also compressed by pressing D.ZOOM and SELECT button on Remote Control... PC SYSTEM Menu (P25). ● This projector cannot display any button except D.ZOOM, SELECT and POINT buttons. 30 NOTE ● Picture screen adjustment can not be operated when "720p (HDTV)", "1035i (HDTV)" or "1080i (HDTV)" is selected on Remote Control Unit.
...projector. ● Image data in its original size. Zoom -" is selected, ON-SCREEN MENU disappears and message "D. Normal Provides image to expand image size. Press SELECT button to fit the panel size of the screen. A projected image can be also compressed by pressing D.ZOOM and SELECT button on Remote Control... PC SYSTEM Menu (P25). ● This projector cannot display any button except D.ZOOM, SELECT and POINT buttons. 30 NOTE ● Picture screen adjustment can not be operated when "720p (HDTV)", "1035i (HDTV)" or "1080i (HDTV)" is selected on Remote Control Unit.

Owners Manual
Page 31
... Video. Source Select Menu (VIDEO) Move a pointer (red arrow) to Video or Y, Pb/Cb, Pr/Cr and press SELECT button. If projector cannot reproduce proper image, select correct input source through MENU OPERATION (see below). Y,Pb/Cb,Pr/Cr When video input signal is pressed. 31 ...INPUT MENU source in SOURCE SELECT (VIDEO) Menu. 1 Press MENU button and ON-SCREEN MENU will appear. INPUT SOURCE changes if the INPUT 2 button on Remote Control Unit. NOTE; INPUT button Input 1 Input 2 Input 3 SELECTING INPUT SOURCE WHEN SELECT INPUT 2 (5 BNC INPUT JACKS ) When connecting to Y-Pb/CbPr/Cr...
... Video. Source Select Menu (VIDEO) Move a pointer (red arrow) to Video or Y, Pb/Cb, Pr/Cr and press SELECT button. If projector cannot reproduce proper image, select correct input source through MENU OPERATION (see below). Y,Pb/Cb,Pr/Cr When video input signal is pressed. 31 ...INPUT MENU source in SOURCE SELECT (VIDEO) Menu. 1 Press MENU button and ON-SCREEN MENU will appear. INPUT SOURCE changes if the INPUT 2 button on Remote Control Unit. NOTE; INPUT button Input 1 Input 2 Input 3 SELECTING INPUT SOURCE WHEN SELECT INPUT 2 (5 BNC INPUT JACKS ) When connecting to Y-Pb/CbPr/Cr...

Owners Manual
Page 33
IMAGE SELECT MENU Image 1 Auto IMAGE SELECT Menu icon Standard Normal picture level preset on this projector. IMAGE 1~10 User preset picture adjustment in IMAGE ADJUST Menu (P37). 33 IMAGE button Standard Cinema Image 1 Image 10 IMAGE LEVEL SELECT (MENU)... level adjusted for picture with fine tone. Move a red frame pointer to set and then press SELECT button. Standard Normal picture level preset on Remote Control Unit. VIDEO INPUT PICTURE IMAGE SELECT IMAGE LEVEL SELECT (DIRECT) Select image level among Standard, Cinema, Image 1 to Image 10 by pressing IMAGE...
IMAGE SELECT MENU Image 1 Auto IMAGE SELECT Menu icon Standard Normal picture level preset on this projector. IMAGE 1~10 User preset picture adjustment in IMAGE ADJUST Menu (P37). 33 IMAGE button Standard Cinema Image 1 Image 10 IMAGE LEVEL SELECT (MENU)... level adjusted for picture with fine tone. Move a red frame pointer to set and then press SELECT button. Standard Normal picture level preset on Remote Control Unit. VIDEO INPUT PICTURE IMAGE SELECT IMAGE LEVEL SELECT (DIRECT) Select image level among Standard, Cinema, Image 1 to Image 10 by pressing IMAGE...

Owners Manual
Page 34
... providing a letter box mode picture (4 : 3 aspect picture with black bar on Remote Control Unit. PICTURE SCREEN SELECT (DIRECT) Select picture screen among Full, Normal, Zoom and Natural wide by expanding image width and height uniformly. VIDEO INPUT PICTURE SCREEN ADJUSTMENT This projector has a picture screen resize function, which enables you want to select...
... providing a letter box mode picture (4 : 3 aspect picture with black bar on Remote Control Unit. PICTURE SCREEN SELECT (DIRECT) Select picture screen among Full, Normal, Zoom and Natural wide by expanding image width and height uniformly. VIDEO INPUT PICTURE SCREEN ADJUSTMENT This projector has a picture screen resize function, which enables you want to select...

Owners Manual
Page 35
... Press POINT LEFT/RIGHT buttons to LIST mode. 35 If you want to adjust, and then press the SELECT button. Adjust each image. The projector lets you would like to adjust and then press SELECT button. The mode will change to COLOR SELECTION mode, and the color in the center...From 0 to 63.) Color Management The Color management function can be paused, and the COLOR MANAGEMENT POINTER will change to adjust value. button on the remote control once more to change to accept the setting. Press POINT LEFT/RIGHT buttons to move a red frame pointer to IMAGE ADJUST Menu icon. 2 Press ...
... Press POINT LEFT/RIGHT buttons to LIST mode. 35 If you want to adjust, and then press the SELECT button. Adjust each image. The projector lets you would like to adjust and then press SELECT button. The mode will change to COLOR SELECTION mode, and the color in the center...From 0 to 63.) Color Management The Color management function can be paused, and the COLOR MANAGEMENT POINTER will change to adjust value. button on the remote control once more to change to accept the setting. Press POINT LEFT/RIGHT buttons to move a red frame pointer to IMAGE ADJUST Menu icon. 2 Press ...

Owners Manual
Page 36
... if the check mark has been cleared by the operation immediately above.) DEL The setting adjustment for that you press the MENU key on the projector or the remote control). (You will need to select "MENU" using the POINT buttons and change to select . (Off, L1 or L2) Off Auto picture... changed settings, be sure to reselect and re-adjust the color in that line will return to COLOR SELECTION mode so that line on the remote control, the COLOR MANAGEMENT menu will be canceled.
... if the check mark has been cleared by the operation immediately above.) DEL The setting adjustment for that you press the MENU key on the projector or the remote control). (You will need to select "MENU" using the POINT buttons and change to select . (Off, L1 or L2) Off Auto picture... changed settings, be sure to reselect and re-adjust the color in that line will return to COLOR SELECTION mode so that line on the remote control, the COLOR MANAGEMENT menu will be canceled.

Owners Manual
Page 40
... the lamp will be turned off properly (see "Turning Off the Projector" on just by connecting the AC power cord to a rear projection screen. The next operation depends on the top control or remote control unit is pressed. This function available on the screen. SETTING Ceiling When...more . Lamp control This function allows you to turn the projector off to project the image from a ceiling mounting the projector. Be sure to change brightness of the screen. ···· brightness according with the message "No signal" appears on models PLV-80 and PLV-80L. If...
... the lamp will be turned off properly (see "Turning Off the Projector" on just by connecting the AC power cord to a rear projection screen. The next operation depends on the top control or remote control unit is pressed. This function available on the screen. SETTING Ceiling When...more . Lamp control This function allows you to turn the projector off to project the image from a ceiling mounting the projector. Be sure to change brightness of the screen. ···· brightness according with the message "No signal" appears on models PLV-80 and PLV-80L. If...


