Owners Manual
Page 2
... (OR BACK). Improper operation may result in the "Trouble-shooting" section of the end of this manual thoroughly and operate the projector properly. q This projector produces intense light from the ventilation holes. Be especially careful that children do not stare directly into the..., fire hazard, or other accidents. Eye damage could result. Operating the projector properly enables you purchased the projector or the service center. TO THE OWNER Before operating this projector, read this manual again, check operations and cable connections and try the solutions in a fire...
... (OR BACK). Improper operation may result in the "Trouble-shooting" section of the end of this manual thoroughly and operate the projector properly. q This projector produces intense light from the ventilation holes. Be especially careful that children do not stare directly into the..., fire hazard, or other accidents. Eye damage could result. Operating the projector properly enables you purchased the projector or the service center. TO THE OWNER Before operating this projector, read this manual again, check operations and cable connections and try the solutions in a fire...
Owners Manual
Page 5
... OPERATION AIR FILTER CARE AND CLEANING 38 20 CLEANING THE PROJECTION LENS 38 LAMP REPLACEMENT 39 TURNING ON / OFF PROJECTOR 20 LAMP REPLACE COUNTER TROUBLESHOOTING 39 40 ADJUSTING SCREEN ZOOM ADJUSTMENT 21 21 TECHNICAL SPECIFICATIONS 42 FOCUS ADJUSTMENT 21 LENS ... 23 24 AUTO PC ADJUSTMENT 24 NAME OF EACH PART OF PROJECTOR 7 MANUAL PC ADJUSTMENT 25 SETTING-UP PROJECTOR 8 COMPATIBLE COMPUTER SPECIFICATIONS 27 CONNECTING AC POWER CORD 8 PICTURE IMAGE ADJUSTMENT 28 POSITIONING PROJECTOR 9 IMAGE LEVEL SELECT 28 ADJUSTABLE FEET 10 IMAGE LEVEL ADJUSTMENT ...
... OPERATION AIR FILTER CARE AND CLEANING 38 20 CLEANING THE PROJECTION LENS 38 LAMP REPLACEMENT 39 TURNING ON / OFF PROJECTOR 20 LAMP REPLACE COUNTER TROUBLESHOOTING 39 40 ADJUSTING SCREEN ZOOM ADJUSTMENT 21 21 TECHNICAL SPECIFICATIONS 42 FOCUS ADJUSTMENT 21 LENS ... 23 24 AUTO PC ADJUSTMENT 24 NAME OF EACH PART OF PROJECTOR 7 MANUAL PC ADJUSTMENT 25 SETTING-UP PROJECTOR 8 COMPATIBLE COMPUTER SPECIFICATIONS 27 CONNECTING AC POWER CORD 8 PICTURE IMAGE ADJUSTMENT 28 POSITIONING PROJECTOR 9 IMAGE LEVEL SELECT 28 ADJUSTABLE FEET 10 IMAGE LEVEL ADJUSTMENT ...
Owners Manual
Page 6
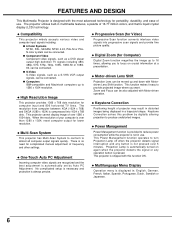
...1280 x 1024) is compressed into progressive scan signals and provide fine picture quality. This projector cannot display image of frequency and other settings. There is no need for complicated manual adjustment of over 1280 x 1024 dots. x Motor-driven Lens Shift Projection Lens can be... connected. x Keystone Correction Positioning height of 16.77 million colors, and matrix liquid crystal display (LCD) technology. The projector utilizes built-in multimedia features, a palette of projector ...
...1280 x 1024) is compressed into progressive scan signals and provide fine picture quality. This projector cannot display image of frequency and other settings. There is no need for complicated manual adjustment of over 1280 x 1024 dots. x Motor-driven Lens Shift Projection Lens can be... connected. x Keystone Correction Positioning height of 16.77 million colors, and matrix liquid crystal display (LCD) technology. The projector utilizes built-in multimedia features, a palette of projector ...
Owners Manual
Page 23
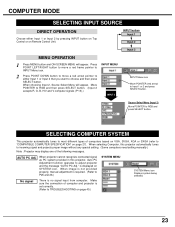
... tunes to incoming signal and projects proper image without any special setting. (Some computers need setting manually.) Note : Projector may display one of computer and projector is set correctly. (Refer to either Input 1 or Input 2 by pressing INPUT button on Top Control or on... arrow pointer to TROUBLESHOOTING on Remote Control Unit. When image is not provided properly, manual adjustment is required. (Refer to "COMPATIBLE COMPUTER SPECIFICATION" on SYSTEM icon. SELECTING COMPUTER SYSTEM This projector automatically tunes to most different types of computers based on VGA, SVGA, XGA or ...
... tunes to incoming signal and projects proper image without any special setting. (Some computers need setting manually.) Note : Projector may display one of computer and projector is set correctly. (Refer to either Input 1 or Input 2 by pressing INPUT button on Top Control or on... arrow pointer to TROUBLESHOOTING on Remote Control Unit. When image is not provided properly, manual adjustment is required. (Refer to "COMPATIBLE COMPUTER SPECIFICATION" on SYSTEM icon. SELECTING COMPUTER SYSTEM This projector automatically tunes to most different types of computers based on VGA, SVGA, XGA or ...
Owners Manual
Page 24
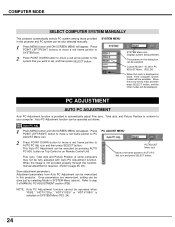
...Auto PC Adjustment can be done just by pressing AUTO PC ADJ. Refer to step 3 of some computers may not be memorized in this projector. icon and press SELECT button. 24 Press POINT LEFT/RIGHT buttons to move a red frame pointer to SYSTEM icon. 2 Press POINT DOWN ... mark is selected on this dialog box can be selected. COMPUTER MODE SELECT COMPUTER SYSTEM MANUALLY This projector automatically selects PC system among those provided in this projector and PC system can be also selected manually. 1 Press MENU button and ON-SCREEN MENU will appear. SYSTEM MENU SYSTEM Menu icon...
...Auto PC Adjustment can be done just by pressing AUTO PC ADJ. Refer to step 3 of some computers may not be memorized in this projector. icon and press SELECT button. 24 Press POINT LEFT/RIGHT buttons to move a red frame pointer to SYSTEM icon. 2 Press POINT DOWN ... mark is selected on this dialog box can be selected. COMPUTER MODE SELECT COMPUTER SYSTEM MANUALLY This projector automatically selects PC system among those provided in this projector and PC system can be also selected manually. 1 Press MENU button and ON-SCREEN MENU will appear. SYSTEM MENU SYSTEM Menu icon...

Owners Manual
Page 25
This projector has a Manual PC Adjustment to enable you want to adjust and then press SELECT button. This projector has 5 independent memory areas to memorize those special signal formats. PC ADJUST MENU 2 Press POINT DOWN button to move a red frame ...of Mode. When the image has a dark bar(s), try this icon to adjust "Total lines," "Clamp," "Display area," "Horiz. COMPUTER MODE MANUAL PC ADJUSTMENT This projector can automatically tune to the display signals from the display. Fine sync Adjust the picture as a flickering picture, a non-synchronized picture, a non-centered...
This projector has a Manual PC Adjustment to enable you want to adjust and then press SELECT button. This projector has 5 independent memory areas to memorize those special signal formats. PC ADJUST MENU 2 Press POINT DOWN button to move a red frame ...of Mode. When the image has a dark bar(s), try this icon to adjust "Total lines," "Clamp," "Display area," "Horiz. COMPUTER MODE MANUAL PC ADJUSTMENT This projector can automatically tune to the display signals from the display. Fine sync Adjust the picture as a flickering picture, a non-synchronized picture, a non-centered...
Owners Manual
Page 29
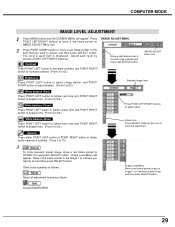
... to adjust value. Gamma Press either POINT LEFT button or POINT RIGHT button to obtain better balance of contrast. (From 0 to 15.) 3 Stored To store manually preset image, move a red frame pointer to the item that you want to any of each level by pressing POINT LEFT/RIGHT button(s). Quit Closes...
... to adjust value. Gamma Press either POINT LEFT button or POINT RIGHT button to obtain better balance of contrast. (From 0 to 15.) 3 Stored To store manually preset image, move a red frame pointer to the item that you want to any of each level by pressing POINT LEFT/RIGHT button(s). Quit Closes...

Owners Manual
Page 32
... the system being selected. When Video System is necessary to the system and press SELECT button. Y, Pb/Cb, Pr/Cr JACKS Auto Projector automatically detects incoming Video signal, and adjusts itself to optimize its performance. Move the pointer to select and then press SELECT button. PAL ... button and ON-SCREEN MENU will appear. AV SYSTEM MENU (COMPONENT VIDEO) COMPONENT VIDEO SIGNAL FORMAT If projector cannot reproduce proper video image, it is PAL-M or PAL-N, select system manually. Press POINT LEFT/RIGHT buttons to move a red frame pointer to SYSTEM Menu icon. 2 Press POINT...
... the system being selected. When Video System is necessary to the system and press SELECT button. Y, Pb/Cb, Pr/Cr JACKS Auto Projector automatically detects incoming Video signal, and adjusts itself to optimize its performance. Move the pointer to select and then press SELECT button. PAL ... button and ON-SCREEN MENU will appear. AV SYSTEM MENU (COMPONENT VIDEO) COMPONENT VIDEO SIGNAL FORMAT If projector cannot reproduce proper video image, it is PAL-M or PAL-N, select system manually. Press POINT LEFT/RIGHT buttons to move a red frame pointer to SYSTEM Menu icon. 2 Press POINT...
Owners Manual
Page 42
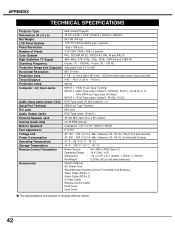
APPENDIX TECHNICAL SPECIFICATIONS Projector Type Dimensions (W x H x D) Net Weight LCD Panel System Panel Resolution Number of Pixels Color System High Definition TV Signal Scanning Frequency Projection Image size (Diagonal) Horizontal Resolution Projection ... Net Weight : AA, UM3 or R06 Type x 2 : 16.4' (5m) / ±30˚ : 1.8" x 0.75" x 6.7" (45mm x 19mm x 170mm) : 0.20 lbs (92 g) (including batteries) Owner's Manual AC Power Cord Wired/Wireless Remote Control Transmitter and Batteries Video Cable (RCA x 1) Audio Cable (RCA x 2) S-Video Cable Remote Control Cable Dust Cover Lens Cover...
APPENDIX TECHNICAL SPECIFICATIONS Projector Type Dimensions (W x H x D) Net Weight LCD Panel System Panel Resolution Number of Pixels Color System High Definition TV Signal Scanning Frequency Projection Image size (Diagonal) Horizontal Resolution Projection ... Net Weight : AA, UM3 or R06 Type x 2 : 16.4' (5m) / ±30˚ : 1.8" x 0.75" x 6.7" (45mm x 19mm x 170mm) : 0.20 lbs (92 g) (including batteries) Owner's Manual AC Power Cord Wired/Wireless Remote Control Transmitter and Batteries Video Cable (RCA x 1) Audio Cable (RCA x 2) S-Video Cable Remote Control Cable Dust Cover Lens Cover...


