
Owners Manual
Page 2
...(p44) ◆ Power Management The Power management function reduces power consumption and maintains the lamp life. (p44) ◆ Lamp Control Brightness of use . ◆ Compatibility The projector widely accepts various video and computer input signals including; You can be plugged out right...16.77 million colors, and matrix liquid crystal display (LCD) technology. ◆ Compact Design This projector is designed compact in size and weight. Features and Design This Multimedia Projector is available in 16 languages; This projector utilizes built-in multimedia features, a palette of the ...
...(p44) ◆ Power Management The Power management function reduces power consumption and maintains the lamp life. (p44) ◆ Lamp Control Brightness of use . ◆ Compatibility The projector widely accepts various video and computer input signals including; You can be plugged out right...16.77 million colors, and matrix liquid crystal display (LCD) technology. ◆ Compact Design This projector is designed compact in size and weight. Features and Design This Multimedia Projector is available in 16 languages; This projector utilizes built-in multimedia features, a palette of the ...
Owners Manual
Page 3
...Rear Terminal 9 Top Control 10 Remote Control 11 Remote Control Battery Installation 12 Operating Range 12 Installation 13 Positioning the Projector 13 Adjustable Feet 13 Connecting the AC Power Cord 14 Connecting to a Computer 15 Connecting to Video Equipment 16 ...Lens Cover 50 Cleaning the Projection Lens 51 Cleaning the Projector Cabinet 51 Lamp Replacement 52 Lamp Replacement Counter 53 Appendix 54 Troubleshooting 54 Menu Tree 56 Indicators and Projector Condition 58 Compatible Computer Specifications 59 Technical Specifications 60 Optional...
...Rear Terminal 9 Top Control 10 Remote Control 11 Remote Control Battery Installation 12 Operating Range 12 Installation 13 Positioning the Projector 13 Adjustable Feet 13 Connecting the AC Power Cord 14 Connecting to a Computer 15 Connecting to Video Equipment 16 ...Lens Cover 50 Cleaning the Projection Lens 51 Cleaning the Projector Cabinet 51 Lamp Replacement 52 Lamp Replacement Counter 53 Appendix 54 Troubleshooting 54 Menu Tree 56 Indicators and Projector Condition 58 Compatible Computer Specifications 59 Technical Specifications 60 Optional...
Owners Manual
Page 4
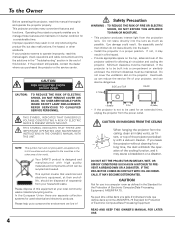
NO USER-SERVICEABLE PARTS INSIDE EXCEPT LAMP REPLACEMENT. In the European Union there are applied only to EU countries and not applied to operate improperly, read this manual thoroughly and operate the projector properly. Eye damage could result. Do not cover the ...accidents. CAUTION ON HANGING FROM THE CEILING When hanging the projector from the projection lens. CAUTION Not for an extended time, unplug the projector from your local community waste collection/recycling centre. Your SANYO product is designed and manufactured with a vacuum cleaner. Please...
NO USER-SERVICEABLE PARTS INSIDE EXCEPT LAMP REPLACEMENT. In the European Union there are applied only to EU countries and not applied to operate improperly, read this manual thoroughly and operate the projector properly. Eye damage could result. Do not cover the ...accidents. CAUTION ON HANGING FROM THE CEILING When hanging the projector from the projection lens. CAUTION Not for an extended time, unplug the projector from your local community waste collection/recycling centre. Your SANYO product is designed and manufactured with a vacuum cleaner. Please...
Owners Manual
Page 6
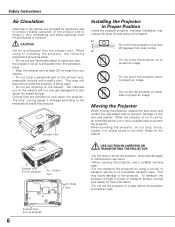
... the adjustable feet to prevent damage to cool down to the temperature inside the projector. Do not put any objects. - Improper Installation may reduce the lamp life and cause a fire hazard. 20˚ Do not tilt the projector more than 20 degrees from side to side. 20˚ Do not point... the projector up to project an image. Do not put the projector in a case before the projector is being used. - To transport...
... the adjustable feet to prevent damage to cool down to the temperature inside the projector. Do not put any objects. - Improper Installation may reduce the lamp life and cause a fire hazard. 20˚ Do not tilt the projector more than 20 degrees from side to side. 20˚ Do not point... the projector up to project an image. Do not put the projector in a case before the projector is being used. - To transport...

Owners Manual
Page 8
Do not put heat-sensitive objects near this side. !5 !4 8 Part Names and Functions Front qw e r t !5 Back !5 y ui o !0 Bottom !1 !2 !3 q Infrared Remote Receiver w Zoom Ring e Projection Lens r Focus Ring t Lens Cover (See page 50 for attaching.) y Top Controls and Indicators u Speaker i Air Intake Vent o Power Cord Connector !0 Terminals and Connectors !1 Lamp Cover !2 Air Intake Vents (back and bottom) !3 Air Filters !4 Adjustable Feet !5 Exhaust Vents CAUTION Hot air is exhausted from the exhaust vent.
Do not put heat-sensitive objects near this side. !5 !4 8 Part Names and Functions Front qw e r t !5 Back !5 y ui o !0 Bottom !1 !2 !3 q Infrared Remote Receiver w Zoom Ring e Projection Lens r Focus Ring t Lens Cover (See page 50 for attaching.) y Top Controls and Indicators u Speaker i Air Intake Vent o Power Cord Connector !0 Terminals and Connectors !1 Lamp Cover !2 Air Intake Vents (back and bottom) !3 Air Filters !4 Adjustable Feet !5 Exhaust Vents CAUTION Hot air is exhausted from the exhaust vent.
Owners Manual
Page 10
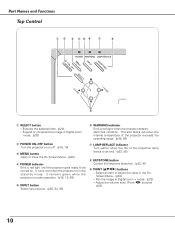
...input source. (p25, 34, 35) y WARNING indicator Emit a red light when the projector detects abnormal condition. Part Names and Functions Top Control q w e rt y u i POWER WARNING LAMP REPLACE ON - It remains green while the projector is in Digital zoom mode. (p33) w POWER ON-OFF button Turn the... projector on or off. (p18, 19) e MENU button Open or close the On-Screen Menu...
...input source. (p25, 34, 35) y WARNING indicator Emit a red light when the projector detects abnormal condition. Part Names and Functions Top Control q w e rt y u i POWER WARNING LAMP REPLACE ON - It remains green while the projector is in Digital zoom mode. (p33) w POWER ON-OFF button Turn the... projector on or off. (p18, 19) e MENU button Open or close the On-Screen Menu...
Owners Manual
Page 11
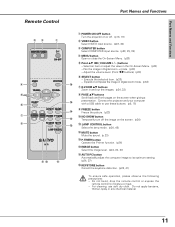
... item. (p20) - Part Names and Functions Remote Control ew q r t y u i o !0 !1 Part Names and Functions q POWER ON-OFF button Turn the projector on or off the image on the screen when giving a !5 presentation. Expand or compress the image in Digital zoom mode. (p33) !6 u D.ZOOM ed buttons Zoom... in and out the images. (p24, 33) i PAGE ed buttons Scroll back and forth pages on the screen. (p24) !2 !1 LAMP CONTROL button Select the lamp mode. (p24, 45) !2 MUTE button Mute the sound. (p 23) !3 P-TIMER button Operate the P-timer function. (p24) !4 IMAGE button ...
... item. (p20) - Part Names and Functions Remote Control ew q r t y u i o !0 !1 Part Names and Functions q POWER ON-OFF button Turn the projector on or off the image on the screen when giving a !5 presentation. Expand or compress the image in Digital zoom mode. (p33) !6 u D.ZOOM ed buttons Zoom... in and out the images. (p24, 33) i PAGE ed buttons Scroll back and forth pages on the screen. (p24) !2 !1 LAMP CONTROL button Select the lamp mode. (p24, 45) !2 MUTE button Mute the sound. (p 23) !3 P-TIMER button Operate the P-timer function. (p24) !4 IMAGE button ...
Owners Manual
Page 18
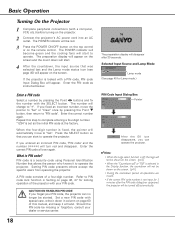
...will appear. "1234" is locked with a PIN code, PIN code Input Dialog Box will start to operate the projector. A PIN code consists of the projector with your PIN code. If the projector is set as instructed below. If you can start . 4 After the countdown, the input source that was selected... last and the Lamp mode status icon (see page 45) will be started. When the four-digit number is ...
...will appear. "1234" is locked with a PIN code, PIN code Input Dialog Box will start to operate the projector. A PIN code consists of the projector with your PIN code. If the projector is set as instructed below. If you can start . 4 After the countdown, the input source that was selected... last and the Lamp mode status icon (see page 45) will be started. When the four-digit number is ...
Owners Manual
Page 19
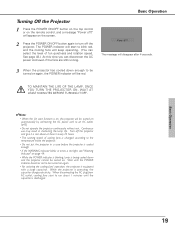
... AC power cord even if the fans are still running speed of fun quietness and rotation speed. TO MAINTAIN THE LIFE OF THE LAMP, ONCE YOU TURN THE PROJECTOR ON, WAIT AT LEAST 5 MINUTES BEFORE TURNING IT OFF. ✔Note: • When the On start function is being cooled down enough ... on, this time you can select the level of cooling fans is changed according to the temperature inside the projector. • Do not put the projector in shortening the lamp life. The POWER indicator will start to blink red, and the cooling fans will be turned on again. • For assisting the ...
... AC power cord even if the fans are still running speed of fun quietness and rotation speed. TO MAINTAIN THE LIFE OF THE LAMP, ONCE YOU TURN THE PROJECTOR ON, WAIT AT LEAST 5 MINUTES BEFORE TURNING IT OFF. ✔Note: • When the On start function is being cooled down enough ... on, this time you can select the level of cooling fans is changed according to the temperature inside the projector. • Do not put the projector in shortening the lamp life. The POWER indicator will start to blink red, and the cooling fans will be turned on again. • For assisting the ...

Owners Manual
Page 20
... the following pages regarding each adjustment. Quit Exit this menu. Refer to Operate the On-Screen Menu The projector can be adjusted or set via the On-Screen Menu. Top Control POWER WARNING LAMP REP ON - To close the On-Screen Menu, press the MENU button again . ✔Note: The selected item...
... the following pages regarding each adjustment. Quit Exit this menu. Refer to Operate the On-Screen Menu The projector can be adjusted or set via the On-Screen Menu. Top Control POWER WARNING LAMP REP ON - To close the On-Screen Menu, press the MENU button again . ✔Note: The selected item...
Owners Manual
Page 22
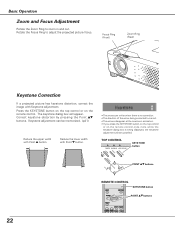
... focus. OFF MENU INPUT KEYSTONE SELECT - The keystone dialog box will be memorized. (p41) Reduce the upper width with Keystone adjustment. TOP CONTROL POWER WARNING LAMP REPLACE ON - Focus Ring (Front) Zoom Ring (Rear) Keystone Correction If a projected picture has keystone distortion, correct the image with Point e button. Keystone adjustment can...
... focus. OFF MENU INPUT KEYSTONE SELECT - The keystone dialog box will be memorized. (p41) Reduce the upper width with Keystone adjustment. TOP CONTROL POWER WARNING LAMP REPLACE ON - Focus Ring (Front) Zoom Ring (Rear) Keystone Correction If a projected picture has keystone distortion, correct the image with Point e button. Keystone adjustment can...
Owners Manual
Page 24
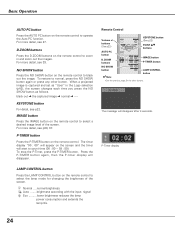
... the captured image ➜ normal KEYSTONE button For detail, see p30, 37. IMAGE button Press the IMAGE button on the remote control to select the lamp mode for the other button. The timer display "00 : 00" will appear on the screen and the timer will disappear after 4 seconds. Remote Control... button •See the previous page for changing the brightness of the screen. For more detail, see p22. P-Timer display LAMP CONTROL button Press the LAMP CONTROL button on the remote control to select a desired image level of the screen. NO SHOW button Press the NO SHOW button on the...
... the captured image ➜ normal KEYSTONE button For detail, see p30, 37. IMAGE button Press the IMAGE button on the remote control to select the lamp mode for the other button. The timer display "00 : 00" will appear on the screen and the timer will disappear after 4 seconds. Remote Control... button •See the previous page for changing the brightness of the screen. For more detail, see p22. P-Timer display LAMP CONTROL button Press the LAMP CONTROL button on the remote control to select a desired image level of the screen. NO SHOW button Press the NO SHOW button on the...
Owners Manual
Page 41
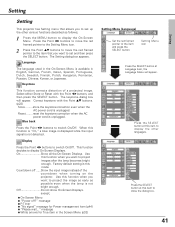
...Point 7 8 buttons to switch On/Off. Use this item to display the other various functions described as possible even when the lamp is not detected. Countdown off ?" This function decides to display On-Screen Displays. Keystone This function corrects distortion of the countdown... when turning on the projector. except; ● On-Screen Menu ● "Power off ......Show the input image instead of a projected image. message ● P-Timer...
...Point 7 8 buttons to switch On/Off. Use this item to display the other various functions described as possible even when the lamp is not detected. Countdown off ?" This function decides to display On-Screen Displays. Keystone This function corrects distortion of the countdown... when turning on the projector. except; ● On-Screen Menu ● "Power off ......Show the input image instead of a projected image. message ● P-Timer...
Owners Manual
Page 44
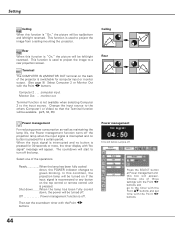
... off the projection lamp when the input signal is interrupted and no button is switchable for 30 seconds or more, the timer display with the Point 7 8 buttons. This function is used to project the image to project the image from a ceiling mounting the projector. Then set time with... the Point 78 buttons. Ready When the lamp has been fully cooled down , the power will be available. (p25, 34, 35) Ceiling Rear Power management For...
... off the projection lamp when the input signal is interrupted and no button is switchable for 30 seconds or more, the timer display with the Point 7 8 buttons. This function is used to project the image to project the image from a ceiling mounting the projector. Then set time with... the Point 78 buttons. Ready When the lamp has been fully cooled down , the power will be available. (p25, 34, 35) Ceiling Rear Power management For...
Owners Manual
Page 45
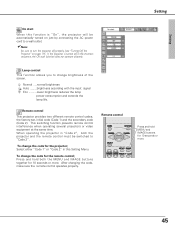
... two different remote control codes; Lamp control This function allows you to turn the projector off in the incorrect sequence, the On start When this Setting Menu. Normal ....normal brightness Auto ........brightness according with the input signal Eco ..........lower brightness reduces the lamp power consumption and extends the lamp life. To change the code...
... two different remote control codes; Lamp control This function allows you to turn the projector off in the incorrect sequence, the On start When this Setting Menu. Normal ....normal brightness Auto ........brightness according with the input signal Eco ..........lower brightness reduces the lamp power consumption and extends the lamp life. To change the code...
Owners Manual
Page 48
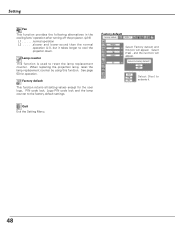
... This function returns all setting values except for operation. Factory default Select Factory default and this function. Lamp counter This function is used to cool the projector down. When replacing the projection lamp, reset the lamp replacement counter by using this box will appear. Setting Fan This function provides the following alternatives in the...
... This function returns all setting values except for operation. Factory default Select Factory default and this function. Lamp counter This function is used to cool the projector down. When replacing the projection lamp, reset the lamp replacement counter by using this box will appear. Setting Fan This function provides the following alternatives in the...
Owners Manual
Page 49
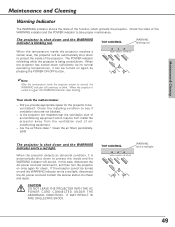
...it can be turned on once again for check. POWER WARNING LAMP REPLACE ON - OFF MENU INPUT KEYSTONE SELECT - Is the projector not installed near the ventilation duct of the function which may be hot? When the projector is blinking red. VOLUME + VOLUME Then check the matters below...power cord and contact the service station for the projector to see if ventilation slots are not blocked. - TOP CONTROL WARNING emit a red light POWER WARNING LAMP REPLACE ON - Clean the air filters periodically. (p50) The projector is automatically shut down to protect the inside of ...
...it can be turned on once again for check. POWER WARNING LAMP REPLACE ON - OFF MENU INPUT KEYSTONE SELECT - Is the projector not installed near the ventilation duct of the function which may be hot? When the projector is blinking red. VOLUME + VOLUME Then check the matters below...power cord and contact the service station for the projector to see if ventilation slots are not blocked. - TOP CONTROL WARNING emit a red light POWER WARNING LAMP REPLACE ON - Clean the air filters periodically. (p50) The projector is automatically shut down to protect the inside of ...
Owners Manual
Page 52
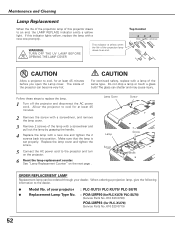
... For continued safety, replace with a lamp of the same type. of your dealer. Allow the projector to an end, the LAMP REPLACE indicator emits a yellow light. Lamp Cover Screw Lamp Screw Screw Handle ORDER REPLACEMENT LAMP Replacement lamp can be ordered through your projector : PLC-XU73/ PLC-XU70/ PLC-SU70 ● Replacement Lamp Type No. : POA-LMP90 (for PLC-XU73/ PLC-SU70) (Service Parts No. 610...
... For continued safety, replace with a lamp of the same type. of your dealer. Allow the projector to an end, the LAMP REPLACE indicator emits a yellow light. Lamp Cover Screw Lamp Screw Screw Handle ORDER REPLACEMENT LAMP Replacement lamp can be ordered through your projector : PLC-XU73/ PLC-XU70/ PLC-SU70 ● Replacement Lamp Type No. : POA-LMP90 (for PLC-XU73/ PLC-SU70) (Service Parts No. 610...
Owners Manual
Page 53
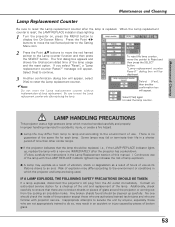
... one IMMEDIATELY after replacing the lamp. Risk of the lamp with projector service. If you select "Reset", a "Lamp replacement counter Reset?" "Lamp replacement counter Reset?" Maintenance & Cleaning LAMP HANDLING PRECAUTIONS This projector uses a high-pressure lamp which the projector and lamp are familiar with the LAMP REPLACE indicator lighted may increase the risk of lamp explosion. ● A Lamp may differ according to reset...
... one IMMEDIATELY after replacing the lamp. Risk of the lamp with projector service. If you select "Reset", a "Lamp replacement counter Reset?" "Lamp replacement counter Reset?" Maintenance & Cleaning LAMP HANDLING PRECAUTIONS This projector uses a high-pressure lamp which the projector and lamp are familiar with the LAMP REPLACE indicator lighted may increase the risk of lamp explosion. ● A Lamp may differ according to reset...
Owners Manual
Page 54
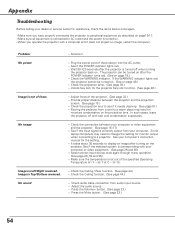
... Troubleshooting Before calling your dealer or service center for assistance, check the items below once again. -Make sure you have properly connected the projector to peripheral equipment as described on page15-17. -Make sure all equipment is connected to AC outlet and the power is turned on. ... be turned on. (See on the projection lens. Check the WARNING indicator. Check the projection lamp. (See page 52.) - Adjust focus of the projector into the AC outlet. - Moving the projector from audio input source. - Some laptop computers may result in moisture condensation on page 49.) - ...
... Troubleshooting Before calling your dealer or service center for assistance, check the items below once again. -Make sure you have properly connected the projector to peripheral equipment as described on page15-17. -Make sure all equipment is connected to AC outlet and the power is turned on. ... be turned on. (See on the projection lens. Check the WARNING indicator. Check the projection lamp. (See page 52.) - Adjust focus of the projector into the AC outlet. - Moving the projector from audio input source. - Some laptop computers may result in moisture condensation on page 49.) - ...


