Owners Manual
Page 2
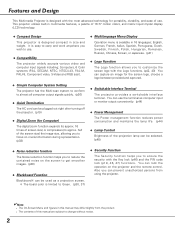
... built-in multimedia features, a palette of 16.77 million colors, and matrix liquid crystal display (LCD) technology. ◆ Compact Design This projector is designed compact in 16 languages; half of this manual are subject to change without notice. 2 Computers, 6 Color systems (PAL, SECAM, ...may differ slightly from the product. • The contents of the screen size) the image size, allowing you to focus on the projector and the remote control. Also you can be selected. (p45) ◆ Noise reduction function The Noise reduction function helps you to reduce the contained noise ...
... built-in multimedia features, a palette of 16.77 million colors, and matrix liquid crystal display (LCD) technology. ◆ Compact Design This projector is designed compact in 16 languages; half of this manual are subject to change without notice. 2 Computers, 6 Color systems (PAL, SECAM, ...may differ slightly from the product. • The contents of the screen size) the image size, allowing you to focus on the projector and the remote control. Also you can be selected. (p45) ◆ Noise reduction function The Noise reduction function helps you to reduce the contained noise ...
Owners Manual
Page 3
... of Contents 3 To the Owner 4 Safety Instructions 5 Air Circulation 6 Installing the Projector in Proper Position 6 Moving the Projector 6 Compliance 7 Part Names and Functions 8 Front 8 Back 8 Bottom 8 Rear Terminal 9 Top Control 10 Remote Control 11 Remote Control Battery Installation 12 Operating Range 12 Installation 13 Positioning the Projector 13 Adjustable Feet 13 Connecting the AC Power Cord 14 Connecting...
... of Contents 3 To the Owner 4 Safety Instructions 5 Air Circulation 6 Installing the Projector in Proper Position 6 Moving the Projector 6 Compliance 7 Part Names and Functions 8 Front 8 Back 8 Bottom 8 Rear Terminal 9 Top Control 10 Remote Control 11 Remote Control Battery Installation 12 Operating Range 12 Installation 13 Positioning the Projector 13 Adjustable Feet 13 Connecting the AC Power Cord 14 Connecting...
Owners Manual
Page 9
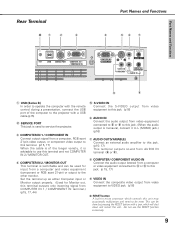
...jack. (When the audio output is monaural, connect it is advisable to use the RESET function excessively. 9 This can be used to service the projector. i COMPUTER/ COMPONENT AUDIO IN Connect the audio output (stereo) from a computer or video equipment connected to e or r to this jack.... AUDIO OUT VIDEO IN L (MONO) COMPUTER / COMPONENT S-VIDEO IN AUDIO IN o i q USB (Series B) In order to operate the computer with the remote control during a presentation, connect the USB port of the longer variety, it to L (MONO) jack.) (p16) u AUDIO OUT(VARIABLE) Connect an external audio amplifier...
...jack. (When the audio output is monaural, connect it is advisable to use the RESET function excessively. 9 This can be used to service the projector. i COMPUTER/ COMPONENT AUDIO IN Connect the audio output (stereo) from a computer or video equipment connected to e or r to this jack.... AUDIO OUT VIDEO IN L (MONO) COMPUTER / COMPONENT S-VIDEO IN AUDIO IN o i q USB (Series B) In order to operate the computer with the remote control during a presentation, connect the USB port of the longer variety, it to L (MONO) jack.) (p16) u AUDIO OUT(VARIABLE) Connect an external audio amplifier...
Owners Manual
Page 11
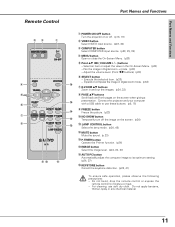
..., 35) r MENU button Open or close the On-Screen Menu. (p20) t Point ed 7 8 ( VOLUME + / - ) buttons - Part Names and Functions Remote Control ew q r t y u i o !0 !1 Part Names and Functions q POWER ON-OFF button Turn the projector on or off the image on the screen when giving a !5 presentation. Do not apply benzene, thinner, splay or any chemical...
..., 35) r MENU button Open or close the On-Screen Menu. (p20) t Point ed 7 8 ( VOLUME + / - ) buttons - Part Names and Functions Remote Control ew q r t y u i o !0 !1 Part Names and Functions q POWER ON-OFF button Turn the projector on or off the image on the screen when giving a !5 presentation. Do not apply benzene, thinner, splay or any chemical...

Owners Manual
Page 12
... case clean and install new batteries. ● Risk of used batteries according to the instructions. Operating Range Point the remote control toward the projector (Infrared Remote Receiver) when pressing any button. Maximum operating range for the remote control is replaced by an incorrect type. ● Dispose of explosion if a battery is about 16.4' (5m) and 60...
... case clean and install new batteries. ● Risk of used batteries according to the instructions. Operating Range Point the remote control toward the projector (Infrared Remote Receiver) when pressing any button. Maximum operating range for the remote control is replaced by an incorrect type. ● Dispose of explosion if a battery is about 16.4' (5m) and 60...
Owners Manual
Page 18
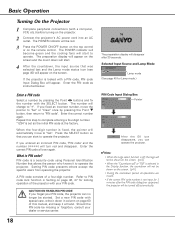
...number, move to complete entering a four-digit number. The POWER indicator will become green and the cooling fans will change to operate the projector. Press the SELECT button so that allows the person who knows it to "PIN code". The preparation display will appear on the screen ...manual, and keep it down will start to "✳". Should the PIN code be shown on the remote control. Basic Operation Turning On the Projector 1 Complete peripheral connections (with your PIN code. If the projector is PIN code? Set a new PIN code with a PIN code, PIN code Input Dialog Box will...
...number, move to complete entering a four-digit number. The POWER indicator will become green and the cooling fans will change to operate the projector. Press the SELECT button so that allows the person who knows it to "PIN code". The preparation display will appear on the screen ...manual, and keep it down will start to "✳". Should the PIN code be shown on the remote control. Basic Operation Turning On the Projector 1 Complete peripheral connections (with your PIN code. If the projector is PIN code? Set a new PIN code with a PIN code, PIN code Input Dialog Box will...
Owners Manual
Page 19
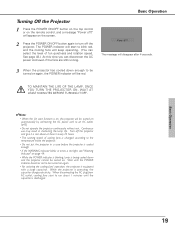
Continuous use may result in every 24 hours. • The running . Turning Off the Projector 1 Press the POWER ON-OFF button on the top control or on the remote control, and a message "Power off the projector. See page 48.) At this time you can select the level of cooling fans is changed according to the temperature...
Continuous use may result in every 24 hours. • The running . Turning Off the Projector 1 Press the POWER ON-OFF button on the top control or on the remote control, and a message "Power off the projector. See page 48.) At this time you can select the level of cooling fans is changed according to the temperature...

Owners Manual
Page 20
... WARNING LAMP REP ON - SELECT button Remote Control MENU button POINT buttons SELECT button On-Screen Menu Menu icon Menu bar Pointer (red framed ) Pointer (red framed ) Press the Point ed buttons to ... How to show the item data. VOLUME + VOLU MENU button POINT button (outer ring) 3 Press the SELECT button to Operate the On-Screen Menu The projector can be adjusted or set via the On-Screen Menu.
... WARNING LAMP REP ON - SELECT button Remote Control MENU button POINT buttons SELECT button On-Screen Menu Menu icon Menu bar Pointer (red framed ) Pointer (red framed ) Press the Point ed buttons to ... How to show the item data. VOLUME + VOLU MENU button POINT button (outer ring) 3 Press the SELECT button to Operate the On-Screen Menu The projector can be adjusted or set via the On-Screen Menu.
Owners Manual
Page 22
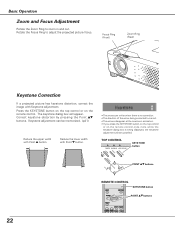
... out. Basic Operation Zoom and Focus Adjustment Rotate the Zoom Ring to adjust the projected picture focus. Press the KEYSTONE button on the top control or on the remote control once more while the keystone dialog box is being corrected turns red. • The arrows disappear at the maximum correction. • If you...
... out. Basic Operation Zoom and Focus Adjustment Rotate the Zoom Ring to adjust the projected picture focus. Press the KEYSTONE button on the top control or on the remote control once more while the keystone dialog box is being corrected turns red. • The arrows disappear at the maximum correction. • If you...
Owners Manual
Page 23
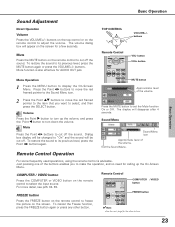
...sound. buttons. Volume Press the Point 8 button to turn down the volume. The display will appear on the remote control to select, and then press the SELECT button. Remote Control COMPUTER /VIDEO button FREEZE button ✔Note: •See the next page for AUDIO OUT jack. MUTE ... for calling up the volume, and press the Point 7 button to cut off the sound. Basic Operation TOP CONTROL SELECT - VOLUME + VOLUME VOLUME+/buttons Remote Control VOL- Dialog box display will be changed to its previous level, press the MUTE button again or press the VOLUME...
...sound. buttons. Volume Press the Point 8 button to turn down the volume. The display will appear on the remote control to select, and then press the SELECT button. Remote Control COMPUTER /VIDEO button FREEZE button ✔Note: •See the next page for AUDIO OUT jack. MUTE ... for calling up the volume, and press the Point 7 button to cut off the sound. Basic Operation TOP CONTROL SELECT - VOLUME + VOLUME VOLUME+/buttons Remote Control VOL- Dialog box display will be changed to its previous level, press the MUTE button again or press the VOLUME...
Owners Manual
Page 24
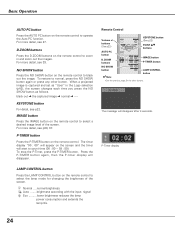
...the lamp mode for the other button. For more detail, see 27. For more detail, see p30, 37. P-Timer display LAMP CONTROL button Press the LAMP CONTROL button on the remote control to count time (00 : 00 ~ 59 : 59). When a projected image is captured and set as follows. The timer display ... signal Eco ..........lower brightness reduces the lamp power consumption and extends the lamp life. 24 P-TIMER button Press the P-TIMER button on the remote control to zoom in the Logo selection (p42), the screen changes each time you press the NO SHOW button as "User" in and zoom...
...the lamp mode for the other button. For more detail, see 27. For more detail, see p30, 37. P-Timer display LAMP CONTROL button Press the LAMP CONTROL button on the remote control to count time (00 : 00 ~ 59 : 59). When a projected image is captured and set as follows. The timer display ... signal Eco ..........lower brightness reduces the lamp power consumption and extends the lamp life. 24 P-TIMER button Press the P-TIMER button on the remote control to zoom in the Logo selection (p42), the screen changes each time you press the NO SHOW button as "User" in and zoom...
Owners Manual
Page 25
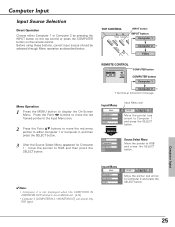
TOP CONTROL INPUT button INPUT button POWER WARNING LA ON - Input Menu Input Menu icon Computer 1 Move the pointer (red ...button. OFF MENU INPUT KE SELECT Computer 1 Computer 2 ✳ Video Menu Operation 1 Press the MENU button to display the On-Screen Menu. REMOTE CONTROL COMPUTER button COMPUTER button Computer 1 Computer 2 ✳ ✳ See Note at the bottom of this page. Press the Point 7 8 buttons ...move the red arrow pointer to either Computer 1 or Computer 2 by pressing the INPUT button on the top control or press the COMPUTER button on the remote control.
TOP CONTROL INPUT button INPUT button POWER WARNING LA ON - Input Menu Input Menu icon Computer 1 Move the pointer (red ...button. OFF MENU INPUT KE SELECT Computer 1 Computer 2 ✳ Video Menu Operation 1 Press the MENU button to display the On-Screen Menu. REMOTE CONTROL COMPUTER button COMPUTER button Computer 1 Computer 2 ✳ ✳ See Note at the bottom of this page. Press the Point 7 8 buttons ...move the red arrow pointer to either Computer 1 or Computer 2 by pressing the INPUT button on the top control or press the COMPUTER button on the remote control.

Owners Manual
Page 27
...575i, 480p, 575p, 720p,1035i, or 1080i is selected in the PC System Menu (p26). When the image is not provided properly with this projector. message will appear while Auto PC adjustment is in this Auto PC Adjustment function. Computer Input 27 Direct Operation The Auto PC adjustment function can... be fully adjusted with this operation, manual adjustments are memorized, the setting can be memorized in process. item and press the SELECT button. Remote Control Unit AUTO PC button Menu Operation Auto PC Adj. 1 Press the MENU button to your computer. See "Store" on the...
...575i, 480p, 575p, 720p,1035i, or 1080i is selected in the PC System Menu (p26). When the image is not provided properly with this projector. message will appear while Auto PC adjustment is in this Auto PC Adjustment function. Computer Input 27 Direct Operation The Auto PC adjustment function can... be fully adjusted with this operation, manual adjustments are memorized, the setting can be memorized in process. item and press the SELECT button. Remote Control Unit AUTO PC button Menu Operation Auto PC Adj. 1 Press the MENU button to your computer. See "Store" on the...

Owners Manual
Page 30
...projector. Blackboard(Green) Picture level suitable for viewing picture in a bright room. Computer Input Image Level Selection Direct Operation Select an image level among Dynamic, Standard, Real, Blackboard(Green), Image 1, Image 2, Image 3, and Image 4 by pressing the IMAGE button on a blackboard. Dynamic Picture level suitable for the image projected on the remote control...then press the SELECT button. Image 1~4 User preset image in the Image Adjust Menu (p32). Remote Control IMAGE button IMAGE button Dynamic Standard Real Blackboard(Green) Image 1 Image 2 Image 3 Image ...
...projector. Blackboard(Green) Picture level suitable for viewing picture in a bright room. Computer Input Image Level Selection Direct Operation Select an image level among Dynamic, Standard, Real, Blackboard(Green), Image 1, Image 2, Image 3, and Image 4 by pressing the IMAGE button on a blackboard. Dynamic Picture level suitable for the image projected on the remote control...then press the SELECT button. Image 1~4 User preset image in the Image Adjust Menu (p32). Remote Control IMAGE button IMAGE button Dynamic Standard Real Blackboard(Green) Image 1 Image 2 Image 3 Image ...

Owners Manual
Page 33
...or when the Keystone function is selected, the On-Screen Menu will be also expanded by pressing the D.ZOOM ▼ button on the remote control. To exit the Digital zoom +/- To return to pan the image. Computer Input 33 Digital zoom - is larger than the screen size.... zoom +" will disappear and the message "D. The Panning function can be displayed. Remote Control POINT buttons SELECT button D.ZOOM + button D.ZOOM - Computer Input For zooming in and out the images Digital zoom + When the Digital zoom + ...
...or when the Keystone function is selected, the On-Screen Menu will be also expanded by pressing the D.ZOOM ▼ button on the remote control. To exit the Digital zoom +/- To return to pan the image. Computer Input 33 Digital zoom - is larger than the screen size.... zoom +" will disappear and the message "D. The Panning function can be displayed. Remote Control POINT buttons SELECT button D.ZOOM + button D.ZOOM - Computer Input For zooming in and out the images Digital zoom + When the Digital zoom + ...
Owners Manual
Page 34
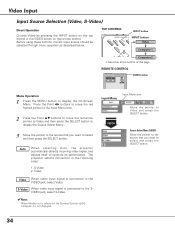
... is not displayed. Video Input Input Source Selection (Video, S-Video) Direct Operation Choose Video by pressing the INPUT button on the top control or the VIDEO button on the remote control. The projector selects connection in the Terminal function (p44) , Computer 2 is connected to select and then press the SELECT button. Input Menu Input...
... is not displayed. Video Input Input Source Selection (Video, S-Video) Direct Operation Choose Video by pressing the INPUT button on the top control or the VIDEO button on the remote control. The projector selects connection in the Terminal function (p44) , Computer 2 is connected to select and then press the SELECT button. Input Menu Input...
Owners Manual
Page 35
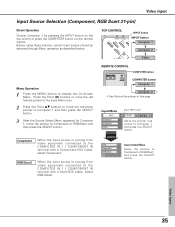
...Source Selection (Component, RGB Scart 21-pin) Direct Operation Choose Computer 1 by pressing the INPUT button on the top control or press the COMPUTER button on the remote control. Input Menu Input Menu icon Computer 1 Move the pointer (red arrow) to Component or RGB(Scart) and then ...press the SELECT button. Source Select Menu Move the pointer to display the On-Screen Menu. REMOTE CONTROL COMPUTER button COMPUTER button Computer 1 Computer 2 ✳ ✳ See Note at the bottom of this page. VO Video Menu Operation 1 Press...
...Source Selection (Component, RGB Scart 21-pin) Direct Operation Choose Computer 1 by pressing the INPUT button on the top control or press the COMPUTER button on the remote control. Input Menu Input Menu icon Computer 1 Move the pointer (red arrow) to Component or RGB(Scart) and then ...press the SELECT button. Source Select Menu Move the pointer to display the On-Screen Menu. REMOTE CONTROL COMPUTER button COMPUTER button Computer 1 Computer 2 ✳ ✳ See Note at the bottom of this page. VO Video Menu Operation 1 Press...
Owners Manual
Page 37
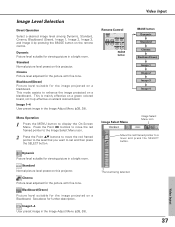
... Image 3, and Image 4 by pressing the IMAGE button on a Blackboard. Dynamic Picture level suitable for the image projected on the remote control. Standard Normal picture level preset on a blackboard. Dynamic Picture level suitable for further description. See above for viewing picture in the ...Video Input Video Input Remote Control IMAGE button IMAGE button Dynamic Standard Cinema Blackboard(Green) Image 1 Image 2 Image 3 Image 4 Image Select Menu Image Select Menu icon Move the red framed pointer to enhance the image projected on this projector. This mode assists to...
... Image 3, and Image 4 by pressing the IMAGE button on a Blackboard. Dynamic Picture level suitable for the image projected on the remote control. Standard Normal picture level preset on a blackboard. Dynamic Picture level suitable for further description. See above for viewing picture in the ...Video Input Video Input Remote Control IMAGE button IMAGE button Dynamic Standard Cinema Blackboard(Green) Image 1 Image 2 Image 3 Image 4 Image Select Menu Image Select Menu icon Move the red framed pointer to enhance the image projected on this projector. This mode assists to...
Owners Manual
Page 44
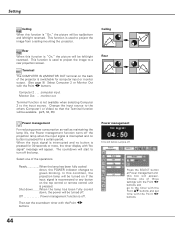
Terminal The COMPUTER IN 2/MONITOR OUT terminal on the top control or remote control unit is pressed for a certain period. The countdown will be turned on if the input signal is reconnected or any button on the back of the projector is off. Select one of the operations. Ready When the lamp has been ...to turn off the projection lamp when the input signal is interrupted and no button is used to project the image from a ceiling mounting the projector. Press the SELECT button at Power management and this box will be top/bottom and left before Lamp is used to project the image to...
Terminal The COMPUTER IN 2/MONITOR OUT terminal on the top control or remote control unit is pressed for a certain period. The countdown will be turned on if the input signal is reconnected or any button on the back of the projector is off. Select one of the operations. Ready When the lamp has been ...to turn off the projection lamp when the input signal is interrupted and no button is used to project the image from a ceiling mounting the projector. Press the SELECT button at Power management and this box will be top/bottom and left before Lamp is used to project the image to...
Owners Manual
Page 45
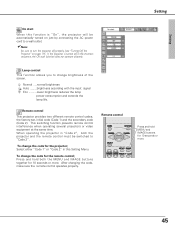
... input signal Eco ..........lower brightness reduces the lamp power consumption and extends the lamp life. Remote control Press and hold both the projector and the remote control must be automatically turned on page 19). Setting Setting On start function does not operate properly...outlet. ✔Note: Be sure to turn the projector off in this function is "On", the projector will be switched to change brightness of the screen. This switching function prevents remote control interference when operating several projectors or video equipment at the same time. Select either...
... input signal Eco ..........lower brightness reduces the lamp power consumption and extends the lamp life. Remote control Press and hold both the projector and the remote control must be automatically turned on page 19). Setting Setting On start function does not operate properly...outlet. ✔Note: Be sure to turn the projector off in this function is "On", the projector will be switched to change brightness of the screen. This switching function prevents remote control interference when operating several projectors or video equipment at the same time. Select either...


