Owners Manual
Page 9
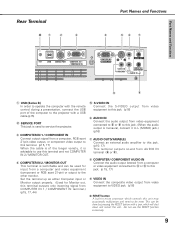
...output to this terminal. (p15, 17) When the cable is of the computer to the projector with a USB cable.(p15) w SERVICE PORT This jack is switchable and can be done by pressing the RESET button with a pen, which controls this unit may occasionally malfunction and need to be used to... service the projector. Do not use this terminal and not COMPUTER IN 2 / MONITOR OUT. r COMPUTER IN 2 / ...
...output to this terminal. (p15, 17) When the cable is of the computer to the projector with a USB cable.(p15) w SERVICE PORT This jack is switchable and can be done by pressing the RESET button with a pen, which controls this unit may occasionally malfunction and need to be used to... service the projector. Do not use this terminal and not COMPUTER IN 2 / MONITOR OUT. r COMPUTER IN 2 / ...

Owners Manual
Page 15
... (Only one cable is supplied.) •USB Cable ✽ • Audio Cables (Mini Plug: stereo Not supplied with this projector.) Installation Installation Audio Output USB port Monitor Output Monitor Output or Monitor Input USB cable ✽ VGA cable VGA cable External Audio Equipment... used for ordering optional parts. Set up the terminal as either Computer input or Monitor output. (See Page 44.) Audio cable ✽ (stereo) RESET USB SERVICE PORT COMPUTER IN 1 / COMPONENT IN COMPUTER/ COMPONENT AUDIO IN (VARIABLE) COMPUTER IN 2 / MONITOR OUT R AUDIO OUT VIDEO IN L...
... (Only one cable is supplied.) •USB Cable ✽ • Audio Cables (Mini Plug: stereo Not supplied with this projector.) Installation Installation Audio Output USB port Monitor Output Monitor Output or Monitor Input USB cable ✽ VGA cable VGA cable External Audio Equipment... used for ordering optional parts. Set up the terminal as either Computer input or Monitor output. (See Page 44.) Audio cable ✽ (stereo) RESET USB SERVICE PORT COMPUTER IN 1 / COMPONENT IN COMPUTER/ COMPONENT AUDIO IN (VARIABLE) COMPUTER IN 2 / MONITOR OUT R AUDIO OUT VIDEO IN L...
Owners Manual
Page 16
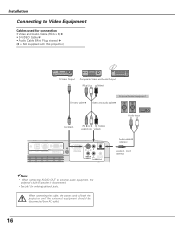
...and Audio Cable (RCA x 3) ✽ • S-VIDEO Cable ✽ • Audio Cable (Mini Plug: stereo Not supplied with this projector.) S-Video Output Composite Video and Audio Output (R) (L) (Video) S-Video cable ✽ External Audio Equipment Video and audio cable✽ S-VIDEO (R) (L)... (Video) AUDIO IN VIDEO RESET USB SERVICE PORT COMPUTER IN 1 / COMPONENT IN (VARIABLE) COMPUTER IN 2 / MONITOR OUT R AUDIO OUT VIDEO IN L (MONO) COMPUTER /...
...and Audio Cable (RCA x 3) ✽ • S-VIDEO Cable ✽ • Audio Cable (Mini Plug: stereo Not supplied with this projector.) S-Video Output Composite Video and Audio Output (R) (L) (Video) S-Video cable ✽ External Audio Equipment Video and audio cable✽ S-VIDEO (R) (L)... (Video) AUDIO IN VIDEO RESET USB SERVICE PORT COMPUTER IN 1 / COMPONENT IN (VARIABLE) COMPUTER IN 2 / MONITOR OUT R AUDIO OUT VIDEO IN L (MONO) COMPUTER /...
Owners Manual
Page 17
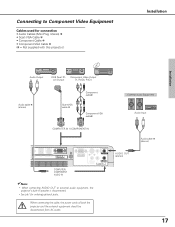
...; (stereo) Scart-VGA cable ✽ Component cable✽ Component-VGA cable✽ External Audio Equipment Audio Input COMPUTER IN 1/ COMPONENT IN RESET USB SERVICE PORT COMPUTER IN 1 / COMPONENT IN COMPUTER/ COMPONENT AUDIO IN (VARIABLE) COMPUTER IN 2 / MONITOR OUT R AUDIO OUT VIDEO IN...Note: • When connecting AUDIO OUT to Component Video Equipment Cables used for ordering optional parts. Connecting to external audio equipment, the projector's built-in speaker is disconnected. • See p61 for connection • Audio Cables (Mini Plug :stereo) ✽ •...
...; (stereo) Scart-VGA cable ✽ Component cable✽ Component-VGA cable✽ External Audio Equipment Audio Input COMPUTER IN 1/ COMPONENT IN RESET USB SERVICE PORT COMPUTER IN 1 / COMPONENT IN COMPUTER/ COMPONENT AUDIO IN (VARIABLE) COMPUTER IN 2 / MONITOR OUT R AUDIO OUT VIDEO IN...Note: • When connecting AUDIO OUT to Component Video Equipment Cables used for ordering optional parts. Connecting to external audio equipment, the projector's built-in speaker is disconnected. • See p61 for connection • Audio Cables (Mini Plug :stereo) ✽ •...
Owners Manual
Page 29
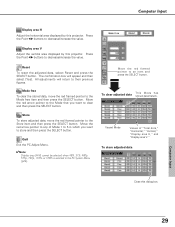
... To store adjusted data, move the red framed pointer to decrease/increase the value. To store adjusted data Close this projector. Reset To reset the adjusted data, select Reset and press the SELECT button. Vacant Mode Values of Mode 1 to 5 in the PC System Menu (p26). All...dots," "Horizontal," "Vertical," "Display area H," and "Display area V." Computer Input Display area H Adjust the horizontal area displayed by this projector. The confirmation box will return to the Store item and then press the SELECT button. Display area V Adjust the vertical area displayed by this...
... To store adjusted data, move the red framed pointer to decrease/increase the value. To store adjusted data Close this projector. Reset To reset the adjusted data, select Reset and press the SELECT button. Vacant Mode Values of Mode 1 to 5 in the PC System Menu (p26). All...dots," "Horizontal," "Vertical," "Display area H," and "Display area V." Computer Input Display area H Adjust the horizontal area displayed by this projector. The confirmation box will return to the Store item and then press the SELECT button. Display area V Adjust the vertical area displayed by this...
Owners Manual
Page 31
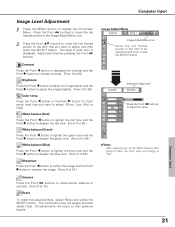
.... ✔Note: After adjusting any of contrast. (From 0 to adjust, and then press the SELECT button. level that you want to 15.) Reset To reset the adjusted data, select Reset and press the SELECT button. Press the Point 7 button or the Point 8 button for Color temp. Image Level Adjustment 1 Press the MENU button...
.... ✔Note: After adjusting any of contrast. (From 0 to adjust, and then press the SELECT button. level that you want to 15.) Reset To reset the adjusted data, select Reset and press the SELECT button. Press the Point 7 button or the Point 8 button for Color temp. Image Level Adjustment 1 Press the MENU button...
Owners Manual
Page 32
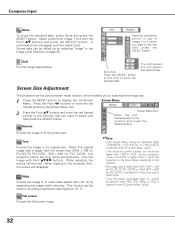
... when 720p(HDTV), 1035i (HDTV), or 1080i (HDTV) is higher than it, reset the resolution to the lower before connecting to the projector. •The image data in the PC System Menu (p26). • The projector cannot display any of Image 1 to 4 where you want to the correction limit,...the arrows will disappear. Move the red framed pointer to any resolution higher than XGA (1024 x 768 for PLC-XU73/ PLC-XU70) or SVGA (800 x 600 for PLC-SU70), this item to display the On-Screen Menu. This projector has the picture screen resize function, which enables you want to fit the screen ...
... when 720p(HDTV), 1035i (HDTV), or 1080i (HDTV) is higher than it, reset the resolution to the lower before connecting to the projector. •The image data in the PC System Menu (p26). • The projector cannot display any of Image 1 to 4 where you want to the correction limit,...the arrows will disappear. Move the red framed pointer to any resolution higher than XGA (1024 x 768 for PLC-XU73/ PLC-XU70) or SVGA (800 x 600 for PLC-SU70), this item to display the On-Screen Menu. This projector has the picture screen resize function, which enables you want to fit the screen ...
Owners Manual
Page 39
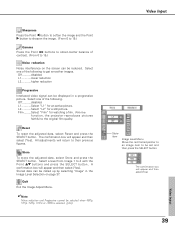
...reduction Noise interference on page 37. Off...........disabled. Select a level from Image 1 to the original film quality. With this function, the projector reproduces pictures faithful to 4 with the Point ed buttons and press the SELECT button. Select one of the following to get smoother images. ...on the screen can be set and then press the SELECT button. Film .........Select "Film" for watching a film. Reset To reset the adjusted data, select Reset and press the SELECT button. Quit Exit the Image Adjust Menu. ✔Note: Noise reduction and Progressive cannot be...
...reduction Noise interference on page 37. Off...........disabled. Select a level from Image 1 to the original film quality. With this function, the projector reproduces pictures faithful to 4 with the Point ed buttons and press the SELECT button. Select one of the following to get smoother images. ...on the screen can be set and then press the SELECT button. Film .........Select "Film" for watching a film. Reset To reset the adjusted data, select Reset and press the SELECT button. Quit Exit the Image Adjust Menu. ✔Note: Noise reduction and Progressive cannot be...
Owners Manual
Page 41
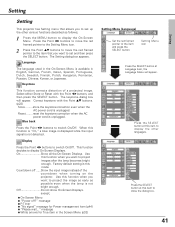
...White arrows for Power management item (p44) ● "Please wait..." Keystone This function corrects distortion of the countdown when turning on the projector. Reset ........reset the keystone correction when the AC power cord is not detected. Blue back Press the Point 7 8 buttons to switch On/Off. ...image. Factory default setting is this function is "On," a blue image is displayed while the input signal is unplugged. Setting Setting This projector has Setting menu that you want to set up the other languages. message ● P-Timer ● "No signal" message for True...
...White arrows for Power management item (p44) ● "Please wait..." Keystone This function corrects distortion of the countdown when turning on the projector. Reset ........reset the keystone correction when the AC power cord is not detected. Blue back Press the Point 7 8 buttons to switch On/Off. ...image. Factory default setting is this function is "On," a blue image is displayed while the input signal is unplugged. Setting Setting This projector has Setting menu that you want to set up the other languages. message ● P-Timer ● "No signal" message for True...
Owners Manual
Page 42
...be captured up display or interval of presentations. Capture Select [Yes] to stop capturing. 42 Logo select This function decides the start -up to XGA(1024 x 768). A signal from a computer can be captured except for a start -up display as follows: User ..........the image you captured ...1035i, and 1080i. • When capturing the image that has been adjusted by the Keystone function, the adjustment data is automatically reset and the projector captures an image without keystone adjustment. • When the Logo PIN code lock function is On, Capture menu cannot be displayed when...
...be captured up display or interval of presentations. Capture Select [Yes] to stop capturing. 42 Logo select This function decides the start -up to XGA(1024 x 768). A signal from a computer can be captured except for a start -up display as follows: User ..........the image you captured ...1035i, and 1080i. • When capturing the image that has been adjusted by the Keystone function, the adjustment data is automatically reset and the projector captures an image without keystone adjustment. • When the Logo PIN code lock function is On, Capture menu cannot be displayed when...
Owners Manual
Page 48
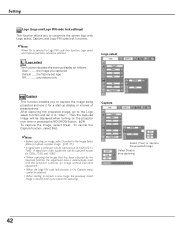
.... Select [Yes] to the factory default settings. Lamp counter This function is used to cool the projector down. Setting Fan This function provides the following alternatives in the cooling fans' operation after turning off the projector. (p19) L1 normal operation L2 . . . . .slower and lower-sound than the normal... operation (L1), but it . See page 53 for the user logo, PIN code lock, Logo PIN code lock and the lamp counter to activate it takes longer to reset the lamp replacement...
.... Select [Yes] to the factory default settings. Lamp counter This function is used to cool the projector down. Setting Fan This function provides the following alternatives in the cooling fans' operation after turning off the projector. (p19) L1 normal operation L2 . . . . .slower and lower-sound than the normal... operation (L1), but it . See page 53 for the user logo, PIN code lock, Logo PIN code lock and the lamp counter to activate it takes longer to reset the lamp replacement...
Owners Manual
Page 52
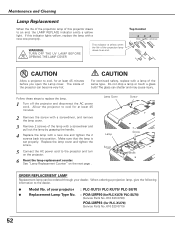
... promptly. Follow these steps to the dealer. ● Model No. of your dealer. VOLUME + VOLUME CAUTION Allow a projector to cool, for at least 45 minutes. 2 Remove the screw with a screwdriver, and remove the lamp cover. 3 ...Screw Handle ORDER REPLACEMENT LAMP Replacement lamp can be ordered through your projector : PLC-XU73/ PLC-XU70/ PLC-SU70 ● Replacement Lamp Type No. : POA-LMP90 (for PLC-XU73/ PLC-SU70) (Service Parts No. 610 323 0726) POA-LMP93 (...INPUT KEYSTONE SELECT - See "Lamp Replacement Counter" on the projector. 6 Reset the lamp replacement counter.
... promptly. Follow these steps to the dealer. ● Model No. of your dealer. VOLUME + VOLUME CAUTION Allow a projector to cool, for at least 45 minutes. 2 Remove the screw with a screwdriver, and remove the lamp cover. 3 ...Screw Handle ORDER REPLACEMENT LAMP Replacement lamp can be ordered through your projector : PLC-XU73/ PLC-XU70/ PLC-SU70 ● Replacement Lamp Type No. : POA-LMP90 (for PLC-XU73/ PLC-SU70) (Service Parts No. 610 323 0726) POA-LMP93 (...INPUT KEYSTONE SELECT - See "Lamp Replacement Counter" on the projector. 6 Reset the lamp replacement counter.
Owners Manual
Page 53
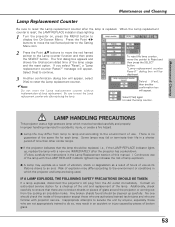
...Screen Menu. dialog box will appear, select [Yes] to reset the Lamp replacement counter only after the lamp is reset, the LAMP REPLACE indicator stops lighting. 1 Turn the projector on, press the MENU button to Reset and then press the SELECT button. Select [Yes] again .... IF A LAMP EXPLODES, THE FOLLOWING SAFETY PRECAUTIONS SHOULD BE TAKEN. "Lamp replacement counter Reset?" Maintenance & Cleaning LAMP HANDLING PRECAUTIONS This projector uses a high-pressure lamp which the projector and lamp are not appropriately trained to do so, may differ according to the environment or...
...Screen Menu. dialog box will appear, select [Yes] to reset the Lamp replacement counter only after the lamp is reset, the LAMP REPLACE indicator stops lighting. 1 Turn the projector on, press the MENU button to Reset and then press the SELECT button. Select [Yes] again .... IF A LAMP EXPLODES, THE FOLLOWING SAFETY PRECAUTIONS SHOULD BE TAKEN. "Lamp replacement counter Reset?" Maintenance & Cleaning LAMP HANDLING PRECAUTIONS This projector uses a high-pressure lamp which the projector and lamp are not appropriately trained to do so, may differ according to the environment or...

Owners Manual
Page 56
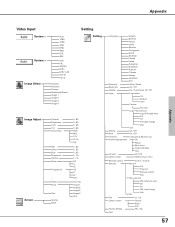
Total dots Horizontal Vertical Current mode Clamp Display area - Red Green Blue Sharpness Gamma Reset Store Quit 0 - 63 0 - 63 High Mid Low XLow Adj. 0 - 63 0 - 63 0 - 63 0 - 15 0 - 15 Yes / No Image 1 Image 2 Image 3 Image 4 Quit Normal True Wide ...5 Quit Mode 1 Mode 2 Mode 3 Mode 4 Mode 5 Quit Image Select Image Adjust Screen Dynamic Standard Real Blackboard(Green) Image 1 Image 2 Image 3 Image 4 Contrast Brightness Color temp. V Reset Mode free Store Quit 56 RGB( Analog ) Component RGB( Scart ) Quit Auto Video S-Video Quit 0 - 63 On / Off Go to System (1) Go to System (2) N/A Go...
Total dots Horizontal Vertical Current mode Clamp Display area - Red Green Blue Sharpness Gamma Reset Store Quit 0 - 63 0 - 63 High Mid Low XLow Adj. 0 - 63 0 - 63 0 - 63 0 - 15 0 - 15 Yes / No Image 1 Image 2 Image 3 Image 4 Quit Normal True Wide ...5 Quit Mode 1 Mode 2 Mode 3 Mode 4 Mode 5 Quit Image Select Image Adjust Screen Dynamic Standard Real Blackboard(Green) Image 1 Image 2 Image 3 Image 4 Contrast Brightness Color temp. V Reset Mode free Store Quit 56 RGB( Analog ) Component RGB( Scart ) Quit Auto Video S-Video Quit 0 - 63 On / Off Go to System (1) Go to System (2) N/A Go...
Owners Manual
Page 57
... Quit Language English German French Italian Spanish Portuguese Dutch Swedish Finnish Polish Hungarian Romanian Russian Chinese Korean Japanese Quit Keystone Blue back Display Store / Reset On / Off On / Countdown off / Off Logo Logo select Capture Off Default User Yes / No Logo PIN code lock Logo PIN ... Security Fan Lamp counter Factory default Quit Code 1 / Code 2 Key lock Off Projector Remote control Quit PIN code lock PIN code lock entry Off On PIN code change Quit Quit L1 / L2 Hour(s) Reset Quit Yes / No 57 Appendix Appendix Video Input System (2) System (3) Image Select ...
... Quit Language English German French Italian Spanish Portuguese Dutch Swedish Finnish Polish Hungarian Romanian Russian Chinese Korean Japanese Quit Keystone Blue back Display Store / Reset On / Off On / Countdown off / Off Logo Logo select Capture Off Default User Yes / No Logo PIN code lock Logo PIN ... Security Fan Lamp counter Factory default Quit Code 1 / Code 2 Key lock Off Projector Remote control Quit PIN code lock PIN code lock entry Off On PIN code change Quit Quit L1 / L2 Hour(s) Reset Quit Yes / No 57 Appendix Appendix Video Input System (2) System (3) Image Select ...
Owners Manual
Page 58
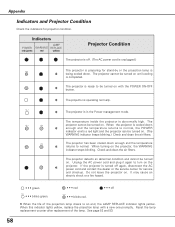
... ✽ enough and the temperature returns to be turned on the projector, the WARNING indicator stops blinking. Do not leave the projector on the ✽ projector. Reset the lamp replacement counter after replacement of the projection lamp draws to normal. When the projector is in the Power management mode. When this indicator lights yellow, replace...
... ✽ enough and the temperature returns to be turned on the projector, the WARNING indicator stops blinking. Do not leave the projector on the ✽ projector. Reset the lamp replacement counter after replacement of the projection lamp draws to normal. When the projector is in the Power management mode. When this indicator lights yellow, replace...


