Instruction Manual, PLC-XU300
Page 2
... built-in multimedia features, a palette of 16.77 million colors, and matrix liquid crystal display (LCD) technology. ◆ Compact Design ◆ Security Function This projector is available in 17 languages; The digital zoom function allows you can turn on the colored wall, you to the ...the similar color to ensure security of the program sound or other information displayed on the top control or remote control (p.54). It is a printed version of the projector. The projector has the Multi-scan system to conform to change without waiting for the screen logo and use . ...
... built-in multimedia features, a palette of 16.77 million colors, and matrix liquid crystal display (LCD) technology. ◆ Compact Design ◆ Security Function This projector is available in 17 languages; The digital zoom function allows you can turn on the colored wall, you to the ...the similar color to ensure security of the program sound or other information displayed on the top control or remote control (p.54). It is a printed version of the projector. The projector has the Multi-scan system to conform to change without waiting for the screen logo and use . ...
Instruction Manual, PLC-XU300
Page 3
... 7 Part Names and Functions 8 Front 8 Back 8 Bottom 8 Rear Terminal 9 Top Control 10 Remote Control 11 Remote Control Battery Installation 12 Remote Control Operating Range 12 Remote Control Code 12 Installation 13 Positioning the Projector 13 Adjustable Feet 13 Connecting to a Computer 14 Connecting to Video Equipment 15 Connecting to Component Video Equipment 16 Connecting the...
... 7 Part Names and Functions 8 Front 8 Back 8 Bottom 8 Rear Terminal 9 Top Control 10 Remote Control 11 Remote Control Battery Installation 12 Remote Control Operating Range 12 Remote Control Code 12 Installation 13 Positioning the Projector 13 Adjustable Feet 13 Connecting to a Computer 14 Connecting to Video Equipment 15 Connecting to Component Video Equipment 16 Connecting the...
Instruction Manual, PLC-XU300
Page 8
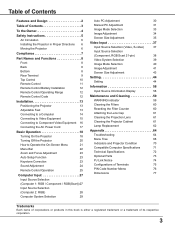
...light beam may damage lens cap and result in fire hazard. ⑥ Speaker ⑦ Exhaust Vents CAUTION Hot air is a registered trademark of the projector. *Kensington is exhausted from the exhaust vent. Part Names and Functions Front ⑤⑨ Back ⑦⑧ * ⑨ ⑩⑪ ...⑫ ⑬ ⑥ Bottom ⑭ ① Infrared Remote Receiver ② Zoom Ring ③ Focus Ring ④ Projection Lens ⑤ Lens Cap (See page 61 for the Network function. Do not put...
...light beam may damage lens cap and result in fire hazard. ⑥ Speaker ⑦ Exhaust Vents CAUTION Hot air is a registered trademark of the projector. *Kensington is exhausted from the exhaust vent. Part Names and Functions Front ⑤⑨ Back ⑦⑧ * ⑨ ⑩⑪ ...⑫ ⑬ ⑥ Bottom ⑭ ① Infrared Remote Receiver ② Zoom Ring ③ Focus Ring ④ Projection Lens ⑤ Lens Cap (See page 61 for the Network function. Do not put...

Instruction Manual, PLC-XU300
Page 11
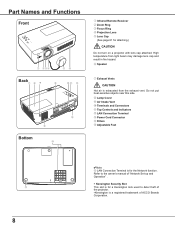
Do not bend, drop, or expose the remote control to moisture or heat. - Do not apply benzene, thinner, spray, or any chemical material. 11 Execute the selected item. (p.21) - Select an item or ...) ⑮ P-TIMER button Operate the P-timer function. (p.26) ⑯ LAMP button Select a lamp mode. (pp.25, 53) ⑰ INFO. Remote Control Part Names and Functions ① ON/STAND-BY button Turn the projector on the screen. (p.26) ⑮ ⑪ D.ZOOM ed buttons ⑭ Zoom in and out the images. (pp.25, 36...
Do not bend, drop, or expose the remote control to moisture or heat. - Do not apply benzene, thinner, spray, or any chemical material. 11 Execute the selected item. (p.21) - Select an item or ...) ⑮ P-TIMER button Operate the P-timer function. (p.26) ⑯ LAMP button Select a lamp mode. (pp.25, 53) ⑰ INFO. Remote Control Part Names and Functions ① ON/STAND-BY button Turn the projector on the screen. (p.26) ⑮ ⑪ D.ZOOM ed buttons ⑭ Zoom in and out the images. (pp.25, 36...
Instruction Manual, PLC-XU300
Page 12
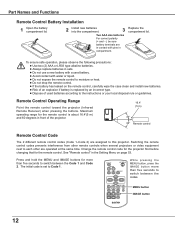
...9679; Use two (2) AAA or LR03 type alkaline batteries. ● Always replace batteries in front of the projector. 16.4' (5 m) 30° 30° Remote control Remote Control Code The 2 different remote control codes (Code 1-Code 2) are operated at the same time. Press and hold the MENU and IMAGE... of an explosion if battery is set to switch between the codes. Maximum operating range for the remote control. Change the remote control code for the projector first before changing that for the remote control is about 16.4'(5 m) and 60 degrees in sets. ● Do not use a new...
...9679; Use two (2) AAA or LR03 type alkaline batteries. ● Always replace batteries in front of the projector. 16.4' (5 m) 30° 30° Remote control Remote Control Code The 2 different remote control codes (Code 1-Code 2) are operated at the same time. Press and hold the MENU and IMAGE... of an explosion if battery is set to switch between the codes. Maximum operating range for the remote control. Change the remote control code for the projector first before changing that for the remote control is about 16.4'(5 m) and 60 degrees in sets. ● Do not use a new...
Instruction Manual, PLC-XU300
Page 13
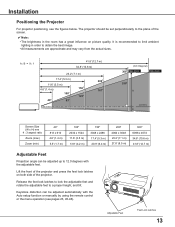
The projector should be set perpendicularly to 12.0 degrees with the Auto setup function or manually by using the remote control or the menu operation (see the figures below. Release the feet lock latches to lock the adjustable feet and rotate the adjustable ...m) 200" 4064 x 3048 23.2' (7.1 m) 27.8' (8.5 m) 300" 6096 x 4572 34.8' (10.6 m) 41.8' (12.7 m) Adjustable Feet Projection angle can be adjusted up to the plane of the projector. Keystone distortion can be adjusted automatically with the adjustable feet. Adjustable Feet Feet Lock Latches 13 Installation Positioning the...
The projector should be set perpendicularly to 12.0 degrees with the Auto setup function or manually by using the remote control or the menu operation (see the figures below. Release the feet lock latches to lock the adjustable feet and rotate the adjustable ...m) 200" 4064 x 3048 23.2' (7.1 m) 27.8' (8.5 m) 300" 6096 x 4572 34.8' (10.6 m) 41.8' (12.7 m) Adjustable Feet Projection angle can be adjusted up to the plane of the projector. Keystone distortion can be adjusted automatically with the adjustable feet. Adjustable Feet Feet Lock Latches 13 Installation Positioning the...

Instruction Manual, PLC-XU300
Page 18
...page 53 for Lamp control status.) ✔Note: The Filter warning and Lamp replacement icons may appear on the screen depending on the projector. 2 Connect the projector's AC power cord into an AC outlet. Is cable connected properly? 18 Open the lens cap (see page 53) appear on ...the countdown will not be shown on the screen (p.46). • During the countdown period, all operations are not shown on the remote control. Video / PC selection window Input signal guidance window No signal Current Input setting:Video Is signal processed correctly? The POWER indicator lights red...
...page 53 for Lamp control status.) ✔Note: The Filter warning and Lamp replacement icons may appear on the screen depending on the projector. 2 Connect the projector's AC power cord into an AC outlet. Is cable connected properly? 18 Open the lens cap (see page 53) appear on ...the countdown will not be shown on the screen (p.46). • During the countdown period, all operations are not shown on the remote control. Video / PC selection window Input signal guidance window No signal Current Input setting:Video Is signal processed correctly? The POWER indicator lights red...
Instruction Manual, PLC-XU300
Page 20
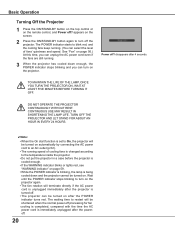
... the AC power cord is unplugged immediately after the projector is cooled enough. • If the WARNING indicator blinks or lights red, see "WARNING indicator" on the remote control, and Power off . • The projector can be turned on the projector. TO MAINTAIN THE LIFE OF THE LAMP, ONCE ...YOU TURN THE PROJECTOR ON, WAIT AT LEAST FIVE MINUTES BEFORE TURNING IT OFF. The waiting time...
... the AC power cord is unplugged immediately after the projector is cooled enough. • If the WARNING indicator blinks or lights red, see "WARNING indicator" on the remote control, and Power off . • The projector can be turned on the projector. TO MAINTAIN THE LIFE OF THE LAMP, ONCE ...YOU TURN THE PROJECTOR ON, WAIT AT LEAST FIVE MINUTES BEFORE TURNING IT OFF. The waiting time...
Instruction Manual, PLC-XU300
Page 21
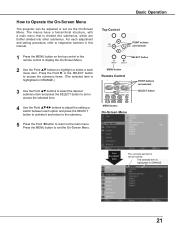
SELECT button MENU button Remote Control POINT buttons (arrowhead) SELECT button MENU button On-Screen Menu Point 8 or SELECT button The currently set via...or select a main menu item. Top Control Basic Operation POINT buttons (arrowhead) 1 Press the MENU button on the top control or the remote control to display the On-Screen Menu. 2 Use the Point ed buttons to exit the On-Screen Menu. Press the Point 8 or... and return to the submenu. 5 Press the Point 7 button to return to Operate the On-Screen Menu The projector can be adjusted or set item is highlighted in ORANGE. 21
SELECT button MENU button Remote Control POINT buttons (arrowhead) SELECT button MENU button On-Screen Menu Point 8 or SELECT button The currently set via...or select a main menu item. Top Control Basic Operation POINT buttons (arrowhead) 1 Press the MENU button on the top control or the remote control to display the On-Screen Menu. 2 Use the Point ed buttons to exit the On-Screen Menu. Press the Point 8 or... and return to the submenu. 5 Press the Point 7 button to return to Operate the On-Screen Menu The projector can be adjusted or set item is highlighted in ORANGE. 21
Instruction Manual, PLC-XU300
Page 22
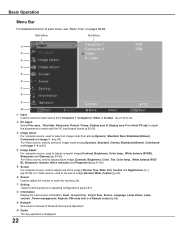
... image [Contrast, Brightness, Color temp., White balance (R/G/B), Sharpness and Gamma] (pp.34-35). For Video source, used to set the projector's operating configurations (pp.44-57). For Video source, used to adjust picture image [Contrast, Brightness, Color, Tint, Color temp., White ... source information: Input , H-sync freq., V-sync freq., Screen, Language, Lamp status, Lamp counter , Power management, Keylock, PIN code lock and Remote control (p.58). For Video source, used to select an image mode among Dynamic, Standard, Real, Blackboard(Green), Colorboard and image 1 - 4 ...
... image [Contrast, Brightness, Color temp., White balance (R/G/B), Sharpness and Gamma] (pp.34-35). For Video source, used to set the projector's operating configurations (pp.44-57). For Video source, used to adjust picture image [Contrast, Brightness, Color, Tint, Color temp., White ... source information: Input , H-sync freq., V-sync freq., Screen, Language, Lamp status, Lamp counter , Power management, Keylock, PIN code lock and Remote control (p.58). For Video source, used to select an image mode among Dynamic, Standard, Real, Blackboard(Green), Colorboard and image 1 - 4 ...
Instruction Manual, PLC-XU300
Page 23
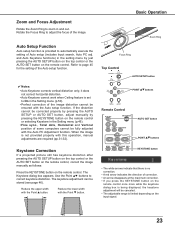
... Vertical position of correction. • An arrow disappears at the maximum correction. • If you press the KEYSTONE button on the remote control once more while the keystone dialog box is limited depending on the input signal. 23 Basic Operation Zoom Ring Focus Ring Top Control...cannot be fully adjusted with this operation, manual adjustments are required (pp.31-32). The Keystone dialog box appears. POINT ed buttons Remote Control AUTO SET button POINT ed buttons Keystone Correction If a projected picture still has keystone distortion after pressing the AUTO SETUP button on...
... Vertical position of correction. • An arrow disappears at the maximum correction. • If you press the KEYSTONE button on the remote control once more while the keystone dialog box is limited depending on the input signal. 23 Basic Operation Zoom Ring Focus Ring Top Control...cannot be fully adjusted with this operation, manual adjustments are required (pp.31-32). The Keystone dialog box appears. POINT ed buttons Remote Control AUTO SET button POINT ed buttons Keystone Correction If a projected picture still has keystone distortion after pressing the AUTO SETUP button on...
Instruction Manual, PLC-XU300
Page 24
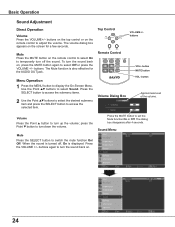
... function is displayed. button Approximate level of the volume. Volume Dialog Box VOL+ button MUTE button VOL- buttons on the top control or on the remote control to select On to select Off or press the VOLUME +/- Top Control VOLUME+/buttons Mute Press the MUTE button on the... remote control to display the On-Screen Menu. To turn the sound back on , press the MUTE button again to temporarily turn off , On is also ...
... function is displayed. button Approximate level of the volume. Volume Dialog Box VOL+ button MUTE button VOL- buttons on the top control or on the remote control to select On to select Off or press the VOLUME +/- Top Control VOLUME+/buttons Mute Press the MUTE button on the... remote control to display the On-Screen Menu. To turn the sound back on , press the MUTE button again to temporarily turn off , On is also ...
Instruction Manual, PLC-XU300
Page 25
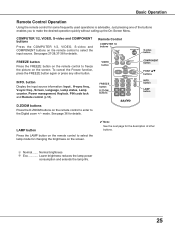
... zoom +/- VIDEO button INFO. button LAMP button D.ZOOM buttons Press the D.ZOOM buttons on the screen. Basic Operation Remote Control Operation Using the remote control for details. Just pressing one of other button. button Display the input source information: Input , H-sync freq.,... freq., Screen, Language, Lamp status, Lamp counter, Power management, Keylock, PIN code lock and Remote control (p.58). See page 36 for some frequently used operations is advisable. Remote Control COMPUTER 1/2 buttons S-video button FREEZE button Press the FREEZE button on the screen. ✔...
... zoom +/- VIDEO button INFO. button LAMP button D.ZOOM buttons Press the D.ZOOM buttons on the screen. Basic Operation Remote Control Operation Using the remote control for details. Just pressing one of other button. button Display the input source information: Input , H-sync freq.,... freq., Screen, Language, Lamp status, Lamp counter, Power management, Keylock, PIN code lock and Remote control (p.58). See page 36 for some frequently used operations is advisable. Remote Control COMPUTER 1/2 buttons S-video button FREEZE button Press the FREEZE button on the screen. ✔...
Instruction Manual, PLC-XU300
Page 26
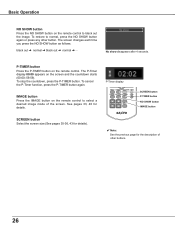
To stop the countdown, press the P-TIMER button. P-Timer display IMAGE button Press the IMAGE button on the remote control to select a desired image mode of other button. black out ➜ normal ➜ black out ➜ normal No show disappears after 4 seconds. SCREEN button P-... 35-36, 43 for details). ✔ Note: See the previous page for details. Basic Operation NO SHOW button Press the NO SHOW button on the remote control to normal, press the NO SHOW button again or press any other buttons. 26 P-TIMER button Press the P-TIMER button on the screen and...
To stop the countdown, press the P-TIMER button. P-Timer display IMAGE button Press the IMAGE button on the remote control to select a desired image mode of other button. black out ➜ normal ➜ black out ➜ normal No show disappears after 4 seconds. SCREEN button P-... 35-36, 43 for details). ✔ Note: See the previous page for details. Basic Operation NO SHOW button Press the NO SHOW button on the remote control to normal, press the NO SHOW button again or press any other buttons. 26 P-TIMER button Press the P-TIMER button on the screen and...
Instruction Manual, PLC-XU300
Page 27
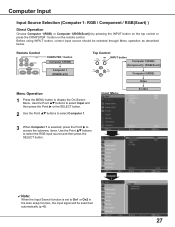
Remote Control COMPUTER 1 button Computer 1(RGB) Computer 1 (RGB(Scart)) Top Control INPUT button Computer 1(RGB) / (Component) / (RGB(Scart)) Computer 2(RGB) Video Menu Operation 1 Press the MENU ...) ) Direct Operation Choose Computer 1(RGB) or Computer 1(RGB(Scart)) by pressing the INPUT button on the top control or press the COMPUTER 1 button on the remote control. Input Menu S-video 3 When Computer 1 is set to select the RGB input source and then press the SELECT button. Before using INPUT button, correct...
Remote Control COMPUTER 1 button Computer 1(RGB) Computer 1 (RGB(Scart)) Top Control INPUT button Computer 1(RGB) / (Component) / (RGB(Scart)) Computer 2(RGB) Video Menu Operation 1 Press the MENU ...) ) Direct Operation Choose Computer 1(RGB) or Computer 1(RGB(Scart)) by pressing the INPUT button on the top control or press the COMPUTER 1 button on the remote control. Input Menu S-video 3 When Computer 1 is set to select the RGB input source and then press the SELECT button. Before using INPUT button, correct...
Instruction Manual, PLC-XU300
Page 28
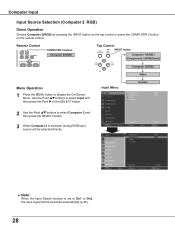
Remote Control COMPUTER 2 button Computer 2(RGB) Top Control INPUT button Computer 1(RGB) / (Component) / (RGB(Scart)) Computer 2(RGB) Video Menu Operation 1 Press the MENU button to On1 ... Source Selection (Computer 2: RGB) Direct Operation Choose Computer 2(RGB) by pressing the INPUT button on the top control or press the COMPUTER 2 button on the remote control.
Remote Control COMPUTER 2 button Computer 2(RGB) Top Control INPUT button Computer 1(RGB) / (Component) / (RGB(Scart)) Computer 2(RGB) Video Menu Operation 1 Press the MENU button to On1 ... Source Selection (Computer 2: RGB) Direct Operation Choose Computer 2(RGB) by pressing the INPUT button on the top control or press the COMPUTER 2 button on the remote control.
Instruction Manual, PLC-XU300
Page 33
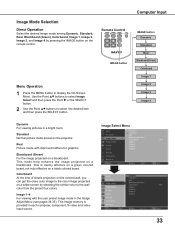
Remote Control IMAGE button Menu Operation 1 Press the MENU button to select the desired item and then press the SELECT button. Use the Point ed buttons ... pictures in the Image Adjust Menu (see pages 34-35). Standard Normal picture mode preset on the remote control. Blackboard (Green) For the image projected on a white screen by pressing the IMAGE button on the projector. Image 1-4 For viewing with improved halftone for graphics. Real Picture mode with the user preset image...
Remote Control IMAGE button Menu Operation 1 Press the MENU button to select the desired item and then press the SELECT button. Use the Point ed buttons ... pictures in the Image Adjust Menu (see pages 34-35). Standard Normal picture mode preset on the remote control. Blackboard (Green) For the image projected on a white screen by pressing the IMAGE button on the projector. Image 1-4 For viewing with improved halftone for graphics. Real Picture mode with the user preset image...

Instruction Manual, PLC-XU300
Page 36
... To reset, press the SELECT button at Yes. The On-Screen Menu disappears and D. Select Digital zoom -. Remote Control POINT buttons SELECT button D.ZOOM + button D.ZOOM - cannot be selected when Full or True is selected in...be also expanded by pressing the D.ZOOM d or the SELECT button on the remote control. Digital zoom - The projected image can be also compressed by pressing the D.ZOOM e or the... SELECT button on the remote control. mode, press any button except the D.ZOOM ed and the SELECT buttons. To return...
... To reset, press the SELECT button at Yes. The On-Screen Menu disappears and D. Select Digital zoom -. Remote Control POINT buttons SELECT button D.ZOOM + button D.ZOOM - cannot be selected when Full or True is selected in...be also expanded by pressing the D.ZOOM d or the SELECT button on the remote control. Digital zoom - The projected image can be also compressed by pressing the D.ZOOM e or the... SELECT button on the remote control. mode, press any button except the D.ZOOM ed and the SELECT buttons. To return...
Instruction Manual, PLC-XU300
Page 37
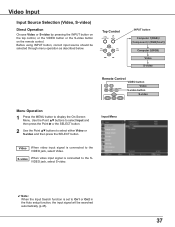
... Point ed buttons to display the On-Screen Menu. Top Control INPUT button Computer 1(RGB) / (Component) / (RGB(Scart)) Computer 2(RGB) Video S-video Remote Control VIDEO button Video S-video button S-video Menu Operation 1 Press the MENU button to select either Video or S-video and then press the SELECT button... Operation Choose Video or S-video by pressing the INPUT button on the top control, or the VIDEO button or the S-video button on the remote control. S-video When video input signal is connected to the SVIDEO jack, select S-video. ✔ Note: When the Input Search function is...
... Point ed buttons to display the On-Screen Menu. Top Control INPUT button Computer 1(RGB) / (Component) / (RGB(Scart)) Computer 2(RGB) Video S-video Remote Control VIDEO button Video S-video button S-video Menu Operation 1 Press the MENU button to select either Video or S-video and then press the SELECT button... Operation Choose Video or S-video by pressing the INPUT button on the top control, or the VIDEO button or the S-video button on the remote control. S-video When video input signal is connected to the SVIDEO jack, select S-video. ✔ Note: When the Input Search function is...
Instruction Manual, PLC-XU300
Page 38
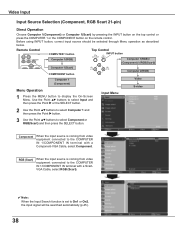
...). ✔ Note: When the Input Search function is coming from video equipment connected to select Component or RGB(Scart) and then press the SELECT button. Remote Control COMPUTER 1 button Top Control INPUT button Computer 1(RGB) Computer 1(RGB) / (Component) / (RGB(Scart)) Computer 1(Scart) COMPONENT button Computer 1 (Component) Menu Operation ...) or Computer 1(Scart) by pressing the INPUT button on the top control or press the COMPUTER 1 or the COMPONENT button on the remote control. Before using INPUT button, correct input source should be searched automatically (p.45). 38
...). ✔ Note: When the Input Search function is coming from video equipment connected to select Component or RGB(Scart) and then press the SELECT button. Remote Control COMPUTER 1 button Top Control INPUT button Computer 1(RGB) Computer 1(RGB) / (Component) / (RGB(Scart)) Computer 1(Scart) COMPONENT button Computer 1 (Component) Menu Operation ...) or Computer 1(Scart) by pressing the INPUT button on the top control or press the COMPUTER 1 or the COMPONENT button on the remote control. Before using INPUT button, correct input source should be searched automatically (p.45). 38


