

Owners Manual
Page 1
Multimedia Projector MODEL PLC-XR201 PLC-XR251 Network Supported □ Wired LAN 100-Base-TX/10-Base-T Refer to the Owner's Manuals below for details about network function. □ Network Set-up and Operation □ PJ Network Manager Owner's Manual
Multimedia Projector MODEL PLC-XR201 PLC-XR251 Network Supported □ Wired LAN 100-Base-TX/10-Base-T Refer to the Owner's Manuals below for details about network function. □ Network Set-up and Operation □ PJ Network Manager Owner's Manual

Owners Manual
Page 2
...technology for better and proper maintenance of 16.77 million colors, and matrix liquid crystal display (LCD) technology. ♦ Compact Design ♦ Security Function This projector is designed compact in 18 languages; The digital zoom function allows you can be used as ...; Switchable Interface Terminal logo (pp.46-48). This projector is available in size and weight. via network. This projector utilizes built-in this manual are subject to the owner's manual of "Network Set-up display or The projector provides a switchable interface terminal. projected on a white ...
...technology for better and proper maintenance of 16.77 million colors, and matrix liquid crystal display (LCD) technology. ♦ Compact Design ♦ Security Function This projector is designed compact in 18 languages; The digital zoom function allows you can be used as ...; Switchable Interface Terminal logo (pp.46-48). This projector is available in size and weight. via network. This projector utilizes built-in this manual are subject to the owner's manual of "Network Set-up display or The projector provides a switchable interface terminal. projected on a white ...
Owners Manual
Page 3
... Control Battery Installation 12 Remote Control Operating Range 12 Remote Control Code 12 Installation 13 Positioning the Projector 13 Adjustable Foot 13 Connecting to a Computer 14 Connecting to Video Equipment 15 Connecting to Component ...Projector 20 How to Operate the On-Screen Menu 21 Menu Bar 22 Zoom and Focus Adjustment 23 Auto Setup Function 23 Keystone Correction 23 Sound Adjustment 24 Remote Control Operation 25 Computer Input 27 Input Source Selection (RGB: Computer 1/Computer 2) 27 Computer System Selection 28 Auto PC Adjustment 29 Manual...
... Control Battery Installation 12 Remote Control Operating Range 12 Remote Control Code 12 Installation 13 Positioning the Projector 13 Adjustable Foot 13 Connecting to a Computer 14 Connecting to Video Equipment 15 Connecting to Component ...Projector 20 How to Operate the On-Screen Menu 21 Menu Bar 22 Zoom and Focus Adjustment 23 Auto Setup Function 23 Keystone Correction 23 Sound Adjustment 24 Remote Control Operation 25 Computer Input 27 Input Source Selection (RGB: Computer 1/Computer 2) 27 Computer System Selection 28 Auto PC Adjustment 29 Manual...

Owners Manual
Page 4
... proper amount of space on the LCD panels by the characteristic of your projector seems to prevent A Breakdown or a disaster. READ AND KEEP THIS OWNER'S MANUAL FOR LATER USE. To the Owner Before installing and operating this projector, read this manual thoroughly. Operating the projector properly enables you purchased the projector or the service center. If your...
... proper amount of space on the LCD panels by the characteristic of your projector seems to prevent A Breakdown or a disaster. READ AND KEEP THIS OWNER'S MANUAL FOR LATER USE. To the Owner Before installing and operating this projector, read this manual thoroughly. Operating the projector properly enables you purchased the projector or the service center. If your...
Owners Manual
Page 8
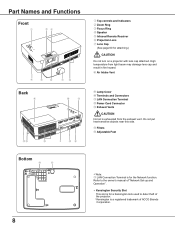
...9315; Speaker ⑤ Infrared Remote Receiver ⑥ Projection Lens ⑦ Lens Cap (See page 60 for a Kensington lock used to deter theft of the projector. Kensington is a registered trademark of ACCO Brands Corporation. 8 Do not put heat-sensitive objects near this side. ⑭ Filters ⑮ Adjustable ... Connection Terminal ⑫ Power Cord Connector ⑬ Exhaust Vents CAUTION Hot air is for the Network function. Refer to the owner's manual of "Network Set-up and Operation" . Kensington Security Slot This slot is for attaching.) CAUTION Do not turn on...
...9315; Speaker ⑤ Infrared Remote Receiver ⑥ Projection Lens ⑦ Lens Cap (See page 60 for a Kensington lock used to deter theft of the projector. Kensington is a registered trademark of ACCO Brands Corporation. 8 Do not put heat-sensitive objects near this side. ⑭ Filters ⑮ Adjustable ... Connection Terminal ⑫ Power Cord Connector ⑬ Exhaust Vents CAUTION Hot air is for the Network function. Refer to the owner's manual of "Network Set-up and Operation" . Kensington Security Slot This slot is for attaching.) CAUTION Do not turn on...

Owners Manual
Page 9
...Connect the composite video output signal to this jack (p.15). ⑥ LAN Connection Terminal Connect the LAN cable (refer to the owner's manual of "Network Set-up and Operation"). ⑦ AUDIO IN Connect the audio output signal from computer or video equipment to this terminal .../ MONITOR OUT - Rear Terminal ① ② Part Names and Functions ③ ④ ⑤ ⑥ ⑦ ① CONTROL PORT When the projector is controlled by a computer, connect to this jack with serial control cable. ② COMPUTER IN 1 /S-VIDEO IN / COMPONENT IN Connect analog RGB output signal...
...Connect the composite video output signal to this jack (p.15). ⑥ LAN Connection Terminal Connect the LAN cable (refer to the owner's manual of "Network Set-up and Operation"). ⑦ AUDIO IN Connect the audio output signal from computer or video equipment to this terminal .../ MONITOR OUT - Rear Terminal ① ② Part Names and Functions ③ ④ ⑤ ⑥ ⑦ ① CONTROL PORT When the projector is controlled by a computer, connect to this jack with serial control cable. ② COMPUTER IN 1 /S-VIDEO IN / COMPONENT IN Connect analog RGB output signal...
Owners Manual
Page 19
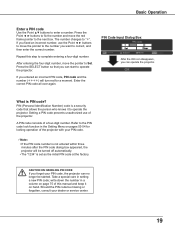
...manual and keep it to "". After entering the four-digit number, move the pointer to complete entering a four-digit number. Press the SELECT button so that allows the person who knows it on hand. What is not entered within three minutes after the PIN code dialog box appeared, the projector... set as the initial PIN code at the factory. write down the number in setting a new PIN code; The number changes to operate the projector. Setting a PIN code prevents unauthorized use the Point ◄ ► buttons to move the red frame pointer to correct, and then enter the...
...manual and keep it to "". After entering the four-digit number, move the pointer to complete entering a four-digit number. Press the SELECT button so that allows the person who knows it on hand. What is not entered within three minutes after the PIN code dialog box appeared, the projector... set as the initial PIN code at the factory. write down the number in setting a new PIN code; The number changes to operate the projector. Setting a PIN code prevents unauthorized use the Point ◄ ► buttons to move the red frame pointer to correct, and then enter the...
Owners Manual
Page 21
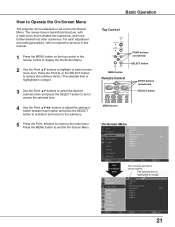
...currently set item is divided into submenus, which are further divided into other submenus. Press the MENU button to Operate the On-Screen Menu The projector can be adjusted or set or access the selected item. 4 Use the Point buttons to adjust the setting or switch between each adjustment and ...setting procedure, refer to respective sections in this manual. 1 Press the MENU button on the top control or the remote control to display the On-Screen Menu. 2 Use the Point ▲▼ ...
...currently set item is divided into submenus, which are further divided into other submenus. Press the MENU button to Operate the On-Screen Menu The projector can be adjusted or set or access the selected item. 4 Use the Point buttons to adjust the setting or switch between each adjustment and ...setting procedure, refer to respective sections in this manual. 1 Press the MENU button on the top control or the remote control to display the On-Screen Menu. 2 Use the Point ▲▼ ...

Owners Manual
Page 22
... select an image mode among Dynamic, Standard, Real, Blackboard(Green), Colorboard and image 1 - 4 (p.32). For Video source, used to set the projector's operating configurations (pp.43-56). ⑧ Information Display the input source information: Input , H-sync freq., V-sync freq., Screen, Language, Lamp status..., Lamp counter , Power management, Key lock, PIN code lock and Remote control (p.57). ⑨ Network See the owner's manual of "Network Set-up and Operation". ⑩ Guide The key operation is displayed. 22 For Video source, used to adjust picture image [...
... select an image mode among Dynamic, Standard, Real, Blackboard(Green), Colorboard and image 1 - 4 (p.32). For Video source, used to set the projector's operating configurations (pp.43-56). ⑧ Information Display the input source information: Input , H-sync freq., V-sync freq., Screen, Language, Lamp status..., Lamp counter , Power management, Key lock, PIN code lock and Remote control (p.57). ⑨ Network See the owner's manual of "Network Set-up and Operation". ⑩ Guide The key operation is displayed. 22 For Video source, used to adjust picture image [...

Owners Manual
Page 28
... Adjustment function works to display proper images. PC System Menu Customized Mode (1-5) set in the projector and displays it. Selecting Computer System Manually PC system can also be selected manually. 1 Press the MENU button to select the desired system and then press the SELECT button....Menu (pp.30-31). Check the connection between your computer and the projector. (See "Troubleshooting" on VGA, SVGA, XGA, SXGA, WXGA or WUXGA with its Multi-scan system and Auto PC Adjustment. RGB(Computer 1) Systems in this projector is required (pp.30-31). If a computer is displayed. *...
... Adjustment function works to display proper images. PC System Menu Customized Mode (1-5) set in the projector and displays it. Selecting Computer System Manually PC system can also be selected manually. 1 Press the MENU button to select the desired system and then press the SELECT button....Menu (pp.30-31). Check the connection between your computer and the projector. (See "Troubleshooting" on VGA, SVGA, XGA, SXGA, WXGA or WUXGA with its Multi-scan system and Auto PC Adjustment. RGB(Computer 1) Systems in this projector is required (pp.30-31). If a computer is displayed. *...

Owners Manual
Page 29
... The adjusted parameters from the Auto PC Adjustment can be operated when 480i, 575i, 480p, 575p, 720p,1035i or 1080i is in the projector. appears while the Auto PC adjustment is selected in the PC System Menu (see page 28). and then press the SELECT button. Computer ...Input Auto PC Adjustment Auto PC Adjustment function is not provided properly with this operation, manual adjustments are stored, the setting can be stored in process. Note: • Fine sync, Total dots, Horizontal and Vertical position of ...
... The adjusted parameters from the Auto PC Adjustment can be operated when 480i, 575i, 480p, 575p, 720p,1035i or 1080i is in the projector. appears while the Auto PC adjustment is selected in the PC System Menu (see page 28). and then press the SELECT button. Computer ...Input Auto PC Adjustment Auto PC Adjustment function is not provided properly with this operation, manual adjustments are stored, the setting can be stored in process. Note: • Fine sync, Total dots, Horizontal and Vertical position of ...

Owners Manual
Page 30
...area V Use the Point ◄► buttons to adjust the vertical area displayed by this projector. 30 It allows you to precisely adjust several parameters to match those parameters manually adjusted. Total dots Use the Point ◄► buttons to adjust the number of this adjustment...picture position. The projector has five independent memory areas to store those signal formats. PC adjust Menu Fine sync Use the Point ◄► buttons to adjust the value, eliminating a flicker from the image displayed (from 0 to 31). Computer Input Manual PC Adjustment Some ...
...area V Use the Point ◄► buttons to adjust the vertical area displayed by this projector. 30 It allows you to precisely adjust several parameters to match those parameters manually adjusted. Total dots Use the Point ◄► buttons to adjust the number of this adjustment...picture position. The projector has five independent memory areas to store those signal formats. PC adjust Menu Fine sync Use the Point ◄► buttons to adjust the value, eliminating a flicker from the image displayed (from 0 to 31). Computer Input Manual PC Adjustment Some ...

Owners Manual
Page 38
...video image, select a specific broadcast signal format from among PAL, SECAM, NTSC, NTSC 4.43, PAL-M, and PAL-N. COMPONENT VIDEO SIGNAL FORMAT If the projector cannot reproduce proper video image, select a specific component video signal format from among 480i, 575i, 480p, 575p, 720p, 1035i, and 1080i. When ...Video System is PAL-M or PAL-N, select the system manually. Use the Point ▲▼ buttons to select Input and then press the Point ► or the SELECT button. 2 Select Video, S-video or...
...video image, select a specific broadcast signal format from among PAL, SECAM, NTSC, NTSC 4.43, PAL-M, and PAL-N. COMPONENT VIDEO SIGNAL FORMAT If the projector cannot reproduce proper video image, select a specific component video signal format from among 480i, 575i, 480p, 575p, 720p, 1035i, and 1080i. When ...Video System is PAL-M or PAL-N, select the system manually. Use the Point ▲▼ buttons to select Input and then press the Point ► or the SELECT button. 2 Select Video, S-video or...

Owners Manual
Page 42
... Screen Size Adjustment This projector has the picture screen resize function, which enables you want to adjust. The Scale V appears dimmed and becomes unavailable. Press the SELECT button at Common to display a confirmation box. Wide Provide the image at Yes. Custom Adjust the screen scale and position manually with this function. Press...
... Screen Size Adjustment This projector has the picture screen resize function, which enables you want to adjust. The Scale V appears dimmed and becomes unavailable. Press the SELECT button at Common to display a confirmation box. Wide Provide the image at Yes. Custom Adjust the screen scale and position manually with this function. Press...

Owners Manual
Page 44
... While Input search is set On in the Setting menu (p.49). • Perfect correction of the image distortion cannot be ensured with this operation, manual adjustments are displayed every time the signal is active, cancel it to the button's input signal. • Input search, Auto PC adj. If the...with the Auto PC Adjustment function. On1.......... When pressing the AUTO SET button on the top control or the remote control. - When turning on the projector by pressing the ON/STAND-BY button on the remote control. - When a signal is displayed. When the current input signal is cut off.* ...
... While Input search is set On in the Setting menu (p.49). • Perfect correction of the image distortion cannot be ensured with this operation, manual adjustments are displayed every time the signal is active, cancel it to the button's input signal. • Input search, Auto PC adj. If the...with the Auto PC Adjustment function. On1.......... When pressing the AUTO SET button on the top control or the remote control. - When turning on the projector by pressing the ON/STAND-BY button on the remote control. - When a signal is displayed. When the current input signal is cut off.* ...
Owners Manual
Page 51
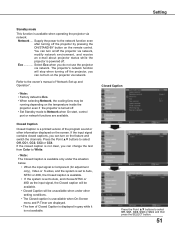
... under other information displayed on the feature and switch the channels. Network..... If the closed captions, you do not use the projector via network. Supply the power to the owner's manual of the program sound or other setting conditions. • The Closed caption is a printed version of "Network Set-up and Operation...
... under other information displayed on the feature and switch the channels. Network..... If the closed captions, you do not use the projector via network. Supply the power to the owner's manual of the program sound or other setting conditions. • The Closed caption is a printed version of "Network Set-up and Operation...

Owners Manual
Page 62
... or pieces of your projector ● Replacement Lamp Type No. : PLC-XR201, PLC-XR251 : POA-LMP132 (Service Parts No. 610 345 2456) LAMP HANDLING PRECAUTIONS This projector uses a high-pressure lamp which the projector and lamp are being used. If a lamp explodes, disconnect the projector's AC plug from lamp... PRECAUTIONS SHOULD BE TAKEN. Additionally, check carefully to do so, may result in the Lamp Replacement section of this manual.) Continuous use of the lamp. Maintenance and Cleaning ORDER REPLACEMENT LAMP Replacement lamp can be handled carefully and properly.
... or pieces of your projector ● Replacement Lamp Type No. : PLC-XR201, PLC-XR251 : POA-LMP132 (Service Parts No. 610 345 2456) LAMP HANDLING PRECAUTIONS This projector uses a high-pressure lamp which the projector and lamp are being used. If a lamp explodes, disconnect the projector's AC plug from lamp... PRECAUTIONS SHOULD BE TAKEN. Additionally, check carefully to do so, may result in the Lamp Replacement section of this manual.) Continuous use of the lamp. Maintenance and Cleaning ORDER REPLACEMENT LAMP Replacement lamp can be handled carefully and properly.
Owners Manual
Page 64
... 480p,575p.720p,480i,575i,1035i or 1080i is not set to a projector. Auto setup does not work . - Check the connection between your computer's instruction manual for monitor output when connecting to Manual. Make sure you selected Store after turning off power. - See pages 14...-16. - When the AUDIO OUT is plugged-in, the projector's built-in speaker is projected. - Power management does...
... 480p,575p.720p,480i,575i,1035i or 1080i is not set to a projector. Auto setup does not work . - Check the connection between your computer's instruction manual for monitor output when connecting to Manual. Make sure you selected Store after turning off power. - See pages 14...-16. - When the AUDIO OUT is plugged-in, the projector's built-in speaker is projected. - Power management does...
Owners Manual
Page 68
... Lamp control Lamp control High/Normal/ECO Lamp life control Mode 1/Mode 2 Remote control Code 1-Code 2 Security Fan Fan control Lamp counter Key lock Off Projector Remote control PIN code lock Off/On1/On2 PIN code change On/Off On/Off Computer 2/Monitor out Contrast Brightness Color Tint Color temp. On.../Off Auto keystone Auto Manual Off Store/Reset Blue/User/Black Off /On/Countdown off Logo select User Default Off Capture Yes/No Logo PIN code lock Off/On Logo...
... Lamp control Lamp control High/Normal/ECO Lamp life control Mode 1/Mode 2 Remote control Code 1-Code 2 Security Fan Fan control Lamp counter Key lock Off Projector Remote control PIN code lock Off/On1/On2 PIN code change On/Off On/Off Computer 2/Monitor out Contrast Brightness Color Tint Color temp. On.../Off Auto keystone Auto Manual Off Store/Reset Blue/User/Black Off /On/Countdown off Logo select User Default Off Capture Yes/No Logo PIN code lock Off/On Logo...

Owners Manual
Page 71
...and The U.K.) PLC-XR251: AC 100-120 V (3.5A Max. Appendix Technical Specifications Mechanical Information Projector Type Dimensions (W x H x D) Net Weight Foot Adjustment Multi-media Projector 13.13" ...x 3.35" x 9.72" (333.5mm x 85.2mm x 247.0mm) (Not including protrusions) 5.5 lbs (2.5 kg) 0˚ to 10˚ Panel Resolution LCD... 2.0 ~ 2.15 lens with f 18.38 mm ~ 22.06 mm with manual zoom and focus 220 W Interface Video Input Jack RCA Type x 1 Audio Input ...PLC-XR201: AC 100-120 V (3.3A Max.
...and The U.K.) PLC-XR251: AC 100-120 V (3.5A Max. Appendix Technical Specifications Mechanical Information Projector Type Dimensions (W x H x D) Net Weight Foot Adjustment Multi-media Projector 13.13" ...x 3.35" x 9.72" (333.5mm x 85.2mm x 247.0mm) (Not including protrusions) 5.5 lbs (2.5 kg) 0˚ to 10˚ Panel Resolution LCD... 2.0 ~ 2.15 lens with f 18.38 mm ~ 22.06 mm with manual zoom and focus 220 W Interface Video Input Jack RCA Type x 1 Audio Input ...PLC-XR201: AC 100-120 V (3.3A Max.

