Owners Manual
Page 3
... 12 Remote Control Operating Range 12 Remote Control Code 12 Installation 13 Positioning the Projector 13 Adjustable Foot 13 Connecting to a Computer 14 Connecting to Video Equipment 15 Connecting to Component Video and RGB (Scart) Equipment 16 Connecting the AC Power Cord 17 Basic Operation... 18 Turning On the Projector 18 Turning Off the Projector 20 How to Operate the On-Screen Menu ...
... 12 Remote Control Operating Range 12 Remote Control Code 12 Installation 13 Positioning the Projector 13 Adjustable Foot 13 Connecting to a Computer 14 Connecting to Video Equipment 15 Connecting to Component Video and RGB (Scart) Equipment 16 Connecting the AC Power Cord 17 Basic Operation... 18 Turning On the Projector 18 Turning Off the Projector 20 How to Operate the On-Screen Menu ...

Owners Manual
Page 9
... ③ ④ ⑤ ⑥ ⑦ ① CONTROL PORT When the projector is controlled by a computer, connect to this jack with serial control cable. ② COMPUTER IN 1 /S-VIDEO IN / COMPONENT IN Connect analog RGB output signal from a computer, S-VIDEO output signal from computer or video equipment to this jack (pp.14-16). 9 Connect analog RGB...
... ③ ④ ⑤ ⑥ ⑦ ① CONTROL PORT When the projector is controlled by a computer, connect to this jack with serial control cable. ② COMPUTER IN 1 /S-VIDEO IN / COMPONENT IN Connect analog RGB output signal from a computer, S-VIDEO output signal from computer or video equipment to this jack (pp.14-16). 9 Connect analog RGB...
Owners Manual
Page 11
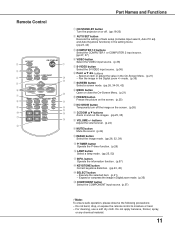
Remote Control Part Names and Functions ① ON/STAND-BY button Turn the projector on or off the image on the screen. (p.25) ⑰ ⑩ NO SHOW button ⑯ Temporarily turn off . (pp.18-20) ② ...menu. (pp.23, 44) ③ COMPUTER 1/2 buttons Select the COMPUTER 1 or COMPUTER 2 input source. (pp.27, 37) ④ VIDEO button Select the VIDEO input source. (p.36) ① ⑤ S-VIDEO button Select the S-VIDEO input source. (p.36) ⑥ Point buttons - and Auto Keystone functions) in the Digital zoom +/- For cleaning, use a soft dry cloth...
Remote Control Part Names and Functions ① ON/STAND-BY button Turn the projector on or off the image on the screen. (p.25) ⑰ ⑩ NO SHOW button ⑯ Temporarily turn off . (pp.18-20) ② ...menu. (pp.23, 44) ③ COMPUTER 1/2 buttons Select the COMPUTER 1 or COMPUTER 2 input source. (pp.27, 37) ④ VIDEO button Select the VIDEO input source. (p.36) ① ⑤ S-VIDEO button Select the S-VIDEO input source. (p.36) ⑥ Point buttons - and Auto Keystone functions) in the Digital zoom +/- For cleaning, use a soft dry cloth...

Owners Manual
Page 12
... wipe the case clean and install new batteries. ● Risk of an explosion if battery is replaced by an incorrect type. ● Dispose of the projector. 16.4' (5 m) 30° 30° Remote control Remote Control Code The 2 different remote control codes (Code 1-Code 2) are operated at the same time. MENU button... control. See "Remote control" in front of used batteries according to Code 1. Switching the remote control codes prevents interference from other remote controls when several projectors or video equipment next to switch between the Code 1 and Code 2.
... wipe the case clean and install new batteries. ● Risk of an explosion if battery is replaced by an incorrect type. ● Dispose of the projector. 16.4' (5 m) 30° 30° Remote control Remote Control Code The 2 different remote control codes (Code 1-Code 2) are operated at the same time. MENU button... control. See "Remote control" in front of used batteries according to Code 1. Switching the remote control codes prevents interference from other remote controls when several projectors or video equipment next to switch between the Code 1 and Code 2.
Owners Manual
Page 14
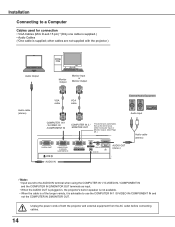
...: • Input sound to the AUDIO IN terminal when using the COMPUTER IN 1/ S-VIDEO IN / COMPONENT IN and the COMPUTER IN 2/MONITOR OUT terminals as input. • When the AUDIO OUT is plugged-in, the projector's built-in speaker is not available. • When the cable is of both the... projector and external equipment from the AC outlet before connecting cables. 14 Installation Connecting to use the COMPUTER IN 1 /S-VIDEO IN /COMPONENT IN and not the COMPUTER IN 2/MONITOR OUT. Unplug the power cords of the ...
...: • Input sound to the AUDIO IN terminal when using the COMPUTER IN 1/ S-VIDEO IN / COMPONENT IN and the COMPUTER IN 2/MONITOR OUT terminals as input. • When the AUDIO OUT is plugged-in, the projector's built-in speaker is not available. • When the cable is of both the... projector and external equipment from the AC outlet before connecting cables. 14 Installation Connecting to use the COMPUTER IN 1 /S-VIDEO IN /COMPONENT IN and not the COMPUTER IN 2/MONITOR OUT. Unplug the power cords of the ...
Owners Manual
Page 15
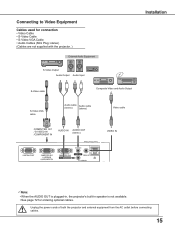
... outlet before connecting cables. 15 Connecting to Video Equipment Cables used for connection • Video Cable • S-Video Cable • S-Video-VGA Cable • Audio Cables (Mini Plug: stereo) (Cables are not supplied with the projector. ) External Audio Equipment S-Video Output Audio Output Audio Input S-Video cable Composite Video and Audio Output S-Video-VGA cable Audio cable (stereo) Audio...
... outlet before connecting cables. 15 Connecting to Video Equipment Cables used for connection • Video Cable • S-Video Cable • S-Video-VGA Cable • Audio Cables (Mini Plug: stereo) (Cables are not supplied with the projector. ) External Audio Equipment S-Video Output Audio Output Audio Input S-Video cable Composite Video and Audio Output S-Video-VGA cable Audio cable (stereo) Audio...
Owners Manual
Page 16
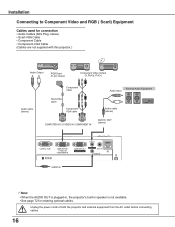
...stereo) • Scart-VGA Cable • Component Cable • Component-VGA Cable (Cables are not supplied with this projector.) Audio Output RGB Scart 21-pin Output Component Video Output (Y, Pb/Cb, Pr/Cr) Audio cable (stereo) Component cable External Audio Equipment Audio Input Scart-VGA cable ...ComponentVGA cable Audio cable (stereo) COMPUTER IN 1/ S-VIDEO IN / COMPONENT IN AUDIO OUT (stereo) AUDIO IN Note: • When the AUDIO OUT is plugged-in, the projector's built-in speaker is not available. • See page 72 for ordering optional...
...stereo) • Scart-VGA Cable • Component Cable • Component-VGA Cable (Cables are not supplied with this projector.) Audio Output RGB Scart 21-pin Output Component Video Output (Y, Pb/Cb, Pr/Cr) Audio cable (stereo) Component cable External Audio Equipment Audio Input Scart-VGA cable ...ComponentVGA cable Audio cable (stereo) COMPUTER IN 1/ S-VIDEO IN / COMPONENT IN AUDIO OUT (stereo) AUDIO IN Note: • When the AUDIO OUT is plugged-in, the projector's built-in speaker is not available. • See page 72 for ordering optional...

Owners Manual
Page 18
... Computer Input signal guidance window No signal Current Input setting:Video Is signal processed correctly? And then follow the input signal guidance window to On2, the input signal will be displayed on the projector. 2 Connect the projector's AC power cord into an AC outlet. Open the ...8226; When Countdown off or Off is selected in the Display function, the Video/ PC selection window and the input signal guidance window are not shown on the remote control. Basic Operation Turning On the Projector 1 Complete peripheral connections (with a PIN code, PIN code input dialog box...
... Computer Input signal guidance window No signal Current Input setting:Video Is signal processed correctly? And then follow the input signal guidance window to On2, the input signal will be displayed on the projector. 2 Connect the projector's AC power cord into an AC outlet. Open the ...8226; When Countdown off or Off is selected in the Display function, the Video/ PC selection window and the input signal guidance window are not shown on the remote control. Basic Operation Turning On the Projector 1 Complete peripheral connections (with a PIN code, PIN code input dialog box...

Owners Manual
Page 22
...mute the sound (p.24). ⑦ Setting Used to adjust size of each menu, see "Menu Tree" on pages 67-68. For Video source, used to adjust picture image [Contrast, Brightness, Color, Tint, Color temp., White balance (R/G/ B), Sharpness, Gamma, Noise reduction ...and Progressive] (pp.40-41). ⑤ Screen For computer source, used to set the projector's operating configurations (pp.43-56). ⑧ Information Display the input source information: Input , H-sync freq., V-sync freq., Screen, Language, Lamp...
...mute the sound (p.24). ⑦ Setting Used to adjust size of each menu, see "Menu Tree" on pages 67-68. For Video source, used to adjust picture image [Contrast, Brightness, Color, Tint, Color temp., White balance (R/G/ B), Sharpness, Gamma, Noise reduction ...and Progressive] (pp.40-41). ⑤ Screen For computer source, used to set the projector's operating configurations (pp.43-56). ⑧ Information Display the input source information: Input , H-sync freq., V-sync freq., Screen, Language, Lamp...
Owners Manual
Page 32
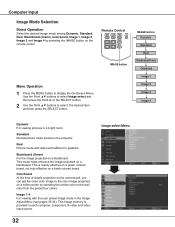
... image projected on a blackboard. IMAGE button Dynamic Standard Real Blackboard(Green) Colorboard Image 1 Image 2 Image 3 Image 4 Dynamic For viewing pictures in each computer, component, S-video and video input source. 32 Image select Menu Use the Point ▲▼ buttons to select Image select and then press the Point ► or the SELECT... ▲▼ buttons to display the On-Screen Menu. Blackboard (Green) For the image projected on a white screen by pressing the IMAGE button on the projector.
... image projected on a blackboard. IMAGE button Dynamic Standard Real Blackboard(Green) Colorboard Image 1 Image 2 Image 3 Image 4 Dynamic For viewing pictures in each computer, component, S-video and video input source. 32 Image select Menu Use the Point ▲▼ buttons to select Image select and then press the Point ► or the SELECT... ▲▼ buttons to display the On-Screen Menu. Blackboard (Green) For the image projected on a white screen by pressing the IMAGE button on the projector.

Owners Manual
Page 34
...16:9. Computer Input Store To store the adjusted data, select Store and press the Point ►or the SELECT button. Screen Size Adjustment This projector has the picture screen resize function, which enables you to customize the image size. 1 Press the MENU button to fit the screen size.... turn red. Wide Provide the image to fit the wide video aspect ratio (16:9) by selecting an Image (1-4) in the PC System Menu (p.28). • This projector cannot display any resolution higher than the screen size (1024 x 768), the projector enters to 4 and press the SELECT button. Use the Point...
...16:9. Computer Input Store To store the adjusted data, select Store and press the Point ►or the SELECT button. Screen Size Adjustment This projector has the picture screen resize function, which enables you to customize the image size. 1 Press the MENU button to fit the screen size.... turn red. Wide Provide the image to fit the wide video aspect ratio (16:9) by selecting an Image (1-4) in the PC System Menu (p.28). • This projector cannot display any resolution higher than the screen size (1024 x 768), the projector enters to 4 and press the SELECT button. Use the Point...

Owners Manual
Page 38
... then press the Point ► or the SELECT button. AV System Menu (Video or S-video) Video or S-video Auto The projector automatically detects an incoming video system, and adjusts itself to optimize its performance. When Video System is PAL-M or PAL-N, select the system manually. AV System Menu (...) Component Note: The AV System Menu cannot be selected when selecting RGB (Scart). 38 System Video Component Auto The projector automatically detects an incoming video signal, and adjusts itself to display the On-Screen Menu. PAL/SECAM/NTSC/NTSC4.43/PAL-M/PAL-N If...
... then press the Point ► or the SELECT button. AV System Menu (Video or S-video) Video or S-video Auto The projector automatically detects an incoming video system, and adjusts itself to optimize its performance. When Video System is PAL-M or PAL-N, select the system manually. AV System Menu (...) Component Note: The AV System Menu cannot be selected when selecting RGB (Scart). 38 System Video Component Auto The projector automatically detects an incoming video signal, and adjusts itself to display the On-Screen Menu. PAL/SECAM/NTSC/NTSC4.43/PAL-M/PAL-N If...
Owners Manual
Page 39
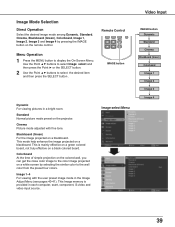
..., Image 1, Image 2, Image 3 and Image 4 by selecting the similar color to the wall color from the preset four colors. Image select Menu Video Input IMAGE button Dynamic Standard Cinema Blackboard (Green) Colorboard Image 1 Image 2 Image 3 Image 4 39 Remote Control Menu Operation 1 Press the MENU button... in the Image Adjust Menu (see pages 40-41). This mode help enhance the image projected on the projector. This is provided in each computer, scart, component, S-video and video input source. This Image memory is mainly effective on a green colored board, not truly effective on a ...
..., Image 1, Image 2, Image 3 and Image 4 by selecting the similar color to the wall color from the preset four colors. Image select Menu Video Input IMAGE button Dynamic Standard Cinema Blackboard (Green) Colorboard Image 1 Image 2 Image 3 Image 4 39 Remote Control Menu Operation 1 Press the MENU button... in the Image Adjust Menu (see pages 40-41). This mode help enhance the image projected on the projector. This is provided in each computer, scart, component, S-video and video input source. This Image memory is mainly effective on a green colored board, not truly effective on a ...

Owners Manual
Page 41
...adjust the gamma value to obtain a better balance of the following options to get smoother images. Higher reduction Progressive An interlaced video signal can be displayed in the Image Mode Selection on the screen can be reduced. For an active picture. L2........... ...press the the Point ► or the SELECT button. Video Input 41 Select one of contrast (from Image 1 to 4 and press the SELECT button. Off.......... Lower reduction L2........... Disabled. With this function, the projector reproduces pictures faithful to their previous figures. Disabled. L1..............
...adjust the gamma value to obtain a better balance of the following options to get smoother images. Higher reduction Progressive An interlaced video signal can be displayed in the Image Mode Selection on the screen can be reduced. For an active picture. L2........... ...press the the Point ► or the SELECT button. Video Input 41 Select one of contrast (from Image 1 to 4 and press the SELECT button. Off.......... Lower reduction L2........... Disabled. With this function, the projector reproduces pictures faithful to their previous figures. Disabled. L1..............

Owners Manual
Page 42
Position H/V...... To save the scale or position, press the SELECT button at the 4:3 normal video aspect ratio. Video Input Screen Size Adjustment This projector has the picture screen resize function, which enables you want to adjust. Screen Menu 2 Use the Point ▲▼ buttons select the desired item and ...
Position H/V...... To save the scale or position, press the SELECT button at the 4:3 normal video aspect ratio. Video Input Screen Size Adjustment This projector has the picture screen resize function, which enables you want to adjust. Screen Menu 2 Use the Point ▲▼ buttons select the desired item and ...

Owners Manual
Page 44
... is found, the search will not work when the Ceiling feature is pressed, Input search will stop . Use the Point ▲▼ buttons to the projector's tilt. When pressing the AUTO SETUP button on the remote control. When pressing the AUTO SET button on the top control. - When turning on the... button on the remote control or the AUTO SETUP button on the top control or the remote control. - If the COMPUTER 1/2 button or VIDEO or COMPONENT or S-VIDEO button is set to On1 or On2, the status of some computers cannot be altered as follows: Input search This function detects the input...
... is found, the search will not work when the Ceiling feature is pressed, Input search will stop . Use the Point ▲▼ buttons to the projector's tilt. When pressing the AUTO SETUP button on the remote control. When pressing the AUTO SET button on the top control. - When turning on the... button on the remote control or the AUTO SETUP button on the top control or the remote control. - If the COMPUTER 1/2 button or VIDEO or COMPONENT or S-VIDEO button is set to On1 or On2, the status of some computers cannot be altered as follows: Input search This function detects the input...

Owners Manual
Page 47
... the Logo PIN code dialog box appears. On The screen logo cannot be changed freely from video equipment can only switch between Default and Off. Select Capture and press the SELECT button. Then...?" Enter a Logo PIN code by the Keystone function, the adjusted data is automatically reset and the projector captures an image without a Logo PIN code. Logo PIN code lock Setting Off Off 47 To cancel...Logo PIN code lock is set to On, capture cannot be selected. • When starting -up to XGA (1024 x 768). If you want to capture the projected image. The initial Logo PIN code is ...
... the Logo PIN code dialog box appears. On The screen logo cannot be changed freely from video equipment can only switch between Default and Off. Select Capture and press the SELECT button. Then...?" Enter a Logo PIN code by the Keystone function, the adjusted data is automatically reset and the projector captures an image without a Logo PIN code. Logo PIN code lock Setting Off Off 47 To cancel...Logo PIN code lock is set to On, capture cannot be selected. • When starting -up to XGA (1024 x 768). If you want to capture the projected image. The initial Logo PIN code is ...
Owners Manual
Page 51
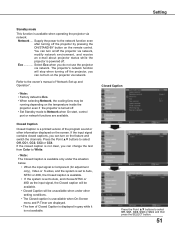
... Eco when you can turn on the feature and switch the channels. The projector's network function will be unavailable when under the situation below. • When the input signal is Component (for adjustment only), Video or S-video, and the system is set to Auto, and choose NTSC or 480i as...mode This function is set to Auto, NTSC or 480i, the Closed caption is available. • If the system is available when operating the projector via network. Press the Point ▲▼ buttons to select Off, CC1, CC2, CC3 or CC4, and then press the SELECT button. 51...
... Eco when you can turn on the feature and switch the channels. The projector's network function will be unavailable when under the situation below. • When the input signal is Component (for adjustment only), Video or S-video, and the system is set to Auto, and choose NTSC or 480i as...mode This function is set to Auto, NTSC or 480i, the Closed caption is available. • If the system is available when operating the projector via network. Press the Point ▲▼ buttons to select Off, CC1, CC2, CC3 or CC4, and then press the SELECT button. 51...
Owners Manual
Page 52
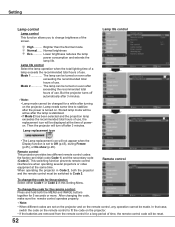
...codes: the factory-set initial code (Code 1) and the secondary code (Code 2). This switching function prevents remote control interference when operating several projectors or video equipment at the time of power on the remote control, any operation cannot be turned on even after 3 minutes. To change the code ...for the remote control: Press and hold both the projector and the remote control must be changed for 5 seconds or more. Lamp life control...
...codes: the factory-set initial code (Code 1) and the secondary code (Code 2). This switching function prevents remote control interference when operating several projectors or video equipment at the time of power on the remote control, any operation cannot be turned on even after 3 minutes. To change the code ...for the remote control: Press and hold both the projector and the remote control must be changed for 5 seconds or more. Lamp life control...
Owners Manual
Page 64
...the setting for the setting. - It takes about 30 seconds to a projector. When No Show is operating, the image cannot be stored if not registered with Store. Adjust the audio source. - Check the Input signal, color system,video system or computer system mode. - See page 45. - Auto PC ...connection and the input signal to Manual. Auto keystone function does not work . - Check the audio cable connection from your computer or video equipment and the projector. Some settings can not work . - Make sure Off is not selected at any other button on the top control. Make sure On...
...the setting for the setting. - It takes about 30 seconds to a projector. When No Show is operating, the image cannot be stored if not registered with Store. Adjust the audio source. - Check the Input signal, color system,video system or computer system mode. - See page 45. - Auto PC ...connection and the input signal to Manual. Auto keystone function does not work . - Check the audio cable connection from your computer or video equipment and the projector. Some settings can not work . - Make sure Off is not selected at any other button on the top control. Make sure On...


