Owners Manual
Page 2
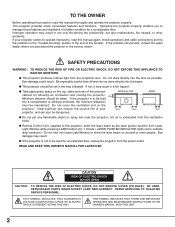
...on yourself or other accidents. READ AND KEEP THIS OWNER'S MANUAL FOR LATER USE. REFER SERVICING TO QUALIFIED SERVICE PERSONNEL. If your projector, and can also be set in the way indicated. SAFETY PRECAUTIONS WARNING : TO REDUCE THE RISK OF FIRE OR ELECTRIC SHOCK, ... in the "Trouble-shooting" section of the end of this booklet. This projector provides many convenient features and functions. Operating the projector properly enables you purchased the projector or the service center. G This projector produces intense light from the ventilation holes. If not, it in better condition...
...on yourself or other accidents. READ AND KEEP THIS OWNER'S MANUAL FOR LATER USE. REFER SERVICING TO QUALIFIED SERVICE PERSONNEL. If your projector, and can also be set in the way indicated. SAFETY PRECAUTIONS WARNING : TO REDUCE THE RISK OF FIRE OR ELECTRIC SHOCK, ... in the "Trouble-shooting" section of the end of this booklet. This projector provides many convenient features and functions. Operating the projector properly enables you purchased the projector or the service center. G This projector produces intense light from the ventilation holes. If not, it in better condition...
Owners Manual
Page 3
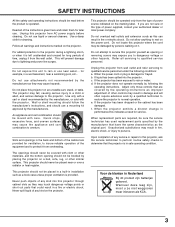
... all warnings and instructions marked on it from AC power supply before the product is damaged or frayed. Do not use . The projector may cause the appliance and cart combination to normal operation. Do not expose this indicates a need for long periods of power supplied,... consult your authorized dealer or local power company. When replacement parts are provided for cleaning. Adjust only those controls that the projector is provided. An appliance and cart combination should never be moved with care. Slots and openings in Nederland Bij dit product zijn ...
... all warnings and instructions marked on it from AC power supply before the product is damaged or frayed. Do not use . The projector may cause the appliance and cart combination to normal operation. Do not expose this indicates a need for long periods of power supplied,... consult your authorized dealer or local power company. When replacement parts are provided for cleaning. Adjust only those controls that the projector is provided. An appliance and cart combination should never be moved with care. Slots and openings in Nederland Bij dit product zijn ...

Owners Manual
Page 4
... Trade Name Responsible party Address Telephone No. : PLC-XP55/PLC-XP55L : Sanyo : SANYO FISHER COMPANY : 21605 Plummer Street, Chatsworth, California 91311 : (818)998-7322 AC POWER CORD REQUIREMENT The AC Power Cord supplied with this safety feature. Should you purchased it is encouraged to try to defeat this projector meets the requirement for the United States...
... Trade Name Responsible party Address Telephone No. : PLC-XP55/PLC-XP55L : Sanyo : SANYO FISHER COMPANY : 21605 Plummer Street, Chatsworth, California 91311 : (818)998-7322 AC POWER CORD REQUIREMENT The AC Power Cord supplied with this safety feature. Should you purchased it is encouraged to try to defeat this projector meets the requirement for the United States...
Owners Manual
Page 5
... 43 21 CLEANING PROJECTION LENS 43 21 LAMP REPLACEMENT 44 21 LAMP REPLACE COUNTER 45 21 TROUBLESHOOTING 46 21 INDICATORS AND PROJECTOR CONDITION 48 22 22 COMPATIBLE COMPUTER SPECIFICATION 49 22 MENU TREE 50 22 TECHNICAL SPECIFICATIONS 52 CONFIGURATIONS OF TERMINALS 53 OPTIONAL...ON-SCREEN MENU 18 FLOW OF ON-SCREEN MENU OPERATION 18 MENU BAR 19 APPENDIX 41 BASIC OPERATION TURNING ON / OFF PROJECTOR ADJUSTING SCREEN ZOOM ADJUSTMENT FOCUS ADJUSTMENT LENS SHIFT ADJUSTMENT KEYSTONE ADJUSTMENT PICTURE FREEZE FUNCTION NO SHOW FUNCTION P-TIMER FUNCTION SOUND ADJUSTMENT...
... 43 21 CLEANING PROJECTION LENS 43 21 LAMP REPLACEMENT 44 21 LAMP REPLACE COUNTER 45 21 TROUBLESHOOTING 46 21 INDICATORS AND PROJECTOR CONDITION 48 22 22 COMPATIBLE COMPUTER SPECIFICATION 49 22 MENU TREE 50 22 TECHNICAL SPECIFICATIONS 52 CONFIGURATIONS OF TERMINALS 53 OPTIONAL...ON-SCREEN MENU 18 FLOW OF ON-SCREEN MENU OPERATION 18 MENU BAR 19 APPENDIX 41 BASIC OPERATION TURNING ON / OFF PROJECTOR ADJUSTING SCREEN ZOOM ADJUSTMENT FOCUS ADJUSTMENT LENS SHIFT ADJUSTMENT KEYSTONE ADJUSTMENT PICTURE FREEZE FUNCTION NO SHOW FUNCTION P-TIMER FUNCTION SOUND ADJUSTMENT...
Owners Manual
Page 6
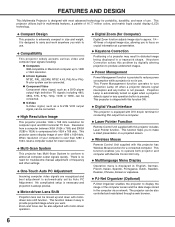
...image size to reduce power consumption while a projector is not in a trapezoid shape. N Power Management Power Management function is provided to approx. 1/4 ~ 49 times of 16.77 million colors, and matrix liquid crystal display (LCD) technology. This function helps you want. No...Italian, Spanish, Portuguese, Dutch, Swedish, Russian, Chinese, Korean or Japanese. FEATURES AND DESIGN This Multimedia Projector is designed with DVI 24-pin terminal for connecting DVI output from a computer between XGA (1024 x 768) and SXGA (1280 x 1024) is compressed into 1024 x 768 dots. G ...
...image size to reduce power consumption while a projector is not in a trapezoid shape. N Power Management Power Management function is provided to approx. 1/4 ~ 49 times of 16.77 million colors, and matrix liquid crystal display (LCD) technology. This function helps you want. No...Italian, Spanish, Portuguese, Dutch, Swedish, Russian, Chinese, Korean or Japanese. FEATURES AND DESIGN This Multimedia Projector is designed with DVI 24-pin terminal for connecting DVI output from a computer between XGA (1024 x 768) and SXGA (1280 x 1024) is compressed into 1024 x 768 dots. G ...

Owners Manual
Page 7
... REMOTE RECEIVER BACK OF CABINET EXHAUST VENT POWER CORD CONNECTOR TERMINALS AND CONNECTORS INFRARED REMOTE RECEIVER HOT AIR EXHAUSTED ! Refer to the projector, remove the these parts. G Do not touch this vent. G Do not cover vent slots. G Do not put a ...area, especially screws and metallic parts. Pay attention to ensure proper ventilation and avoid a possible risk of Cooling Fans. This projector detects internal temperature and automatically controls operating power of fire and malfunction. Obstructions may block cooling air. LAMP COVER CARRYING HANDLE...
... REMOTE RECEIVER BACK OF CABINET EXHAUST VENT POWER CORD CONNECTOR TERMINALS AND CONNECTORS INFRARED REMOTE RECEIVER HOT AIR EXHAUSTED ! Refer to the projector, remove the these parts. G Do not touch this vent. G Do not cover vent slots. G Do not put a ...area, especially screws and metallic parts. Pay attention to ensure proper ventilation and avoid a possible risk of Cooling Fans. This projector detects internal temperature and automatically controls operating power of fire and malfunction. Obstructions may block cooling air. LAMP COVER CARRYING HANDLE...
Owners Manual
Page 8
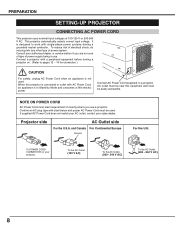
... ON POWER CORD AC Power Cord must meet requirement of 100-120 V or 200-240 V AC. PREPARATION SETTING-UP PROJECTOR CONNECTING AC POWER CORD This projector uses nominal input voltages of country where you are not sure of type of power system. To reduce risk of electrical shock...appliance is not used . Consult your authorized dealer or service station if you use . AC outlet must be near this projector is in use a projector. Connect a projector with single-phase power systems having a grounded neutral conductor. It is designed to work with a peripheral equipment before turning...
... ON POWER CORD AC Power Cord must meet requirement of 100-120 V or 200-240 V AC. PREPARATION SETTING-UP PROJECTOR CONNECTING AC POWER CORD This projector uses nominal input voltages of country where you are not sure of type of power system. To reduce risk of electrical shock...appliance is not used . Consult your authorized dealer or service station if you use . AC outlet must be near this projector is in use a projector. Connect a projector with single-phase power systems having a grounded neutral conductor. It is designed to work with a peripheral equipment before turning...

Owners Manual
Page 9
...Projector can be moved up and down with Model PLC-XP55L. Projection lens is recommended to limit ambient lighting in room has a great influence on a flat projection surface. This function makes it easy to project on picture quality. ROOM LIGHT Brightness in order to P 21 for Model PLC-XP55...can be adjusted 10 : 0 ~ 1 : 1 (refer to figure below to figure below .). PREPARATION POSITIONING PROJECTOR NOTE: The figures below are only for operation. G This projector is designed to provide projected image where you want. U/D ratio can be focused from 4.6' (1.4m) ~ 48...
...Projector can be moved up and down with Model PLC-XP55L. Projection lens is recommended to limit ambient lighting in room has a great influence on a flat projection surface. This function makes it easy to project on picture quality. ROOM LIGHT Brightness in order to P 21 for Model PLC-XP55...can be adjusted 10 : 0 ~ 1 : 1 (refer to figure below to figure below .). PREPARATION POSITIONING PROJECTOR NOTE: The figures below are only for operation. G This projector is designed to provide projected image where you want. U/D ratio can be focused from 4.6' (1.4m) ~ 48...

Owners Manual
Page 10
... rotating ADJUSTABLE FEET. Projection angle can be adjusted to 10.5 degrees. 1 Lift front of a projector and pull and undo FEET LOCK LATCHES. NO DOWNWARD Do not point the projector down to project an image. PREPARATION ADJUSTABLE FEET Picture tilt and projection angle can be adjusted using ...Menu Operation. (Refer to P 21 and 37.) ADJUSTABLE FEET FEET LOCK LATCHES INSTALLING PROJECTOR IN PROPER POSITION Install the projector properly. Improper installation may reduce the lamp lifetime and cause a fire hazard. 10˚ Do not tilt the...
... rotating ADJUSTABLE FEET. Projection angle can be adjusted to 10.5 degrees. 1 Lift front of a projector and pull and undo FEET LOCK LATCHES. NO DOWNWARD Do not point the projector down to project an image. PREPARATION ADJUSTABLE FEET Picture tilt and projection angle can be adjusted using ...Menu Operation. (Refer to P 21 and 37.) ADJUSTABLE FEET FEET LOCK LATCHES INSTALLING PROJECTOR IN PROPER POSITION Install the projector properly. Improper installation may reduce the lamp lifetime and cause a fire hazard. 10˚ Do not tilt the...

Owners Manual
Page 11
... it into case (dust cover) supplied with this projector. When moving a Projector. G Do not transport a projector by using a courier or transport service in use a suitable carrying case. G When carrying a projector, use for best way. 11 PREPARATION CAUTION IN CARRYING OR TRANSPORTING A PROJECTOR G Do not drop or bump a projector, otherwise damages or malfunctions may cause damage to...
... it into case (dust cover) supplied with this projector. When moving a Projector. G Do not transport a projector by using a courier or transport service in use a suitable carrying case. G When carrying a projector, use for best way. 11 PREPARATION CAUTION IN CARRYING OR TRANSPORTING A PROJECTOR G Do not drop or bump a projector, otherwise damages or malfunctions may cause damage to...

Owners Manual
Page 12
...Wired Remote Control Unit to P13.) R/C JACK INPUT 1 ANALOG IN/OUT DIGITAL(DVI-D) R/C JACK When using this button. CONNECTING PROJECTOR TERMINALS OF PROJECTOR This projector has input and output terminals on INPUT 2 jacks only. COMPUTER INPUT TERMINAL (DIGITAL) Connect computer output (Digital DVI-D type)... to this jack. (Refer to this terminal. USB CONNECTOR (Series B) When controlling computer with Remote Control Unit of this projector, connect mouse port of your personal computer to this connector. (Refer to this terminal. COMPUTER AUDIO INPUT 1/AUDIO MONITOR OUTPUT...
...Wired Remote Control Unit to P13.) R/C JACK INPUT 1 ANALOG IN/OUT DIGITAL(DVI-D) R/C JACK When using this button. CONNECTING PROJECTOR TERMINALS OF PROJECTOR This projector has input and output terminals on INPUT 2 jacks only. COMPUTER INPUT TERMINAL (DIGITAL) Connect computer output (Digital DVI-D type)... to this jack. (Refer to this terminal. USB CONNECTOR (Series B) When controlling computer with Remote Control Unit of this projector, connect mouse port of your personal computer to this connector. (Refer to this terminal. COMPUTER AUDIO INPUT 1/AUDIO MONITOR OUTPUT...
Owners Manual
Page 13
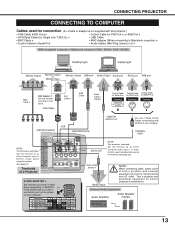
...audio monitor output (variable) before using this terminal. (See page 23.) Audio Cable (stereo) ✽ Audio Input NOTE : When connecting cable, power cords of a Projector INPUT 1 ANALOG IN/OUT DIGITAL(DVI-D) R/C JACK AUDIO 1 IN/OUT USB RESET CONTROL PORT AUDIO 2 G B R H/V V VIDEO/Y Cb/Pb Cr/Pr INPUT... Port • Audio Cables (Mini Plug (stereo) x 2) ✽ IBM-compatible computer or Macintosh computer (VGA / SVGA / XGA / SXGA) Desktop type Laptop type Monitor Output Monitor Output or Monitor Input Monitor Output USB port Audio Output Serial port PS/2 port ADB...
...audio monitor output (variable) before using this terminal. (See page 23.) Audio Cable (stereo) ✽ Audio Input NOTE : When connecting cable, power cords of a Projector INPUT 1 ANALOG IN/OUT DIGITAL(DVI-D) R/C JACK AUDIO 1 IN/OUT USB RESET CONTROL PORT AUDIO 2 G B R H/V V VIDEO/Y Cb/Pb Cr/Pr INPUT... Port • Audio Cables (Mini Plug (stereo) x 2) ✽ IBM-compatible computer or Macintosh computer (VGA / SVGA / XGA / SXGA) Desktop type Laptop type Monitor Output Monitor Output or Monitor Input Monitor Output USB port Audio Output Serial port PS/2 port ADB...

Owners Manual
Page 14
...RCA x 2) ✽ Cable ✽ VIDEO Y - Video Disc Player (such as either Computer audio input 1 or audio monitor output (variable) before using this projector.) • Video Cable (RCA x 1 or RCA x 3) ✽ • BNC Cable ✽ • S-VIDEO Cable ✽ • Audio Cable ...Pb Cr/Pr R-AUDIO-L S-VIDEO (MONO) INPUT 3 Terminals of a Projector NOTE : When connecting cable, power cords of both a projector and external equipment should be disconnected from AC outlet. 14 CONNECTING PROJECTOR CONNECTING TO VIDEO EQUIPMENT Cables used for connection (✽ = Cable is...
...RCA x 2) ✽ Cable ✽ VIDEO Y - Video Disc Player (such as either Computer audio input 1 or audio monitor output (variable) before using this projector.) • Video Cable (RCA x 1 or RCA x 3) ✽ • BNC Cable ✽ • S-VIDEO Cable ✽ • Audio Cable ...Pb Cr/Pr R-AUDIO-L S-VIDEO (MONO) INPUT 3 Terminals of a Projector NOTE : When connecting cable, power cords of both a projector and external equipment should be disconnected from AC outlet. 14 CONNECTING PROJECTOR CONNECTING TO VIDEO EQUIPMENT Cables used for connection (✽ = Cable is...
Owners Manual
Page 15
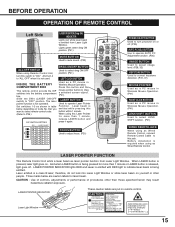
And turn projector on . Set switches 1-3 as a PC mouse in Wireless Mouse Operation. (P41) LENS SHIFT BUTTON Used to select drag ON/OFF position. (P41) LEFT CLICK BUTTON ...
And turn projector on . Set switches 1-3 as a PC mouse in Wireless Mouse Operation. (P41) LENS SHIFT BUTTON Used to select drag ON/OFF position. (P41) LEFT CLICK BUTTON ...
Owners Manual
Page 16
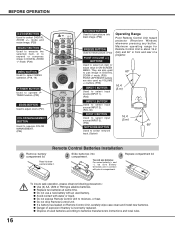
...a new battery with an used batteries according to select input source (INPUT 1). (P23) Operating Range Point Remote Control Unit toward projector (Receiver Window) whenever pressing any button. They are also used as VOLUME +/- Maximum operating range for Remote Control Unit is incorrectly...image in compartment. 16 To insure safe operation, please observe following precautions : G Use (2) AA, UM3 or R06 type alkaline batteries. G Danger of a projector. 60° 16.4' (5 m) INPUT 2 BUTTON Used to select input source (INPUT 2). (P24, 30) INPUT 3 BUTTON Used to select input source (...
...a new battery with an used batteries according to select input source (INPUT 1). (P23) Operating Range Point Remote Control Unit toward projector (Receiver Window) whenever pressing any button. They are also used as VOLUME +/- Maximum operating range for Remote Control Unit is incorrectly...image in compartment. 16 To insure safe operation, please observe following precautions : G Use (2) AA, UM3 or R06 type alkaline batteries. G Danger of a projector. 60° 16.4' (5 m) INPUT 2 BUTTON Used to select input source (INPUT 2). (P24, 30) INPUT 3 BUTTON Used to select input source (...
Owners Manual
Page 17
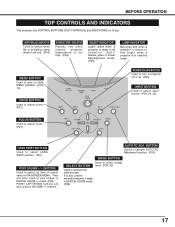
...) POINT LEFT/RIGHT buttons are also used to expand/compress image in ON-SCREEN MENU. INDICATOR Flashes red when internal projector temperature is too high. (P42) READY INDICATOR Lights green when a projector is in DIGITAL ZOOM +/- BUTTON Used to operate AUTO PC Adjustment function. (P25) IMAGE BUTTON Used to select image...MENU BUTTON Used to open or close MENU operation. (P18, 19) ZOOM BUTTON Used to adjust zoom. (P21) POWER ON-OFF BUTTON Used to turn a projector on its top. buttons. AUTO PC ADJ. And it flashes green in Power Management mode. (P39) LAMP INDICATOR Becomes dim when...
...) POINT LEFT/RIGHT buttons are also used to expand/compress image in ON-SCREEN MENU. INDICATOR Flashes red when internal projector temperature is too high. (P42) READY INDICATOR Lights green when a projector is in DIGITAL ZOOM +/- BUTTON Used to operate AUTO PC Adjustment function. (P25) IMAGE BUTTON Used to select image...MENU BUTTON Used to open or close MENU operation. (P18, 19) ZOOM BUTTON Used to adjust zoom. (P21) POWER ON-OFF BUTTON Used to turn a projector on its top. buttons. AUTO PC ADJ. And it flashes green in Power Management mode. (P39) LAMP INDICATOR Becomes dim when...
Owners Manual
Page 18
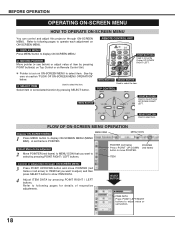
... pressing SELECT button. Refer to select item. BEFORE OPERATION OPERATING ON-SCREEN MENU HOW TO OPERATE ON-SCREEN MENU You can control and adjust this projector through ON-SCREEN MENU 3 Press POINT UP/DOWN button and move POINTER (red frame or red arrow) to ITEM that you want to select by...
... pressing SELECT button. Refer to select item. BEFORE OPERATION OPERATING ON-SCREEN MENU HOW TO OPERATE ON-SCREEN MENU You can control and adjust this projector through ON-SCREEN MENU 3 Press POINT UP/DOWN button and move POINTER (red frame or red arrow) to ITEM that you want to select by...
Owners Manual
Page 19
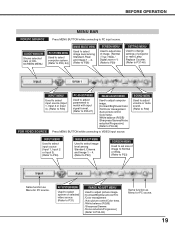
GUIDE WINDOW Shows selected item of projector or reset Lamp Replace Counter. (Refer to P37-40) INPUT MENU Used to select input source (Input 1, Input 2 or Input 3). (Refer to P23) PC ADJUST ...
GUIDE WINDOW Shows selected item of projector or reset Lamp Replace Counter. (Refer to P37-40) INPUT MENU Used to select input source (Input 1, Input 2 or Input 3). (Refer to P23) PC ADJUST ...
Owners Manual
Page 20
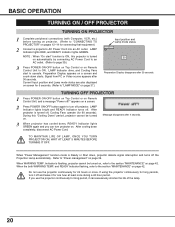
... refer to "LAMP MODE" on page 39. When the both WARNING TEMP. BASIC OPERATION TURNING ON / OFF PROJECTOR TURNING ON PROJECTOR 1 Complete peripheral connections (with Computer, VCR, etc.) before turning on projector. (Refer to ON. LAMP Indicator lights RED, and READY Indicator lights GREEN. NOTE : When "On start...(Refer to page 39.) 3 Press POWER ON-OFF button on Top Control or on Remote Control Unit to "CONNECTING TO PROJECTOR" on Remote Control Unit, and a message "Power off the Projection Lamp automatically. Refer to operate. and READY Indicator flashing, refer to ...
... refer to "LAMP MODE" on page 39. When the both WARNING TEMP. BASIC OPERATION TURNING ON / OFF PROJECTOR TURNING ON PROJECTOR 1 Complete peripheral connections (with Computer, VCR, etc.) before turning on projector. (Refer to ON. LAMP Indicator lights RED, and READY Indicator lights GREEN. NOTE : When "On start...(Refer to page 39.) 3 Press POWER ON-OFF button on Top Control or on Remote Control Unit to "CONNECTING TO PROJECTOR" on Remote Control Unit, and a message "Power off the Projection Lamp automatically. Refer to operate. and READY Indicator flashing, refer to ...

Owners Manual
Page 23
...DIGITAL) terminal, select RGB(PC Digital). NOTE; Monitor out If the INPUT 1 ANALOG terminal is switchable and can be changed, this projector may not display the digital content protected by DVI (Digital Visual Interface) from being used as computer input or monitor output. COMPUTER INPUT ... 1 and press SELECT button. RGB(PC Digital) When your computer is connected to INPUT 1 (ANALOG) terminal, select RGB(Scart). If projector cannot reproduce proper image, select correct input source through MENU OPERATION (see below). Source Select Menu will appear. INPUT MENU Input 1 INPUT ...
...DIGITAL) terminal, select RGB(PC Digital). NOTE; Monitor out If the INPUT 1 ANALOG terminal is switchable and can be changed, this projector may not display the digital content protected by DVI (Digital Visual Interface) from being used as computer input or monitor output. COMPUTER INPUT ... 1 and press SELECT button. RGB(PC Digital) When your computer is connected to INPUT 1 (ANALOG) terminal, select RGB(Scart). If projector cannot reproduce proper image, select correct input source through MENU OPERATION (see below). Source Select Menu will appear. INPUT MENU Input 1 INPUT ...


